Eric Camden
-
Posts
95 -
Joined
-
Last visited
Content Type
Profiles
Forums
Events
Everything posted by Eric Camden
-
If there are no groups, and if the overall model attribute does not contain the flesh color, then I'm guessing it must be a decal. No groups and no root color attribute means no color other than decals. Now there is also the possibility that you just aren't looking in the right places. Why dont you let us know which model it is and give us a screencap of the area you are talking about, then we can help more.
-
You can see the lines very clearly in the shadow below the ornament too. My first hunch would be a combination of the lighting and multipass. That's where I would start to investigate. It's not the model or any material on it since the shadows also show signs of the distortion. Is is possible that you have any post effect going on? Have you tried rendering with a standard light setup or AO with one light for shadows? Just make a new chor and try that first. Obviously if that renders fine, then you know for sure it's your light setup.
-
How Much of the Model Should Have a Texture Map?
Eric Camden replied to Fox Raptor's topic in New Users
Fox: if you want to see some of my work, go to the stills gallery home page and do a search with the key word: Camden. Also check out my "Enterprise" September contest entry and my July "Mohawk Mini Mart" entry. -
How Much of the Model Should Have a Texture Map?
Eric Camden replied to Fox Raptor's topic in New Users
It all depends on what you are trying to get across with your finished product. Obviously if you are doing a very simple animation or still with stick like figures, then texturing may not be as important as something more involved. I prefer to do stills (hobby) that have a lot of textures/decals on them because I want the end result to be like a painting of sorts. I also prefer to use decals because I have so much more control over them vs materials. When I first started out, I used to do a lot of wandering in the AM stills gallery to get inspiration. Once you look through there, you'll get a better idea of what other people do and what you tend to lean towards. Hope that helps Eric -
Enterprise under construction
Eric Camden replied to Eric Camden's topic in Work In Progress / Sweatbox
Thank you Joe. It's a piece I'm actually quite pleased with. Sometimes what's important to the creator of a piece is not necessarily important to others viewing the work. Cheers Eric -
Thanks for trying this out and letting me know that I'm not the only one to have this problem. The reason I really wanted to get Bitmap to work with displacement is the fact that it wraps itself so nicely around pretty much any surface without much distortion. This lends itself nicely for terrain such as caves and such. If distortion would work, the possibilities would be endless. Could you give me a little insight into baking decals? What is the purpose for doing this and how is it done?
-
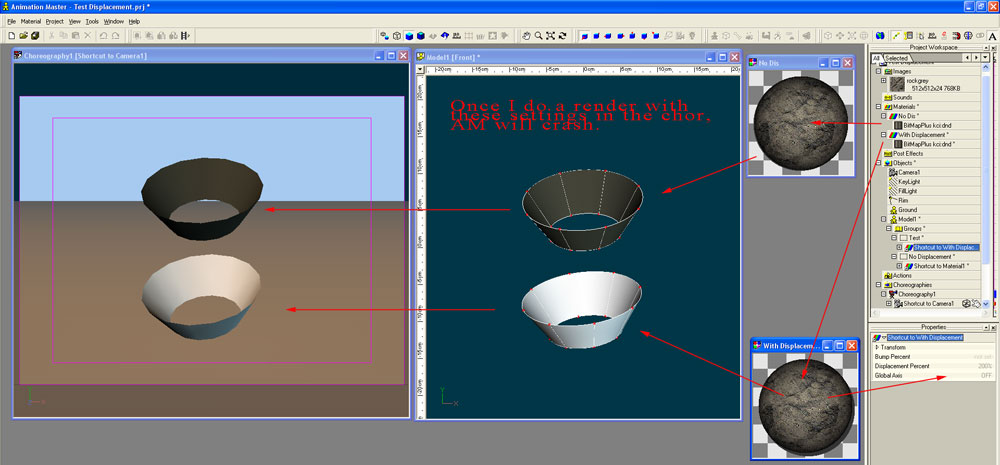
I've posted on this twice before and also put in a Hash/reports request, but so far the problem persists for me. Since I am not getting any feedback other than that the problem is resolved (this from Hash/reports as of V.14 - it is not resolved for me on any version up to V.15a), I am posting this again in hopes of finding my sanity and getting satisfaction in knowing that this is not only in my head. It doesn't matter which tileable image I use for the bitmapPlus material, the problem is the same. When I add a displacement value to the material and apply it to a group in any model, that goup become invisible in quick and final render. Sometimes it gets worse and I get large blocky artifacts and or the program crashes. I just started a brand new project and imported a random tileable texture from my collection. Next I made a Bitmap material with the texture and specified 400 for the displacement value. Going into the Object folder I created a new object. This was a simple line which I lathed and then extruded once. Upon selecting all cps, I named that group "test." Now I dragged the bitmap material onto the "test" group and did a quick render. As I watched the render progress, I noticed that the object started to disappear as the render was scanning down the page and then AM crashed about 1/3 into the render. In other words there is still a major issue with bitmap and displacement values. This whole process took me about 4 minutes to do from start to finish, or should I say from start to crash. Would someone please take the time to check this out and save me from BitMapPlus hell? Maybe I am missing a step or somehow getting the sequence wrong, but I just can't get BitMap to work with a displacement value. If anyone can do this, please post a render of a model with bitmap applied on one half and the other half without. I don't hink it can be done at this point, please prove me wrong. To one of my earlier posts someone replied that BitMap has no option for displacement, well, that's wrong and the pic below shows where that option is.

-
Check out this thread and get some ideas: http://forums.cgsociety.org/showthread.php...hlight=asteroid
-
If you're not too far along, just delete the corrupt model and start a new project.
-
Enterprise under construction
Eric Camden replied to Eric Camden's topic in Work In Progress / Sweatbox
Thanks guys, I really appreciate it. Here is the scene without "Film Grain" post effect and a few minor tweaks.
-
Enterprise under construction
Eric Camden replied to Eric Camden's topic in Work In Progress / Sweatbox
I appreciate the interest and comments, thank you. Yes, Stian, I used lens flare on almost every light in the scene to give the illusion of being able to see the actual sources of the lights. This is after all a sort of dry dock which would be lit with lots of halogen and other lights. Ken, not sure what to say other than yes, it was in the contest . How fast do you go through voting ? Thank you Stormed Darkwing, you are right on both counts. I wanted to emulate the look and feel of the trailer pic and yes, I did use parts of Gabe's enterprise as reference. Rob, you are also right on. I actually wanted it to be quite dark and am very pleased with the outcome. I don't think I could have worked with this many lights without problems in an earlier version of AM - koodos to the AM programmers. Btw, this was done with V.15 -
Hello friends: Just wanted to post my contest entry and a wireframe of the scene. I've worked on it a little bit more, but the basics are unchanged. I really wanted to keep the modeling to a minimum and concentrate more on the mood and lighting. AM v.15 has been very stable when it came to putting all these lights in a scene. Most of the lights have lens flares turned on to get the effect I was after. I also used smoke particles, although the background is comprised of two camera rotoscopes, one with stars and moon, and the other one with the majority of the background smoke. Feel free to leave any comments or questions. -E
-
AVR32 Network Gateway 100 (NGW100)
Eric Camden replied to agep's topic in Work In Progress / Sweatbox
Ok, I'll admit it, I'm a total geek - that white render with the wireframe just makes me feel fuzzy all over -
Chor turns almost black in all projects
Eric Camden replied to Eric Camden's topic in Work In Progress / Sweatbox
That's why you're the Grand PoohBah! It worked. The major change was resetting the gamma correction from 1.0 to 2.2. I must have played around with the gamma without setting it back. Thank you Martin -
Chor turns almost black in all projects
Eric Camden replied to Eric Camden's topic in Work In Progress / Sweatbox
Neither of those apply Ken. To make sure, I tried opening the same project on my laptop, and it's fine there. I'm using a USB memory stick to store the project on. Like I said, it's this way with all projects now. The only thing I can think of is ZoneAlarm firewall and program control. When I booted up, I got a message saying that System32 is trying to act as a server. Since it gave me no further information and this did not sound like something normal was happening, I chose the option to deny the request. Maybe AM was the program that made the request and now it's not running right? If that's the case, I'm not sure how to correct it now. I did close both AM and Zonealarm to try and run AM without running Zonealarm in the background, but I still got the blackened chor. Very frustrating. I wonder if I should uninstall and reinstall AM? -
I had to leave on a business trip this past Friday and just came back. When I left, AM was running perfectly on my desktop. Upon turning my desktop on just now, I was very surprised to find that my WIP chor, which had no issues last Friday, now looks like all lights are down to about 10%, almost black. Naturally the values in the PWS have not changed, but the chor is almost black nonetheless. Thinking this might be a corrupt project file, I loaded a completely different project from a few weeks ago. The chor in that project also had the same problem, almost black. I opened one more old project and found the same. Since all chors were affected, I knew it had to be something other than the project files. The next step was to close AM down, shut down my computer, and re-open both. Upon getting AM back up and running, I was surprised to find that the problem persisted. Nothing else seems to be affected, and my projects look fine on my laptop. Has anyone had a similar experience? I also checked my Gamma setting under "Tools", but that was still where I had left it on Friday, 1.0. I'm a bit stumped right now and any suggestions are appreciated. -E
-
You are absolutely right. I had been using Bitmap so much lately for uneven surfaces that I got stuck into one-way thinking
-
Then I would suggest a search on "Bitmap Plus". It's included in AM and does a great job on tiles.
-
Be a little more specific. There is glazed ceramic, terra cotta style (like a ceramic pot for plants) and everything in between. I would guess you want a glazed look? If so, then you would have to work with a combination of specular size, intensity, and reflection. You could probably get away with faking reflections by using a material with an environment map in it. Depending on how involved you want to get, you could double skin the model to get a dual specular effect. Here's an example:
-
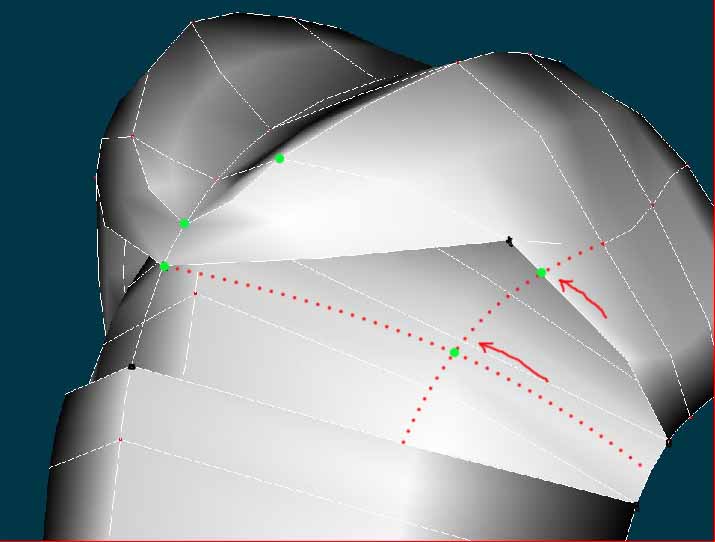
Here is an example of what could be done. Now you have a smaller 5 pointer that may not pose a problem. The arrows indicate that you could move the splines higher to make an even smaller 5 point patch. Btw, if that's a hair piece, you don't need to have the closed patches on the bottom where it connects to the skull. Kinda hard to see what's going on from the pics.
-
I have never seen a model that cannot be modified to move or reduce a 5 pointer. As Ken pointed out, that patch is very stretched out and may cause problems. For a 5 point patch, you want it to be as close to flat as possible, or as close to curving all 5 points equally as possible. Also, try to get all sides to be similar lengths.
-
The tube idea won't work for the reasons you described. My first thought is to have the emitter follow the path and turn the life of the particles way up.
-
I appreciate it, David. Thanks -E
-
Good to know, thanks.
-
I never paid much attention to it, but now that I have a night scene, I wonder if I have to make adjustments so everyone can see all the intended details? It looks great on my monitor, will it look the same on everyone elses'?