TNT
-
Posts
333 -
Joined
-
Last visited
Content Type
Profiles
Forums
Events
Everything posted by TNT
-
I just watched this one. That is a really neat idea! I like it!
-
Thanks. That fixed the twisting proble3m I had
-
Thanks for the tut. Any chance one of those will ever exists for the TSM quad?????
-
Hey Spleen, I hope I didn't confuse things for you. Like I said, I am learning TSM2 also. I'm glad Robcat is helping you out. He really understands this rig. Robcat is one of the great teachers. You mentioned not being able to move anything with the rig. One thing that is easy to forget with the TSM rig is to turn the TSM constraints ON. I still forget and move a bone only to see the character do nothing. Make sure you turn the constraints ON before you start to animate. Good luck with Frankenface.
-
First off I have to say that I have not rigged a lot with the TSM2 rig but I have a little experience with it. My solution is not the only fix but it should help you get going again. The first thing I did was to delete the entire left side of Frankenface. I then cleaned up the splines along the center to be continuous chains. (If you select one CP in the chain and then hit the comma (,) it should select the whole chain. If not there is a problem where it stops) I then aligned all the CP's for the center of Frankenface by selecting each spline chain along the center, setting the "X" value for pivot to "0" and then setting the "X" value for scale to "0". You should see the whole spline now aligned perfectly straight on "X". (The green line running top to bottom in the modeling window). I did this for each center spline until they all were on the "X" plane. I saved and then selected the entire half model. Right click inside the selected area and chose "Copy,Flip,Attach". You should now have a complete Frankenface with perfectly mirrored halves. Save. Next you need to install the TSM2 rig. I think you had this part pretty much right by following the install instructions. Your problems were coming from not having a symmetrical model that was centered on the "X" plane. I included a couple models so you can see what I did and then make the corrections to your model yourself. I did not weight the model other than Auto Assign CP's. When you do assign the CP's absolutly NONE can be assigned to the body bone or and "BLACK" bones in the rig. They must all be assigned to geometry bones. Good Luck and I hope I helped a little. There are others on here that are much better than I am at this but I thought I would try to help. frankenface2hairriggedTDF.mdlfrankenface2hairriggedTDF_TSMstage2.mdl
-
Caroline also has a really good tut for rigging a biped with TSM2. It's pinned at the top of the TSM2 rigging part of the forum as "Rigging GalaDM with TSM Workshop". That is what I followed to rig my caveman. It was pretty helpful.
-
I think I am fighting envy......actually, I am sure of it. Best of luck and let the adventure begin!
-
I gotta' git me one a those!
-
Well, the rigging is started but not complete. Face poses, smart skin, joint smoothing, etc. I am having some difficulty with the learning curve just as you have had with your tortise. We will learn together I guess. It is a good feeling to at least see part of it starting to work.
-
Who'da thunk there were so many funny ways to pass a ball! Please tweak and enter in the finals.
-
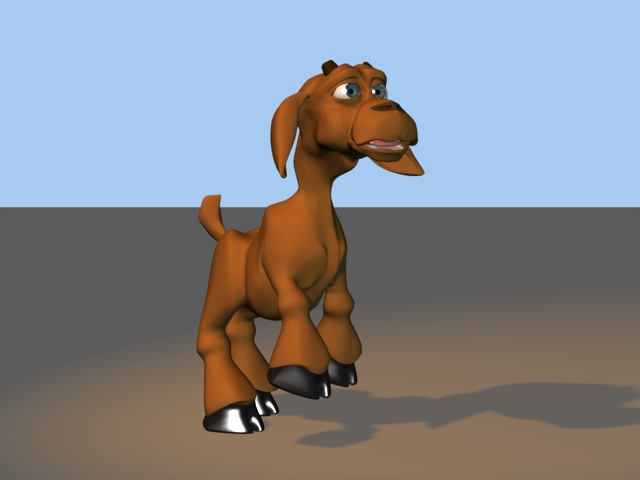
I have asked myself "What was I thinking trying to make this goat!" more than once.
-
It's been a while but I have been working on the little goat. I am learning to use the TSM2 rig and also add some rigging for the eyes. I got lots of help from Robert and David over in the Rigging area finding my errors. He is far from done but here is an update doing a little more than standing and staring.

-
I can't see it either.
-
THAT! is amazing! I watched it back and forth a dozen times. I played a frame at a time several times just to see what all was going on. It's way cool at every speed. I love it!
-
OK, I've been playing with this tonight and I got to say that learning to smartskin bone movements gives a whole new level of adjustment I never new was possible. Thanks for helping me out guys. Thanks Robcat for making me an example to follow. That was great. I think I am on my way...until the next snag.
-
Thanks for the feedback. I like your solution Robcat. I'll have to give it a go when I get home. Smartskin may be the best solution still, but I want to learn how to make the blends very predictable. Thanks again,
-
I can weight the CP's to get close. Let me try to explain the effect I want and maybe there is a better way to get there than I can think of. I am really green at rigging. Assume I have two bones as parent and child to create a simple joint. There is a tube around the bones and its CP's are assigned to the bones. By fan bones, weighting CP's, or any other method available I would like the following. When I rotate the tip of the child bone in a circle I want the CP's to follow in an elliptical path. SO if I move the child bone up and down the CP's follow 80% but side to side the CP's follow only 20%. I would want the motion to blend between so that each CP is moving with a sort of eliptical influence. Thanks
-
I am doing some rigging on my goat and was wondering if something is possible. Can I have a fan bone "orient like" another bone lets say 80% about "Z", 50% about "Y", and 20% about "X"? Or is there another way I'm not seeing to make a fan more flexible in one direction and more restricted in the others? Or is there a way to limit the rotation to "orient like" in one plane only and shut the others off? I think this could help me with the neck and shoulder joints. Thanks,
-
That is great! Congrat's!
-
Thanks Robcat and Meowx. I may still use the bone as suggested. It makes good sense. I appreciate knowing how to hold the rotation of the manipulator. I think it will be useful from time to time.
-
I think I may try it that way. I was still hoping to find out if you can save the manipulators position and rotation somehow. Even if I don't use it here, I can see using it other times
-
OK, Now I know how to position and re-orient the rotation manipulator thanks to Robcat. Is there a way to save the new position so I can return to it or at least type in its position and rotation? I am needing the same exact orientation and position many times to adjust the smartskin to its near finished positions.
-
OK, that was simple. I feel rather foolish now. Thanks Robcat. It worked perfectly!
-
I am setting up some smart skin on eye lids. Looking from the side the corners of the eye lid do not line up as this view shows. I don't know if it's possible but here is what I want to do. I want to rotate the eye lid to the full open and full closed positions with the Rotation Manipulator. I know how to move the Pivot to the center of the eye socket. What I can't figure out is how to skew the manipulator so that its planes are rotated the same as the eye lid prior to actually rotating the eye lids CP's. That sounds confusing so here is a picture to help explain. In this view I am looking at the eye lid with both corners lined up. I want the Rotation Manipulator basically flat to the screen with it's pivot centered in the eye socket. This way one axis of rotation moves the lid correctly to close or open the socket. Thanks,
-
Every time there is a new entry I just can't wait to see it! The imaginations are as amazing as the skills. That's really nice Nancy. I love the way you did the entry and the style. I think she is a ballerina in her heart.