TNT
-
Posts
333 -
Joined
-
Last visited
Content Type
Profiles
Forums
Events
Everything posted by TNT
-
Here are my stats to add to the mix version of A:M - 14.0C render time min:sec - 10:20 CPU Brand and model - AMD Phenom 9600 Quad-Core Actual CPU Speed - 2.31 GHz how many cores A:M is using - 1 RAM - 3GB OS - XP Pro SP3
-
Could the differences be due to bus speed between the CPU,memory, and page files?????
-
That's impressive David! Your contributions always are.
-
Great character Gene. Will Moses be showing up with any Divine messages?
-
How about a shot that concentrates on the character. Have him leaning out of the car window. Thanks for the suggestion. I think I'll give that a try.

-
Hey David! Looking forward to the newer, better tail. You are one dedicated and talented rig developer. I appreciate all you do for this forum on top of your own projects.
-
The 2008 rig is really a great rig. Can't wait to test drive the updates. Thank you Mark
-
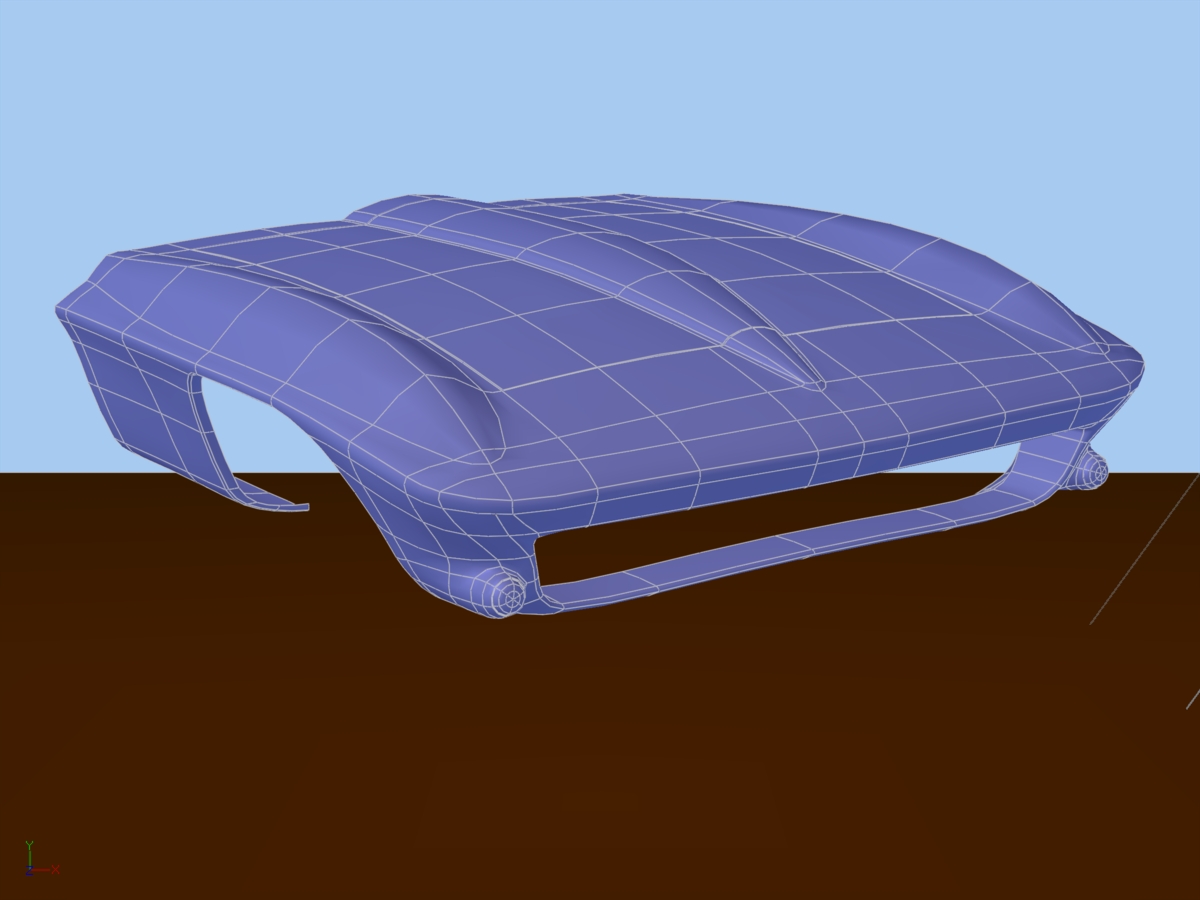
Thanks everyone for all the feedback. I have some more of the detail done now. The fender wells, door handles, and interior are all there. I did them a bit rough since I don't figure on shots from inside the car. Everyones input has really helped with the modeling. Now I need suggestions on composition and lighting. It's probably not a winner but I thought I might an entry for the 2010 Mascot contest Jason is running. I would like to use my robot and the vette. Everything else is unsettled. I'm not sure just what makes a good entry but I'm pretty sure it's not stock trees and rocks.
-
Thanks. David Simmons (itsjustme) gave me some links to creating the paint earlier in the topic. I made a few adjustments to get what I wanted. Here is the material in a ZIP file if you would like to check it out. Gradient_Paint.zip
-
I've finished some more on the vette and so I thought I would post an update. I tried everything that was suggested from material for glass to IOR to red paint. I still need an interior and a few details but here it is after all the suggestions. Thanks,
-
I did some more with this and it definately makes a difference once you have tight bends and corners. It straightened out the edges of the doors and the windshield opening a lot.
-
OK. I got to tell ya, in case you can't tell already, I am as green as they come to understanding lighting, texturing, and rendering. If you would be so kind, please explain what "IOR" is. I've seen several of your stills and you obviously have something to teach me here.
-
Here are a couple more pics of the vette. Working out the back half. Still needs doods. Not sure how to do the glass???? Any suggestions.
-
Just watched this on my lunch break. You just keep turning them out and they just keep getting better. Myron's song was really well done also.
-
Looks perfect as always
-
I removed all the bias adjustments prior to this change. It is hard to say how much it did on its own because I did not render after just that change. The way I used it was, I selected all the CP's and then applied the "Perpendicular" bias setting. You could see ALL the splines "tweak" when I did so I assumed I did it correctly. The change was subtle but it did make a difference. Thanks,
-
I wanted to give an update to the vette since everyone was so kind to offer help. Below is what I get after applying the techniques given by Roger and Robert to smooth the creases. All the bias settings are now 0,0,100,100. I don't know if it was the best way to get them all reset but I just selected the entire model, set the bias settings to 1,1,0,0 and then changed them to 0,0,100,100. It didn't seem to work until I changed them all and then changed them to what I wanted. I also found that I was not as careful as I needed to be in ending a few splines and they were causing a lot of the distortion. I broke a lot of connections and very carefully reconnected them properly. Below is what I get now. There are still some places that may need tweaked but as Roger suggested, I will wait till I am finished with the basic model. I am moving on to make more of the body now. Please critique so I can get better. Thanks,
-
Your method is probably the most accurate, but you can use distortion boxes to bend things. Because of the way fonts get splined some may work better than others. Another possibility is to create the letters in a a vector program like AI, use the better tools in that program to bend them, and import the result via the AI wizard. Thanks Robert, I never thought about using another program. I guess I have always just tried to find my solutions inside AM. I should have thought outside the box. I'll remember that for the next time.
-
I did have a bit of success using some of the paint settings David pointed out to make a polished aluminum rim. I thought I would post a shot of it. The Spleen mentioned the lettering earlier. I did it one letter at a time and rotated the tire to place each one radially. Is there a simpler way to make the font wizard follow an arc or path?
-
I'll give that a try. I figured I could remove the bias settings I have altered, get as smooth as I can and see what is needed when done. Thanks
-
I didn't realize I had this one. I gave it a quick render and found what I suspected would be the case. The vette now appears to have been made with a ballpeen hammer but the paint is nice and shiney! I guess I need to take what Robert and Roger have explained about the bias settings and work the surfaces till smooth. Hopfully I can get the vette to look half as good as your bike. Then I can work on more paint solutions to see which one is best for me. Thanks,
-
WOW! The help this forum gives never stops amazing me! I found the buttons Robert mentioned and will gives those a "road test" to see what they do. I copied all the paint setups David pointed me towards and downloaded Photoman's example project. Lots to digest. I hope I can apply it and show more later. Thanks again to everyone!
-
I was originally going to follow the tuts by Xtaz but they don't seem available any more. I'm having some trouble keeping the sheetmetal from creasing. It seems that sometimes the bias settings tweak themselves and an edge I made straight gets twisted. I see it happens as I adjust the position of adjacent CP's. I must not understand something about how the CP's and bias settings are related. Also any bias settings I make don't seem to actually mirror when I C/F/A. It looks more like they translate. Lastly, I have no idea how to make nice shiney paint! Any suggestions or tuts will be appreciated. Thanks,
-
I decided to take a stab at modeling a 63 vette. So far I just have the dog house, hood, and front tires. It's got a long way to go and a lot of detail missing but it's starting to look like something. I used Photoman's tut on the bike tire to make my tires. It worked perfectly. Thanks.
-
Here is a final go at getting a decent walk cycle. I think it's much better. I hunted for ever making sure every channel beginning and end matched for every bone in each arm and leg but was still getting jerks. Then the light came on and I realized I had not checked the parent bones. Namely the hips and back. Sure enough, they did not match at the beginning and end. Once I cleaned them up, I think it's better. I also found a bad frame on each heel where they moved off their arcs. Thanks for all your time Robert and for everyone who looked and gave feedback. I think I learned quite a bit on this exercise.... I hope I can remember it all for next time. bot_QuickWalk_cycle_3.mov