-
Posts
21,630 -
Joined
-
Last visited
-
Days Won
114
Content Type
Profiles
Forums
Events
Everything posted by Rodney
-
Can you provide a little more detail on what that entails? What the end result might look like in A:M as a plugin? Links to research, development or code examples?
-
If you would have asked this a year or so ago I would have had a long list. As it is right now I'm drawing a blank. But... I'll remember some soon and post those. Practically speaking,and mainly for the learning experience, I'd like to see a public project that expands the Font Wizard. It might move forward in phases like this: Phase 1: Add ability to input the text from an external text file. Phase 2: Expand the capability of the text file input to include special characters (carriage returns, font styles, etc.) Phase 3: Expand the capability of the text file syntax to allow for placement of the text in 3D space. Phase 4: Mirror the -new- Font Wizard capability in a new Model Import Wizard that allows A:M to import and place Models in 3D space at specific coordinates designated in a referenced text file. Note that the format might mirror that of A:M Libraries shortcuts with the addition of XYZ coordinates tacked on to the end. Phase 5: Explore ability to save out 'scripts' for reimport at later time with options to change elements of the script in the Wizard. At this point we've almost come full circle to simply importing a Chor or opening a Project file with the resources specified in detail. R&D phase (With the knowledge/experience gained by programming those enhancements to the Font Wizard identify obstacles to overcome in order to create a full scripting environment for A:M) Note that similar plugins could be created by swapping out the target format (i.e. SVG instead of AI. etc.) I'm not sure if the code is freely available but plugins such as the Terrain Wizard might demonstrate excellent areas of plugin capability that are not often explored (The Terrain Wizard is one of the few areas where users can paint directly in A:M)
-
Glad to see others are exploring too. I haven't been able to get the scanner process (a program called GTS) to work yet. (I probably need to read the instructions) Here's a shot at what a test sequence looks like going the longer route to getting the images in after scanning outside of OpenToonz and drag/dropping the images into he Xsheet:
-
I'm pretty sure Steph Greenberg used Toonz with A:M for his "The Physics of Cartoons". That was way... way... way back in the day. xhttps://www.youtube.com/watch?v=K_QAeicX-Rw
-
There are a lot of things to get sorted out but I already anticipate adding OpenToonz to my workflow. I need to get busy and put together some useful animation sequences in A:M that can demonstrate the benefits of using OpenToonz. In a way OpenToonz is a bit like Blender (but more user friendly), a bit like Fusion (but with a very useful Xsheet premise) and certainly compatible with imagery rendered out of A:M. If OpenToonz gets a bit more streamlined I can see it moving onto the Top 10 list of software I use and (potentially) replacing Fusion at the Number 2 spot. This is saying something (IMO) because Fusion is an impressive piece of software that I wouldn't want to give up. Rather than spam the forum with OpenToonz postings I've started adding some basic information and resources related to it on my blog. I have a vision for what might be done relative to matching A:M with OpenToonz but it's too early to tell whether any of that will pan out. The potential is certainly there.
-
Very interesting. xhttps://www.youtube.com/watch?v=7d59O6cfaM0 Kudos to the demo team at Microsoft research who thought of excellent ways to show off the potential while adding new 'features' all the way to the end of the video. I can think of several downsides to such technology but it's hard to deny the potential.
-
I've been brushing up on my Japanese language skills and see just how easy it is to lose what you don't use. Not that I was ever skilled at reading kanji! I can see why the companies involved felt the need to open source. There is much work to be done. I've noticed several names that make this project well worth watching. The interest in getting Toonz ramped up and where it needs to be (largely documentation and workflow related) is certainly there.
-
I haven't yet seen the official release announcement but went a'lookin' for the OpenToonz software and looks like I found it. Downloading now... For the brave and adventurous, here's the link: https://opentoonz.github.io/e/index.html The announcement is/was to be 26 March but that is in Japan so... should have already happened. And of course the big question: how to best integrate OpenToonz with A:M! The scanning interface alone with Xsheet should prove valuable.
-

Tell me all you know about Normal and Displacement Maps and A:M
Rodney replied to Heiner's topic in Open Forum
That looks to me like a classic example of inverted normals. If you turn 'Display Normals' on (in Tools/Options) you'll be able to see if that is the case. If it is then use the Group Select tool to grab those patches and then Right Click and select 'Flip Normals'. In your case there are two indicators that inverted normals might be the cause. The first is the black discoloring. The second is that the models appears to be displaced in the wrong direction at those areas. -

Playing with patches getting weird effect at the end
Rodney replied to johnl3d's topic in Tinkering Gnome's Workshop
Nice sleuthing Robert! Maybe Steffen can implement a 'Find Problematics' filter to make finding those things easier. -

Playing with patches getting weird effect at the end
Rodney replied to johnl3d's topic in Tinkering Gnome's Workshop
While I didn't find what it was there is something animated/keyframed that appears to be making the change. The reason I believe this to be so is that if you delete all the keyframes from the end of the sequence the problem goes away. But then again so does everything else that was animated too! For tweaking/troubleshooting purposes this is why I would generally suggest that cyclic motion/animation be made in an Action and then dropped onto the Model's instance in the Choreography. Then it's a lot easier to ferret out where the problem is. And it's easier to change the animation in all instances because you've got only one place to edit it. -
Looking forward to it! This is the part I'm interested in the most. I've often thought of doing such things but outside of the occasional test haven't done anything significant with that approach. The closest I came to success with those tests was with two characters (one imported into the other for the purposes of fighting each other. The jury is still out on how well that turned out.
-
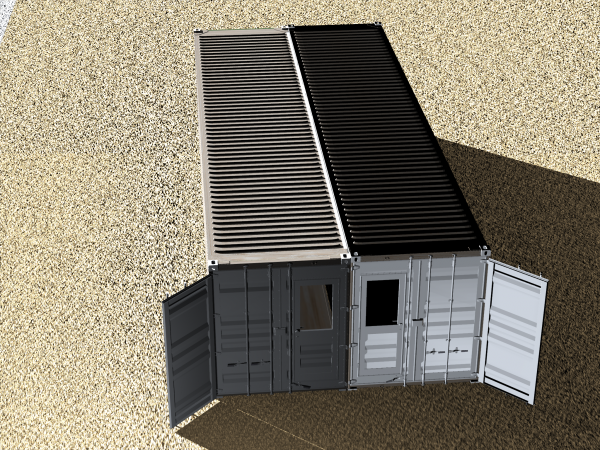
Not sure how to get a DAE file into A:M? Howzabout import it as an OBJ via SW3D. Same trailer scaled -100% on X axis to make a mirror image to butt up against the trailer's open side. I'll have to check to see why most of the color on the trailers turned to white... probably the intensity of the sun.
-
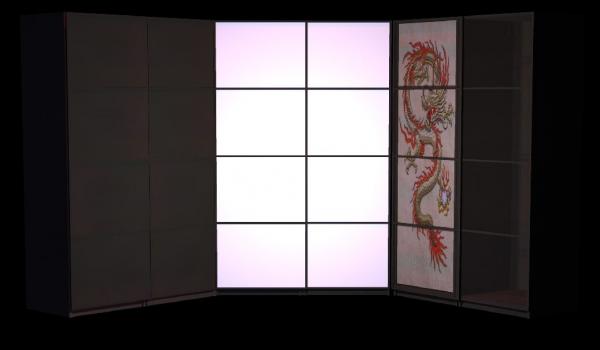
I've got a few more random tests of various file formats and modifications. Here's one of a basic cabinet out of the SW3D library recolored and adapted in A:M.
-
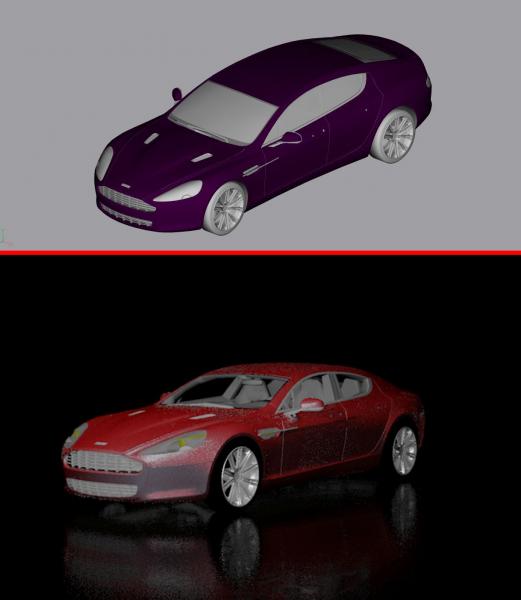
Here's a quick recolor test of a car downloaded from http://tf3dm.com While fairly detailed the original car came into A:M with limited coloring, texturing and no transparency. A few tweaks in the Chor's shortcut to the Prop resulted in the bottom image rendered out of A:M. Not bad for someone that doesn't know what the heck he's doing. Someone that has a clue could achieve much better results. Point being is that surfaces are highly modifiable in A:M as Props. Top image is of what the car looked like upon import into A:M as a Prop. Note the transparent windows in the render on the bottom. That is the result of simply adjusting our standard surface transparency property.
-
Many additional options are available so a video tutorial may be in order... after some more exploration.
-
Okay... okay... as I was. It helps to go back and read Steffen's release notes! He said: The problem I was having was that I couldn't change the image/decal type *in the OBJ*. But we can change the Image type from Color to Cookie Cutter (as he stated) in the same location in a Chor or Action. Ah, sweet success. Thanks Steffen!
-
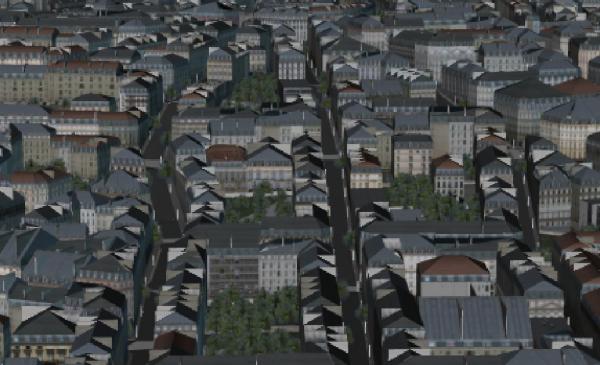
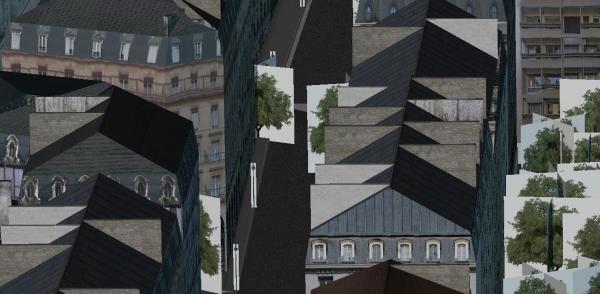
There are still some issues I'm trying to troubleshoot with OBJ objects where images placed on "cards" show the outline of the cards. This is very likely an oversight on the part of the model makers and could easily be remedied in the original program the OBJ was created in but trying to resolve the issue via MTL tweaking or exchanging of imagery isn't resolving the issue. An example of this is a downloaded model of Paris where everything rectangular renders appropriately but the trees... not so much. The white from the cards the images are applied to shows up. In the attached you can see that both trees and lamp posts exhibit the same problem. This wouldn't be much of a problem if dealing with only a few cards (easily replaced) but is a bit more difficult when dealing with hundreds/thousands or cards. At a guess I'd say there is likely a way to tweak the OBJ file so that all cards have transparent backgrounds but I'm not sure what that would be. It's easy enough to swap out the images on the cards by editing the image shortcut in the MTL file. (Disclaimer: This Paris OBJ isn't from the site/libraries mentioned above but is from another free models site)
-
The only difference I know of is that when purchasing for $299 your license to the current release (at the time of purchase) will never expire. When purchasing the standard subscription for $79 that will run for one year from point of activation. Both perpetual and annual releases are downloadable installers activated by a keycode issued by Hash. Both require contacting Hash Inc to transfer the license to any new system the program isn't initially installed on.
-
Most of these files have licenses of their own. Generally each one will have an accompanying license in the folder with the model. Some state any usage is fine but the originator must be attributed somewhere in the final product. One set of models states this: I see that 235 models donated by Scopia have a very liberal license: When using any model made by someone else it's important to consider the intent of their license. Specifically, if that license is meant to restrict usage which is usually not the case with most online shared objects. The creators want others to use those objects. A license in place to protect the originators of the files is hardly useless nor does it nullify obvious usage granted by said license. It's not like someone has to be able to carve their object out of a rendered scene in order for their rights to be intact so the words concerning incorporation into larger works must be addressing something else. A good rule of thumb would be to always consider finances gained by use of some else's models. Another way of looking at this would be to consider a project that incorporates dozen these objects in a single scene. Because the original objects are Props in A:M they can still be accessed in original form in that Project. This meets the strictest interpretation of the license. In cases where the object is only used as a temporary stand in for another object that will later replace that object the license is likewise intact as the file(s) are not being incorporated into the final product. An excellent example of this would be George Lucas and Steven Spielberg's usage of old film to layout their films. One could argue that some monetary compensation should flow toward the originator of those products but the legal end of the chain is more concerned with the final product. And here is where modification comes to play as it is the judicial system that must more often than not decide what is to be considered a derivative work and what constitutes a new product. So, 'useless'? Hardly. It is a bit unfortunately, an encouragement for folks to build everything from scratch even though their may be no requirement to do that as intended by the originating artist. But for those that plan to make cold hard cash with their endeavors the only way to make doubly sure you are adhering to all intents and every letter of the law is to use products which you either own outright or have paid for the appropriate usage rights. And don't forget to keep receipts of all licensing transactions! At any rate, this is the long way of saying that 'useless' might not be quite the appropriate terminology.
-
Well worth the watch but set aside some time as the interview runs approx. 1 hour and 45 minutes, including a fairly long intro outlining the 'Design by Hand' project headed up by Cooper Hewitt. Part 1 xhttps://www.youtube.com/watch?v=00hDSOCQy4s Part 2 xhttps://www.youtube.com/watch?v=VmUzwM89Fdw John Lasseter, twice fired from Disney Studios recounts the history of animation which culminates in him leading the Disney Studio into the current age of computer animation.
-
Looking good. It appears the use of cardinal direction (straight forward and profile camera) fits well with your project's over all style but if possible I'd suggest moving the camera slightly to allow for some variation of movement. An alternative in cases where objects move in a straight line would be to have the camera drift ever so slightly. It has been said... although I certainly haven't vetted the idea fully... that straight on camera shots primarily lend themselves to comedy. (speaking of which, I just noticed Grandma is riding the cycle backward during the second half of the previous shot (the terraced houses). I know that is just a standin, Press on. press on!
-
Sweet Home 3d is primarily a home layout planner. As such it has a library of OBJ models that can be drag/dropped to the plan view (top view). The reason one must Export to OBJ (rather than save) is that is the only option to get a Model back out of the program. Although the terminology of the program will tag everything as 'furntiture' just about any OBJ file will work. No, these aren't editable models within SH3D except scaling and such. To edit the model you'd have to use a different program... and if you have such a program... you'd probably use that program to export/save to OBJ. The primary reason to use SH3D would be to access the libraries of models which have been placed into a proprietary format that is used by SH3D. The (minor) temptation is to use SH3D to organize all OBJ I want to use in A:M but I sense that might only be the case until I find a more versatile program. Most of the models I've used thus far import into A:M as editable models as well although much depends on how the model was built in the first place. If the model consists of polygon tris the results will be mostly unusable. Even if the model consists of quads it may be too dense. So, the primary usage of any OBJ remains as props in A:M. The main difference being that A:M can handle them a bit better than previously. I'm still exploring and some models don't maintain their color after import to A:M while others do. Again, I'd say a lot depends on how the model was created originally. In my world OBJ files are usually static props that don't do much other than translate, scale and rotate but even there that allows for some considerable world-building and if nothing else the models can serve as temporary proxy models until more articulate and appropiate models can take their place.
-
One OBJ import in particular really impressed me. It was a relatively simple window frame. I noted the windows themselves had just the right amount of transparency. Nice.


