


Caroline
-
Posts
1,248 -
Joined
-
Last visited
Content Type
Profiles
Forums
Events
Posts posted by Caroline
-
-
If I can be of any help, Rodney, just let me know.

-
Looking at your splines, they seem a bit pointy - have you tried pressing the Page Up key for full resolution, so your splines should be fully curved.
-
In the PWS Image properties, you can change the transparency colour of an image. For example if you wanted the black color of an image to be transparent, you would choose black as the Key Color. If you do not want any colour to be transparent, you have to change the Key Color of the image to Not Set:

Right click the Key Color, and choose Not Set.
-
Hi, Todd, glad to hear you're following the dream!
There's a good discussion on cigarette smoke here:
and of course the smoke exercise in the TaoA:M.
-
It may also just be in the rendering.
If you click the Advanced box on the rendering options window, then you can change Buffers > Alpha > ON.
-
I also had some sound braking up on a PC that runs at 1.7g clock speed. After moving the file over to a faster PC running at 2.7g there wasn't any sound problems, but still had artifacts in the video. I think that was from the recording side and not playing the video.
That's interesting - I uninstalled that codec I mentioned and reinstalled the On2 and it still worked. But my sound is very bad between 20-30mins, and the video is off too. I have a fast computer, and I'm going to reformat soon and see what happens. (Either that or I will lose everything in hyperdarkness.)
-
I downloaded it twice just to make sure it didn't work
 (I was just getting audio no video)
I got most of it to work using this codec:
http://www.xiph.org/quicktime/download.html
and then I transferred Xiphqt.qtx into the specified quicktime program folder.
Someone suggested the One2 (?) codec, but that didn't work for me.
But the sound went really horrible between 20-30mins, so it probably isn't the right one still.
The quality is really bad, also, with lots of pixellation, so someone may have a better codec to use with it.
-
suppose you didn't use a force, but moved the car away from the emitted sprites
Yes, I was playing with something like that - a combination would probably work, if I could line up the rendered tgas properly.
John, I've looked at everything you've done (although I still find the occasional previously unfound snippet to amaze and amuse me). Thank you - fascinating.
I was going to return to smoke and fire as per schedule, but I am drawn back to flies. I shall have another go at putting it back together using your suggestions....
-
They are QT movs, but I didn't know if Macs could read zips. But I guess Windows can read .sits, and, thinking more about it, as Jim's homepage is homepage.mac.com/etc I would guess he created them on a Mac.
Put it down to one of my many stupid moments.
-
I was reading Dec 3d World, and there's an article in there about making the Caltex advert, that had a car made out of flies. So, seeing as I'm studying particles, I thought I'd have a go:
[attachmentid=22919]
It raised a number of questions - like did I do it the easiest way?
I emitted fly sprites from the undecalled transparent Porsche, and applied a lot of force to make it go backwards, and then reversed the rendered TGAs.
So you can't send particles along a path? I wanted the swarm to form a ball and then swarm along a path to form the car, but I could not get them to join up with the backwards rendered TGAs convincingly. If you send out particles, you have less control than if you drag them behind the emitter, but they don't look right if you drag them.
Particles are pretty fun though.
The Caltex advert is here (34mb):
http://www.animallogic.com/commercials/cal...es/qt/flies.mov
and the making of is here:
-
Jim Talbot has done some videos on decalling a face, and the first video shows how to flatten - I've used this in v13, so it worked for me the way he showed:
They are in zip files, so I guess they're windows only.
-
Thanks for the link - some great reading in this and his other tutorials - I hadn't found these.
Footsteps in the snow here we come!
-
I really enjoy modelling with splines - I'm making a huge (for me, anyway) model (the requisite newbie dragonish creature), and I really like being able to pull out a few points and adjust the shape of his tum, or add a few points and make the top of his head more lumpy.
The challenge now is to look at my model and remove unnecessary splines. Some of the models out there are so elegant and spline-light.
I think one of the tutorials that really helped me suddenly realize that I'm working in 3d space, but I hesitate to mention it, because it is 10 years old, and the decal bit at the end doesn't apply, is this Skylark one by Jeff Lew:
http://www.hash.com/users/jsherwood/tutes/SkyLark.pdf
And to keep it on-topic, it shows building a flat face, and adding extra points so that it's obvious where to hang other splines. It's not as good as Colin's Cooper face, because I don't think that Jeff had 5 point patches way back then, but making a flat face and pulling out the features is a very different approach.
But if you can put together the definitive "what to do with splines, how to avoid creases, how to add new splines, how to get rid of existing ones", then you'll definitely be approaching enlightenment.
-
I've learned a lot about searching in the last few months - even before learning splining, I think it's the most useful basic skill! And I enjoy searching, because I will always learn something on a totally unrelated topic that will be useful next week.
I've learned to put quotes ("") around everything that has a space, and in the forums, if I go to the search box on the main forum page, to search for separate words with a + sign in front of them, so you get both words in the search.
As for example I just looked for +spline +tutorial, checked the titles of the many threads, and came up with this thread, which is talking about the same sort of thing:
http://www.hash.com/forums/index.php?showtopic=23013&hl=
and this one, which is a wink tutorial about avoiding creases, but you're probably past this stage:
-
Thank you for pointing out this difference to me. I've spent a lot of time just doodling with splines to get the feel for them, and adding an extra point to a spline I'm going to cross, so that I definitely don't join onto the same spline.
I looked in the Technical Reference manual for "Shift A" and came up with this that explains it:
http://www.hash.com/htmlHelp/v12.0/CustomHtml/Join.htm
So in summary, I think, if you have an existing spline with 2 points, and you start a new spline that is going to cross the existing spline, if you just A onto the existing spline, the new spline will become part of the existing one. But if you Shift A, then the new spline will be a second separate spline.
I find the Technical Reference Manual, which comes on the disk, often has useful snippets of knowledge. It is often frustrating, because you can't read it easily, but if you kinda sorta know what you're looking for, it is often there.
-
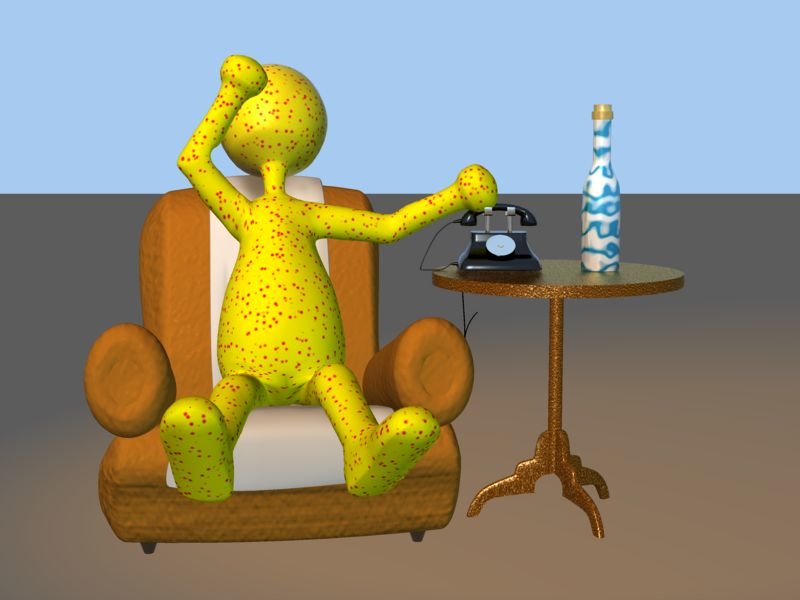
Name: Caroline Begbie
Exercise: Exercise 15 - Eat My Dust
Date Completed: 25th November 2006
Here's the knight:
[attachmentid=22544]
What I learned:
I think if you put the volumetric directly into the choreography, it works more predictably then when you have it in an action then the chor. I had no multipass issues when I transferred my dust out of the action and into the choreography.
And if you're rendering with multipass=off, then the dust is white, but when you put multipass on, the dust takes the colour that you set.
Here's my little volumetric fun:
[attachmentid=22545]
-
-
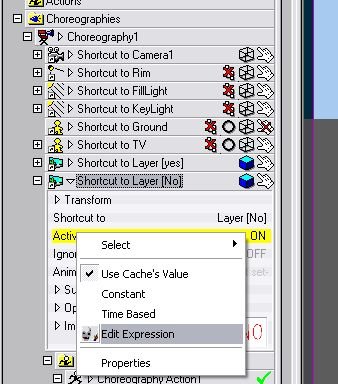
Warning - This is not for the faint-hearted, but it does seem like an elegant solution.
I have been wanting to make Expressions work for me, and in this case they could. (I don't know how Expressions affect render times.)
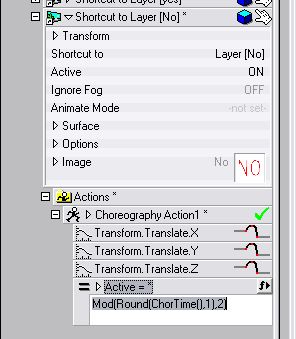
This is a movie of two Decals acting as Layers with an Expression on the No Layer.
[attachmentid=22472]
I have a simple 4 spline model, and a "Yes" Decal Layer in front of that, and a "No" Decal Layer in front of that.
On the properties of the "No" Decal Layer, in the Choreography, I right clicked Active, and chose Edit Expression.
[attachmentid=22474]
Then, after a long trial and error and searching and head scratching, I came up with:
Mod(Round(ChorTime(),1),2)
[attachmentid=22475]
I set the Chor Time to 5:00, and it seems to work - it should work indefinitely as well, with no change needed, no matter how long the Chor Time is. (I hope!)
This will take the Choreography Time, Round it up, and Modulus it by 2, so that every second, the "No" Decal Layer Active Property will be Off, and will not render, showing up the "Yes" Decal Layer behind it.
I have no mathematical ability, and I have no doubt a mathematical mind would be able to change the 1 second to something else, but I couldn't.

-
That dog play is really cute.
I'm sure you have reels of footage from your dog, and I found this dog walk clip:
which is very close to your's, except I wonder if there is a slightly longer delay in bringing up the front paw after the rear paw. But I was definitely wrong about the both legs on same side issue, and you're the director!
They're both looking great. Are you compressing the mov with Sorensen 3? It seemed quite a large file size for a short clip.
-
I hope you don't mind me critiquing, Steve - you've taken this a lot further than I could. I hope you get your action blend problem sorted.
I don't think that front and rear paws should leave the ground at the same time. Also, should the left front and left rear should be raised together? I thought the only animals that do that are the giraffe and the camel. I believe that at some point in the walk cycle, the left rear and right front are raised at the same time.
I've been watching my dog - he's an old Maltese with much hair, so is probably very different to a dalmation in his prime, but when he walks, I can't see a curl of his rear end - I could imagine that your sort does, though, and the base of his tail has a definite left/right motion, rather than an up/down. I think there's a sideways sway in the backbone.
And I love your dog!
[Edit]
I've been trying to find some video, but all I've come up with so far is:
http://video.google.com.au/videoplay?docid...594988272&q
which is a bit too blurry and fast. (I look for "Getty" + "dog")
You may have more luck if you go to The Getty Images Site and search for "dog" - I found a couple that had clearer dogs.
-
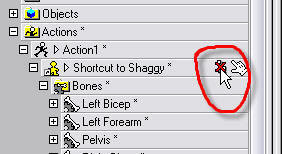
Do you mean like this?
[attachmentid=22413]
If so:
First, when you create your Action - make sure "Show More than Drivers" is on.
[attachmentid=22412]
This will let you select individual named groups in an Action. You can do the same thing in a Choreography for each model in the Chor.
In the model window, I grouped and named the patches in the middle of Thom, and followed the 4 steps I wrote above. The transparency is also in the Surface Properties which I set in the Action at frame 1:00 to 0% and at frame 2:00 to 100%.
Not a drag - just let me know where I'm not understanding your dilemma!
-
Name: Caroline Begbie
Exercise: Exercise 14 - Playing Marble
Date Completed: 19th November 2006
What fun! I love the beautifully understated, yet perfectly correct, "20 minutes".
This one's for Al, who's probably better by now!
[attachmentid=22394]
-
This probably doesn't help, because it's cartoon, but it's always fun to look at anyway:
Preston Blair Four Legged Movements
Also a couple of dog cycles from Muybridge:
-
1. Make sure you have the property triangle showing in the Project Workspace Panel:
Change Tools Menu > Options > Global > Show Property triangle.
2. Create an Action for your model.
3. Click the + next to Action1, then click the + next to Action1 (in the Project Workspace Panel), then click the triangle next to Shortcut to Your Model.
4. Click the triangle next to Surface and click on the Diffuse Colour.
If you want the colour to change over time, then, for example, if you are using Thom who is yellow, you can change the Action Frame (down at the bottom of the screen) to 10, and then change the Diffuse Colour to blue, then change the Frame to 20, then change the Diffuse Colour to red. He will then over time gradually blend colours. To change the colour from yellow to blue abruptly, you need to change the Frame to 9, and make sure the colour is yellow, then OK. Same for Blue to Red - change the Frame to 19, and make sure the colour is Red.
If you've done TAOA:M, Exercise 12 shows you how to make a pose, so you could also make a pose slider for all the different colours that you want him to be.
 - thanks.

Alpha Channel from Particles
in New Users
Posted
I'm trying to get my fire with a flickering light - I've looked through the forum and found that if I render the fire to a tga alpha channel I could apply it as a gel to a klieg light ( )
)
However, I've tried various ways - the simplest is rendering a ball with the flame material as described in TaoAM Chapter 16. I get the alpha channel for the ball, but the flames do not show in the alpha channel.
Am I doing something wrong, or are particles not supposed to show up in the alpha channel?
I was reading this thread on Compositing Particles, and, while it is all a bit too hard for me, it does seem to imply that you can get an alpha channel from particles.
I tried an EXR sequence with the ball, but the flames only appeared on top of where the ball is - all of the flames that come out of the ball were not there.
(I'm sure that there are other ways I could simulate a flickering light, but I did want to see what could be done with alpha channels too.)