


Caroline
-
Posts
1,248 -
Joined
-
Last visited
Content Type
Profiles
Forums
Events
Posts posted by Caroline
-
-
1. Make sure you have the property triangle showing in the Project Workspace Panel:
Change Tools Menu > Options > Global > Show Property triangle.
2. Create an Action for your model.
3. Click the + next to Action1, then click the + next to Action1 (in the Project Workspace Panel), then click the triangle next to Shortcut to Your Model.
4. Click the triangle next to Surface and click on the Diffuse Colour.
If you want the colour to change over time, then, for example, if you are using Thom who is yellow, you can change the Action Frame (down at the bottom of the screen) to 10, and then change the Diffuse Colour to blue, then change the Frame to 20, then change the Diffuse Colour to red. He will then over time gradually blend colours. To change the colour from yellow to blue abruptly, you need to change the Frame to 9, and make sure the colour is yellow, then OK. Same for Blue to Red - change the Frame to 19, and make sure the colour is Red.
If you've done TAOA:M, Exercise 12 shows you how to make a pose, so you could also make a pose slider for all the different colours that you want him to be.
-
Name: Caroline Begbie
Exercise: Exercise 13 - Show Some Backbone
Date Completed: 18th November 2006
The main thing I learned in this exercise is that you don't have to model in grey! (I know, everybody else already knows it.) I've been making a model that's up to 3796 patches now, and every time I made patches, I would group and change the surface colour of the group. BUT if on the model properties you change the surface colour, new patches are that colour. (Du-uh - I feel stupid! But I thought I'd post in case someone else had the same problem)
Thom's happy about it, anyway!
[attachmentid=22357]
-
Looks great. I'm using Internet Explorer 7, and I had trouble with the default Quicktime plugin (the forum Quicktimes work for me, but nothing from any other source). I was able to view the wmv version.
-
Quick explanation of ease:
Each path constraint has an ease associated with it. By default, the ease goes from 0% at the beginning of the path, to 100% at the end of the path.
Let's say that you have a path cycle length of 10 seconds, and you've set that in the Action's Cycle Length property. It'll take 10 seconds for Shaggy to walk along the path. But if you want him to walk slowly for 8 seconds, and then walk really quickly for 2 seconds, then you can set your frame time to 8 seconds, and change the Ease % to 50% - you may have to change the 10 second Ease % to 100% too.
Now Shaggy is going to walk along 50% of the path in 8 seconds (ie slowly), and walk the other 50% in 2 seconds (ie quickly).
Try it and see - the hard part is locating Ease % - it's in the properties for Constrain to Path "Path1".
(But you don't need it for Exercise 5!)
-
There's a simple 3 minute video explaining how to combine two actions and use an ease adjustments at:
Its at:
http://www.hash.com/VM/ and is under Misc, Path Ease.
The walk and wheel, and constraints and compensate videos on that page may also help.
To slow him down, look at the properties for the Walk Action (shortcut to MyRabbitWalk) and change the cycle length to more, like 10 secs, depending on the length of the path.
I don't know if you're making a study of walk cycles, but while searching, I came across Rodney's thread:
The 'annotated' Art of Animation:Master
and amongst other gems, it's got a great link to Walk Cycles (non A:M) The Walk and the Whip.
Now I must go and study that thread....
-
(Shh, mine lost contact too.)

I blame it on the legs being too long, but I think if you play around with his hips, it may work. I also forgot until almost the end to turn off Balance and Balance Rigid poses, which makes a big difference.
Strategy - well, as I am myself quite new, I use a lot of patience. Next to the PWS Show more than drivers, there is an option not to render the object. I turned off rendering for the door and for the ground, so that when I switched views, I could still see Shaggy. I used the T key (turn) a lot.
Movie looks great for a start. I haven't tried toon rendering yet.
-
though I am able to pull the doorknob away from the arm totally. So it uis not really attached, isìt
The technical manual example of kinematic constraints has a character and a ball, and says:
"The characters forearms will now always try to reach the ball."
I think the main word there is "try" - so if you move Shaggy side to side by his hips, his arms are in a kinematic chain to the door knob, but yes you can move him right away from the door.
And that about covers my complete knowledge of constraints - more experience may be needed here!
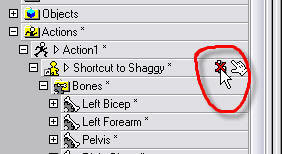
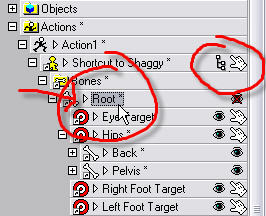
I just want to change the position of Shaggy in an action window, lets say move him 5cm to the rightYes, you can, but you need to move his "root" bone. As a default that root bone is not showing in the action window. To show it, you need to click on "show more than drivers":
[attachmentid=22264]
Then the root bone appears, click on it in the PWS (Project Workspace), and you can move it.
[attachmentid=22265]
The root bone is the mother of all bones, so when you move it, it moves everything.

-
IMHO, I prefer them not themed. Sometimes I have to do the exercise several (many) times to get it "right", and I am very glad to get on to the next exercise which is totally different, using different characters.
I have finished the modelling section, and, like Al, I am putting what I have learned to use. So I hope to have a WIP thread where I can put up my model, then go on to the next sections of TaoA:M, to learn how to rig, materialize, etc. This is my themed TaoA:M, and it is of my own choosing, and I'm using everything I've learned so far.
One of the difficulties is choosing a theme that everyone likes. At least, as it is, you can spend less time on one you don't like. Anything with FWhatevers would leave me cold, but i'm sure lots of people like them.
-
Jake, I downloaded your project -
As your project stands, when I move the doorknob bone, the Right Forearm Kinematic Constraint works, but the left one didn't. I deleted the Left Forearm constraint, and just put it in again, and it was fine. (Perhaps you left off Compensate on the Left Forearm??)
When you move the door knob bone, shaggy's arm will also move.
The book also calls for an Orient Like Constraint on the Right Hand and Left Hand (that's with the Compensate mode too).
I don't think I understand your other question. When you move the bones in an Action window, that is only moving the bones for that particular action, not actually changing the rig.
-
Congratulations, Joe - I'm surprised you have any time at all to be making giraffes.

Your giraffe looks great - I know from my experience that I find the exercises really hard, but about the third time I do it, I wonder what I was fussing about.
-
When I asked him if he minded if I posted it, he said - "Of course I don't, it doesn't look anything like me." (The real reason for not posting the photo
)Still, he is all teeth and hair.
-
Name: Caroline Begbie
Exercise: Exercise 11.5 & 12 - Face and Lip Poses
Date Completed: 6th November 2006
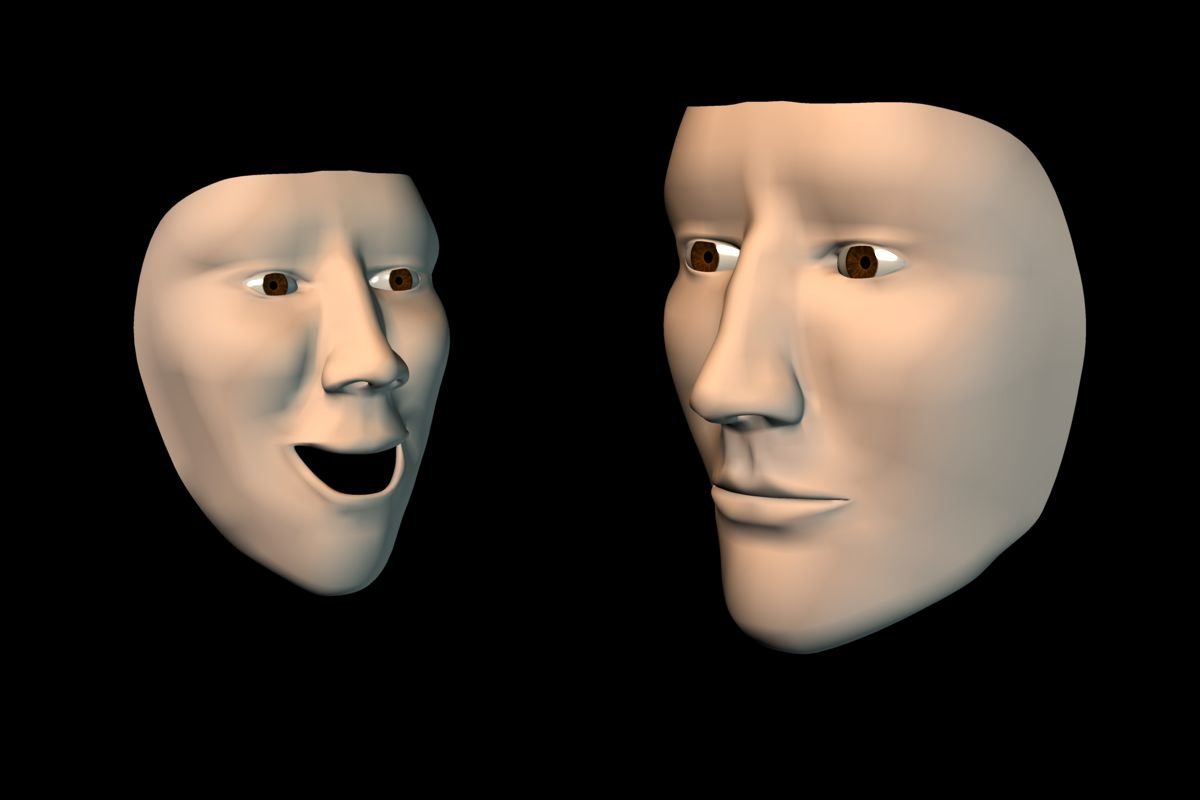
This is my son Robin. I'm not posting the original, in case someone accuses him of having a wonky spline.
 (The one thing I've never accused him of. But wait... maybe...) So all wonky splines are mine.
As I couldn't find anywhere to post 11.5, I thought I'd play with lip poses on it. It's interesting that when I came to animate it, some of the splines were in completely the wrong place. So that's something to remember when building models. Al is absolutely right, that in doing an AI, the whole face under the eyes move.
Is there any limit on how many CPs you can move in a pose?
The eyes are Colin Freeman's amazing Uber-Eyes.
I found DeskPins useful for keeping little reference photos on top of A:M.
[attachmentid=22015]
-
Thanks, Scott - I do forget the Balance Rigid. I expect it's useful somewhere.
Logrus - just a suggestion, if you're still having problems - perhaps it would help if you reset all your settings (Help Menu > Reset Settings), and just started again slowly.
You're way ahead of me using those buttons at the bottom (the Key Bone, etc). I did my Shaggy exercise without touching any of them, as I don't know yet what each one does, and, personally, I can only learn one thing at a time. Those buttons may be putting in a variable that you don't yet need.
-
I've been trying to find some screen capture software that actually works, and doesn't take 68mb per second. That may take time....
So, I've downloaded Wink, and this is my first attempt, so please forgive it.
This demonstrates just moving Shaggy's Right Foot, then his Left Foot (and I also had to move his hips to get the right position.) I moved and rotated both his feet. Right foot at 0:10, and Left Foot at 0:20. You can see what happens here:
www.popsyland.com/hash/shaggy.htm
(It's about 0.7mb, so not big).
There are green left and right arrows at the bottom right to navigate to the next screen capture.
Try reproducing what I did there in those few keyframes, and you may start to see why the left foot is moving when it "shouldn't".
The first half dozen times you watch it, it probably won't make sense, but once you tried exactly that a few times, then I hope it will.
-
I've only used Default (spline) and Hold so far.
I couldn't find much either, but this link is From The Technical Manual
-
Name: Caroline Begbie
Exercise: Exercise 11 - Giraffe
Date Completed: 1st Nov 2006
[attachmentid=21891]
Mine's the one with knobbly knees and fat ankles. That was fun doing an alpha channel render and fitting it into a photo.
You are really getting quick!Quick? I've spent all day trying to fit a round horn into a square patch. My family are making appointments to see me.... I guess I can make it up to them by taking their photo with a giraffe.

-
Hi, Logrus - I'm a new user, too, and I don't really understand your first paragraph.
What I learned and did a lot of experimenting with, was the channels for the animating. I'm glad you found that movie Keeping Bones from Wandering - I watched that one over and over. And then I experimented a lot.
The constraints I did EXACTLY as the manual, remembering at some stage to turn the constraints off when he lets go the handle. Those in the manual were the only constraints I used. I didn't change the standard rigging, and used only what came in Shaggy.
I also trashed a lot of projects, I found sometimes it's just easier to start again, with the new things that I've learned by doing.
That foot. If you use the left foot for the first time at 2.00, then you're going to have a gentle slope in the channels from frame 0.00 to 2.00. This means that the foot is going to move very gradually the whole time. So what I did was to wiggle the foot at 1.25 (just before 2.00). This means that the spline in the channels should be even until 1.25, then start the move to 2.00. HOWEVER, most times I forgot the pre-wiggle, and had to fix it up with a point in the channel editor.
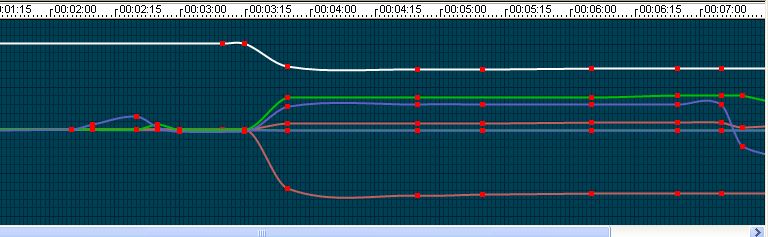
Just to give you an idea, here's a screen catch from my Shaggy:
[attachmentid=21890]
In this picture, it's the timeline for the Left Foot Target. The green one is the easiest to follow, as it's the Translate.Y channel, which goes up and down. You can see exactly where the Left Foot Target goes up at 3.15 - if you want it to go up and down, you just click in the right place and drag the points.
Note:- (if you're using the channels) When you have a keyframe along the spline in the channels, then you can drag it up and down only. To drag it to left and right to get the timing right, you have to hold down the '1' key (not the numeric 1).
Disclaimer:- I am a new user and may be doing things differently from the 'pros'!
It is a difficult exercise and took me a LONG TIME to sort out, with lots of searching on the forums, and experimentation. I think it's the only one like that in the book, though, so even if you leave it to the end, then you may not learn more about animating. However, if you're really sick of it, then rather than get over-frustrated, then leave it and go on with the next one.

-
Hi, Logrus - I haven't myself had the problem of losing keyframes, but I did a search and found
this thread which talks about a missing keyframe.
But as you're not having that problem any more, perhaps it's gone away.
The other problem of the left foot moving before it's supposed to, does sound like a lack of keyframe on the left foot.
Personally I didn't really understand how these bones were moving until I looked at the channels. If you click on a bone in the timeline, you will see the keyframes for that bone. Under the timeline there are a series of buttons:
[attachmentid=21841]
The left button will show you the channels for that bone. So, for example, if you click on the Left Foot Target Bone, and look at the Transform.Translate.Y channel, it will show the spline for movement in the Y channel. This means that when the spline goes up, the Y value goes up, so the Foot Target goes up.
If you look at the channels, you can very easily see unwanted spline movement where key frames have not been properly set.
There is a short movie somewhere, that might help, but I can't find it, I think by Robert Holmen, about Keeping Bones from Wandering.
It's late here, so I hope this makes some sense so you can find something to search on - there's so much information here in the forums.

-
Hi, eazail - link to the A:M 13.0m Installer is:
I look forward to seeing you in the New User's forum doing TAOA:M (The Art Of Animation:Master)!
-
Name: Caroline Begbie
Exercise: Exercise 10 - FWhatever
Date Completed: 29th Oct 2006
Halfway through, so it's time to say:
It's great that you guys look at what we're doing here. It really gives incentive to do each exercise carefully, and gradually learn The Art. Thank you.
Onward and Upward....
[attachmentid=21793]

-
Thanks, John - coincidentally I had just finished my Flower for TAOA:M Exercise 9, and I was looking at the petals thinking Wouldn't it be neat to press a petal and play a note.
Then you pointed out that I could use a Dope Sheet. I used 2 dope sheets, one for the high notes and one for the lower notes, for Daisy, posted here:
(I hope I've linked that properly - it's under Newbie Ex 9 if I haven't!)
I could not yet work out how to assign a made up word eg. noteA1 to a particular phoneme, so for the words I typed in dd bb gg etc and manually assigned "a single phoneme" to each word. Great fun.
Chrury, you're probably looking for better sound quality, but I used Noteworthy to create the midi, then used Wavepad to record the midi to wav. I couldn't find a converter that would work.
-
Name: Caroline Begbie
Exercise: Exercise 9 - Flower Power
Date Completed: 25th Oct 2006
Thanks to Johnl3d for pointing out use of dope sheets for Daisy.
[attachmentid=21693]
-
I can always get it to happen, by going to the word "Can" and dragging it before secret, and resizing and do that about 3 times, and the poses get messed up.
Tried it again on "secret" and could not get it to fail, but it did on "can".
Thanks for the info on filing. I hope I never have to know it!
-
I've just finished exercise 7, and I thought there was a problem - I had to restart that exercise half a dozen times, but I did not know how to report a problem, and I'm such a newbie anyway!
It is reproducible, however, as I just re-tried it. If you set up Ex 7, then start moving I've then Got then A then Secret to the correct positions. Then move Can before Secret, and Secret before A then the poses start splitting up as in this screen shot:
[attachmentid=21646]
I found that I had to trash the project to get rid of it.
But I still don't know how to report it as a problem.


new dog
in Work In Progress / Sweatbox
Posted
This probably doesn't help, because it's cartoon, but it's always fun to look at anyway:
Preston Blair Four Legged Movements
from ASIFA Animation Course
Also a couple of dog cycles from Muybridge:
http://bowlingsite.mcf.com/Movement/locoindex.html
http://www.cmp.ucr.edu/exhibitions/dogdays/muybridge.html