


Caroline
-
Posts
1,248 -
Joined
-
Last visited
Content Type
Profiles
Forums
Events
Posts posted by Caroline
-
-
Well done, Roger - that was a very hard scene - you improved it vastly.
-
I do that all the time. However, I've got a little bit better at versioning. When I'm happy with the way one part looks, then I save a mov file under 'proj_name_a', and save the proj as 'proj_name_a'. Then I save the proj as 'proj_name_b' and work until I have another part good. So then I'm only losing one bit at a time. I also do Project Menu > Embed All, just in case my models are not in the project itself. If they are not embedded, then every time you save, you are overwriting the same model all the time.
Looking forward to seeing a result.

-
I'm definitely not an expert on this - I think I'll try it over the weekend.
However, I can point you at a few links.
Firstly - the video: Path Ease - Walk then Wave
The picture from Robert Holmen that I've sticky-taped to my wall:
http://www.hash.com/forums/index.php?act=a...st&id=14198
And other threads asking the same question:
http://www.hash.com/forums/index.php?showtopic=27825
http://www.hash.com/forums/index.php?showtopic=26882
http://www.hash.com/forums/index.php?showtopic=26616
http://www.hash.com/forums/index.php?showtopic=26076
Hope this helps!
-
-
Hi, Eric - 5 point patches can be a bit odd sometimes.
One of the tricks is to select your 5 points, and if the button does not activate, press the "." (period) key, then press it again. The "." key inverts the selection, so when you invert it back again, the button should be activated.
On the rare occasions when that does not work, I have found hiding all but the few patches around the 5 points, and using the Lasso selection tool (Shift G) to select the 5 points works.
-
King Bal unties himself and floats upwards.
Questions:
1. I assume I can move the camera? He looked a bit odd if I didn't.
2. Do I keep the exact same chor time?
3. Rope / throne / watchers are missing. I assume that's OK.
4. My frame count is blurred - am I rendering wrong?
-
I don't know the first part. I downloaded it all, but I can see that you probably don't need most of it.
Here's the storyboard:
http://wiki.hash.com/index.php?title=Animatics
But it's not split up into little mov sections. In the downloaded data, each scene is split out with it's own bit of the animatic.
-
I don't know - have you tried resetting settings under the help menu?
You could post the project (in a zip file), if you want, to see if I can open it.
I guess everything's embedded?
-
Hi, Geoff - it should be as stated in the TaoA:M manual, for this exercise, on your CD in the folder "Data\Tutorials\FW-190 Fighter\Maps\Front.tga".
-
That's looking good - did you get all those rise constraints in?
Or did you come up with an easier way? I'm sure there must be one.
-
I don't use sweeper, although I'd like to one day, but I did the first tutorial on the web site, and it worked for me.
Did you create your cross section, and give it a named group? Then, create a path, highlight it, and go into Sweeper. Even though the dropdown for Cross-section on the dialogue window is blank, if you click the dropdown arrow, the named group should be there.
It was for me anyway

-
The Rise nulls use totally different constraints to the Path nulls.
The Path uses Constrain to a Path, which means that you can specify whereabouts on the path the constraint should be (ie. Ease percentage, 0% at the beginning of the path, 100% at the end of the path).
The Rise nulls use the Translate To constraint, which constrains each Rise Null to the corresponding path null. So there is no Ease percentage at all in that constraint. (There is an Enforcement, but that should be left at 100%).
There is also a Translate Limits constraint, which makes sure that the Rise Nulls only translate together with the Path nulls along the Y axis (up and down), so Minimum & Maximum X and Z axes are 0, and Y is set to -1000 to +1000.
[Wasn't there a song called "Percentage on the Rise"? Or something like that. Oh no come to think of it, it was Bad Moon, similar though.
] -
He (the shiitake man), in his instructions, said that he found that the animated map was better than volumetrics. I can't comment on that, as I haven't got to the map bit. I would have thought dust and forces would be the way to go though.
But if you want to give it a go, have a look at Exercise 15 for the dust, and Exercise 16 for the fire, in TaoA:M.
If you are trying dust, be sure to render it in the choreograph to see what it really looks like, as it does have a slightly different effect when rendered in an Action.
-
Nice pitch.
I agree with you - every time I did a TaoA:M exercise I thought - that's what I want to do most - like modelling, rigging, animation, particles. I still feel like that too, with still so much to learn in every way
. It's all cool. -
Nice plane - not sure what you mean by covering the wings. I liked the light reflection on the canopy whosit. (I'm not a plane person
)It shouldn't have been 16.5mb - were you using Sorenson 3 compression for the mov format? Or was it just a big fancy render?
-
Worked fine, Geoff - great to know that you're finding your way around A:M, on the journey towards TWO.
Have a look under the render settings (advanced mode), click the arrow next to format, with a .mov chosen, and click Set. Change the Compression Type to Sorenson 3, and your movie size shoud be even smaller.
-
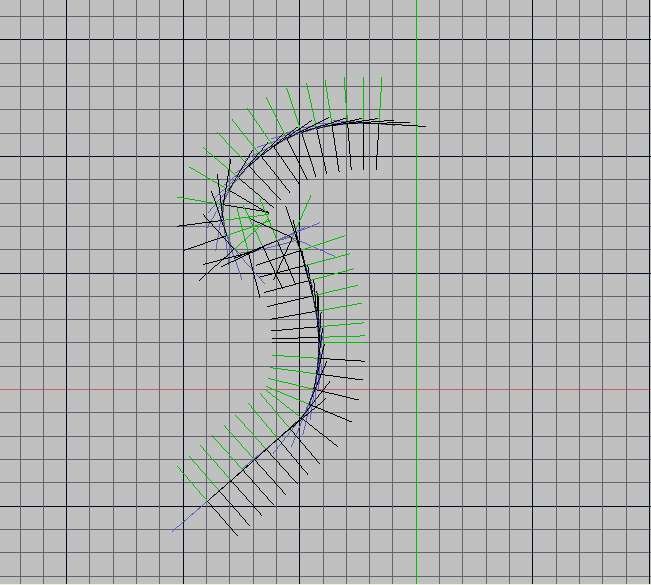
I was thinking that your spline looks different from mine, but you've still got another 36 path nulls to go, so that looks right.
The main thing that bothers me is that when I put my path nulls on, I didn't have the cylinder in there. I added the cylinder for the rise nulls, and the shape did not appear until all rise nulls were constrained.
Your mushroom cloud is there fully shaped.
This is my spline after adding the nulls (I think and hope - I have different revisions, so I hope this is correct):
-
I voted to have each exercise in it's own thread as now. I toyed with the idea of having a separate thread for each user, which would be fun to go back to, and more personalised, but it wouldn't be as easy for other people to find the exercise they are doing to learn from. And it is a learning forum.
When I was doing TaoA:M, I looked through the whole thread before starting the exercise. This was so I could get hints on where people go wrong.
What about archiving them by year, so they don't get massively long?
-
I remember I had problems when I didn't add all the nulls on frame 0. One of the percentages (ease???) was off. I started again at that point.
You also need to make sure that from the top view your control spline stays in a continuous straight line. It'll move on the other 2 axes, but be perfectly straight from the top. That's to do with the initial animation of the control spline, not adding the nulls - they'll automatically constrain in a straight line if the spline is in a straight line.
I have to admire your sticking power.
I've given up temporarily at the animated displacement phase.You can post your project if you get stuck, if you want.
-
That's a great start - love the render.
-
Looks good to me - agreed with spacecomics about the right arm, but you have the right as a director to make any choice you like
I liked the exaggeration on the door pulling out slightly.
-
Thanks for the welcome - I'm definitely looking forward to meeting the rest of the crop.
-
Hi, Roger - yes, that's what I mean - those lines are splines, so sometimes they curve when you don't want them too. I was searching for tutes - there's one by Robert Holmen that is called something like Keeping Bones from Wandering that I wish I could remember to bookmark.
But I also found one by me that I'd forgotten about, showing how to put interpolation on the curves:
http://www.popsyland.com/hash/shaggy.htm
I forgot that before trying this you must go to frame 0 and turn off the Balance and Balance Rigid poses.
This one isn't about channels, but about keyframing, and I had missed it before, and it's very good:
-
Hi, Roger - I think that's great - good story. I think you should move on with TaoA:M, too. There are always things that can be improved.
But if you really want a way to improve, you could investigate channels in the timeline - some of your splines are being interpolated incorrectly, as for example where the foot goes into the door instead of staying on the surface.
Ask for clarification, if you don't know about channels.
Other picky things, like having both feet are in the air at the same time can be corrected later, so don't get stuck on the details here.
2_03_99 "Enough, Master Woot!"
in TWO Animating
Posted
That's a great cross-looking Woot, Ralf!
I like it a combination of both.
1. Ladder (love King Bal scratching his tum)
2. Striding from the first one - should he have legs, or is the expression enough?
3. Far off Bal, scarecrow & woot
4. Close up scarecrow & woot.
I thought there were too many camera angles on the second one in a short space of time.
I use Sorensen 3 Medium quality, but even then sometimes I am surprised at the file size being bigger than I thought.