


Caroline
-
Posts
1,248 -
Joined
-
Last visited
Content Type
Profiles
Forums
Events
Posts posted by Caroline
-
-
Hi, Roger - I think that's great - good story. I think you should move on with TaoA:M, too. There are always things that can be improved.
But if you really want a way to improve, you could investigate channels in the timeline - some of your splines are being interpolated incorrectly, as for example where the foot goes into the door instead of staying on the surface.
Ask for clarification, if you don't know about channels.
Other picky things, like having both feet are in the air at the same time can be corrected later, so don't get stuck on the details here.
-
Does it look better like that?
I think the turning is because of the way you've animated the control spline. If you're going to change that, you'll have to make sure that any control points that you move are on the control spline, and not the cylinder.
If you look from the top view, mine are all on the same Z (?) axis, whereas yours appear to be moving around on that axis. Mine are only moving on the X (left to right in front view) and Y (up and down in front view) axes.
-
Information about the Treez plugin:
http://www.hash.com/forums/index.php?showtopic=26049
There's a whole forum devoted to A:M features, so it is really good to go and surf here occasionally - I just saw one I'd forgotten about:
-
By the way, Ease is the amount the object goes along a path.
So for example if you place an object onto a path, the ease starts at 0% (the start of the path), and after a stated time, finishes at 100% (the end of the path). You can animate them differently, like if you've got Thom along a path, you can say at 10frames he's 50% along the path, then 20frames still 50%, then 30frames 100%. He'll then stay still (ish) for those frames between 10 and 20.
Here, it's just a way of evenly spreading out the nulls along the control spline, so that your 41 bones will eventually be constrained to them, so that the bones will move evenly with the nulls.
-
So you've got up to step 5? Those nulls were created in the action, right?
In the action window, they are action objects. I was really lazy and did not rename mine, so my first 41 nulls are called Null 1 to Null 41. In the action I renamed them path Null1 Action Object.
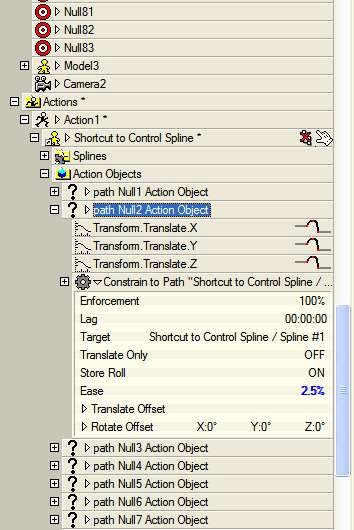
Step 6 is where these nulls have to be constrained to a path, so for each null, you right click it (in the action) > new constraint > path > click the control spline. If the click 'doesn't take', then you have to choose the target dropdown in the properties for the constraint.
When you have done that, then in the properties for the constraint for each null, there is an Ease property. In the picture below you can see that my 'path Null2 Action Object' has a 'constraint to path', and the Ease is set to 2.5%.
the path null1 action object is 0%, the path null3 is 5%, path null4 7.5%, etc, for a long time.
NOTES: make sure you're on frame 0 of the action when you do this.
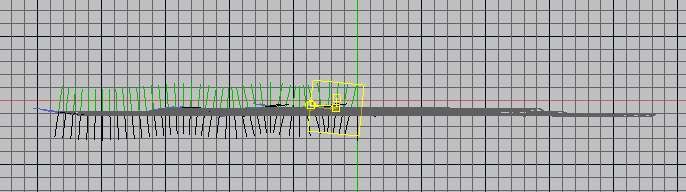
When you've finished doing them all, the nulls will place themselves all along the control spline, and look like a caterpillar.
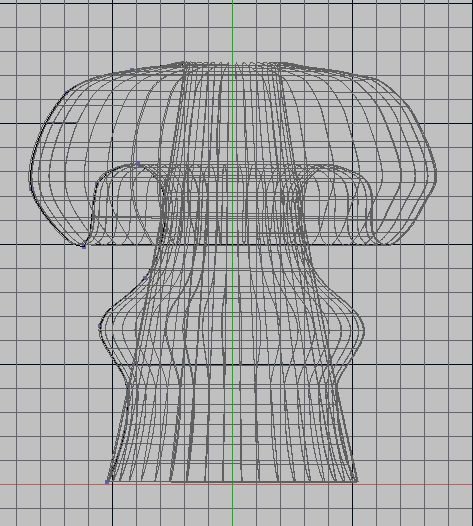
 After looking at your top view wire frame you could use this as making water.
I was looking at that - lovely ripples.
-
You could try the gold and silver from:
http://perso.orange.fr/ffave/e_ressources.htm
Some of the materials there use extra things that aren't available to download any more, but I think gold and silver are useable.
-
The one on the right looks good - 41 bones all present and correct - make sure that none of them are parented - ie when you created them, click away from the bone before adding the next one - they should all be at the same level in the hierarchy.
My pic 1 is different from your's - I'm not sure which one is right, possibly yours:
This is an interesting view - wireframe in the action window - shows the control spline with the cps:
-
I just typed a huge message, clicked the wrong button. All gone. Shall try to recreate. Bother.
nah sure haven't thats where i'm stuck at Your's turned out a whole lot better then mine how did you get your control spline onto model like that. Are the green line on the model the control spline.A summary of the steps for part 1:
1. Create a cylinder mesh model
2. Create 41 bones for the mesh and assign control points
3. Create a control spline model
4. Create an action with the control spline model and animate the spline to be the shape of the rising mushroom cloud over 1 second.
5. ON FRAME 0 create 41 new nulls in the action (right click) and name them 'path 01' to 'path 41'.
6. These nulls have a 'constrain to path' (the control spline is the path), and an ease percentage (path 01 = 0, path 02 = 2.5%, path 03 = 5%, path 04 = 7.5% etc). They will now look like a caterpillar along the spline - that's the green line
7. Create 41 new nulls in the action called 'rise 01' to 'rise 41'.
8. Each of these have 'translate to' the corresponding 'path' null constraints, and also 'translate limits' to stop any movement except up and down.
9. Drag in the cylinder mesh into the action.
10. For each bone add a 'translate to' constraint to the corresponding rise null. Also an 'aim at' constraint to the corresponding path null. Bone 1 is at the top of the cylinder and translates to rise 01, and aims at path 01 (with scale set to ON)
Your's looks pretty good, except the control spline needs to be animated a little better to have more shape. Do you want to post your project? It's very easy to constrain to the wrong null.
This tutorial is mindboggling - Ilya Anisimoff aka weevil must have incredible powers of concentration.
I'm trying to think of other applications of this method - I'm unlikely ever to want to do a nuclear explosion. Maybe a snake along a path. Or a waterfall. Or maybe rain. I shall have to continue with the animated displacement tomorrow to see if I can do water.
-
I haven't got my control spline moving in a nice nuke-type way, but this is what I have after finishing part 1. Does your's look like this? You can use the arrow keys to go through it more slowly.
If not, are you able to post the project (in a zip file), as you may have constraints targetting the wrong thing.
-
Wow - I never knew it would do that.
Did you get the cylinder moving with the control spline? I've gone half blind putting in 82 nulls, and a few constraints
 so I put the cylinder in to see what it would do, and it did just as the tutorial says.
Don't know anything about steam lights yet though.
If anyone's interested in the tutorial, it's here:
-
I'm sure it feels like you're invisible in a crowded room
 but I haven't answered, because I know nothing, and I'm sure it's the same for others.
I'm working through the tutorial now, but it's fairly intense, so don't expect me to come up with anything soon. I'm up to creating the action in Part 1 - how far into it do you start having problems?
-
Further assistance required: I tried compositing the Giraffe into a Safari scene but cannot create transparent areas in the picture (TGA)
You'll need to create an alpha channel in external software for this. I use Photoshop Elements, others use Photoshop or Gimp or Paint Shop Pro. In Elements, I make a selection, then save the selection. When the file is saved as a tga, this selection is saved as the alpha channel, so the rest of the photo is transparent.
If you had that vehicle as a model in A:M instead of a photo, you would render it to a tga against no background in A:M with Alpha Channel turned on, so that the tga looks like just the vehicle, with a black background, that would be transparent when reused in A:M as a layer.
Nice giraffe - the only thing that you would want to avoid in the future is having a Control Point that has more than two splines crossing. Your back leg and your front leg have control points that have 5 lines coming out of them. This will cause creasing in more complex models.
Edit: Tutorial on Alpha channels:
-
Isn't this what flocking is for?
Cool effect, I hadn't realised you can use an animated sequence as a hair image.
-
I remember just how long that 5 seconds was.
Lovely expression in the "Why, Why??" bit.
-
Crankin'
You certainly are - thanks for my morning viewing
All looking good - (I'd agree with you about the overlapping action on the bunny ears).
-
There's a great grass tutorial at:
http://perso.orange.fr/ffave/e_herbes.htm
From there, you can change the photos to make different colours, and lengths. You can also tweak the length of the grass in the choreography, using the hair lengthening tool, and probably animate it there too, but I haven't tried that.
If you want different types of grass, you can use an image map for the hair, as described at:
http://www.hash.com/Technical_Reference/v110/Hair.htm
but that would be harder to make it bend in the wind, I think.
-
There's a couple of pictures of how to do this here:
-
Just above your post on the right hand side, on the same line as the topic title, there's an Options dropdown button. Click this, and you will see the option Print this Topic.
-
When I put a second copy of the particle emitter into the chor, I have not found a way to make the second copy of the particle emitter object's sprite emitter "rate" value change over time.
???
I used the cube from the primitives, using the top as the emittor. I dragged the cube into a chor twice, so in the Chor I had Shortcut to Cube, and also Shortcut to Cube (2). Using the method described above, I could set each of the cube's emittors independently.
(I don't understand the word "driver" in this context either. I shall have to go and surf.)
-
An avi movie to illustrate this - the main gotchas are clicking "show more than drivers" and also putting the interpolation to hold. These are shown in the movie.
Let me know if this helps - I'm experimenting with Camstudio - I am amazed that 21mb zips down to 1.8mb.
-
The first half of the tutorial is for grass, and the second for a sky dome.
You can take your own photo to get the colouring better. Change the length map for more even, short grass. If you want certain areas longer, and curling, then you can tweak the hair splines in the choreography to fit the scene.
You can also change the thickness of the grass over time, using the timeline, so that the bottom is thicker than the top.
I suggest you put the real time density factor down to 1-2%, otherwise your computer will crawl. Remember that Shift 8 toggles hair on/off.
-
That's a great angle - he's really bi-i-i-g!
-
Very good, Daniel -
Positives - good story, well told, great interaction, love the lamp-post and lighting.
Negatives - walk cycles esp. Rabbit's, being too fast then too slow; door slightly crooked; Shaggy's foot pointing behind him oddly; slippage in various forms - head, food - just needs refining of the splines in the timeline, which are beyond this exercise.
They are all small negatives - have you read Victor Navone's Splinophilia? That talks about spacing and timing. And that is probably the main area where this could be improved.
Media Player automatically downloaded a codec to view this one - do you have an objection to movs?
I'm watching too! (As are at least 45 others, even if they don't say anything!)
-
I am always amazed when I see this flag actually become cloth-like, with so little effort by the animator. It's one of my favourite exercises to look at.


Exercise 6: The Door's Stuck
in TaoA:M and the A:M Technical Reference
Posted
Hi, Roger - yes, that's what I mean - those lines are splines, so sometimes they curve when you don't want them too. I was searching for tutes - there's one by Robert Holmen that is called something like Keeping Bones from Wandering that I wish I could remember to bookmark.
But I also found one by me that I'd forgotten about, showing how to put interpolation on the curves:
http://www.popsyland.com/hash/shaggy.htm
I forgot that before trying this you must go to frame 0 and turn off the Balance and Balance Rigid poses.
This one isn't about channels, but about keyframing, and I had missed it before, and it's very good:
http://www.hash.com/forums/index.php?s=&am...st&p=197119