


Caroline
-
Posts
1,248 -
Joined
-
Last visited
Content Type
Profiles
Forums
Events
Posts posted by Caroline
-
-
Well that's one fine looking giraffe, Logrus - both ends are looking magnificent - congratulations.
You know, if you started again from scratch, I bet you would have no problems at all this time. Once you get the hang of spline modelling it's so elegant.
And I'm glad to be of help - I always learn something - this time I learned how to use Camstudio (and how not to use it!).
-
Ouch - they do that at my daughter's school, and it always worries me!
Tips - have you done the manual exercise exactly as is, just to check how it should be done? Because as Rodney says it should work.
It didn't show up as a lack in this great movie though.
-
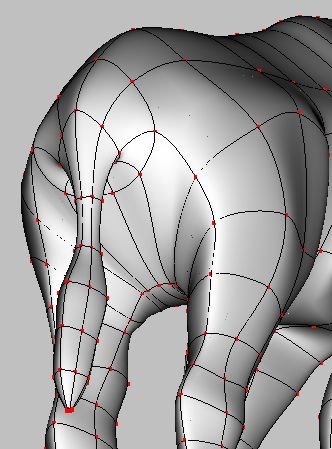
I have to say that the back leg is pretty horrible
 and is beyond me tonight.
You have a spline running right through the back leg that needs to be broken (the letter K breaks)
One way of telling which spline is going where is clicking on the spline, and pressing the comma key. That will highlight the spline so that you can track where it's going.
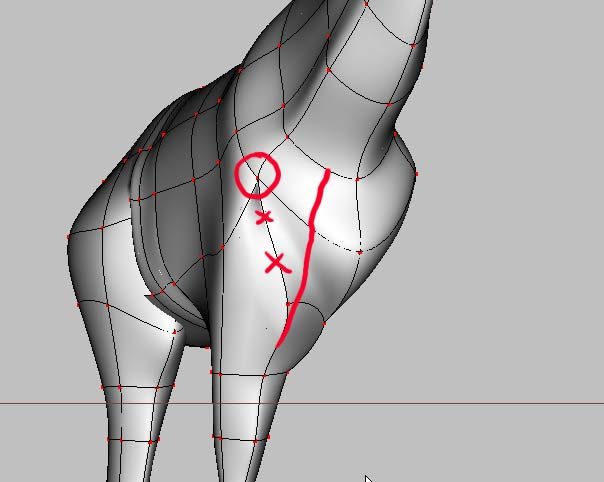
Actually, I don't think it is as horrible as all that, if that spline were in the right place - here's pics of my giraffe:
Bottom view with lower legs missing.
Let me know if you want me to have a look at it again tomorrow - it's a bit late here now.
-
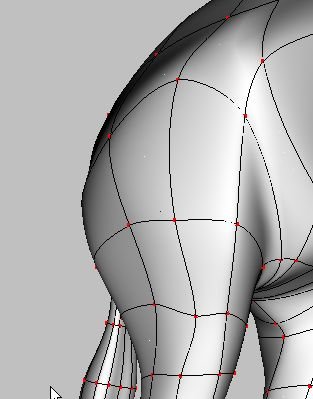
Let's start with the front leg.
You have a control point with more than 2 splines. (Ie 5 lines coming into 1 point) This will cause creasing. It's much better to have a hook here.
Second, I think that funny curly spline is wrong. You have 5 lines coming into 1 point again, which is a no-no.
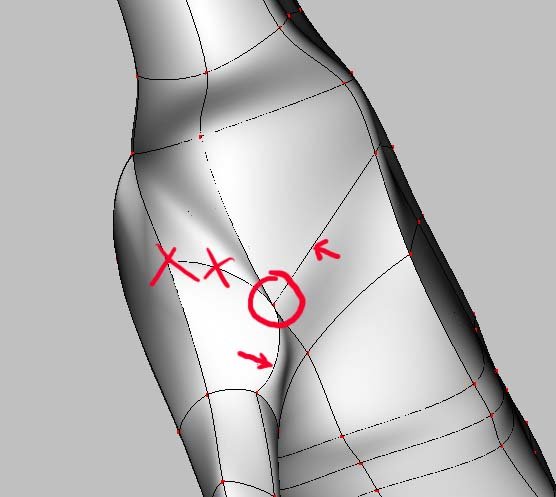
The 2 splines marked with an arrow, should be one continuous spline. You'll need to break the arrowed one from the curly spline, and connect it to the dead-ending arrowed one.
You'll probably end up with a couple of 5 point patches, but that's fine. It's a whole lot better to have 5 point patches, than to have a control point that's overloaded. (An optimal control point is a cross - one spline crossing another)
-
-Lightbulb- Ah - you probably don't have v13, and that's why you can't open it.
When I try and download your project, it appears to be mine, perhaps you could upload it under a different name, if you're still having problems.
Or take a deep breath and go fishing and come back later, and it'll be easy
. -
The rabbit was a rendered tga sequence from rabbit walk. So my images work.
Imported as an image sequence into a new project, then dropped on the chor as a layer, with the expression attached.
But I don't know if shaded quality produces a good enough image quality.
-
To use the .mdl, right click Objects in the PWS > Import, then import the .mdl file, and it will appear as a model in your project.
-
Onion Skin?
Edit:
That's not a very good example - Onion skin only renders in shaded mode.
It's got an expression - Image.Frame = GetTime() because onion skin needs keyframes.
-
-
There's examples of using the timeline for changing thickness (or colour or anything) along a length of hair in the online reference manual:
http://www.hash.com/Technical_Reference/v110/Hair.htm
(Not sure why it appears to be linking to 11.0 page, I went through v13 help, but it's the same anyway)
I vote for a 3d turkey.
-
I was really only teasing about the smile - I've tried, and all I got is a fearsome grimace, destined to scare the bravest child.
I too am enjoying your progress.
-
That turned out really well. The walk slides a bit, but you were adventurous trying out a skirt. That's not cloth is it?
Can she smile yet?
-
That looks fantastic. The texture is very realistic.
Where the light hits it looks maybe a bit smooth, and the texture is lost. Without knowing anything about it, is this maybe a case for a reflectivity map?
-
Well done on the FW - my advice on the giraffe would be just as you did on the plane. When you get stuck, go out and fish for a while, and then it gets easier.

-
There is an XnView plugins page at:
http://perso.orange.fr/pierre.g/xnview/enplugins.html
Download the exr.zip, extract the .dll file and put it in the XnView plugins folder.
XnView now reads my openexr file fine, but I'm not sure if it'll do anything else with them.
Thanks for the dll pointer, Richard.
-
How do you mean "come out". Do you mean latheing?
If you follow the manual exactly it should work. There are a couple of tutorials on latheing - the tire is a torus shape:
http://www.hash.com/amtutes/basic/LathingTorus.htm
and Rodney's Advanced Latheing:
http://www.hash.com/forums/index.php?showt...lathe++tutorial
Or do you mean materials?
Specifics needed.....
-
I thought the timing was good - I didn't compute what was happening. I did think he was a bit too close.
I liked the music and fonts.
Tail definitely goes through bucket.
I thought the www.uberanimator.com was right in the middle of the action - can it be moved down at all?
-
-
It looks like your CPs are locked.
Click the padlock on the right hand toolbar, then they should be unlocked again.
(I like the name of the gun
) -
You could try the links in this thread:
http://www.hash.com/forums/index.php?showt...&hl=boolean
Great bevels tutorial from Yves Poissant here:
-
What about AM TerraForm?
-
She's cute - was she thrilled to see herself?
What Rodney said about the smile.
Happy birthday, Ralf's daughter!
-
Change the view - when you put in a light it always goes in at ground level, and if you stay in camera view (1 on the numeric keypad), dragging up and down moves it forwards and backwards. You can use the up and down arrows for fine tuning in camera view, so it will go up and down.
But the easiest way is to go into side view (4 on the numeric keypad, or 6 for the other way) and then you can drag it up and down easily. 5 on the numeric keypad gives you a top view.
Remember to go into the camera view (1) before rendering, otherwise you will render the specific view you are currently looking at.
-
In the PWS (Project WorkSpace) Image properties, you can change the transparency colour of an image. For example if you wanted the white color of an image to be transparent, you would choose white as the Key Color. If you do not want any colour to be transparent, you have to change the Key Color of the image to Not Set:
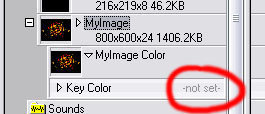
Only the exact RGB color that you choose as the key color will go transparent - if you still want the white around the shapes to show, you will have to change the colour very slightly so that it is not the same as the key color. Cute coloring by the way.
(If you are running 13.0p or 13.0q, you will not see the key colour as in the picture - but if you download v13.0r it is there.)


Exercise 16: Smoke, Wind and Fire
in TaoA:M and the A:M Technical Reference
Posted
That looks fine - if you ran the movie for another couple of secs, it looks like that heavy white smoke is going to sink out of the witch's cauldron. A gruesome dish.
Have you tried Help menu > Reset settings? The manual, if all steps are followed exactly, (and sometimes it's very easy to skip over some), I had no problem following.