


robcat2075
-
Posts
28,261 -
Joined
-
Last visited
-
Days Won
404
Content Type
Profiles
Forums
Events
Posts posted by robcat2075
-
-
It looks like that had not made it into the v15 build. Likewise for the scale to x=0 menu option we used at LAT.
You can try the primitives plugin on this page... -
John Purcell introduces functions, a form of reusable code.
When you invoke a function, that causes the program to depart to another portion of your code, execute it, then return to just after the original function call.
This first lesson on functions does not yet consider the important function return values or function parameters, but those are coming.
Sample lesson idea:
Copy the code of your Case and Switch program into a new C++ project and modify it to print the opening title and explanation via a function that is called, rather than having those hard coded into the main() loop of your program
If your Case and Switch program didn't have an opening title and explanation... invent one for your function to print!
-
She has a slow reaction time! 😄
-
 1
1
-
-
Here's the same animation but with a somewhat-better-fitting shirt.
-
The pre-roll when the model un-shrinks into the cloth looks like this...
-
 1
1
-
-
I think he's reclining and we're seeing his underside there.
like the guy drinking the wine...
This is him upright and in motion. The tail is a tail...
-
Remember "Goofy Grape"?
-
Here's another one...
https://forums.hash.com/topic/42423-exercise-11-geeeeraff/?do=findComment&comment=372103@Pizza Time That was the wrong link. Correct link...
https://forums.hash.com/topic/33529-avoiding-dead-end-splines/
-
1
-
-
That looks promising!
I thought the big long thing on him was like the tail on a slug and was behind him. Maybe I'm wrong on that?
My first suggestion is to respline the mouth corner so it is not an actual corner but a U-turn instead. You can quickly terminate the new spline (highlighted) with a hook.
If the mouth opening is one continuous loop it is easy to extrude it inward when you want to make the inside of the mouth.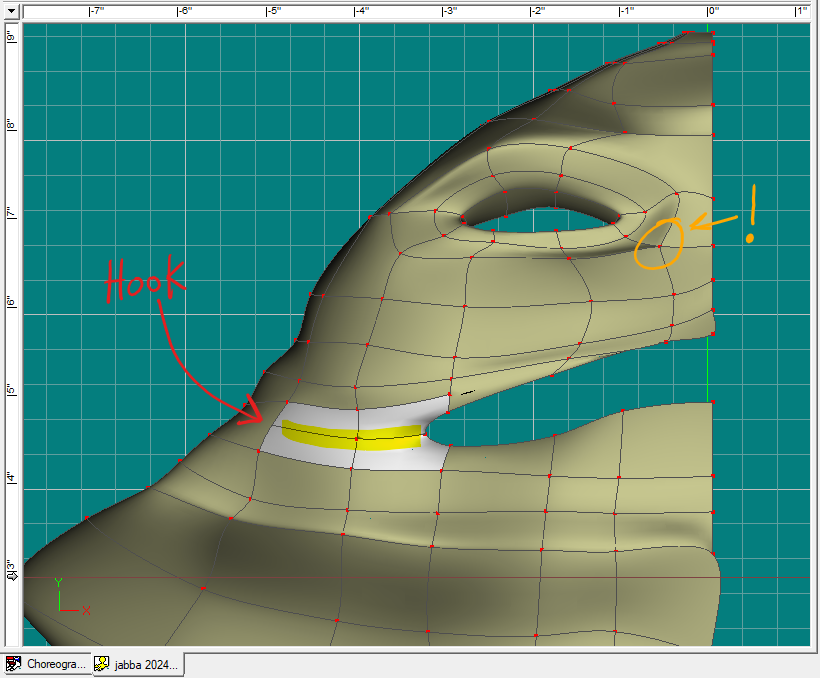
The part I circled in orange has a dead end spline. That will want to be fixed with some combination of five-pointers and hooks.
I have a video about one user's dead end spline. It's not exactly the same situation but it might be helpful...
https://forums.hash.com/topic/42423-exercise-11-geeeeraff/?do=findComment&comment=372103
-
 1
1
-
-
Version with SimCloth added at top.
-
1
-
-
Good C-curve!
-
1
-
-
Festive New Year Greetings to all the Animation:Master users!
Update: The cloth simulation I didn't quite get working on New Year's Eve...
-
1
-
 2
2
-
-
Wonderful work, Bobby! Have a great 2024!
-
On 12/26/2023 at 7:55 PM, Pizza Time said:
oh sorry hahah my bad
I've you'd like that we should look at a scene at LAT, save a PRJ with all the models embedded, put it in a ZIP and send it to me in a PM before we get started.
-
1 hour ago, Pizza Time said:
hmmm oh ok what's LAT?
-
One more Merry Christmas, John!
-
Lighting is a whole topic in itself. Perhaps if you brought a shot to LAT we could look at economical ways to light it better.
-
Merry Christmas, Yopp!
-
Happy Christmas wishes to everyone!
You can find me in this year's Trombone forum collaboration...
ccc
-
1
-
-
To make an orthogonal camera that sees a 8.5 inch wide view we can use this equation
width in cm = 200 * (100/focal length)
or width = 20,000/focal length
Algebra leads us to this equation... focal length = 20,000/width
convert inches... 8.5" * 2.54 = 21.59cm
We want a view width of 21.59 cm
20,000/21.59 = 926.35
inputting a focal length of 926.35 into the orthogonal camera creates this view which does appear to be 8.5 inches wide
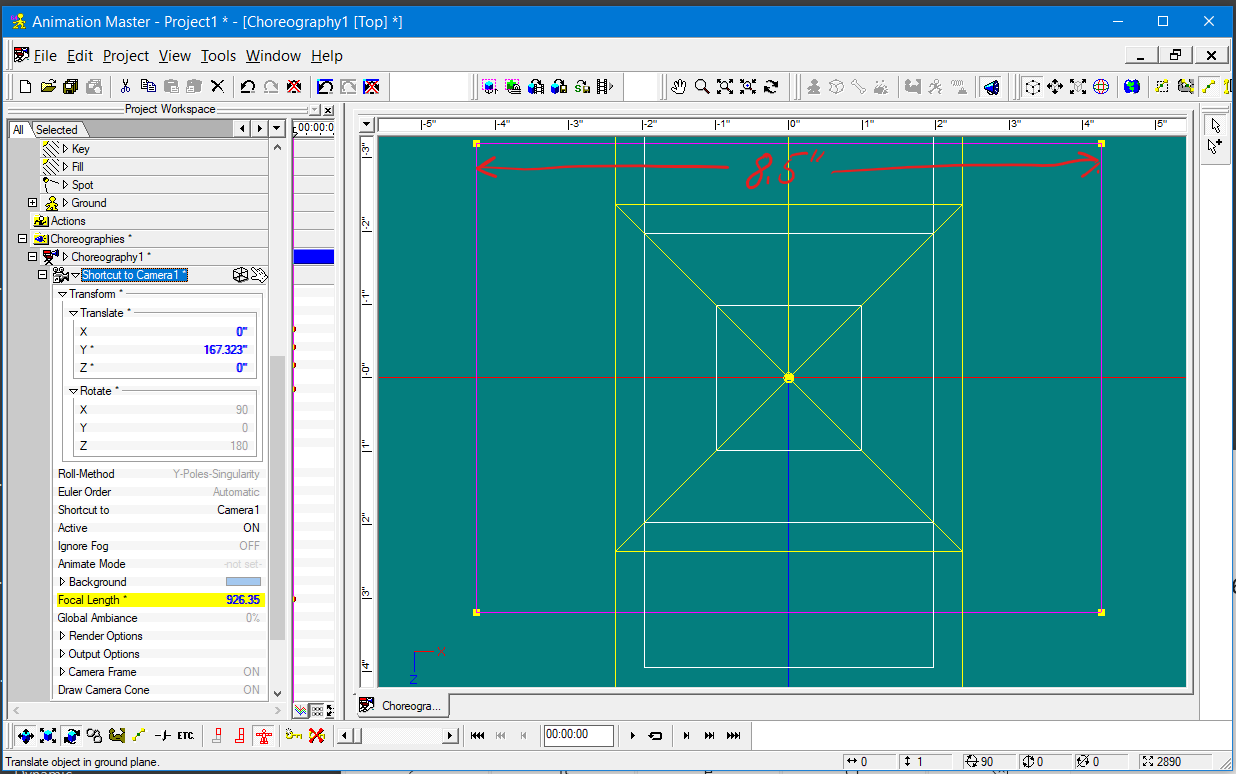
You can put any pixel resolution into the camera and it will not change the width of the view.. The focal length is what changes the width.
If you put in a 2550 pixels that will render the 8.5" wide view with 2550 pixels.
However... A:M tags all renders with a DPI of 72. You will need to take the A:M render into a photo app that can alter the document's DPI setting as shown above and set it to 300
-
What program are you printing from?
The DPI of your printer doesn't matter.
What matters is how many DPI your document believes itself to have.
Here are two JPGs printed out.
Both are 100 pixels wide but they print out at different sizes because they have different DPI information as part of the data stored in their JPG file format.
And I don't even know what the DPI of the printer is.
-
Kevin asks...
Quote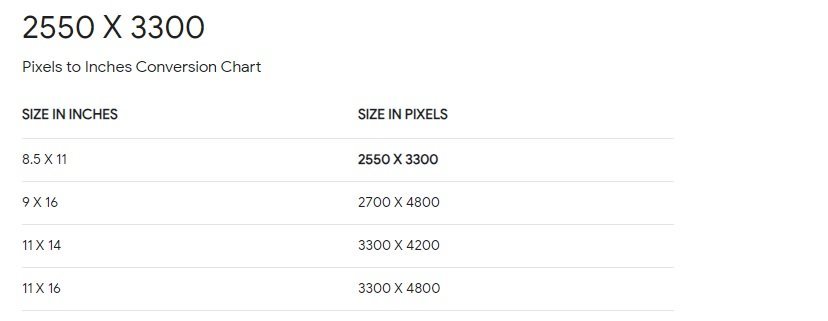
That chart presumes a standard of 300 dpi. But modern printers often do more... or less. The original Mac printer did 72 dpi? Laser printers do 1200 dpi and yet print 300dpi documents appropriately, without shrinking them to 1/4 their intended size.
That is why the document you are printing needs to contain its own dpi ( or ppi) data so the printer driver can interpolate your pixels to the printer's dots.
QuoteAccording to that chart, 8.5 x 11 is equal to 2550 x 3300 pixels.
So how could this be rendered in A:M with Ortho. camera setting?
Could I set the camera like below I wonder. An Orthog. Camera at 100 focal length
and then set to 2550 x 3300??

The orthogonal camera set to "focal length" of 100 always sees a width of 200 cm (100cm on each side of the center) regardless of the "resolution" that is set.
2550 pixels spread across 200 cm is only 12.75 per cm or 32.385 pixels per inch.
More to come... -
The short answer will be to take the render from A:M into a photo app that can set the document's "pixels per inch" value such that the number of pixels in your image that represented one inch are now thought by the Photo app to be an inch's worth of space when you go to print.
In Photoshop the dialog looks like this. Notice that "Resample Image" is OFF. We do not want this operation to change any pixels.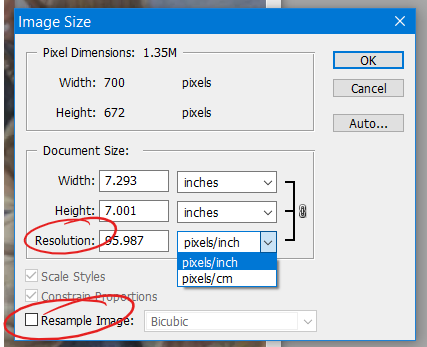
A:M can produce a render with a known number of pixels per centimeter of model space by shooting the object in a chor with a camera set to "orthogonal"
It turns out that an orthogonal camera set to ANY resolution where width and height are equal and has "Focal length" set to 100 will have a field of view that is 200 cm by 200 cm
I have not tested this but I believe that means the width in cm of the field of view will equal 200 * (100/focal length)
-
Do this...
Possible TSM2 script error
in TSM2 - Rig
Posted
This is largely a note to myself.
While researching another bug, I noticed in TSM2...
1 - a constraint that has "none" as a target. That should not be.
2 - the line of the TSM2 script that creates that constraint indicates the target should be "...toe IK tagger"
3 - However, the line of the script that creates that bone names it "...toes IK tagger" (plural)
Perusing the script, it seems that all other references are to "toes" plural, so #2 is probably the error.
I am surprised that the script has been working all these years. In my experience, when a TSM2 script encounters a bone name that doesn't exist it either crashes or stops executing the script.
So that's another mystery.
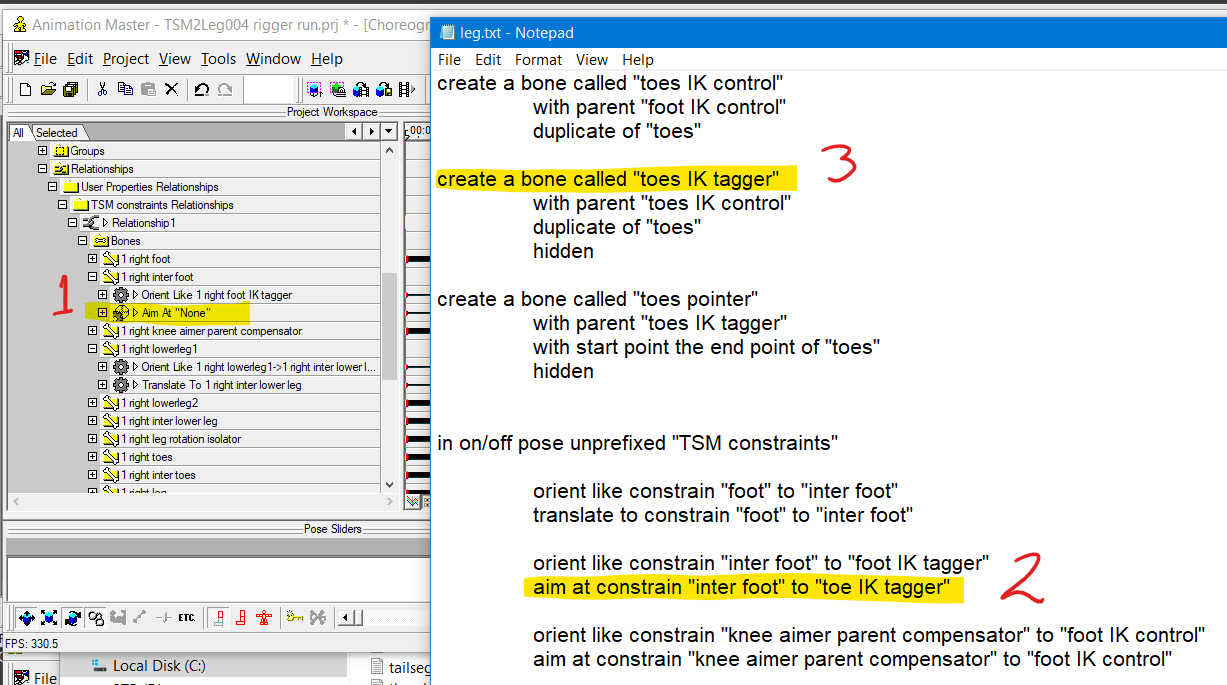
update: "1 right inter toes" also has a broken aim at constraint