largento
-
Posts
3,827 -
Joined
-
Last visited
-
Days Won
31
Content Type
Profiles
Forums
Events
Everything posted by largento
-
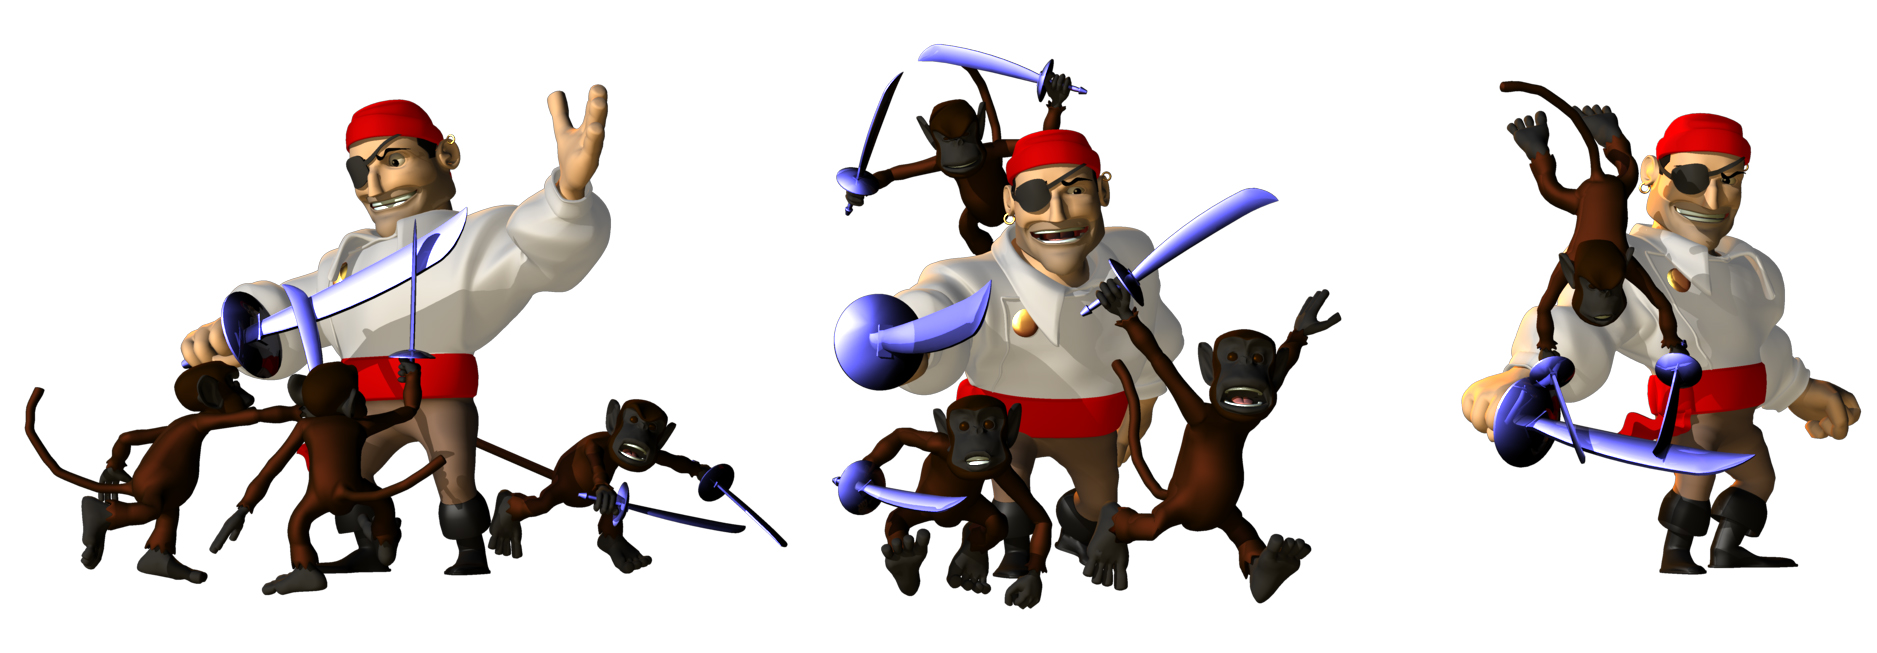
Been having fun today working on an over-sized strip for Tuesday. This one's all Flemm sword-fighting with monkeys... :-)

-
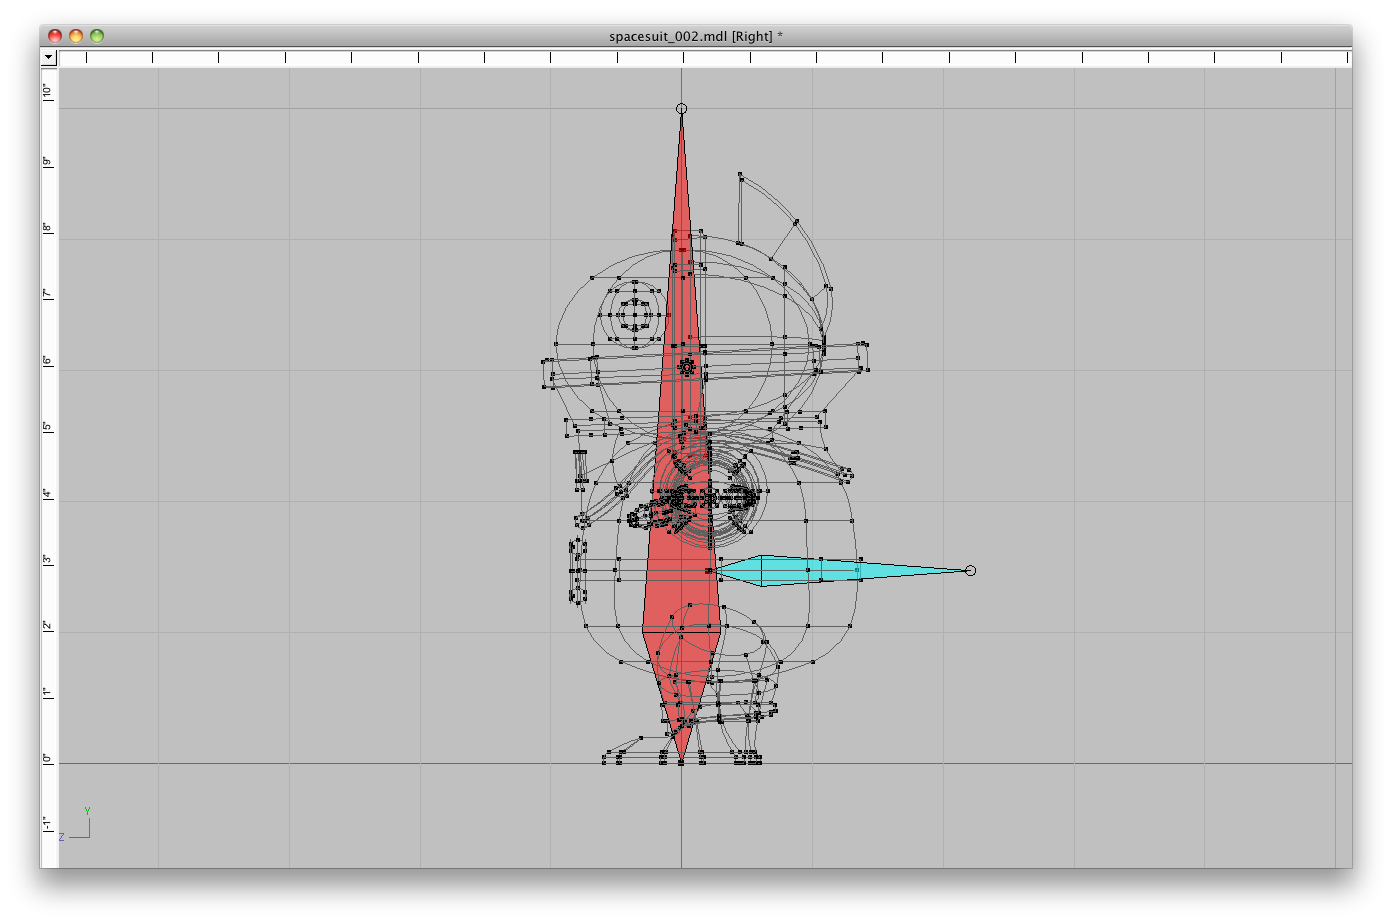
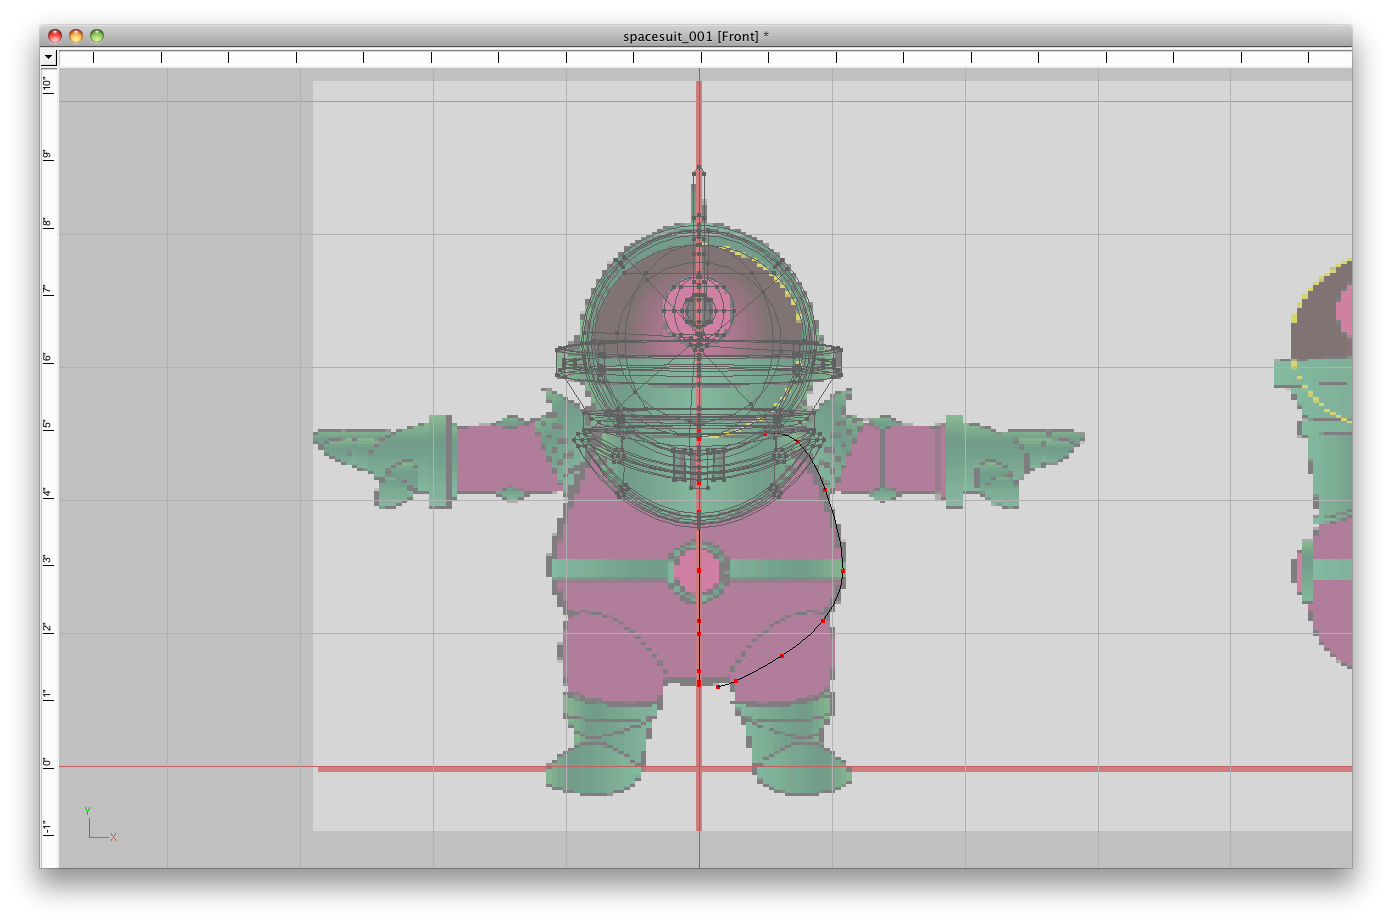
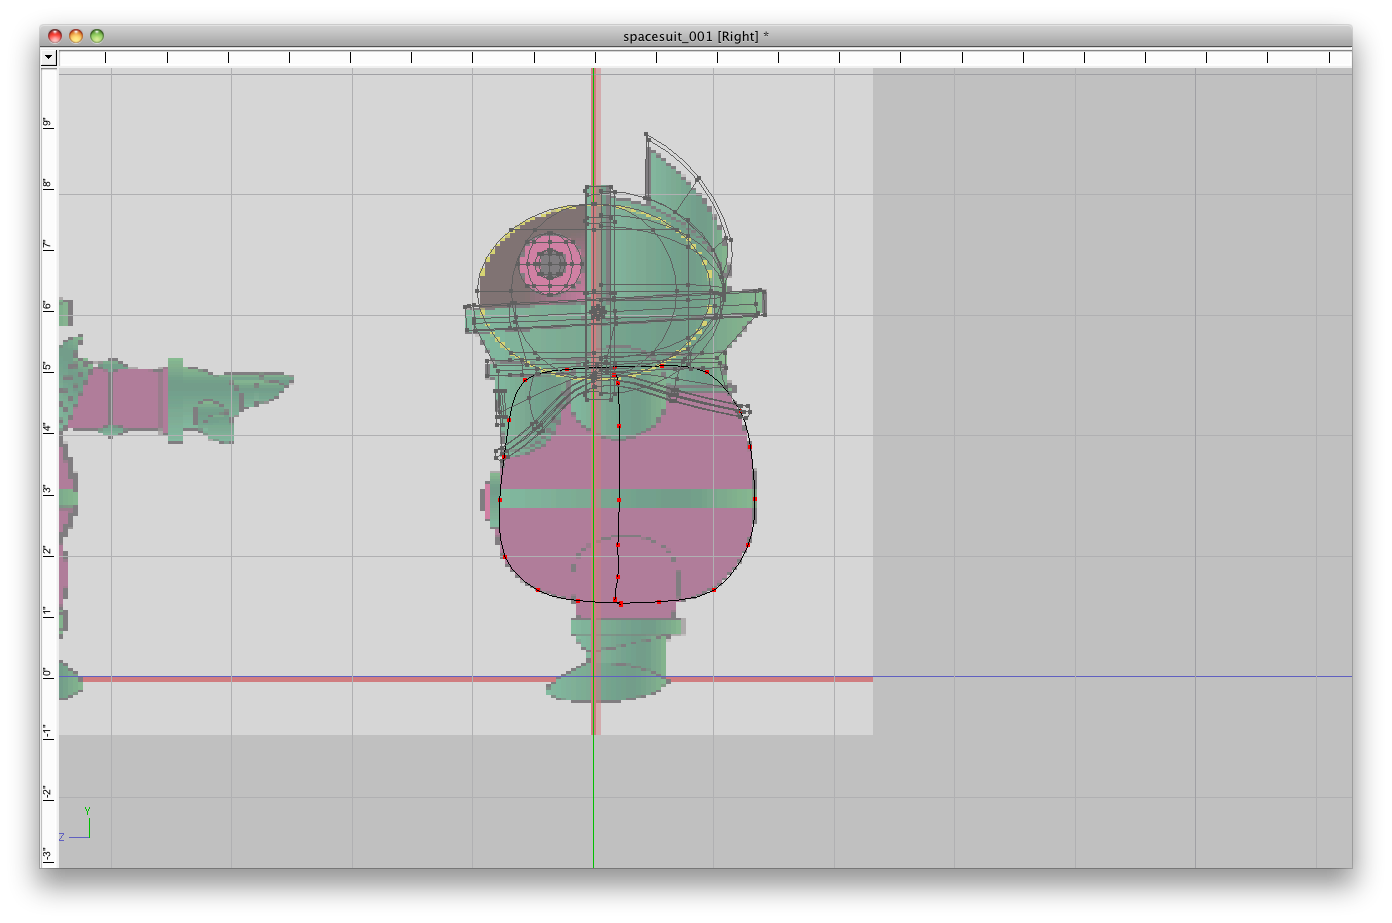
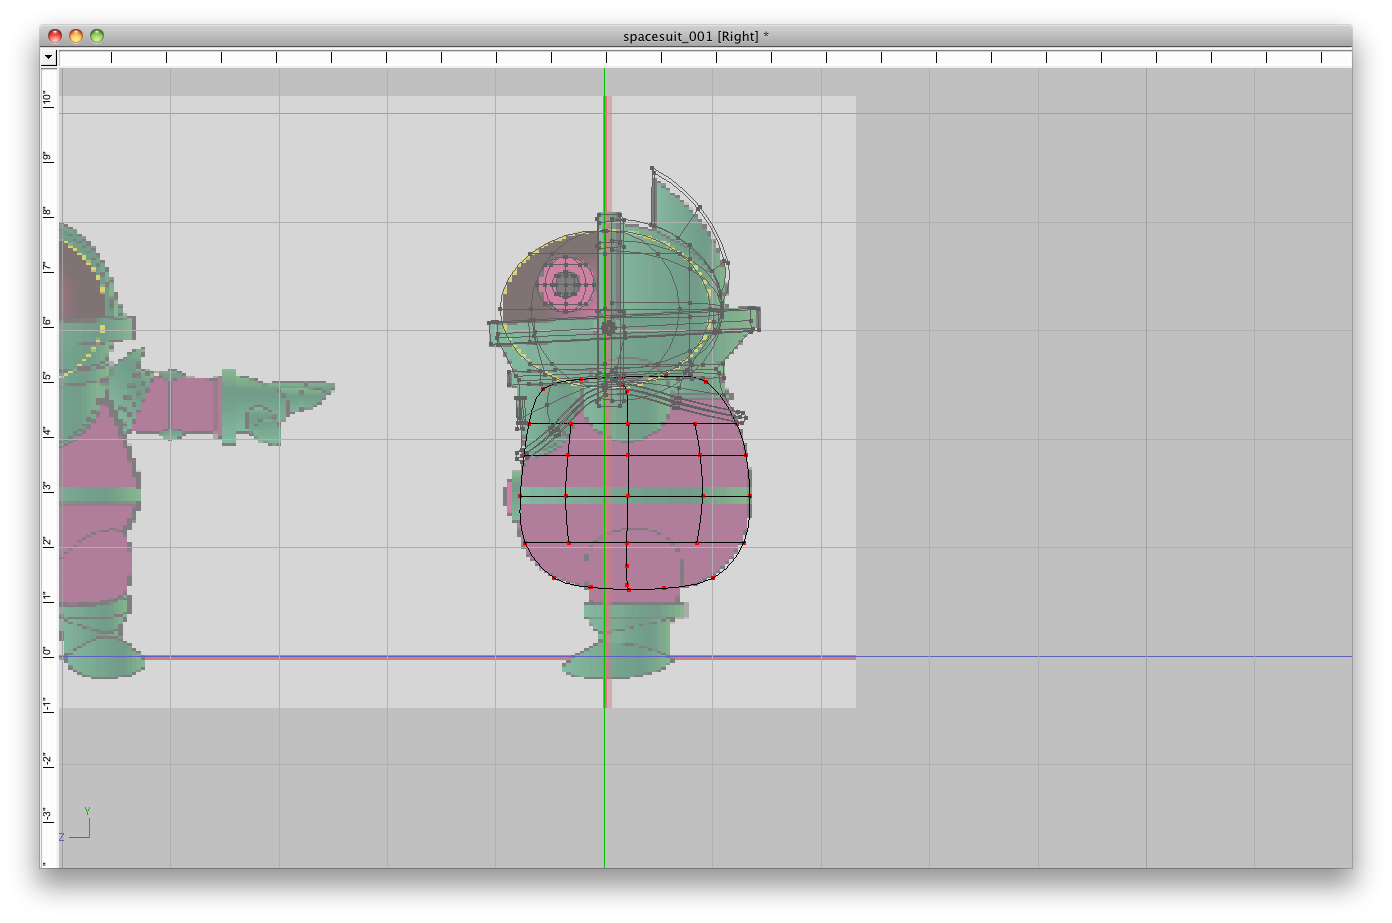
Thanks, Jimd! Okay, here's a quick overview of a *very* simple rigging for the character. This doesn't have any of the cool bells and whistles of the rigs David and Mark and others have built, but it's easy enough to do and for my character's needs, it was sufficient. I start off, with one big bone, I name "Main." It will be hidden, but the other bones will be children of it. From the Main, I create the "Body" bone. I'm having to supplement some of the screenshots, that I didn't make. From the Body, I created a couple of spine bones running up to the head. Also from the body, I create the Pelvis bone and the leg and foot bones (thigh, calf, foot and toes). Note that they will be created in the center of the model. You'll need to switch to the front view and use the translate tool to move the leg bones over into place. Also remember to add "left" to all the bone names that will be mirrored onto the other side of the body. From the Spine bone in Top view, I created the bones for the arm (shoulder, bicep, forearm, hand and the finger bones.) To keep the character simple, I modeled it to only have one joint in the fingers. Again, you'll need to switch to the front view and translate the collection of bones up or down to match with the arm's geometry. For my floating eye piece, I created a bone called Eye (parented to the Head bone) and then made a null that I scaled down and placed in the exact same spot. In an On/Off Pose, I constrained the Eye bone to the null. That way I can move around the null to move the eye. I also added another bone from the Head called Visor that by rotating the handle, will rotate the visor of the helmet. Finally, I went through and attached CPs to the various bones as needed. The normal process is that I select the geometry I'm going to attach to a bone and hide the rest of the geometry in model mode. Then when I switch to bones mode, all I have to do is select the appropriate bone and draw a selection box around everything. There were a few spline rings that needed to be weighted between two bones, but not many. With one side complete, I used the Mirror Bones plug-in to create the rest of the rigging. This is by no means perfect, and like I said, it's nothing fancy, but this allows me to pose the character to the extent that I need to. I'm not going into great detail (after all, this is only a *semi*-tutorial), but this is the basics of starting a rig. From here you can create additional cosmetic bones and then create control bones that you have the geometry and cosmetic bones constrain to in a pose. If you keep in mind how you want things to move and how best to attach the geometry to bones, you can greatly simplify the process. Hope this helps a little and inspires you to give character modeling a try!
-
Thanks, Darkwing!
-
Thanks, Andy! Definitely see it in 3D! Personally, I do not think it is the best movie I've ever seen, but I did enjoy it greatly and it really succeeds in taking you to another world. I recommend it highly!
-
Great looking model, Jirard!
-
It hardly seems possible, but this Monday, February 1st, will mark The Wannabe Pirates webcomic's 2nd anniversary! I'm going to put up a blog post about it on Monday. As part of the celebration, we're going to have a drawing for two cool items: a 20" x 30" poster of The Wannabe Pirates and a signed copy of the original 1997 graphic novel, "Greyhawk and the Starbucklers of the Caribbean!" See the blog post on Monday to find out how to enter the drawing! I think we've finally got everything in place and this third year will hopefully be our best year yet!
-
Thanks, everybody! Despite the terrible weather yesterday, I had a great day! I enjoyed Avatar even more the second time and my friend said that it might be the best movie she's ever seen (she went in with very low expectations.) Now back to The Wannabe Pirates. I've got to write next week's strips... I blink and I'm behind again... :-)
-
Thanks, Matt! I think we're a day apart... (mine's the 28th). Rodney gets to start his days waaay earlier than us. :-)
-
Thanks, everybody!
-
Thanks, Al! It was fun doing it this way! I realize this is probably the least organic of any of my characters, but the process I used on the torso is pretty much how I do everything on an organic character. Create those two outlines and then work on filling 'em in. 'Course, normally they include limbs or mouths and eyes which makes the process more difficult. :-) This was good for me, too, since it put me on a deadline and gave me the extra push I needed to get him done! And thanks, too, Rodney! I'd hardly accept "master," yet, but all of this is done in service to the story. I'm starting to feel more comfortable taking on the harder stuff. I can't wait until a couple of years from now when I *really* know what I'm doing. :-)
-
Thanks to all of you!
-
Thanks! I took screen captures of the rigging, but am going to wait and do the write up later. Here's me playing around with it... :-)
-
Thanks, gentlemen! Gonna' celebrate tomorrow by going to see Avatar again. :-) I'll drink to that! :-)
-
Can you go for another walk and make it about a 4 or 5 hours long? :-) Thanks, Nancy!
-
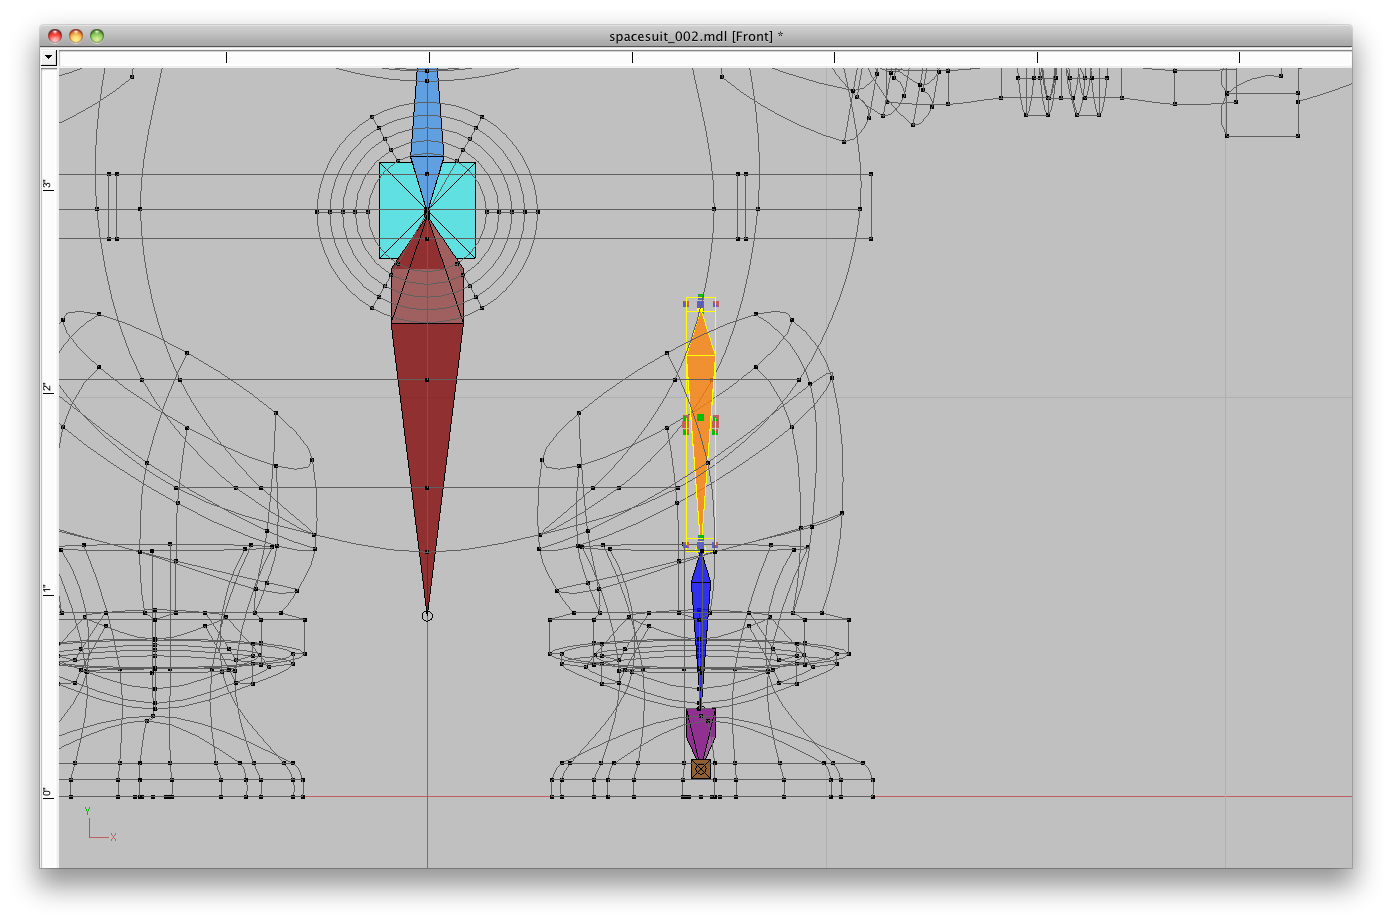
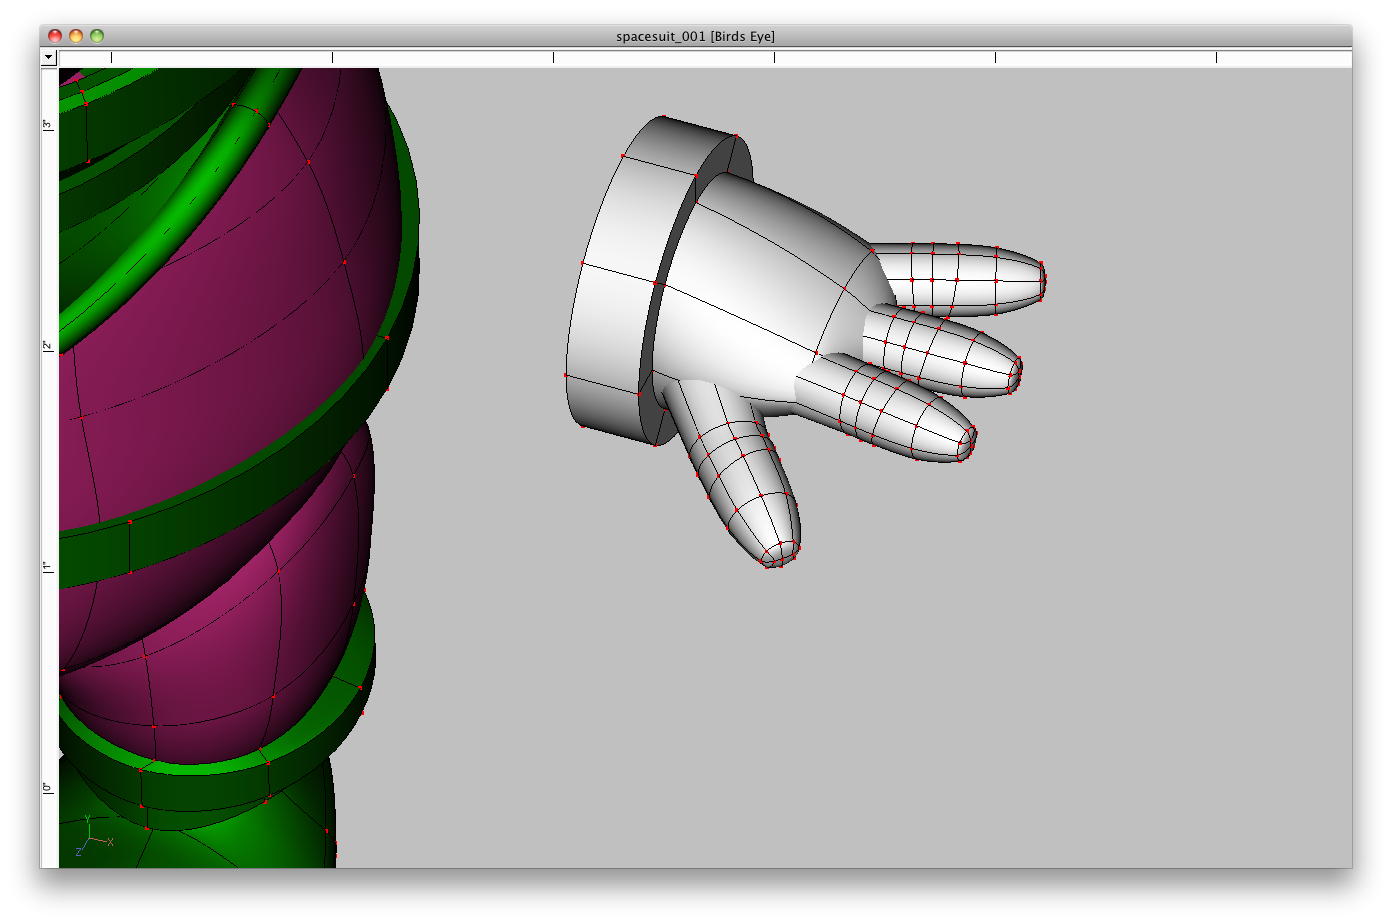
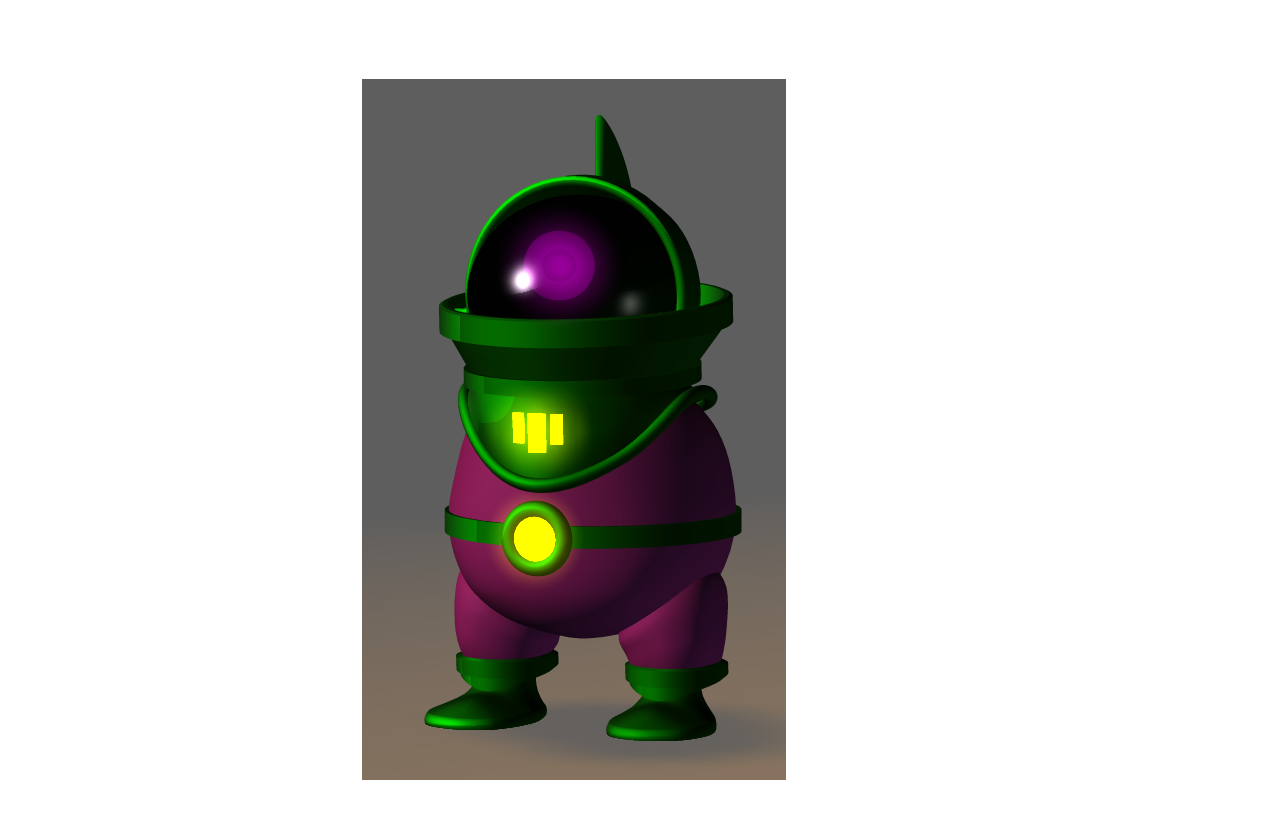
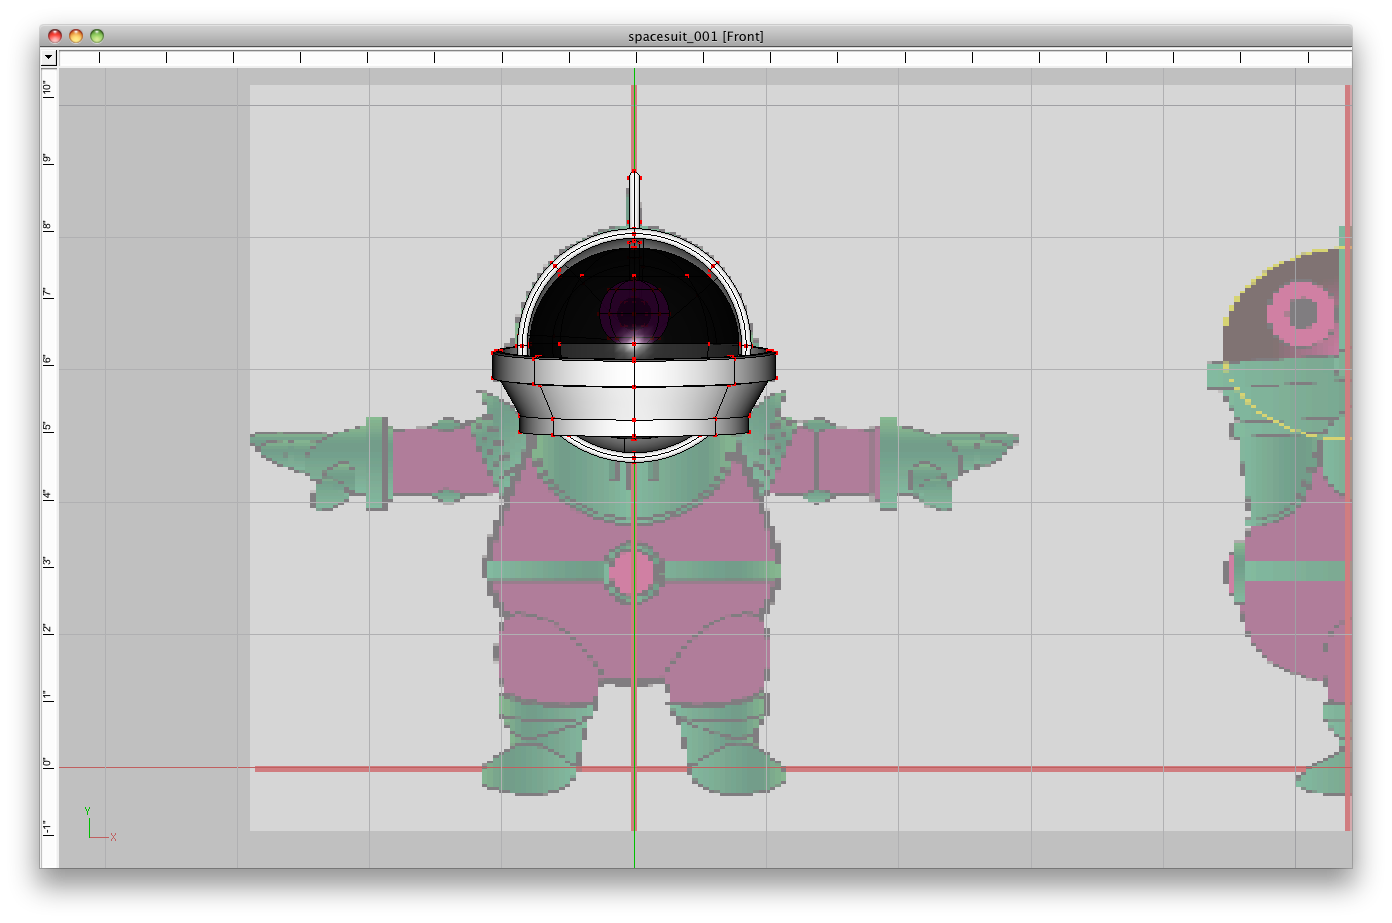
Okay, rushing along, the arms! To create the gloves, I mostly used circles again. I may change my mind later, but for right now, I've chosen just to stick the fingers on like sausages. :-) A big directive for me on this model is that it be easy to rig, so the gloves are separate from the arms and the arms themselves have been divided into parts. Here's the elbow piece. Rings of splines set up so that they can move with the bend. Then for the shoulder, I've created these shoulder rings (made one and then copied it and scaled it for the two others), which will work similar to the elbow. Because of how the helmet turned out, I chose to lower the arms so they wouldn't conflict with it. And here's basically the completed model. There's a couple of things I want to play with and I haven't added his backpack yet, but I've got to stop now and get ready for dinner. Here's another quick render... When I get back from dinner, I'll do the simple rigging. [EDIT] Forgot to mention that I've placed Flemm in the choreography for scale.
-
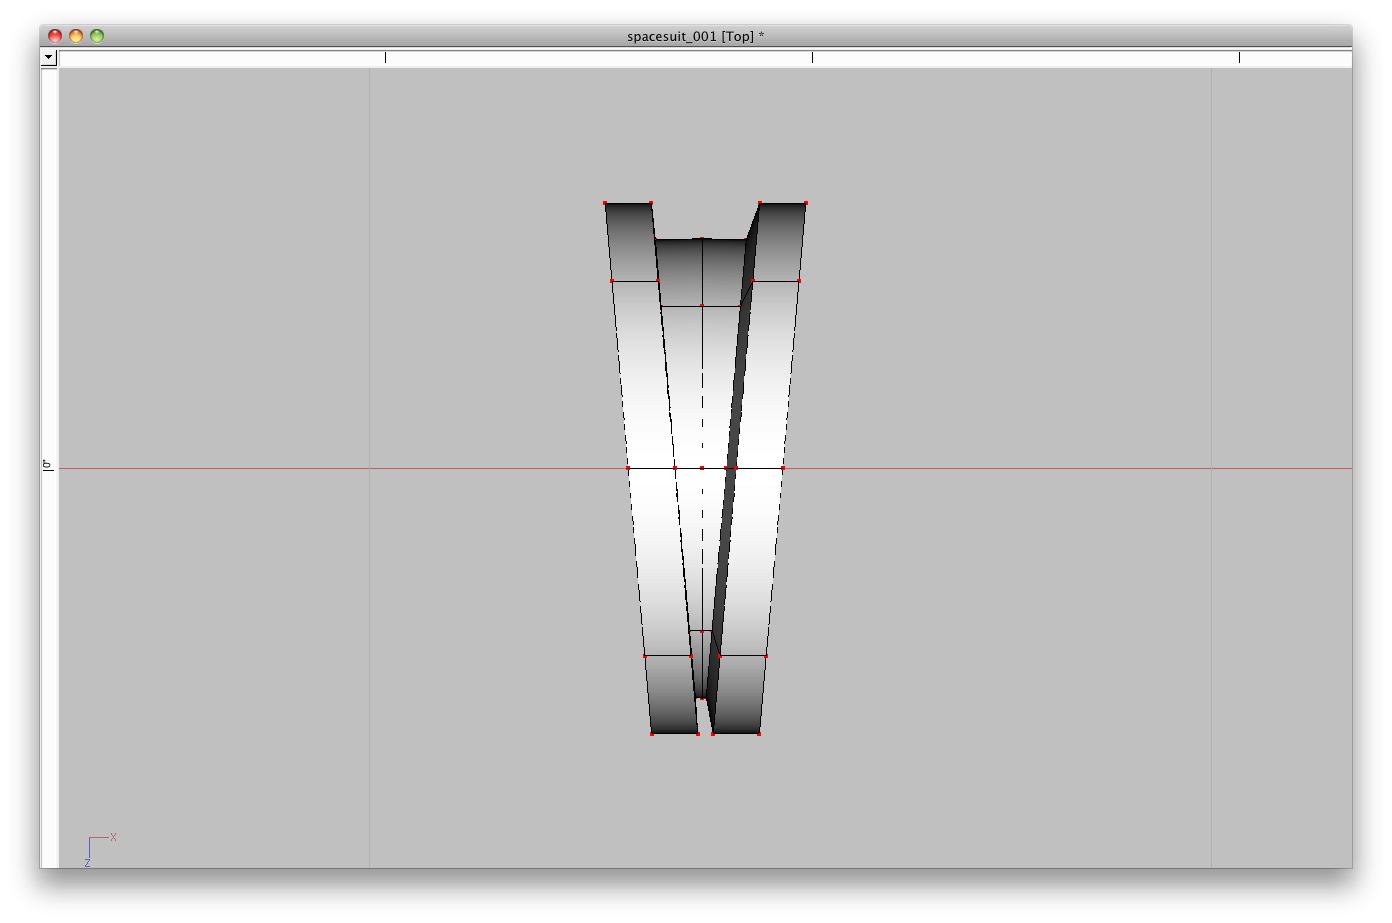
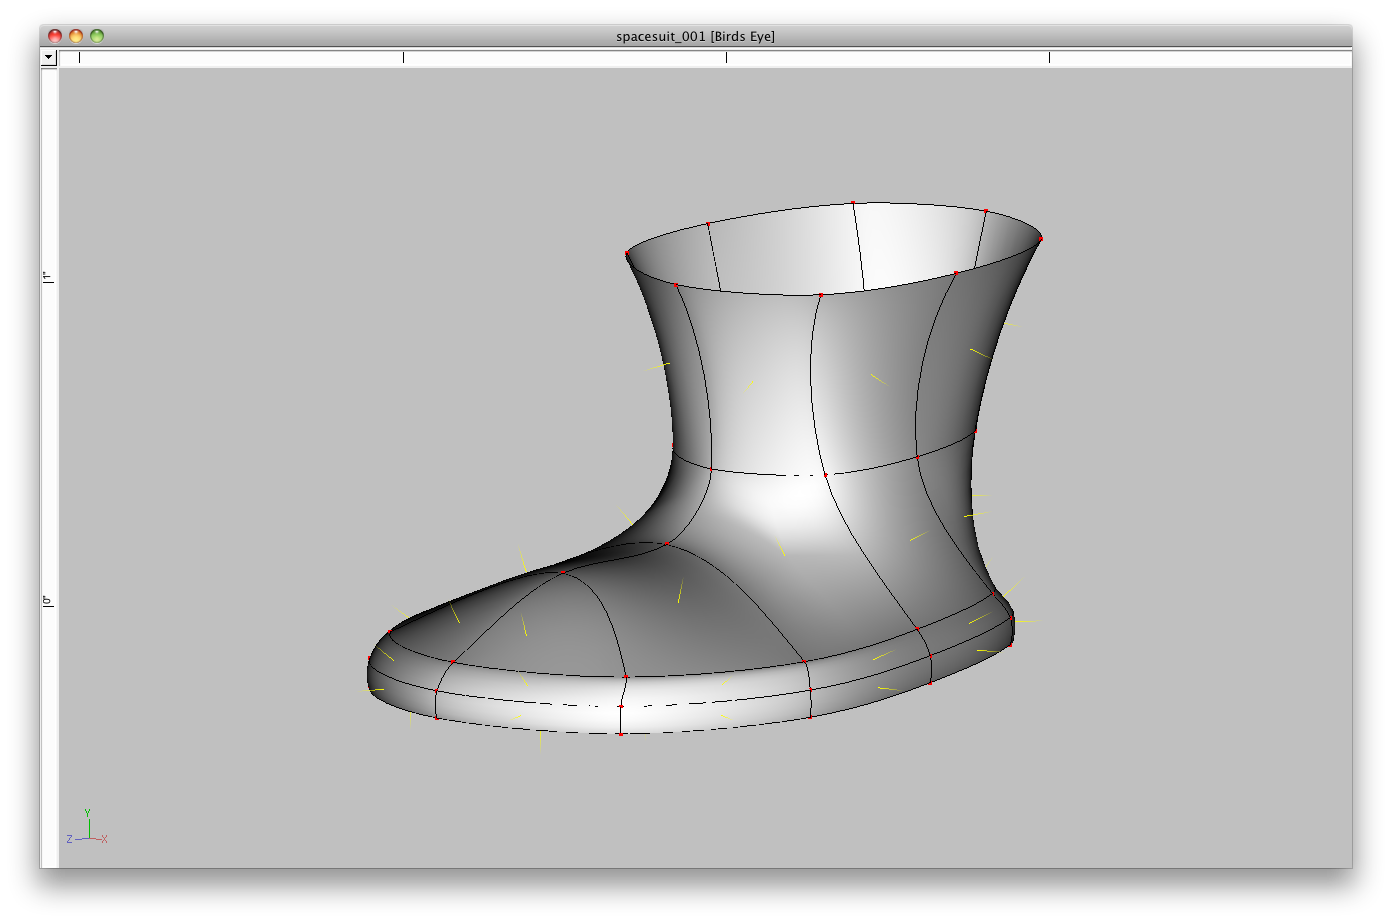
Thanks, Steve! Okay, quickly rushing past the legs... The legs are mostly just cylinders and I spend some time shaping them. For the foot, I drew the outline of it with a spline and placed that below the leg. To create a simple foot, I extrude up once and then create a circle for the ankle and work to create the inbetween. Trying to keep this model very simple to rig, I'm separating the upper leg and lower leg into two pieces. This is how they come together... And another quick render showing the progress.
-
Thanks, Gene! Onto the torso! I start off by drawing splines to outline the side and half of the front. I then hold down the 3 key to drag the front spline into place on the side. Now I begin connecting them, adding or deleting CPs as necessary. Once I've got them done, I select each cross spline in turn and zero out the y-scale to make them straight. With that done, I use the y-key to add CPs between the vertical splines. I then connect them with splines. I change my angles so that I can see the curve of the cross splines and use the new CPs I've created to make the curves more round. I then go back and connect the last of the splines, keeping the cross splines level. I then do a copy/paste/flip (I attach it manually) and use the mirror tool to make the bottom and top curves round. And that gets me to this... If I can stop getting distracted by all the stuff around Apple's iPad announcement, I can get this finished today. :-)
-
Thanks for the encouragement, guys! Myron, the piping is just there... and I used the original sweeper path as the bottom of the apron. Any movement of the head won't include the bottom part, so I'm not afraid of the apron breaking through the piping.
-
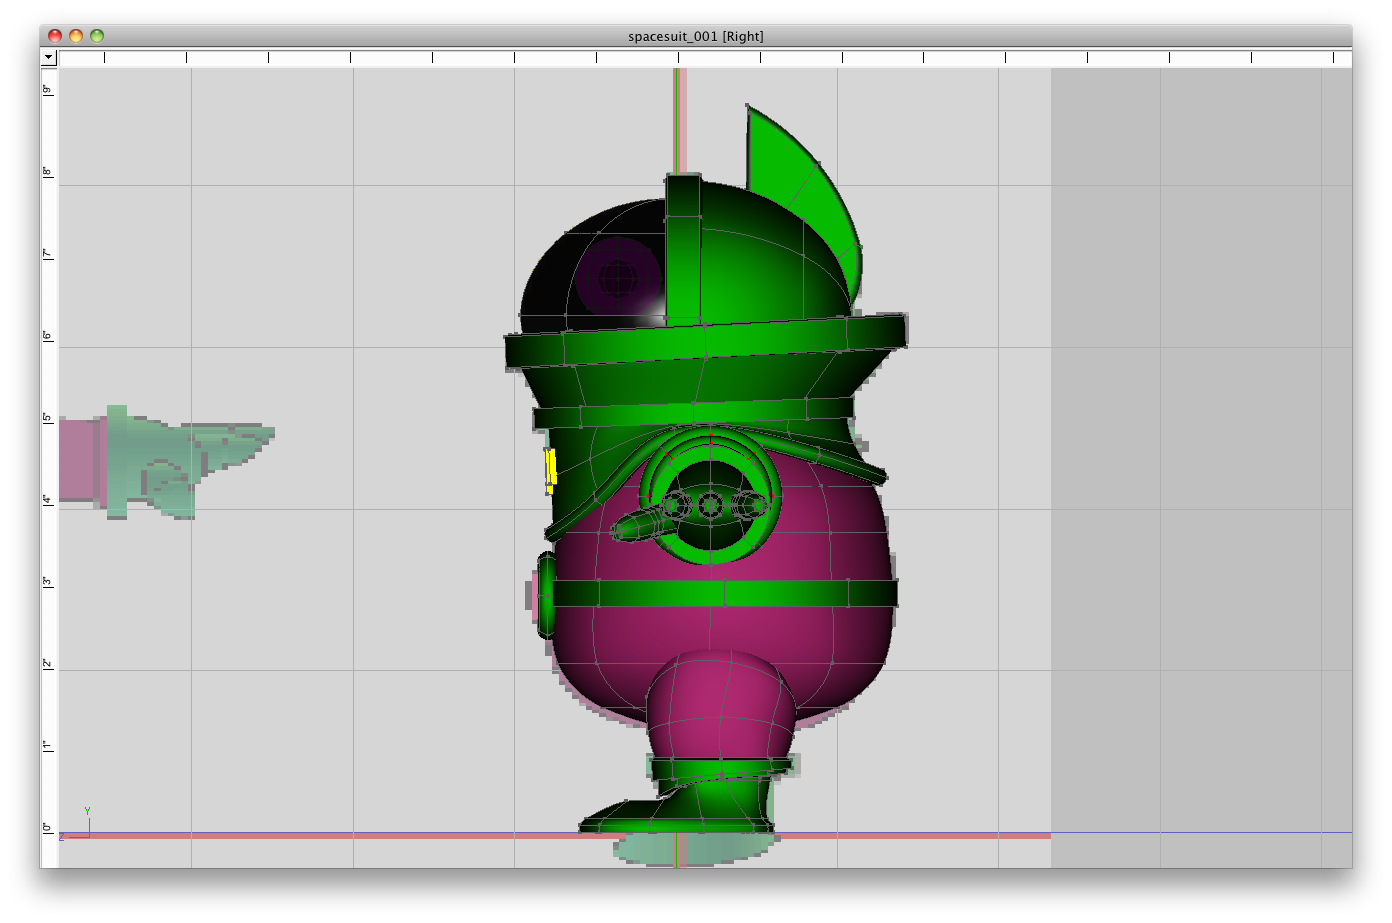
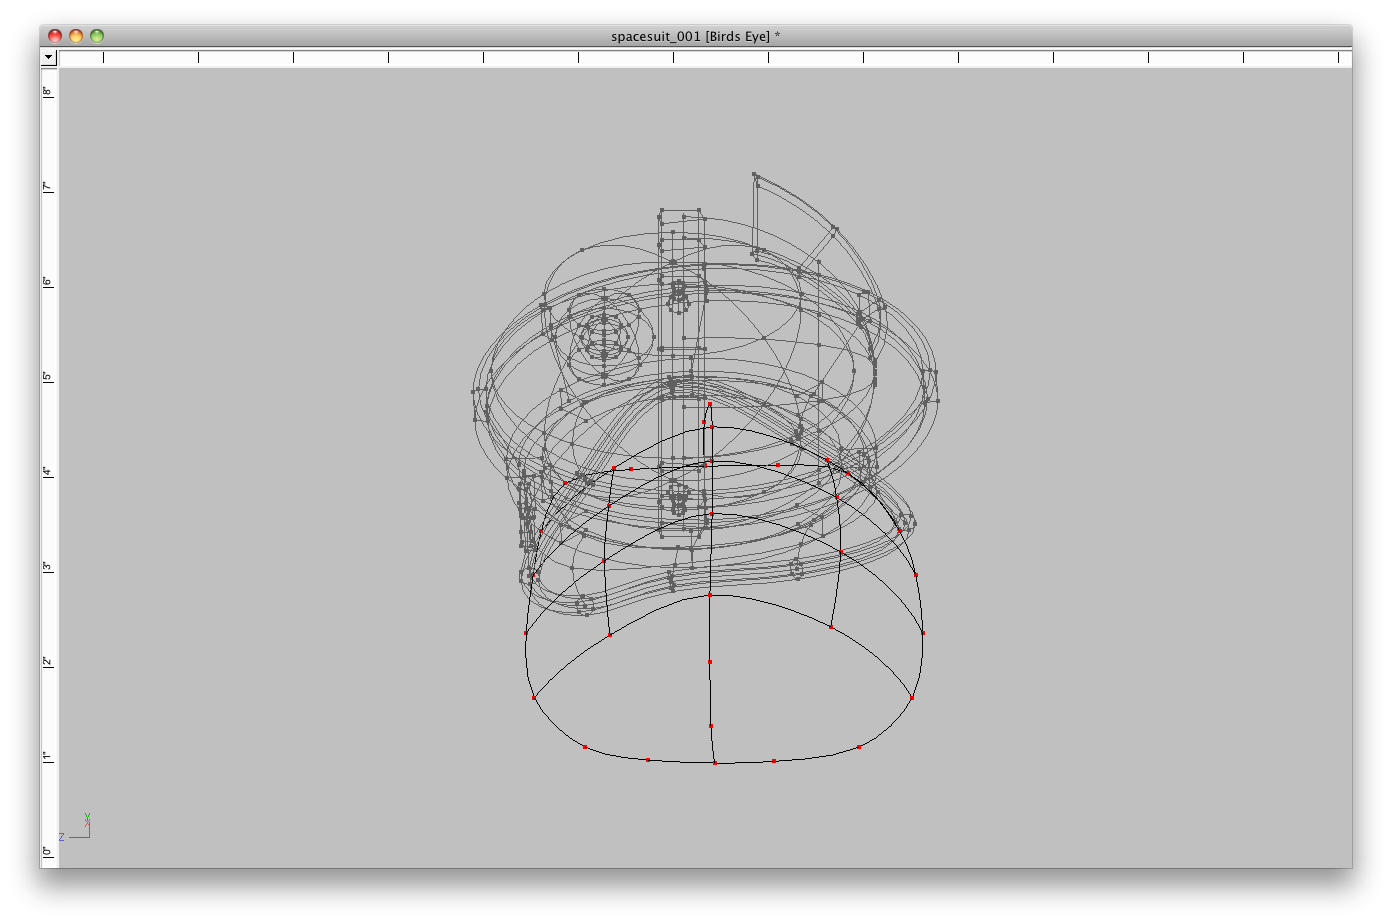
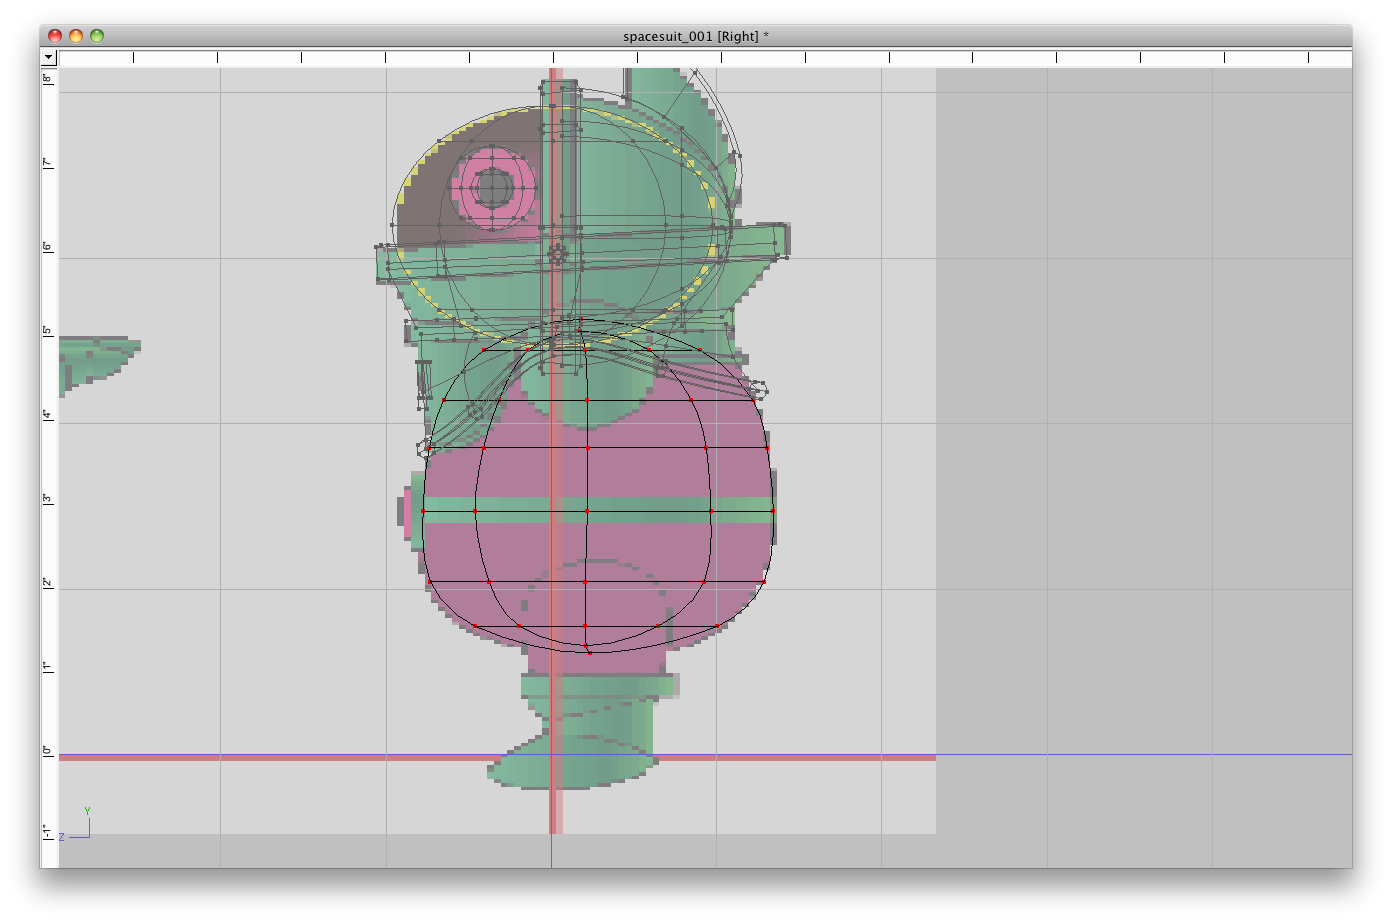
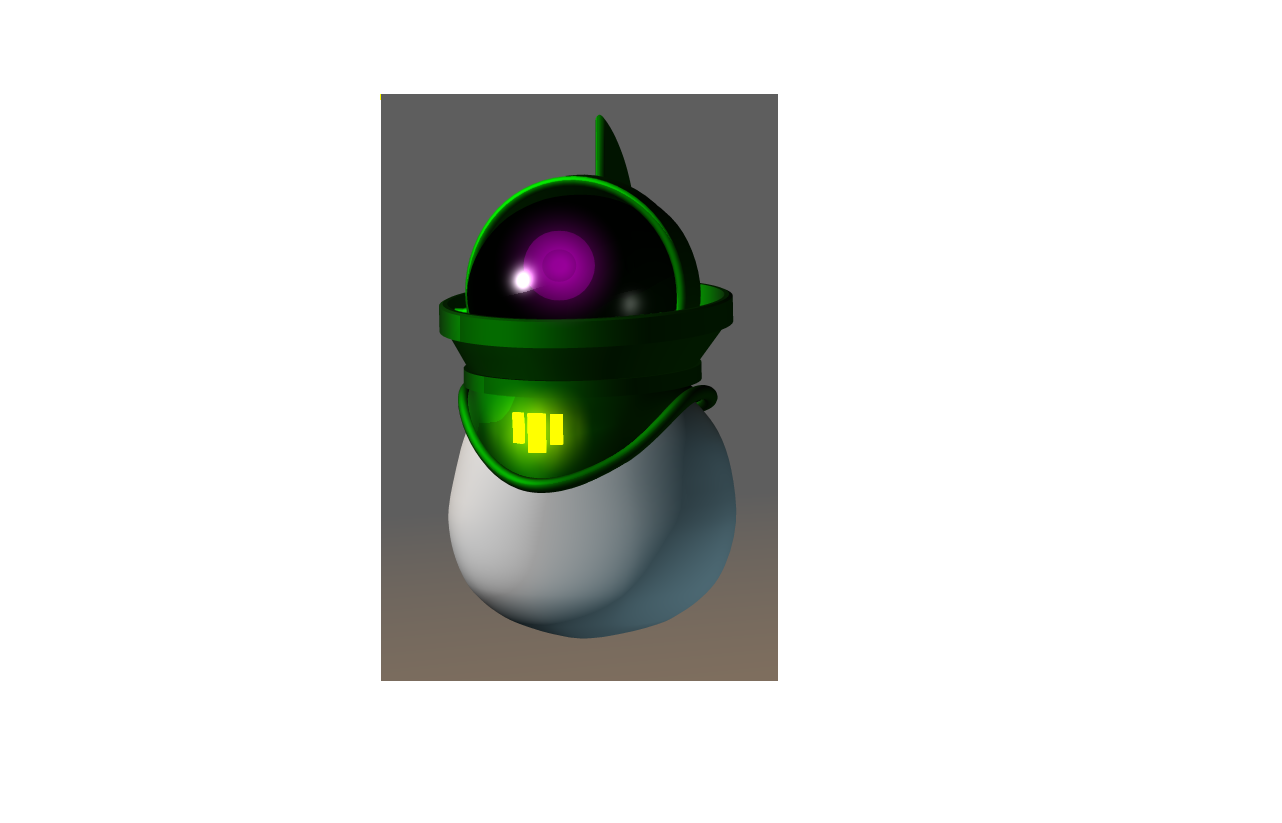
Okay, let's do this puppy! :-) I got up this morning and started with creating the rotoscopes. I find that my drawings are always very asymmetrical, so I work in Illustrator, creating one half and then copy/pasting/flipping to see how it looks. I tend to cheat some on the side-view, just to get it moving. I'm making the model for me, so I give myself permission to stray from the rotoscopes. I do the front and the side on the same image, so that I don't have to worry about scaling issues from the two views. You'll be able to see that I indicated in yellow the shape of the eyeball, to make it easier to create. I also gave some thought to the coloring. Once they are in place, I add some transparency, so they aren't overpowering. Normally, I work on one half of the model only, but in this case, since most of the helmet parts are circles, I modeled the helmet whole. Starting with the spheres for the "eyeball" I distorted the shape of the spheres to match the rotos. I used a combination of transparency and glow to create the effect I wanted. From there, I moved onto the rest of the helmet, which is mostly made up of ellipses. As I create these shapes, I use two methods: I extrude if I want to keep continuity (and have curves) or I copy and paste and then stitch together if I want it to be straight (and have edges.) For the piping along the bottom of the helmet, I created a circle and then using the mirror tool, shaped it into the shape I wanted. I created a circle to use as the cross-section and used the Sweeper plugin to create the piping. And here's where I'm at right now (before stopping for lunch): And here's a grab of a quick render in a choreography...
-

Mac - Camtasia or Screencasting Studio?
largento replied to higginsdj's topic in A:M Tutorials & Demos
The new Quicktime player also allows you to trim video for editing, but yes, most of these don't have editing tools built in. -
LOL, Gene! That's pretty awesome! I'll take it as high praise that you were so inspired! And I thought *I* was fast. :-)
-
Mac - Camtasia or Screencasting Studio?
largento replied to higginsdj's topic in A:M Tutorials & Demos
I've not used Camtasia, but purchased Screenflick a couple of years ago and like it. (It's only $25, too!) Additionally, there are: Snapz Pro for $69 iShowU HD ($59.99 for Pro, $29.99 for base app) and Screenflow for $99. Chris Been did a course on Screencasting with the Mac over at Lynda.com and takes it more formally than most of us would. -
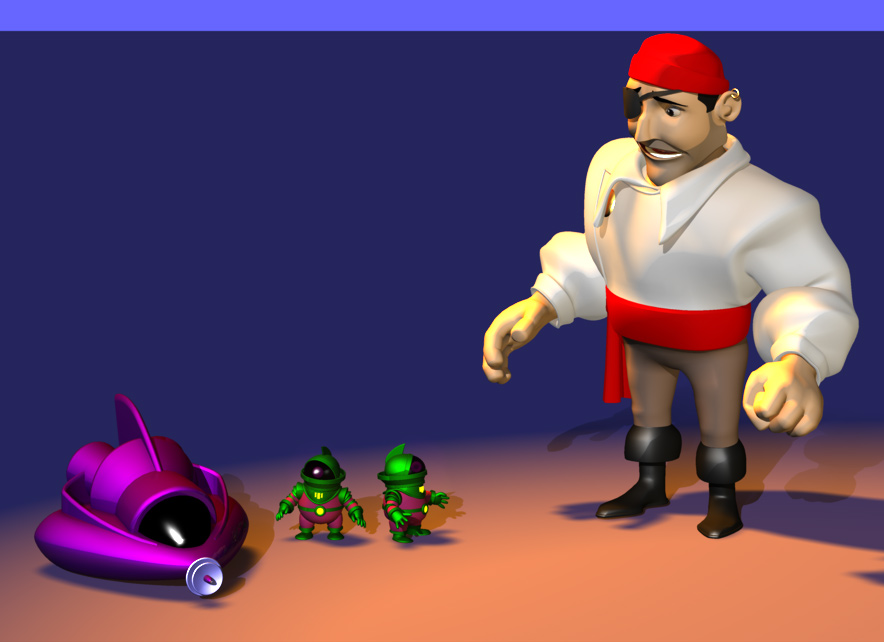
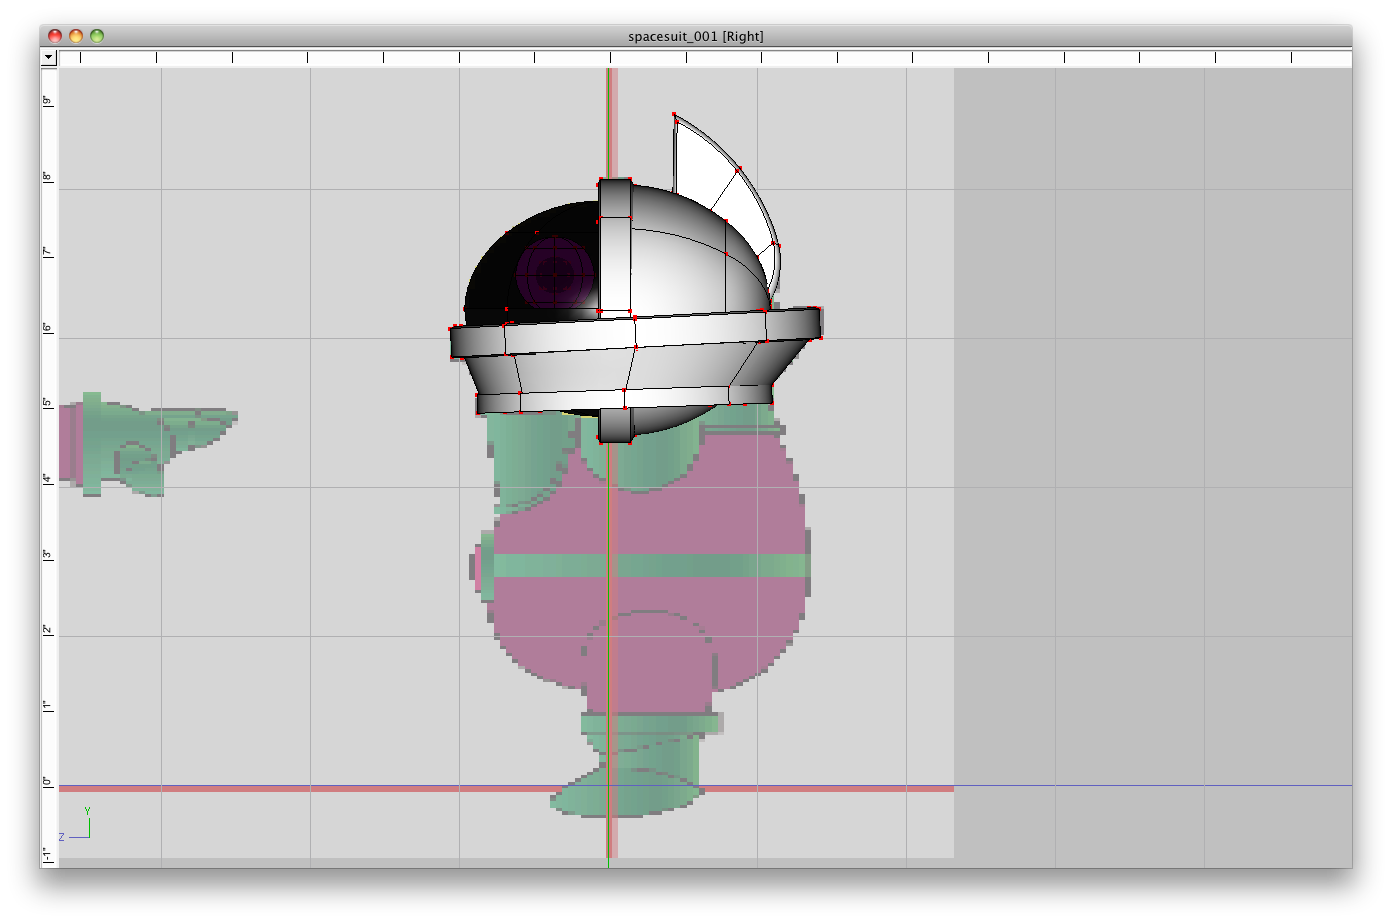
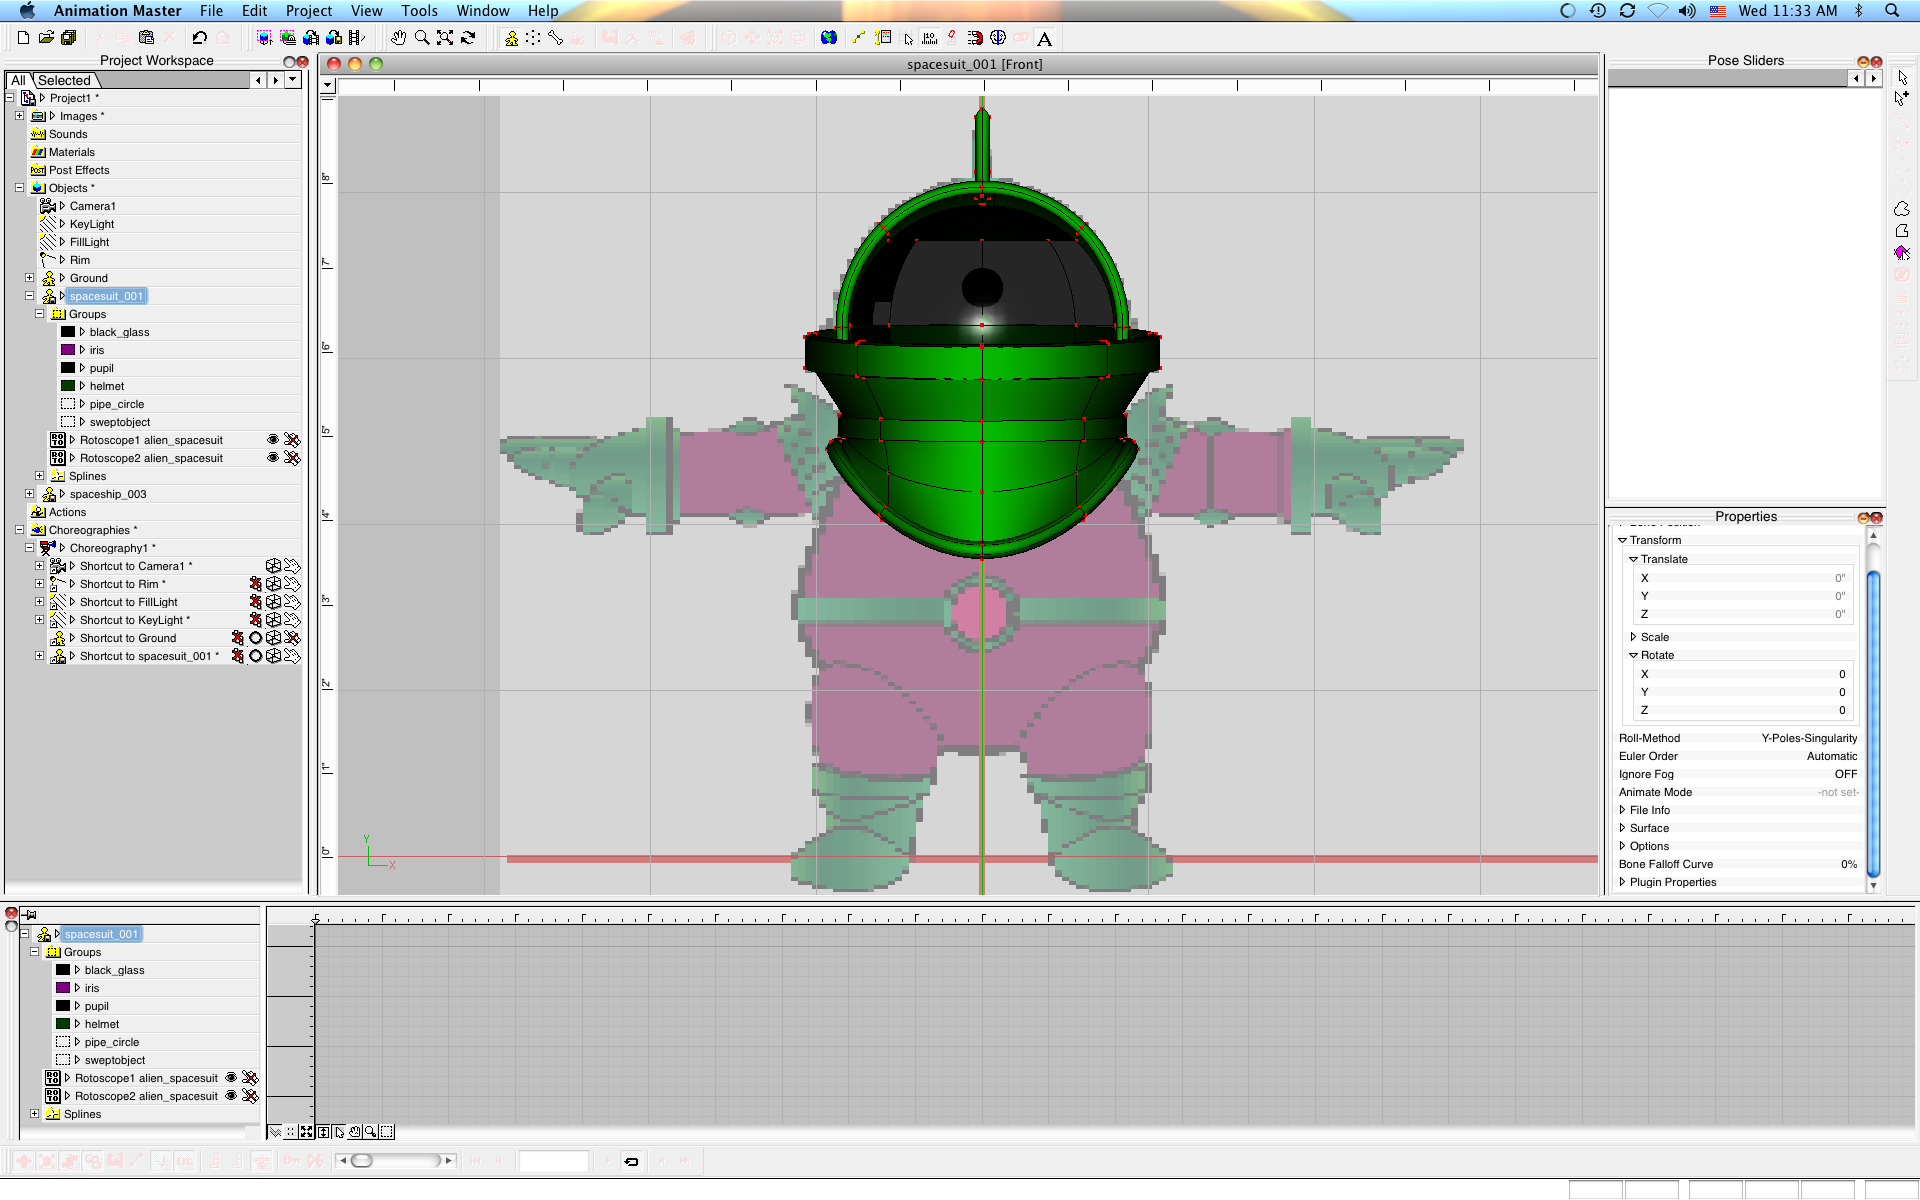
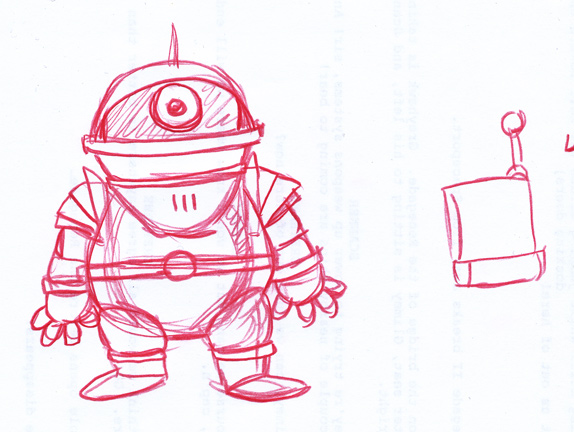
Hey all! Doing the Wannabe Pirates webcomic in A:M has meant a *lot* of modeling, but modeling is probably the aspect of using A:M that I enjoy the most, so that kind of works out. I thought it would be fun to do one of the characters out in the open and sort of make a sort-of tutorial as I go along. This character is going to first appear in strip #72, which will be online on the 10th of February, but I'll actually work on the strip the Friday before, which is the 5th. So it'll have to be finished complete 9 days from now. (I won't actually spend that many days working on it. In fact, I'm hoping to only spend *one* day working on it.) Here's the rough sketch that I did back in July of the character: The design was a bit of a compromise. The aliens are supposed to have big appetites, but McCrary really wanted to see an alien with one big eye. Not sure why, but that's the compromise. :-) I decided that they would be in spacesuits and that the eye would just be a part of the spacesuit and we'd hold off seeing what they really looked like for awhile. Even though it isn't the style of the Greyhawk graphic novel, I really wanted to make the sci-fi aspects of this story very classic sci-fi ...the kind you would see in old kids' comic books. Knowing that I wanted to keep the rigging simple for this, the space suit will be mostly be made of rigid parts that don't bend. That's the idea, anyway. Let's see how it goes from here. :-) Today's a "writing" day, so I probably won't work anymore on this today. With luck I can knock it out tomorrow, but I'm going to take screenshots along the way to show the process. Hopefully it'll be interesting to somebody. :-)
-
Thanks, Kat!
-
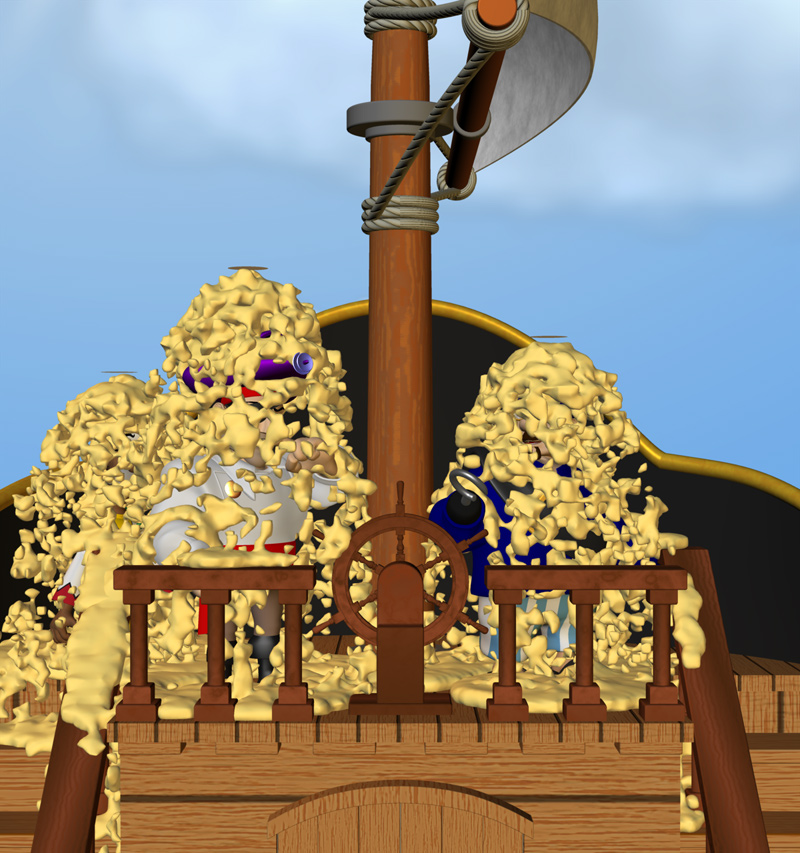
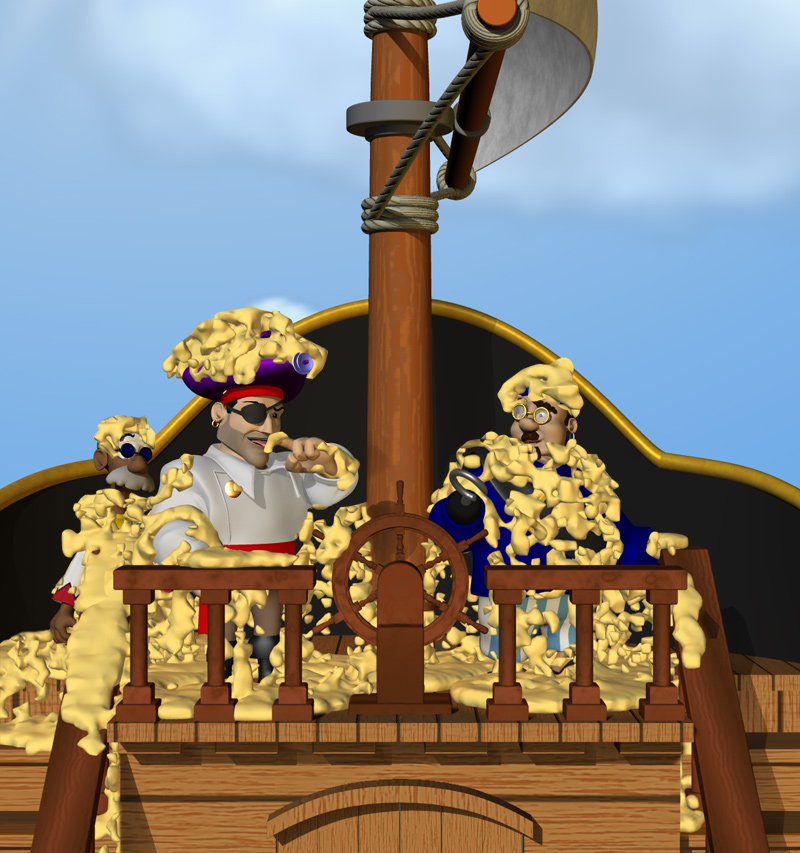
Thanks, Ken & Gerry! (Have you guys ever considered making ice cream?) :-) After the initial drop, I had a whole strip where the gloop is around them. For this, I put emitters over the heads of the three characters: Then I rendered out a clean version with no gloop to use as a background plate. Took both into Photoshop and with some selective deleting, got the final look. *Very* glad this was only for one strip!