


UNGLAUBLICHUSA
-
Posts
637 -
Joined
-
Last visited
Content Type
Profiles
Forums
Events
Posts posted by UNGLAUBLICHUSA
-
-
 Did all the bugs get worked out yet on this rig. It sounds awesome even with them.
-
I'm not jason but we are all here to help each other. Do you have a specific issue that someone else can address?
-
 Is there any way that non -two-er's can use this rig?
-
 Any John carter of Mars inspiration there? Looks like the description of a Thoat. They are the martian equivalent of a horse used in the Edgar Rice Burroughs series. Looks cool so far.
-
Just one thing to say. DAMN!
-
Are the veins bump mapped? They look very nicely done.
-
 AAAAAARRRRRRRGGGGGGHHHHHH!!!!!!!!!!!!!!!!1 What could I be doing wrong. Got my flat pass fine. My dome pass is all black. Can't enter the Mascot Contest if I can't render an image. HELP!!!!!!!!!!!!!
-
 Revisiting this thread, I wonder what format these guys render out to???????? EXR, TGA?????
-
 Glad to see that the problem was easily fixed. This kind of thread is great for others to follow along with to see where simple mistakes can frustrate the heck out of you! Very nice hoverboard.
-
 I feel kinda bad on one hand for not contributing to the two project, but exited about my own project I have been working on (currently under investigation for Unhandled exception Error). I think that the people who have been contributing to the TWO project deserve a round of applause for their efforts. maybe if I get my Mascot Entry done I can work more on helping the community.
-
If you want the eyes as seen in this pic, they're on the svn or I can send them to you.
Those are some very nice eyes but what the heck is svn?
-
Welcome aboard, tell us a little about yourself.
-
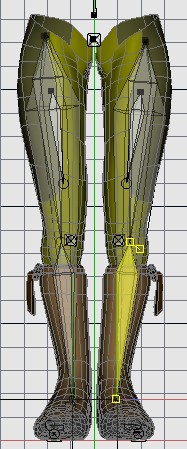
The patch count is partially to define different material boundries and also decal locations for clothing seams. The density around the knees is for extreme bends (heel to butt).
-
Fand-damn-tastic! It woiks!!!
-
I actually started trying the pose out on myself AFTER I posted. You are correct, it is a "knock kneed" pose which is from a photo reference. I am going to have to move the legs around some and try to get the sculpt to look right. I didn't screen capture the really horrific issue after the constraints, I only posted a modified 'pose' of straighter legs. I will post again soon on my progress. You da man!
-
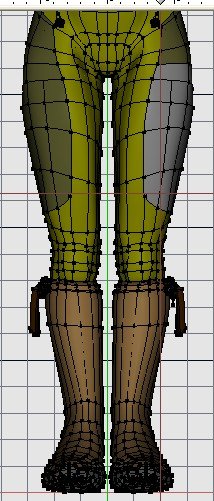
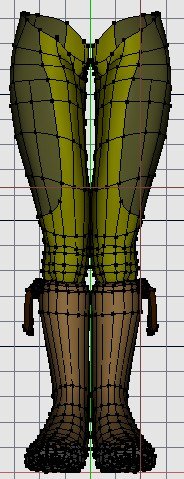
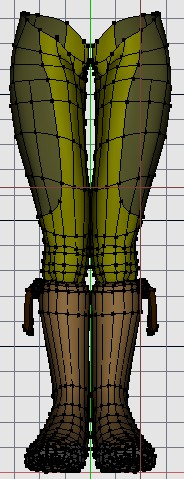
Hopefully Mike Fitz will see this soon, I have used his basic setup from his free section on my arms - everything went to plan. When I set up my legs - aaaaaaiiiiiiiiiieeeeeeeeeeee!!!!!!!!!!!!!!!
I have my model in what is a natural closed leg knees together pose. However, once I assign my constraints it bowed my models knees out in an inhumanly painful position. I tried seeing what my model would look like if the (anatomic bones) ran paralell to the rig the pose looks unnatural. see attached images.
Do I have to have my model splined out with the legs going straight down for this set-up to work? Or is there some kind of work around? Thanks-

-
Bravo Mike, is there a chance you could post a couple screen caps of the bone set up. I think I get the drift but Images would help. This might help me with rigging a character I am working on that needs a VERY flexible spine.
-
Yeah, that's pretty much it. Are you making the crossing spline in add-lock mode, or do you just create one long spline, with cp's at the appropriate spots, and THEN start hooking it in?
For this particular one I would add the points to each spline as I go across - dot, dot, dot, connecting all the splines together and leaving the trailing edges. Then deleting the trailing edges.
Or, just one spline w/ 2 cp's, one at each end, and then use hooks to attach the vertical members?I would not try to hook this, although I think you can hook up to four (or is it 3?), I would not do it in this case, especially if there will be any further modelling 'out" from the flat edge.
-
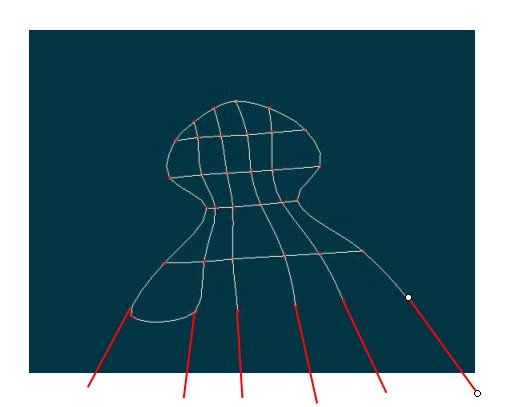
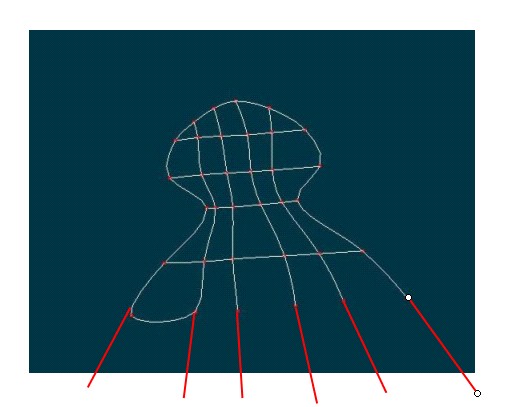
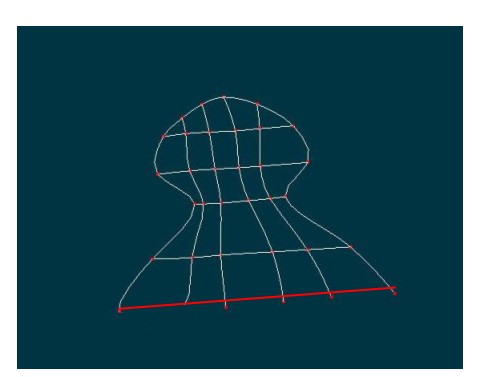
This is a common new user error and I still do it myself when I hurry. The software doesnt know you want a straight edge, the normal condition of a HASH spline is to curve and be organic. Try the following, extend the splines for what looks like a finger area out slightly past where you want to go. (see UN-argh 01.jpg). Next where you want your straight line add a spline (see UN-argh 02.jpg) making sure you attach it to each extended spline as you go across. Next delete the ends of the extended splines (UN-argh 03.jpg). Is this what you wanted?


-
Me again. As I work for a manufacturer of dental restoration materials, I thought I would share some factoids. Teeth are composed of many components, the root, the dentin and the enamel are some. For the most part we can forget about the others like the root and focus on the main two.
The dentin is the material underneath the enamel. dentin is semi-translucent but mostly opaque. The enamel is the opposite, mostly translucent. I am experimenting with a way to model more realistic teeth that involves having each tooth made of two models (sets of patches), one inside the other. The outer model would have a degree of translucency and the inner opaque.
Also, different teeth have various degrees of where the tooth is most translucent. There is no real need to go to great lengths modelling and texturing human molars as they are in the back of the mouth. Incisors (the pointy ones) have a different translucency ratio than the first front 3 (top/bottom).
Also consider that except for cases like those of extreme make overs, teeth are not perfect. They lean one way or another, are not horizontally level, have berry stains, tartar, etc. As a movie prop, the teeth may not be easily distinguished as 'perfect' on this great reptile model so detail on a prop like this would not have been required.
For stills, the eye can recognize the perfection and think "hey, this doesn't look right", simply because it lacks imperfection. That is one of the issues with the uncanny valley effect as most 3D humans have perfectly mirrored right & left halfs, this is unnatural and the mind notices. Eyes are not always horizontally centered, mouths are slightly crooked, jaw bones do not always grow mirrored perfectly. Wrinkles are not symmetrical.
Perfection for us in the artistic world can more easily be found in imperfection.
I have tried to keep this as layman as possible and left out many technical terms on purpose. Please examine opportunities in your experience and share them with the forum. Thanks,
-
Love the work. The bricks could use something to make them look a little less uniform. That said, I do not think I could have done better. Very inspiring!!!
I give it a 9.97 out of 10. Fantastic!!!!!!!!!!!!!!!!!!!!!!!!!!!!!!!!!!!!!!!!!!!!!!!!!!!!!!!!!!!1
-
 These characters are VERY cute. I have not had much success doing cute, most of my character designs have a very HARD look to them. My wife wishes I was doing cute stuff instead of what I currently do also. very nice style on these two characters, my compliments!! keep up the fine work.
-
AAAAARRRRGH!!!!!! It wouldn't let me download for "virus protection"! Did I say AAAAARRRRGH yet? AAAAARRRRGH!!!!!!!!!!!!!!!!!!!!!!!!!
-
 I justify the expense (for myself) in that it pays for itself in increased productivity. Since I build my own PC's I can keep the cost down for the extras. I cannot imagine using a mouse anymore. Best of luck with the tablet you do get.


Butts
in New Users
Posted
If this helps you can use it: butt.mdl
Pics attached