jakerupert
-
Posts
1,530 -
Joined
-
Last visited
-
Days Won
2
Content Type
Profiles
Forums
Events
Everything posted by jakerupert
-
>It seems maybe he *is* looking for a way to repeat a cropped action multiple times. Just select the action shortcut in the chor and set the value for "Repeat" to however many times you want it to repeat. inbetween the cropped actions. No knowledge about the questionmarks anybody?
-
-Hm , maybe it IS working when you actually create the light in the model and NOT working, when you drag an externally created light onto the model? I will continue my tests next week.
-
--What is that questionmark for in the actionobjects or materials for example? Does it say something is missing? Seems nothing is really affected by it.... Can anybody clarify this please --Also: Why can a cropped action not be copied multiple times into the same channel? I wonder, if it really is necesary to copy the action onto the model every time you need it newly again?
-
-
-
>I was able to reopen my project and the lights were still there. Were you able to load mine in V15 and the lights were still there? >It's odd that a light would disappear and not any other bone. you might examine your saved file and see if the lights were not saved or if they are there and disappear on re-opening. But how can they disappear then on reopening? I post the testmodelfile. Can you find something strange there? CarLighttestA.mdl
-
>web v15f XP unlimited added a light to model,set volumetrics to on.Saved model close AM restart AM,only change is the volumetrics is turned off but the light is saved with the model seems to be working fine on my pc because that means "I am at the end with my latin" somehow now, as they say here. I reinstalled 15 f with no avail... any more ideas, what I can try to encircle the problem? Paul, Robcad, have you been able to add lights to a model without them vanishing later?
-
in further investigating this phenomenon I found, that on my newer computer with Win Vista AM 15e CD-version I can save models with lights allright. On my XP with 15f web I cant, also I tried with no succsses 15e Web. After restart of AM the lightbones simply are gone. (Any idea anybody, what this might cause?) So I am asking if anybody else can reproduce this? Come on, all your suportive ghosts on this forum, it`s not that hard to put a light into one of your models and see, if it gets saved in 15e/f Web, is it? ....else I will have to continue talking to myself (sigh).
-
Maybe there is something broken with model internal lights in 15f? Whenever I save some lights with my model and reopen it later after restarting AM all the light(bones ) are just gone. Can somebody test this also to doublecheck if I am not the only one, please.
-
Seems everybody is avoiding this topic, leads me to the conclusion, that it is very difficult to handle. I have never seen a convincing example of some carlights in this forum also. Maybe because all the carproducers around here are just doing stills and no animation. Maybe it was the control/click copying of the lightbones inside the model that caused the trouble? I will return and build the different lights externally from the model and then draging it on top of the model one by one as a workaround. Lets see , if that makes a difference. (If its a known "critter", please tell me, so I could fill in a report.)
-
sorry , I meant control /click
-
Seems I have been happy too early. While copying(dublicating) the backlights(bones) for some directionallights(bones) with control click, afterwards I tried to switch just this conesize, but couldn`t find its property any more, simply vanished. Then restarted AM , property there again, switched it from 60 to 80 and my rendering went ballony. Seems to have switched all the conesizes at the same time, though its not telling it.. and the rendertimes went through the roof. So is this some kind of known sturdiness in this field or am I simply doing things wrong in the handling? Am I not meant to be able to alter the conesizes after dublicating alightbone with control/click?
-
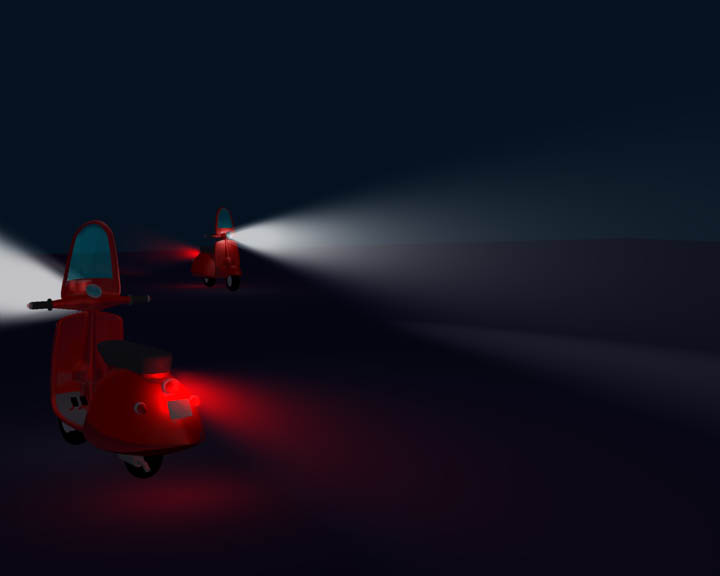
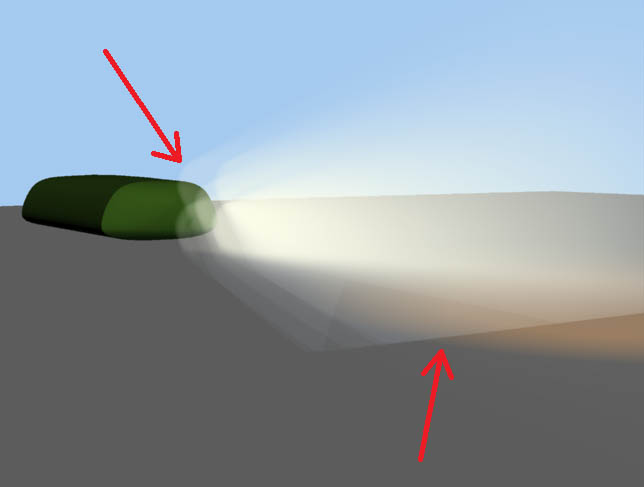
>it allmost looks like thats where the ground intersecs the light from the cameras point of view after some more fumbling around, I guess I managed to achieve some convincing carlights? Critics welcome-

-
Must be still something else...
-
>You may want to first experiment with a plain white ball. Then, when you are comfortable with the process and all the available options, use more complex models with reflections and textures and stuff. Fuchur, now I can see a difference, you were right. A looks better to me HDRITestA.mov HDRITestB.mov
-
Did some experimantation with Image based ligthing and an HDRI picture along the line of Stians Tutorial. Managed to get an effect from the enviroment map on the big sphere to be visible on the vehicles. But what amazes me is: There is no visible difference, when in the chor properties I additionally activate the HDRI image or if I keep the default set to no picture at all. ( See pictures A and B ) So, what does the property there do? building_probe.zip
-
I am trying to build some headlights for a car. But I cant seem to get it right. I get some strange kind of "offset dublication" and a very sharp edge at the end of the cone. (see pictures) multipass 5 passes Any ideas, how I can get rid of that? Any good example of a headlight and backlight somebody could post? And also, whatfor is the lightwindow that opens up, when clicking a light object in the PWS? It only seems to stay all black for me. Headlightsettings.bmp
-
Seems to be the same issue like in the teddy bear thread...
-
>I've never played around with HDRI - don't need it for Image based lighting. I don't know how it would impact IBL. It would be great if you ran some tests - and then tell us what your conclusion is. No visible difference at all. So I must be doing something wrong...I guess. Will continue tests next week....
-
>Simple trick for you to try is to use expand property triangle for chor - choose Global Ambiance type=Global color=white - just try it! - it's so simple - play with the Ambiance intensity (AI) to 50-75% (if you leave your other lights in) and leave Ambiance Occlusion = 0%. Play with the color, play with using an image instead for lighting (eg use a blue image for night time) . Another trick for just isolating characters from their background is to create a "fake rim light" material - a gradient material that has an ambiance color, set in the second attribute only - drop this material on your character (whole character) - and see how it gets highlighted...(this trick courtesy of Holmes , courtesy of Matt Campbell) - play with the edge threshold, and ambiant color, intensity. Invaluable hints! Just followed your advice and started to play around with these options and it opened a whole new world to me. (Though AM tended to get a bit touchyon me, probably because I wasn`t really knowing, what I was doing..... Thanks a lot! Does the Image have to be HDRI to influence anything else but the color? Why leave Ambient Oclusion alone? Just because of rendertimes?
-
Ha, Ha very good and funny and somehow true. Very nice cinematic as well!
-
Thanks a lot for all your generous gifts! >I started modelling TOS NCC-1701 Enterprise, but developed repetitive strain injury in my wrists.
-
Hi Nancy, Thanks for your help. Managed to use a material effector boxshaped to make that red zack line in the chart visible one by one. (This little animation is for some animated icons for a pdf-presentation presenting some coaching guys work.) ManniMan_Unternehmer_Sor3_200.mov
-
I am trying to use a material effector with a transparent material to make a part of a modell invisible in a chor and can`t get it to work. Does anybody by chance have an example project or mini tut for this matter?
-
>Well after a ton of work Great result. How much time do you estimate, went into this? I guess, it`s no harsh critic from me, when I say, that your work could still be improved quite a lot with some more effort put into the texturing and ligthing section. I admire how fast and dedicated you are getting a hold of A:M and animating. Keep up your good work ;>) Jake
-
>Jake- I agree it's hard to assemble sets in actions, I also prefer to assemble in chors.