-
Posts
5,792 -
Joined
-
Last visited
-
Days Won
59
Content Type
Profiles
Forums
Events
Everything posted by itsjustme
-
Top notch! That's as good as anything I've ever seen, Lee.
-
Nice, Stian! You're making me feel lazy...you're churning out great bunches of stuff. The only critique I have is that the car could be dirtied up a bit....great job.
-
Yes, all versions will work with v13 or later. The v12 and v13 are identical, except the v13 installation won't open in earlier versions. The v11.1 versions don't have the FK/IK seamless switching, because that didn't get put in until late in the v12 cycle (otherwise, they are the same). If you have v13s or later, I would recommend using the Posable installations that Mark will be posting shortly. They make the process a lot easier. At this time, there are only Posable installations for the biped rigs. Hope that helps, Mike.
-
Here's the next update to the biped rigs (these updates aren't necessary in the Quad rigs). The bicep flexing is improved and limited now and there are added geometry bones for a short-sleeved shirt. There is a new Pose, "Animation_Controls/Arm_Controls/sleeves_roll_like_biceps" which will roll the sleeve geometry bones like the biceps using a percentage slider. The sleeve geometry bones will work with limb bowing and general squetching...in extreme squashes you might have the arm go through the sleeve though, since there isn't any squetching built into the sleeves. I have included versions of Squetchy Sam that have some make-shift sleeves so that it will be easier to see what the new stuff does. This release has the InstallRig plugin included in the installation ZIPs. If anyone finds a problem or something I missed, let me know and I'll fix it as fast as I can. Mark posted the Posable installations here. If you are using v11.1, you'll need the DLL files located here, there are instructions for installing them inside the ZIP file. There is more information and add-ons on the Wiki. ---------------------------------- EDIT ---------------------------------- I forgot to thank Rusty Williamson for suggesting these updates and Mark Skodacek for double-checking everything...so, I'll tack that on here. Thanks guys! Sorry for the unintended omission. ---------------------------------- EDIT ---------------------------------- The next update is located here, the files from this post were deleted.
-
Just as an FYI, Squetchy Sam has the latest version of the Squetch Rig installed. The latest is in this post, at the moment.
-
Inspiring, as usual, Stian! Makes me think about how much I need to improve.
-
I liked the show...that's a very nice model. My memory may be hazy, but it seems pretty accurate to me. Very nice job so far!
-
I thought I'd post a "heads-up" for anyone that is about to rig a character. I'll be posting another rig update on Saturday, if no problems are found with the proposed versions. If someone needs the update sooner, I can send them a link if they PM me. This update improves the bicep flexing and adds some stuff for short shirt sleeves, it is a biped-only update.
-
The installation method...the Posable installation uses Poses to position the bones, then you export the Action you used to position the bones. The Action export only works 100% on v13s or later. Hope that helps, Jeff.
-
There is a four and five finger version of the Posable rig...it makes installation a lot easier. Mark made a tutorial that is a little out of date, but not by much...it's located starting here. Hope that helps.
-
It's easy in the Posable version of the rig...you can use that in any version after 13s, John. Hopefully, that's the one you're using...but if you're not, take a look at it.
-
I don't know what will be included in the program installations, that's up to Hash. The plugin is presently included in the Posable installation ZIP. I posted both versions of the plugin in this post. I'll make a point to include the plugin in future versions of the rig. I was hesitant to include it before this because of the chance that the plugin would get updated, so I posted links.
-
To make it easier to rig, I think eight splines for each eye socket and twelve for the mouth would be the ideal. Any number could be rigged, but, those numbers would give you the easiest weighting. Very nice job so far, Dhar!
-
What does this pertain to? The arm flexing? What expression? Where did you correct it? I don't want to reinstall the rig on this model again: can you post the fix (what changes, where) so I can modify the rig I have installed? Thanks, Rusty In this part of my post: I was referring to that explanation...the Expressions in the rig haven't been changed. I had left out part of it when I initially posted it.
-
It looks like it's down at the moment...here's what I have. It is also in the Posable installation Zip file. Hope that helps. OSX_InstallRig.hxt.zip Windows_InstallRig.zip
-
I'm not sure, Chris...if I can look at the model, I'm sure I can track it down. You can PM me to give me a location to download it if you'd like.
-
The way the flexing is being done, Chris? I'll give you a quick rundown. The biceps are divided into four (four bones), each bone "translates to" and "aims at" nulls (with "scale-to-reach" on and an Expression on them to preserve volume, "X=1/Sqr(..|Z)" and "Y=1/Sqr(..|Z)" ) along the length of the bicep. Those nulls are children of separate bones that "orient like" the bicep at different percentages when using the limb bowing (which moves the nulls at different percentages of the rotation of the bicep) creating the bowing. There are some bicep "muscle" bones that scale according to how much the arm is bent (using the "bicep_flexor" bones), which have nulls as children that the "scaler" bones "scale-to-reach". Then, the parent bones of the squetch nulls "scale like" the "scaler" bones...which moves the squetch nulls, flexing the biceps. I have attached a couple of quick clips to illustrate. I hope that is helpful. The last time I counted it was around 800 bones...I think it's higher than that now though (and I'm pretty sure there are going to be more added). There's quite a bit going on in there. I think Mark's suggestion is the way to go at the moment, Rusty. I do have to improve that though...I've been meaning to improve the bicep flexing as well. I'll see if I can tackle both of them in the next couple of days. The questions are good ones, Rusty. Asking questions, especially good ones, is a good thing. --------------------------- EDIT --------------------------- When I initially posted this, I had an error in the Expression...you would think I would get it right after the number of times I've used it. I corrected it...so, there shouldn't be any mistakes in there now. Hopefully, I didn't mess anyone up. bicep_setup_example1_Sorenson3.mov bicep_setup_example2_Sorenson3.mov
-
Issues and a small 'catch 22' in 'compensates'...
itsjustme replied to rusty's topic in Squetch - Rig
That post was before I posted the latest Squetchy Sam, as Mark mentioned. The upcoming improvements are geared toward making the face rig installation easier (there may be other areas that will benefit). What I'm trying to do is eliminate the need to dig into the Poses to set things up by making everything a percentage slider...it will add a couple of cool options similar to the animatable blink location. I'm pretty happy with what I've got so far, but it needs some more hammering done to it. -
Here's the latest update. In this release, the spine for both the biped and quadruped versions now have an FK option and the quadruped versions have an FK option for the neck. The new Poses are "Animation_Controls/TORSO/unhide_FK_spine_controls" on both the biped and quadruped versions and "Animation_Controls/HEAD/NECK/unhide_FK_neck_controls" and "Animation_Controls/HEAD/NECK/hide_neck_base_control" on the quadrupeds. A simple example of the updated spine setup is in this post, in case anyone wants to check it out. Thanks to Mack Chappelle for putting together some rigging tutorials that made me think differently. Definitely visit Mack's site, he's got a very ambitious tutorial section he's putting together. Thanks to Mark Skodacek for all of his advice and help, thanks to Mark Strohbehn for stress testing the updates and thanks to Nancy Gormezano for asking for the modifications to the Hippogyraf that led to these updates. If you are using v11.1, you'll need the DLL files located here, there are instructions for installing them inside the ZIP file. You will need the InstallRig plugin for all versions. For the MirrorBones versions, you'll need the MirrorBone plugin. There is more information and add-ons on the Wiki. ------------------------------------ EDIT ------------------------------------ The next update to the biped versions are here, the next Quad versions are here. v12_spine_example_09_01_2007.zip
-

Issues and a small 'catch 22' in 'compensates'...
itsjustme replied to rusty's topic in Squetch - Rig
Gads, what changed in this upcoming release? r The spine on both the bipeds and quadrupeds will now have an FK option and the neck on the quadrupeds will also have an FK option. There are other updates that are presently being worked on to improve the installation, but those are going to be in the next update...I wanted to get the updates to the spine out so that everyone is on the same page from the development end. If you have access to the Hippogyraf, the updates are installed in him. -

Issues and a small 'catch 22' in 'compensates'...
itsjustme replied to rusty's topic in Squetch - Rig
I was unclear on that instruction, sorry about that, Rusty. What I should have said was, "return the Poses to the default position using Squetchy Sam as a guide". I'll make that change on the next release...which should be by sometime early tomorrow. Thanks for spending so much time on this, Rusty! -
Clear to me...I think. Those control points need to have some movement established to do that...select the points, nudge them one direction and then nudge them back to the original position within the keyframe you want to start. That will give those points a "change" that isn't a change because it is the original starting position. Make sense? Select the Action in the Choreography, in its' "Properties" change the "Chor Range" start and end points. There's probably something you forgot you did...you would have to post the Project for the forum to help track it down. I haven't had a problem with the magnifier in the Timeline...I have no idea what's going on with you there, Jake. Hope that helps.
-
Congratulations, Satyajit! It's good to see your hard work being rewarded.
-
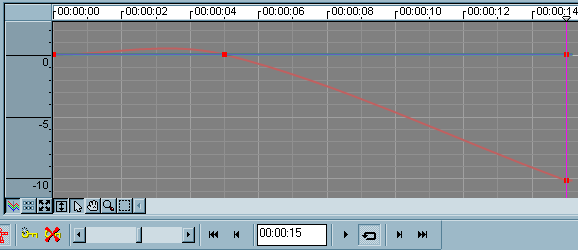
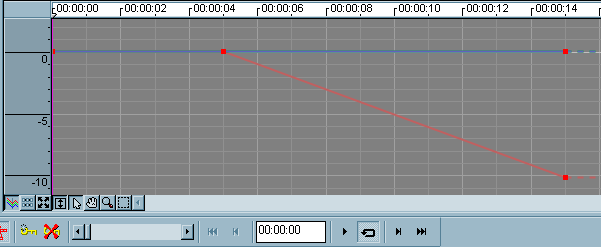
Here is an example. The first one shows the red spline with the key where I want it, but, the method that the spline runs through the point that is the key makes it move before I want. So, I change the interpolation method of the spline (by right mouse clicking on the previous key and changing it to "linear interpolation") and get the result in the second image. Now, I don't get any movement before I want. Make sense? Hope that helps.
-
When I got my v14, the CD and Extras DVD were in the same clear case...the DVD was visible through the back of the case. Did you get some other kind of packaging, John? If it was one of the early releases of v14, it might not have been included. If that is the case, you should be able to contact Hash to get a copy sent to you. The Extras CD (from v13) is available here...I'm not sure if the DVD material is organized in a single location or not. Hope that helps.


