Search the Community
Showing results for 'snap to surface'.
-
1.) See attachment. There is a button for that. (be aware, that it is only available in chors or at least is the only thing where it will make a difference if I am not wrong) 2.) Press 1, 2 or 3 and move the object around. Each stands for one axis. 3.) Real radiosity? That is extremly time consuming but you do not need that for reflections. Radiosity will create very convincing lightening if used correctly, but it really takes a lot of rendertime. For a small overview about rendering have a look here: https://www.patchwork3d.de/rendering-45-en I think you are talking about Raytracing, which is something A:M does most of the time anyway ;). Just activate Reflections in the rendering dialog (at least to level 2), put in reflectivity in a group or surface settings or material settings and give it something to be reflected.
-
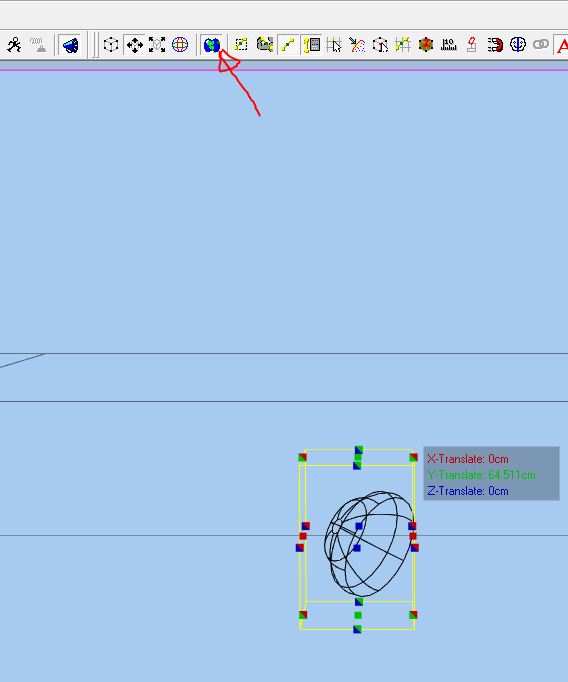
I'm not sure what you mean. Yes. In most environments the 1, 2 and 3 keys (not the ones on the number pad) will constrain motion to x, y or z. They can be used in combinationn to move on a plane. If you have the World Space button (the Earth icon on your toolbar) ON those motions will be in world space. If it is OFF the motion will be in Object space. I've never had to do that. Do you have "Radiosity" ON in the Chor Properties? Turn if OFF. To get reflections you should only need to have a reflective surface and "Reflections" ON in the Render settings.
-
No. But I am not using the cylindrical mapping method of Robert in most of the cases. If you want to get rid of the problem, do a Bake Surface before export. That should get rid of it... otherwise, Robert would you like to file a bug report for it? Best regards *Fuchur*
-
Yes, that was always a problem with the exports. What size is your model? Anyway hooks and 5-pointers should be made small and used rarely, which is a good idea anyway. The good thing: If you use something like "UV set smoothing > Full UV Set Smoothing" and the right margins for Bake Surface, it works pretty well anyway, since the surface underneath it is very close to the one covered by the patch. If you might see a small distortion there, but if the 5 pointers are not extremly large, it should not be very visible. But yes, it would be better if that could be fixed. Malo had some nice ideas in that direction but I do not think they ever got fully worked out. Best regards *Fuchur*
-
Examples and Context. the red ones are the most important. Kinematic - makes the end of a chain of bones seek a target (without having to pose all the bones in the chain). Legs are the most common use Aim at - knee and elbow pointers are the most common use. You could control two eyeballs at once by making them aim at a common target null or bone. See "Simplest IK Leg" and "Adding an IK Leg" on my Tutorials page for examples of Kinematic and Aim At use. Orient Like - The most common use is for "fan" bones. You can see an example of a fan bone in" CP Weighting vs. Fan-Boning" Translate to - A bone that is a child of another bone will inherit both Translation and Rotation from its parent. A Translate To constraint is a way of making a bone get only translation from another bone. A head that is on the top of a spine could follow the spine without having to rotate like it. Roll Like - useful for creating partial rotation. When your hand turns (as if it were turning a door knob), the skin by your wrist turns the most, the skin by your elbow not much and the skin in the middle about half way in between. Putting the CPs for the middle skin on a bone that is constrained to Roll Like the hand, but only 50%, will simulate that... without following any of the hand rotation on other axes. Aim Roll (Handle) At - permits a target to influence only the Z-axis roll of a Bone. "Gas Pump Hose" on my Tutorials page uses Aim Roll At to keep all the bones in a chain aligned. Path - Often seen in tutorials where you animate a walk "cycle" and make a waling character follow a path. A more practical use is to make chains of bones conform to curvy paths. See BasicWormCrawl in https://forums.hash.com/topic/45166-path-constraint-for-a-bone-chain/?tab=comments#comment-387426 Surface Constraint creation example. Euler, Spherical and Translate Limits are rarely used in characters. Group is like a Translate To Constraint to make a bone follow a Group of CPs rather than a bone. I use this to attach buttons to groups in simulated cloth see Chicago Bears fan in simcloth Hawaiian shirt with buttons and collar
-
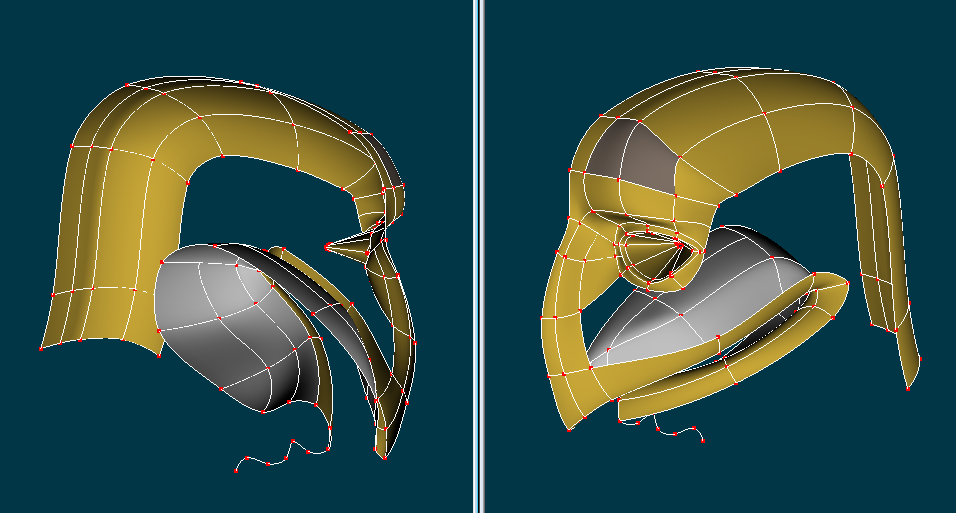
Before I surface the outside of the face I extrude and extend some splines from the inside edge of the mouth to make a simple oral cavity. Just in case he ever opens his mouth wide enough to see inside. The scalp is extruded up and over from the brow spline.
-
This is the first time I've ever seen this (v19.0o). Attached is a model of what will ultimately be the hinge on the back door of a 1950's vintage truck trailer. The attached image shows that it has one strange patch that doesn't respond well to "refind normals" which has the effect of pointing its normal opposite to all its neighbours and messing up the smoothness of the surface. The only way to correct it is to select just the patch and flip it's normal. It's not much of a bug but can Steffen fix it? Fruehauf_hinge.mdl

-
That's an impressive improvement from what I guess is something like a Photoshop "curves" adjustment? Looking forward, for everyone doing mission-critical rendering, I'll note that rendering to OpenEXR will allow careful level adjustments in post, and rendering to OpenEXR with "buffers" will allow adjustments of individual light/shadow intensities and color and even surface qualities like specularity and reflection... all without re-rendering.
-

v19, v18, v17 New features and enhancements
robcat2075 replied to robcat2075's topic in * Latest Info *
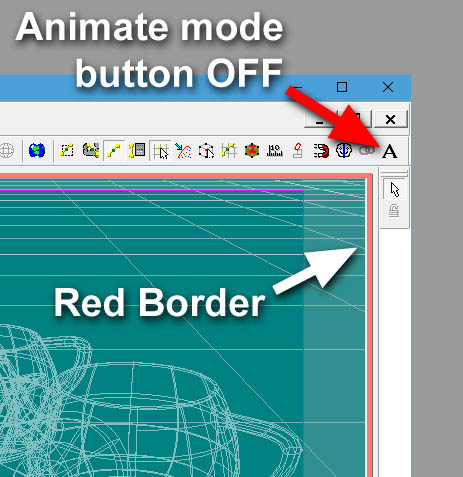
v17 New features and enhancements This page is not fully edited yet. Speedup Coding optimizations make rendering about 15% faster than in v16. Interface Animate Mode OFF warning v17 Red border appears around Viewport when Animate Mode is OFF. Animate Mode is sometimes turned OFF to make global adjustments to animation without making new keyframes. However, new animation can not be made with it OFF. D'oh! The new border warns the animator that "A" is OFF. It is possible to reverse the behavior of this border, so that the border is visible when the A button is ON by checking "Animate Mode warning reversed" in Tools--> Options --> Global. new Default chor v17 "Spot" light now white instead of brown. "Ground" has more patches for more visible perspective lines in shaded/wireframe camera view "Ground" set to allow shadowing by single thickness patches Further discussion of changes made with archived version of original default Chor. Introduction dialog displayed v17b At startup (like Tip of the day), which is pointing to resources for beginners Libraries -> Models - Some Primitives added v17c Zoom Fit after Paste now configurable at Options->Units default ON v17f Modeling "Prevent CP Assignment" property v17e for bones now property for bones is named "Prevent assigning cp's", if it is set to "ON"no cp's can't be assigned to this bone Frequently when rigging a model it is useful to use bones in relationhips within a model but undesirable for the model's CPs to be directly assigned (accidentally) to those particular bones. For example: A subset of bones for an FK arm control will never need the model's mesh directly assigned to it. Sometimes, some of the mesh can accidentally be assigned to the bones and reassigning the mesh and CP weighting back to the intended bones can be time consuming. I am suggesting here that an additional option in the properties window for the selected bone be added called "Prevent CP Assignment" (implemented like the "Lock IK" option). This would prevent the bone from having CPs assigned to it. Rendering Ambient Occlusion change v17 Occlusion Sampling can be set up to 200% (Render to File Settings) when the value is more than 100% a different algorithm is used for calculating AO (the result is a bit darker than the original one), this will solve the problem described in bugreport [bug]6176[/bug] Rendering is a reflection of artifacts Radiosity change v17b "Calculate Radiosity" no longer needed when you are doing a final render with Radiosity ON Sub Surface Scattering (SSS) changes SSS can now be used in materials v17 SSS property "Extend group to avoid SSS-borders" added v17 Selecting this option will cause to extend the group with their neighbor patches for SSS computation only Has only affect on groups, not if it is changed in the surface attributes for the figure self. The default value is OFF . SSS is now computed only at the first pass v17 for multipass rendering (exception stereo rendering or active motion blur) for choreographies a new menu entry "Calculate needed memory for SSS" v17 This calculates and displays the memory, which will be needed for the SSS computation at rendertime and inform the user about this value or warn if too much memory will be needed for computation, it writes also additional information's about SSS to the logfile a case where SSS computation will need to much memory is as example, if You have very small values for "Half extinction distances" (Red 0.1,Green 4,Blue 5) in conjugation with a high sample area (compute from surface which is covered by SSS) will need around 12 GigaByte for the SSS computation the "Relative density of SSS samples" has also a influence here (the sample projectfile for the values above are from the report [bug]6174[/bug]) Particles/Simulations Baked sprite systems - breaking change v17b Baked sprite systems from v17b onward are not backward compatible, due a needed format change for baking more than one sprite emitter too. Older PRJs will need to be re-baked. Sprite emitters have additional properties v17b - "Single Particle" , default is OFF if this option is set to ON , only one particle is created , when it dies, a new particle will be created the following 3 options having only an effect with image sequences - "Randomize the image sequence" , default is OFF if this option is set to ON , each particle is displaying a random frame from the image sequence (and this means each time the frames are randomized , for a repeatable result bake this particle system) setting this to ON disabling also the next two options - "Image sequence start at particle birth" , default is OFF the old behavior for sprite emitters if this option is set to ON , the image sequence starts first when the sprite is created - "Repeat the image sequence" , default is OFF if this option is set to ON , the image sequence is repeated over the particle life Animatable parameters for SimCloth (not ClothWizard) v17c Fixed only for Simcloth. But be warned, changing simulation parameters (like stiffness) over the time , having a high potential to make the simulation unresolvable. For the Clothwizard (the old cloth scheme, superceded by SimCloth) We don't change the current behavior (simulation parameters are not and will be not animatable) Other New expression keyword "AtTime(time, n)", v17e where time is the time for which You want to have the value for n , n is the Bone information Example: AtTime(GetTime()+SetFrame(2),..|..|..|..|Model1.Transform.Translate.Y) where GetTime()+SetFrame(2) , evaluates the Y position for Model1 at the current chor time + 2 frames SetFrames() is also a new keyword, setting the time value in frames based on the current fps, time value is always based on seconds polygon export plugins now supporting 32 and 64 polygons/patch v17d STL files can now imported as prop or model v17a Amplitude Plugin v17e Create keyframes for a property in a chor or action, based on the amplitude from a wav file Amplitude Plugin Documentation Amplitude Plugin sub-forum has user examples and PRJs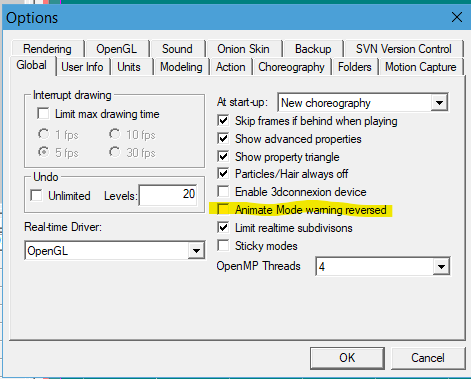
-
v19, v18, v17 New features and enhancements
robcat2075 replied to robcat2075's topic in * Latest Info *
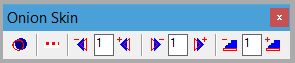
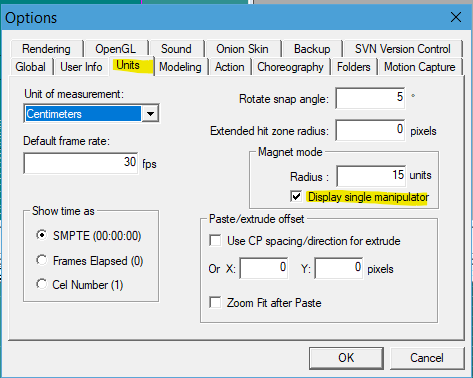
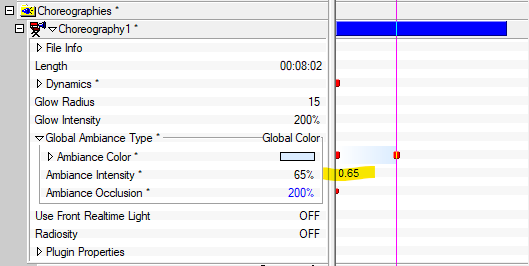
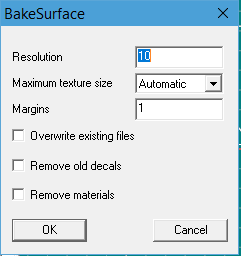
v18 New features and enhancements This list for v18 is complete but not properly formatted or edited yet. Top Five Hot v18 Features Screenspace Ambient Occlusion AO look without the render time Onionskin Toolbar makes onionskin usage more efficient and convenient. User Defineable/Saveable Layouts Snapshot for precise decal template placement OpenGL3 improved reatime performance. Interface Set Camera to current view v18k Two new menu entries for camera objects in a chor "Set camera to bird view" Transfer the actual camera view into a birdseye view in perspective mode "Set bird view from camera" Transfer the actual birdseye view to the selected camera, switch to camera view and make keyframes for rotation and transformation. The birdseye view must be in perspective mode otherwise this option is not available. the Introduction dialog v18a (Help -> Introduction) now has workable links to the single section (like mouseover effect) Magnet mode>Display single manipulator v18a With checkbox ON(default), the magnetic field radius is only drawn for the last selected CP. With the checkbox OFF, the magnetic field radius is drawn for each selected CP. The radius is adjusted with the manipulators from the last selected CP. Magnet mode has always worked with more than one CP selected, however the OFF option allows you to see the influence area of all the selected CPs more easily. Set in Tools>Options>Units OSX dialog If a dialog hangs, you can now quit it with Cmd+Q v18a Polygon mode (only OpenGL3) v18a Tools->Options->OpenGL In shaded views, the polygon structure is displayed, which will be used when you export the model/chor in a polygon export format like stl/obj etc.. Quad view v18a Creates a 2x2 arrangement of four windows in the modeler Viewport. For users who prefer simultaneous orthogonal views. on the model in the PWS > Quad View Realtime subdivisions increased v18a Now offers 1, 4, 16, 64, 256, 1024, 4096,Adaptive subdivisions. 256 and above require significantly more time in Realtime views. Realtime subdivision Limit v18a new checkbox on global property page "Limit realtime subdivisons". Default ON, limits the real time subdivisions to 1,4,16,Adaptive Reload Images v18L popup menu entry for imagecontainer reload all images, if the timestamp for a image is modified , refresh icons in the project bar and real-time textures related sdk command GetHProject()->ReloadImages(); Reload Image v18L popup menu entry for single image reload the image, if the timestamp for the image is modified , refresh icons in the projectbar and real-time textures Respect Z-Order v18m When ON, CPs which are covered by other patches are no longer selectable (also not selectable with group or lasso modes), works in all views. Add button manually from Tools->Customize->Commands->Manipulator" (filled cube with a red Z). Add keyboard shortcut at "Tools->Customize->Keyboard-->Respect Z-Order. Rotoscope change v18d No longer allowed to drag rotoscopes on light or camera caches (the originals in Objects folder), only allowed for instances of light/camera in a chor/action or lights inside a model. Notes for the special case lights inside a model (in the bone hierarchy): "if show more than drivers" is selected , the rotoscopes are NOT visible but they still affect rendering, this is an accommodation for Netrender. It was very tricky to get this to work .... Simple Bone Draw Mode v18d Option to select the visual representation of bones. Switching to simple bone draw mode (bones are drawn as simple line instead of pyramid shaft). Reduces screen clutter Keyboard shortcut "Shift+7" or the optional button from Tools->Customize->Commands->Draw Custom keyboard shortcut can found at Tools->Customize->Commands->Keyboard "Toggle Bone Draw Mode Snapshot Save Snapshot v18a Button saves an image of the current active view. This is useful for capturing a wireframe view to use as a template for texture painting. CTRL-button brings up dialog box for resolution and save location Directory where the snapshot is saved is configurable at Tools->Options->Backup The toolbar button for this is under Tools->Customize->Commands->Render The snapshot is saved as a targa file Save Snapshot [context menu] v18a automatically applied back to model new menu entry for this "Apply Snapshot", available only in the context menu from a view filename, extension (tga,jpg,png,exr), save destination configurable. "Apply Snapshot" v18n changed "Apply Snapshot" applied snapshot now correct scaled , if a value 1 is used for the created decal image possible to input the value for scaling numerical Save Snapshot (Button) and Apply snapshot (menu entry)v18a If you hold down the Ctrl (Mac Shift) key, while clicking this command a dialog appears, where you can change the size for the created image, the Filename and image format User-definable workspace/window layout presets v18a User can Load, Save and Delete layouts from the View menu Live Answer Time session: March 16, 2024 Select Spline#/Select CP# Relationships v18a the menu commands "Select Spline#" and "Select CP#" in the PWS, selects now the spline/CP in the relationship window, no longer in the PWS Choraction v18a The menu commands "Select Spline#" and "Select CP#" in the PWS, selects now the spline/CP in the relationship window, no longer in the PWS, if the current viewmode for the chor is "Modeling" or "Muscle" Action v18a the menu commands "Select Spline#" and "Select CP#" in the PWS, selecting now the spline/CP in the relationship window, no longer in the PWS, if the current viewmode for the action is "Muscle" "Zoom Selected Object" button v18k Add this button manually from "Customize->Commands->Navigation" to a toolbar keyboard. Default Shortcut remains Ctrl+Shift+Z but can be changed now. If You use this from camera or light view, it creates a keyframe for the computed new rotation Viewport Settings Dialog: Apply v18k Added a "Apply" button applied changed settings without closing the dialog The View Settings dialog is accessed by clicking the Viewport Settings display is at lower right corner of A:M Viewport Perspective/Orthogonal toggle v18k Now has default keyboard shortcut 9 on the Numpad, only active if You have not changed any keyboard shortcut at "Customize->Commands->Keyboard". To get the default shortcut back, you need to delete the file Master.MAC(Master_64.MAC for the 64bit version) in the A:M directory. Modeling/Rigging "Bone snap to grid" v18L snap Bone to nearest grid position no keyboard modifier -> bone pivot is snapped keyboard modifier Shift -> bone pivot is snapped, bone end is moved to maintain bone length "Clone CP Weights" v18n Pluginclone the weights from one model to another model , the target must be identical to the source model (bones,CPs) except the CP weights and CP bone assignments Forum post: Clone CP weights tutorial Invert "Hide CPs" and "Lock CPs" v18a Invert the functionality of the the "Hide CPs" and "Lock CPs" tool buttons. Holding the Ctrl (for Mac the Command) key down, inverting the affected CPs. "Prevent assigning CPs" bone property v18a When enabled, now hides bone from list of bones in the "Edit CP Weights" dialog. Respect Z-Order v18m (See above, in Interface) "Snap Group To Surface" v18a Conforms a spline mesh to the shape of another surface. Can work in a pose/action/chor view without changing the original model. Can work with imported Props as goal surfaces. For grouped CPs that are members of a patch, the reversed normal direction from the patch is used as the direction for finding the goal surface. For all other CPs, the pivot for the group is used as a direction special case if only one CP is selected and the CP is not a member of a patch the view direction is used. Options dialog avaiable when you hold down the Shift key: offset distance from target surface maximum intersection distance Use CP normals" v18b the CP normals are used for computation instead of the patch normals "Try reverse direction, if no hit" v18b if this checkbox is checked and no intersection is found, a second try with negated normaldirection is done for intersection checking additonal change if no patch is in the group (single spline as example) the normal direction is calculated from the CP position and the group center point (direction looking to the group center) Snap to nearest CP v18a If you select a single CP or a group of CPs, than this new option in the popup menu is available. It is snapping the selected CP to the nearest other CP position from the model. If you have a group named "target group" in the model, this group is used as target positions, otherwise a dialog appears, where you must select the target group. Only the CPs from this group are used as possible target CP positions. This option is also available in a pose/action/chor, when the muscle mode is selected. The default shortcut is Shift+Ctrl+9. Bone snap to CP v18L menu entry bones menu "Bone snap to CP" snap Bone to nearest CP no keyboard modifier -> bone pivot is snapped keyboard modifier Shift -> bone pivot is snapped, bone end is moved to maintain bone length keyboard modifier Ctrl -> bone end is snapped, bone pivot is moved to maintain bone length snap Bone to nearest CP no keyboard modifier -> bone pivot is snapped keyboard modifier Shift -> bone pivot is snapped, bone end is moved to maintain bone length keyboard modifier Ctrl -> bone end is snapped, bone pivot is moved to maintain bone length "Snap to CP" Buttonv18m snap a bone to the nearest CP You must manually add this button from "Tools->Customize->Commands->Manipulator" (Cube with red point and arrow) to add a keyboard shortcut search for "Snap Bone To CP" only active in modelingviews , when the view is in bonesmode Snap the selected bone manipulator (Chain,End,Shaft) to the nearest CP, hidden CPs are excluded from the calculation except of moving the shaft, the bonelength isn't preserve Subdivide a spline with the Shortcut "Y" v18a Now possible when you are in a chor or action. Resulting in important change for Springsystems: adding a mass now has the keyboard shortcut "Shift + Y" Renumber CPs v18o Menu entry for Models. Primarily of interest to developers, for whom uniformly numbered CPs will simplify diagnosing problems. Import Images on Grids Wizard v18L Plugin "Textured Grid" v18k Creates new model that exactly fits image. Available only from the objects folder itself "Select Image", opens a image selection dialog for selecting the decalimage to use "Pixel per Unit", let You define the gridsize for the create model can be a float value (as example 6.4) "Subdivision x" , how many subdivision in the width axis should be createt "Subdivision y" , how many subdivision in the height axis should be createt "Offset (Pixel)", how much pixel the decal should moved on the gridplane in x and/or y axis , if there any other value as 0 in this editfields a wraparound for the decal is done "Copies", how many models should be createt , minimum value is 1 makes only sense if a offset is used , the offset is shifted for each model "Use offset for the first model",if the checkbox is checked the offset values are used also for the first created model "Orientation" , in which view the grid should be created "Modelname" , the name for the created model , if "Copies" > 1 then a numericalvalue is add to the name Plugin "Gridimages" v18L Available from a choreography "Add Images"opens a image selection dialog for selecting the decalimage, multiple selection is possible if the checkbox "Import as an animation or a sequence of images" (win) or "Import as sequence" (mac) is checked and the selected image is a imagesequence a animated decal is created can be used multiple times, new selected images are added at the end of the imagelist "Clear List" remove all items from the imagelist Listbox Imagelist You can nowdrag and drop the entries to make a specific order with You get a menu Menu item "Add Images" the same as the Button "Add Images" Menuitem "Remove selected" removes the selected item from the list "Pixel per unit" let You define the gridsize for the create model/layer, can be a float value (as example 6.4) resulting gridsize is shown in the listbox "Subdivision" how many subdivision in the width/height axis should be createt, has only influence if "Create as" "Model" is selected "Create as" "Model" , creating models for the images "Layer" , creating layers for the images[/b][/b] "Create as CookieCut Decal" create the decal as a CokkieCut deacltype instead of the default Color typ decal has only influence if "Create as" "Model" is selected[/b][/b] "Add to chor" add the created models/layers to the choreographie, if more than one image is in the imagelist a general offset between the importet models is computet, so they don't overlap[/b][/b] "First position" the position for the first created model[/b] "Offset" a additonal position offset "Orientation" in which view the grid should be created has only influence if "Create as" "Model" is selected "Modelname" the basename for the created models/layers Terrain wizard changes v18a number of rows and columns now similar to grid wizard orientation similar to grid wizard save and restore changed values now working Animation Keyframe interpolation default options v18d Option to select between Spline/Hold/Linear/Zero as default !!! Important change !!! Affects only new created drivers. For these drivers, keyframes are created with the selected default keyframe interpolation. You can set this at "Tools"->"Options"->"Action"->"Keyframe Interpolation". If "Default" is selected in most cases the interpolation method is "Spline" (sometimes "Zero"), the behavior of creating keyframes is in this case the same as in previous A:M versions. ! If any other is selected, it overrides the default values for the driver ! Onion Skin Control Toolbar for Onion Skin v18a Allows quick changing of Onion Skin parameters without needing to navigate to the Tools>Options dialog box. Explanation of Using the Onion Skin Toolbar Rendering Render settings dialog now sizable v18a Screen Space Ambient Occlusion v18a SSAO can simulate the Ambient Occlusion effect, usually with less rendering time. This is a post effect, which is implemented as a GPU Shader, but has also a CPU fallback implementation, for the case that the gpu doesn't support this or OpenGL3 is not used. The effects also needs the depth buffer, if it is not enabled, the effect enables it. On OSX this effect can be computed only on the CPU, due to glTexBuffer and samplerBuffer (gsls) isn't available in the compatibility profile, the core profile can't be used (nor supported via AGL) there. SSAO is set in the Render to File Settings>Options tab additional settings "SSAO Effect only" Only the computed SSAO is shown as a greyscale picture (not applied to the original render, overwrites it in stead) "Samples" How many samples are used to compute the ssao around each pixel, available values,when gpu is used are 2-1024, if the CPU is used it is limited to 2-128 (higher values are clamped to 128) it's also a good idea to enable OpenMP, when the fallback to the CPU implementation is used. "Radius" The radius around each pixel, from which the SSAO is computed "Distance" Distance (front to back, along the camera view axis) which occlusion reaches "Gamma" Gamma correction for occlusion only "Density" Density for sampling "Softness" Softness of the edge of occlusion "Luminance influence" How much luminance affects occlusion (gpu only, and only when applied to finalrender) "Blur the effect" Enables blurring for the effect itself (not the applied effect) "Radius" The radius for which the blur is calculated (gpu gaussian blur used) "Apply to finalrender" See GPU Postprocess effects when "GPU Postprocess effects" is set to ON and "Applying each pass" is ON and the gpu implementation is used the effect is applied each pass. GPU Post process effects v18a (only OpenGL3, driver version 3.2 or higher is needed) Accessed in Render settings This implements some post effects as GPU calculated effects, they are faster than the normal posteffects applied to the camera. An additional logfile (GPUShader.log in the A:M installation directory) is created, when such aa effect is used (for bug hunting) if an error occurs, the master.log is also needed for bug hunting the order for computing the post effects is SSAO, Blur, Different Post effects. Settings for each GPU post process effect "Applying each pass" When You render with multipass ON, the effect is applied at each pass. "Apply to final result" If this setting is OFF, the result from the posteffect is saved as a seperate image file (also for every pass in multipass), and not added to the final result image. The imagefile is saved in the directory where the final image is stored and appended with the posteffect name and pass number. "Samples" How often the post effect is applied. Blur Additional setting, "Radius" which controls the radius for which the blur posteffect is calculated Different Post effects additional setting "Post effect Type" Available types are "Greyscale" "Sepia tone" "Negative" "Sharpen" "Dilate" "Erode" "Laplacian" "Prewitt" "Sobel" GPU Post effects in NetRender v18a Netrender can now use GPU Post effects too, if the machine where the slaves are running supports this NetRender note v18j Problem: The GPU memory total amount RenderSlave uses is too big. Solution: It is configurable for each render job. Default value for GPU and OpenMP using is OFF, it can be changed on the first page from the job wizard (renderserver) The configuration is render job dependent and has precendence over the gpu settings on the render options page SubSurface Scattering speedup v18k When OpenMP is enabled Save with unpremultiplied alpha v18j For compatibility with video or image editing programs that may expect "premultiplied" or "unpremultiplied" alpha channels Setting on output properties page, default value is OFF. Post Effects Shadow and Alpha v18a added to the list of possible input buffers in Composite Projects Prop note v18p For decaltype "Color" the alpha channel is not used in final render, if You need this, change the decaltype in the chor to "CookieCut" (the obj file format doesn't know such a type)in contrast the realtime render use the alpha channel, even the decaltype is "Color", but I will not change this behavior due heavy side effects. Render resolution presets v18e added: "UHD" Ultra high definition television 3840 × 2160 "DCI 2K cropped" (CinemaScope cropped) 2048 × 858 "DCI 2K native" (native resolution) 2048 × 1080 "DCI 4K cropped" (CinemaScope cropped) 4096 × 1716 "DCI 4K native" (native resolution) 4096 × 2160 Import/Export plugin Image format TIF v18m supports save and load. Multiframe Tiff not supported (load only the first frame, save not supported) plugin Image format TIF, v18n Added compression dialog. Available compression types: None, Packbits, LZW, Zip. Default is LZW. Plugin Image format PSD (Adobe Photoshop) v18m supports save and load (save only uncompressed) Layer and Masks are not supported (load and save) Greyscale with Alpha not supported (load and save) OBJ sequence exporter v18m obj export plugin ask only at the first frame , if the filenames for decals should be unique, when a range of frames should be exported. New OSX v18n psd and tif imageformat plugins added Hash Poly Model is renamed v18b Was *.ply", now to " *.plh" , because it is NOT the original PLY format developed by Greg Turk (Georgia Institute of Technology) Prop options v18a When you hold the Shift key down, while selecting "Import" -> "Prop" a dialog pops up where you can change the behavior for the imported Prop "Scale the prop at import" Down/Upscaling the prop with the given value(obj files only) "Discard textures" textures for this prop will not loaded and assigned "Don't display information" the information dialog for new imported props is suppressed These settings are saved in the project too, so if you reload the project the same settings given here are reused. The import process can be cancelled with the escape key. Export plugins "Generated Model mapsize" can now be up to 8192x8192 v18m Polygon exporter option changes: v18a STL (Sterolithography) is now an export option. Subdivisions now offers 1, 4, 16, 64, 256, 1024, 4096, Adaptive subdivisions. Higher subdivisions can more accurately render low density spline mesh curves to polygons. High subdivision exports may be lengthy in time and create very large files. Generate Model Maps If "Generate Model Maps" is active, only the model map texture is exported, this texture is like a baked surface and includes other applied textures too. The texture is now written as a 32bit bmp (with alpha channel). Min and Max Size can now be "512" too, it is the min/max size for each patch in the created texture, depends which size is needed (patch fully covered from a texture is using the max size, a patch with only surface changed the min size). Remove degenerated faces at export It no longer breaks the UV mapping, It is useful if you want to create valid obj files and 3/5/Hook patches are in the model. It is simply not possible to create only quad polygons (which are valid) for example for patches with hooks, in this case the exported obj file now has Quads and Triangles (have not seen problems in this case with other polygon based apps). Previous, obselete note: "Remove degenerated faces at export" v18a Caution: if this is checked, the UV datas are no longer valid , should be checked only if You export for 3D printing (solving problems coming from hooks / 5pointers) Texture handling Only the first texture for a face is used, because a face can have only one material and uv coordinates assigned, but it can be a multi texture (like the from BakeSurface created one) Copy Textures Dialog This dialog are now only displayed, if the texture files are not in the 8.3 format. "Export normals" If the checkbox isn't checked, normal information is not exported, this information is only a hint for other importers and not needed in general (most of the programs are rebuilding the normals at import), unchecking this option reduces the filesize. Other Expressions: new keywords v18f CurrentValue() Returns the current value for this propertie, before the expression is interpreted. VectorF( x ) Creates a vector by filling the three floating point values x, y, and z with the initial value. Vector2( x, y ) Creates a vector2 by combining the two floating point values x and y. AtFrame(frame , n ) Returns the value of n at the given frame. GetFrame() Returns the relative frame within the action. When in a choreography, this is equal to the chor's frame. Clamp( n, min, max ) Clamp the value n into the range between min and max OpenEXR format upgrade v18i From OpenEXR v1x to OpenEXR 2.2 (addresses exr and hdr image io, read and write(only exr)) Open EXR Compression methods now available NO,RLE,ZIPS,ZIP,PIZ,PXR24,B44,B44A,DWAA,DWAB) Definitions of OpenEXR compression types (Wikipedia) :https://en.wikipedia.org/wiki/OpenEXR#Compression_methods Explanation of OpenEXR compression uses (third party): https://duduf.com/understanding-openexr-image-compression-methods/ OpenGL3 driver v18a (had also the possibility to use features from newer OpenGL versions, if detected) This is now the default driver, the other OpenGl driver exists only for backward compatibility if the gpu/driver doesn't support OpenGL 3.0 (for gpu postprocessing OpenGL 3.2 is required as minimum) When you switch the drivers, a restart is highly recommended! This driver works faster in realtime mode (in special with high count patch models/models with transparency) and enables some additional features. It also contains some bugfixes for realtime displaying. OpenGL Driver note v18e If the error message, "Your hardware configuration does not meet minimum specifications needed to run the application. The application must close." appears please set in the registry (OSX Masterprefs.ini) the value for "OpenGL3" "Max Vertices" to a lower value. OpenGL Driver notes v18e reworked the opengl3 property page all settings on this page having only influence for the realtime rendering bilinear filtering for real time textures removed the next 3 options have only influence for realtime textures "Anisotropic filter" for textures added, can be switched with the same named checkbox on the opengl3 properties page, only avaible if the "GL_EXT_texture_filter_anisotropic" extension is supported from the gpu driver "Scale always to power of two", if this checkbox is checked all textures are scaled to the next power of two value for width and height (256,512,1024 and so one) "Compress if x or y > xxx", if this checkbox is checked the textured are stored as compressed texture in the gpu accesible memory, the value means the size for the texture width or height , and is the computed from the "GL_MAX_TEXTURE_SIZE" value, for Your GPU this value can be shown if You save the list of extensions "Show All" on the property page than "Save") "Antialiased Lines" only a hint for OpenGL , that lines should drawn anti-aliased "Inverse sort order" transparent Patches are drawn in reverse order (Z- to Z+) "Polymode" in shaded views, the polygon structure is displayed, which will be used when You export the model/chor in a polygon export format like stl/obj etc. Special note for OSX users if You get uglish(?) decals/rotoscopes please try first to set "Scale always to power of two" to On , even the OpenGL extension "GL_ARB_texture_non_power_of_two" is reported , it looks like there is problem with the driver (seen the problem on systems with a nvidia gpu, ati or intel seems to be ok) Plugin Amplitude v18a Added possibility to use a frequency band as controller, Amplitude Plugin Documentation Amplitude Plugin sub-forum has user examples and PRJs Bake surface option changes v18d default values now the following Resolution 10 Margins 1 Maximum textures size Automatic Overwrite Files True Delete old decals False Delete materials False If Bakesurface is started without the dialog (Shift + LMB) last settings are used the created decal images having now a new naming scheme "bs_"modelname"_"texturetype"."extension (jpg as default) with this change it's possible to bake more than one model in one projectfile new combo box "Maximum textures size", where You can select wich size the created decalimages should have Automatic - based on Resolution , the best matched size (as in previous A:M versions) 128 - maximum texturesize 128x128 pixel and so one up to 4096x4096 only the 64bit version has the possibility to select 8192 as maximum texture size the algorithm tries now to match this value in one dimension new option "Delete materials" If this is checked , all materialnodes (! INCLUDING particle materials !) are removed from the model and groups and the surface atrributes are set to the default values Volumetrics v18a Draw shaded in real time view option added for Default Off. If it is set to On the a shaded cone is drawn if real time views are set to shaded. stamp editor v18d Allow undo functionality in the basic undo/redo functionality added, selections are not undoable, only corner CP moving is undoable. Special functionality for command key's + LMB in the stamp view (only as reminder) Ctrl key (Mac Command key) + LMB split uv stack and add the nearest corner to selection Shift key + LMB add uvs to selection Alt key + LMB add vertex to selection New for OSX installer v18i A SSE4 version is now distributed too , the installer for this version detects if the CPU has the capabilities for this version, otherwise it doesn't install. This results in needing a secondary installation packet . To avoid to download the false packet, You can look at http://en.wikipedia.org/wiki/List_of_Macintosh_models_grouped_by_CPU_type if Your mac supports sse4.2 or open a terminal and type "sysctl machdep.cpu.features" (look in the output for SSE4.2) or look in your Master.log (Available instruction sets)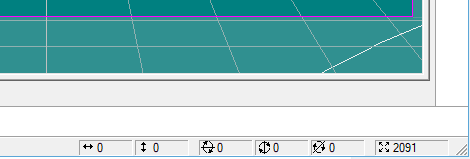


-
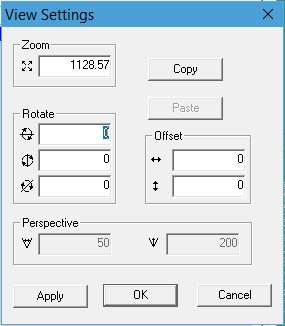
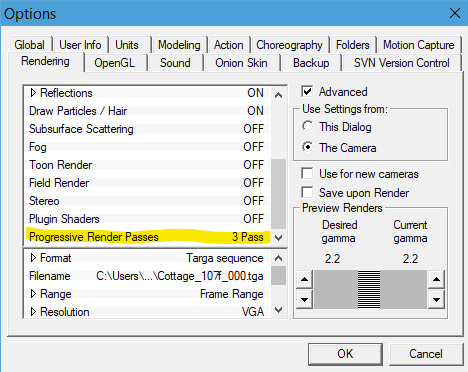
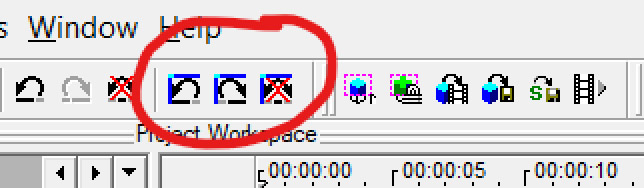
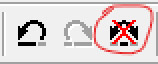
This is an edited compilation of A:M's incremental release notes so that they may be found in one place. This includes new features and enhancements but excludes bug fix and SDK reports. I will endeavor to organize this and add links to relevant documentation and explanations as I find them. If you see something here that already has existing documentation, PM me and I will add it. v19 New features and enhancements Top Five Hot v19 Features... Bullet Physics includes soft body simulations SVG importer enables design of lathe and extrusion outlines in low-cost vector art programs Bias Handle Aim at next CP simplifies common mechanical modeling task of creating straight splines Birdseye View Queue allows stepping through many previous birdseye views Scale to X=0 reduces common Copy/Flip/Attach prereq to one step Been away for a while? Check out the v18 features in the next post! Bullet Physics Bullet replaces Newton for dynamic simulations. See full Bullet Section at bottom. Speedup Coding optimizations make v19 render 10-15% faster than v18. This benefit will vary by CPU Interface Birdseye View Queue v19a It is now possible to step back/forward through many previous Birdseye views rather than just recalling the single most recent one (Numpad 7). undoing/redoing for view position now have a separate undo stack, have their own buttons and shortcuts... shortcut for view undo Shift+Alt+Z shortcut for view redo Shift+Alt+Y If You don't make a new install or "Reset Toolbars" You must manually add the buttons from Tools->Customize->Commands->Standard Discussion thread: https://forums.hash.com/topic/50244-birds-eye-view-queue/ Clear Undo stack (Edit menu) v19a Removes all entries from undo/redo. Also has a button... Forum thread Feature Clear Undo Stack Choreography Groups v19L Added the possibility to add other objects to the named chor group(select the chor group -> than Shift + LMB Selectionobjects. Can be deleted with a Dialog (RMB -> "Remove From Groups..."). "Constant" parameters in PWS now display their current values in the timeline. CP Weights dialog box v19c Remembers last position. Duplicate for objects in a chor. v19a Right Click/Duplicate Menu entry "Duplicate" for objects in a chor. If the Shift key is held down while clicking "Duplicate," keys from the source object are not copied. Progressive Render Limit v19c Progressive renders can be set to make less than five passes to allow more quickly regaining control of the interface after onscreen test renders. This setting also exists in Camera properties so each camera view can have its own setting. Render settings dialog box v19a Resizable Maximize Render to File Dialog Window button added File Menu>"Render to File" Option added Render to File dialog box Size/Open/Collapse state are remembered. Works only in "Advanced mode" Two new buttons here too, "Expand All" and "Collapse All", expand/collapse all possible properties Reset Toolbars (Help menu) v19a Reset all toolbars to their default layout. Save before Render: v19a saves the project, if it is modified, after hit "OK" in the "Render to File Settings" Dialog can be controlled with the "Save upon Render" checkbox at Tools/Options/Rendering , Default is ON Translate manipulator minimum size v19m The translate and the scale manipulator now scaled up, if the size is too small AND the "World Space" button is set to ON. Viewport settings Copy/Paste v19j It's now possible to Copy/Paste Viewport settings from one window to another one. Click on the Viewport settings display to open the "View Settings" dialog for the source window , push "Copy", open the "Viewport Settings" dialog for the destination window, push "Paste" Viewport Settings display is at lower right corner of A:M Modeling Bias Handles: Aim bias handle at next CP v19n Holding ALT while adjusting bias handle snaps the bias to the next CP on the spline in direction of the handle side. SHIFT+ALT leaves the bias handle on the other side unchanged. Discussion thread with demo video Bias Handles Snap to Grid button v19a New button for this , Tools->Customize->Commands->Manipulator (default key Shift+2) Acts like "Snap to Grid". Existing installations needs to add this button manually to the toolbar or "Reset Toolbars" [demo video in post] Bias Handles Snap To Grid menu option v19a When a group of CPs is selected, >Snap Bias to Grid snaps the in- and out-bias for the selected CPs to the nearest grid interval. CP weighting dialog Cancel/Undo/Redo v19a The weight dialog has now a "Cancel" button , which reverts the changes done in the dialog to the state before the dialog was started. Weighting has now also a general Undo/Redo , if the dialog is exited with the "Done" button. Remove Internal Patches v19a "Remove internal patches" Tries to break internal patches , detach CPs from detected internal patches and create a named group with this CPs for 3 and 5 point patches it works only partially depends on the spline layout. [demo video in post] Remove unused drivers menu entry. v19a Delete all drivers without a key available only for model cache, not for instances. Remove User Properties menu entry for models. v19a Deletes all user properties and relationships for this model available only for model cache, not for instances. Warning : This action is not undoable Reset Main Bone v19h Set the main model bone back to the default values (helpful for simulation with bullet constraint, if the main bone not at default , unexpected behavior can occur) For objects> menu -> "Reset Main Bone". Scale Group to X=0 v19a Before doing a Copy-Flip-Attach it is good practice to scale all the center spline CPs to be truly on the center axis. Now this task can be done in one step: select the CPs and then >"Scale Group to X=0". Show Groups, where the CP is included Button will show which groups a CP is in. For existing installations the button needs to be added manually. Add the button Tools->Customize->Commands->Manipulator -> "Show Groups, where the CP is included" to the toolbar, or "Reset Toolbars" For new installations, it's default in the manipulator toolbar. Works only for single selected CPs. Spline and CP selection from PWS v19n It's now possible to select Spline and CP from the PWS. Select the Spline or CP (under Objects -> Your model -> Splines) and hit SVG importer: v19a Plugin for importing the SVG vector graphic format. This enables graphic outline importing as the .AI importer does. Particles/Simulations Particle system: Hair v19a Support for Turbulence on forces. Forces no longer need high magnitudes to affect hair dynamics groom mode: selected guide CPs now drawn with the selected CP color groom mode: added possibility to select more than one Hair guide for operations except the "Brush Mode" operation two new buttons "Select Hair guides" if You press this button you are now in the selection mode, and can select more than one Hair guide. Limitation: it's only possible to select one Hair guide CP, for the other selected Hair guides the Hair guide CP from the first selected Hair guide is used. "Deselect Hair guides" deselect all selected Hair guides Hair grooming Disable Particle System Update v19o For faster manipulation of hair guides. Implemented for Edit, FK, Brush and Lengthen Mode. [demo video in post] New button "Disable Particle System Update" is available under Tools->Customize->Commands->Categories:Tools to add this to Your grooming bar... The other way to enable this button is Help->Reset Toolbars If this button is checked, the particle system is not updated while you're modifying the hairguides. Be sure that only the window where You modify the guides is visible (no tiled or cascaded view mode), otherwise the other views are updated. Particles: Color change over lifetime v19L Streak and Blobbies there is a new Bool property, "Color change over lifetime". This controls how the color is changed. Default ON: the color is changed over the lifetime from each particle OFF: the color change is done for all particles simultaneously. Simcloth v19c Simulations faster with with OpenMP (multicore processing), to disable this option set "Tools->Options->OpenMP Threads" to "Disable OpenMP" Simcloth v19b "Custom Attach groups" now only editable in material instances. Makes no sense to edit the cache. Attach groups are used for temporarily constraining a portion of a SimCloth to a bone. For example, to have a character pickup and drop a handkerchief. new property "Remove previous simulation Data" Deletes the simulation data from previous Simulation. Setting it to "OFF" is helpful, when the cloth object has many CPs. Default is "ON" Plugins plugin: Batch v19d added Bullet "Rolling friction" and possibility to set the values back to default. Plugin: Brick v19a it's now possible to add Bullet Constraints for the instanced model. Access with RMB>Choreography>plugins>wizards>Brick z position can be set models can be imported in user folders save/restore settings documentation Plugin: Simple_Scatter v19a it's now possible to add Bullet Constraints for the instanced model models are now imported into user folder documentation Polygon import plugins v19L If peak tolerance is set to 0 , all CPs are peaked ,useful for importing mechanical models. If peak tolerance is set to 360 , all CPs are smooth Other Bake Surface: optional larger margin for Baked Surfaces. v19a Makes it easier to use some paint program filters on tiled image maps. Options dialog accessed by holding SHIFT while selecting "Bake Suface" Distortion Box Action Objects Resolution v19a Now the same resolution as the modeling window Distortion boxes (maximum 1000), and now uses for initial value the same settings as for the distortion box in the modelling window. Measure Distance v19n Menu entry "Measure Distance". Select 2 CPs (both in same view) -> -> "Measure Distance". If more than 2 CPs are selected the distance is calculated for the first 2 CPs in the group. Can also be started from the PWS, select a CP entry, then select a second CP while holding down the CTRL key -> -> "Measure Distance" "Render Stamp to File" v19p Discussion in AMReport 7054 Discussion in v19p announcement This renders the actual stampview to file with a user defined resolution. If You start from the stamp entry in the PWS and the stampview isn't open, a new stamp view is opened. In the dialog , which opend after hit the menu entry, You can change the Path and Filename (the button on the right side) fileformat is selected trough the filename extension (supported OpenEXR, TGA, PNG and PSD) the "Width" and "Height" for the newly created file limited to 16384 x 16384 for Win64 version, 8192 x 8192 for the others the limitation is the result size , means a resolution from 32768 x 8192 is also possible. Warning On the highest resolution around 14 Gigabyte is needed at the creation process. The width and height are always changed to a even size. (1025 becomes 1028 , always modulo 2) "Save layered" If this checkbox is checked, two layers are created , one for the decal self and one for the splines. For all formats ,excluding OpenEXR, in this case two files are created with the naming scheme "Filename"_Decal".Extension" and "Filename"_Splines".Extension" OpenExr is saved as one file with two layers. "Render with CP's" rendering also the CP's on the spline layer A new menu entry for single stamps / a opened stamp view is added. Bullet Physics - v19a Bullet replaces Newton for simulations. Bullet includes soft body simulations which were absent in Newton. Alpha Documentation constraint: Bullet Constraint for dynamic simulation with the Bullet physics engine. constraint: Bullet Soft Constraint v19d Model with this constraint applied act as softbodies (deformable hull) in Bullet simulation Reset Main Bone v19h for objects> menu -> "Reset Main Bone", set the main model bone back to the default values (helpful for simulation with bullet constraint, if the main bone not at default , unexpected behavior can occur) Plugin: Add bullet constraints to multiple models in a cho. v19a on choreography -> "Add Bullet Constraints to multiple models". Plugin: Modify Bullet Constraints on multiple models v19d Modify parameters for bullet rigid constraints on multiple models in a chor. Only parameters where the checkbox "Set" is active are applied to the selected bullet constraints. on choreography -> "Modify Bullet Constraints on multiple models" Menu Remove Bullet Constraints v19d menu for Choreography has now an entry "Remove Bullet Constraints" starts a dialog, where You can select the Bullet constraints , You want to remove from models (Extended selection in the listbox) Menu Bake and Remove Bullet Constraints v19h for chor > menu -> bake simulation data and then remove the Bullet Constraints from the models. If the Shift key is held while clicking this entry, a simulation run is first done for all Bullet Constraints. Plugin: Batch v19d added Bullet "Rolling friction" and possibility to set the values back to default. Plugin: Brick v19a it's now possible to add Bullet Constraints for the instanced model. Access with RMB>Choreography>plugins>wizards>Brick Plugin: Simple_Scatter v19a it's now possible to add Bullet Constraints for the instanced model


-
I rendered the scene in five houres. I'm a bit concerned about the straight line under the particle surface. Maybe better to lift the camera a bit. This scene has nine sprite emitters, six underneath the launchers for smoke and fire and four in front of them with a turbo smoke and explode. It looks as if the smoke overbrights the explo emitter. The first frames without sprite activity render fast, ie 4 seconds, the others go about 2m30. Yet it isn't still what I was looking, maybe the explo.mat is a bit too dim. 07start.avi
-
The Bias to Grid-one is a pretty new feature from a feature request I did ;). It helps a lot if you are using it for mechanical modelling. It really should help making mechnical models. Just have a look at this: https://www.patchwork3d.de/snap-bias-to-grid-195-en Best regards *Fuchur*
-
That... sounds like "Snap Bias to Grid" is on. 😀
-
That can't be because the "notchiness" also occurs while adjusting bias handles. I suppose that depends upon your definition of "extreme". 😉 (See attached images.) I agree it's most noticeable when zoomed in (zoom = 43000) but on my machine even zoomed out (zoom = 3200) it's still there. And when I'm trying to align all splines in a flat surface using a ruler line as a reference, zooms of 100,000 are not out of the question. At those zooms, aligning a notchy bias handle becomes a bit of a chore. Thanks, Steffen.


-
That sounds like "Snap to Grid" is on
-
Here's four, 8026 gal. tank cars all made in the same factory but painted with the logos of various vendors. I also tried to make each car to have a different level of surface dirt and rust.


-
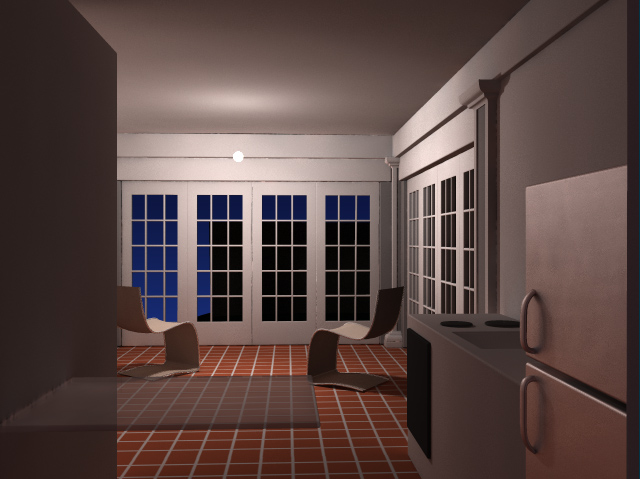
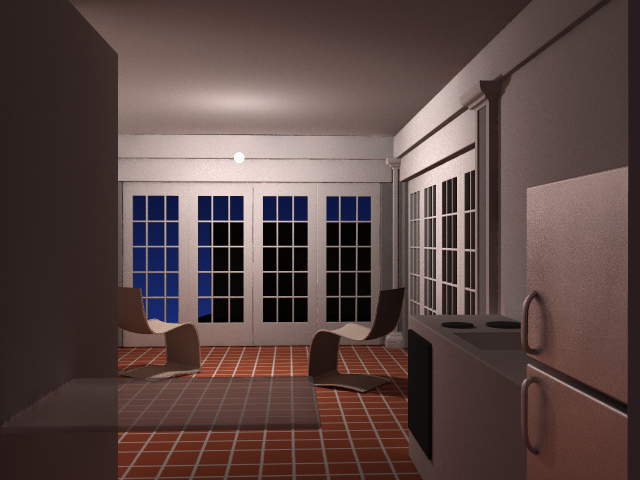
@R Reynolds Here is a less noisy render of a similar frame. More Final Gathering Samples and much less "Jitter" (dithering). The refrigerator door with its higher specular is difficult to remedy. Maybe if it were textured with a bumpy surface like a real fridge door instead of a flat plane it would be less troublesome. Or maybe some refrigerator magnets and kindergarten art all over would fix it. Final Gathering: 500 samples, Jitter 5% 18 minutes 250 samples, Jitter 15% 12 minutes The original render was 100 samples, 100% Jitter 6 minutes
-
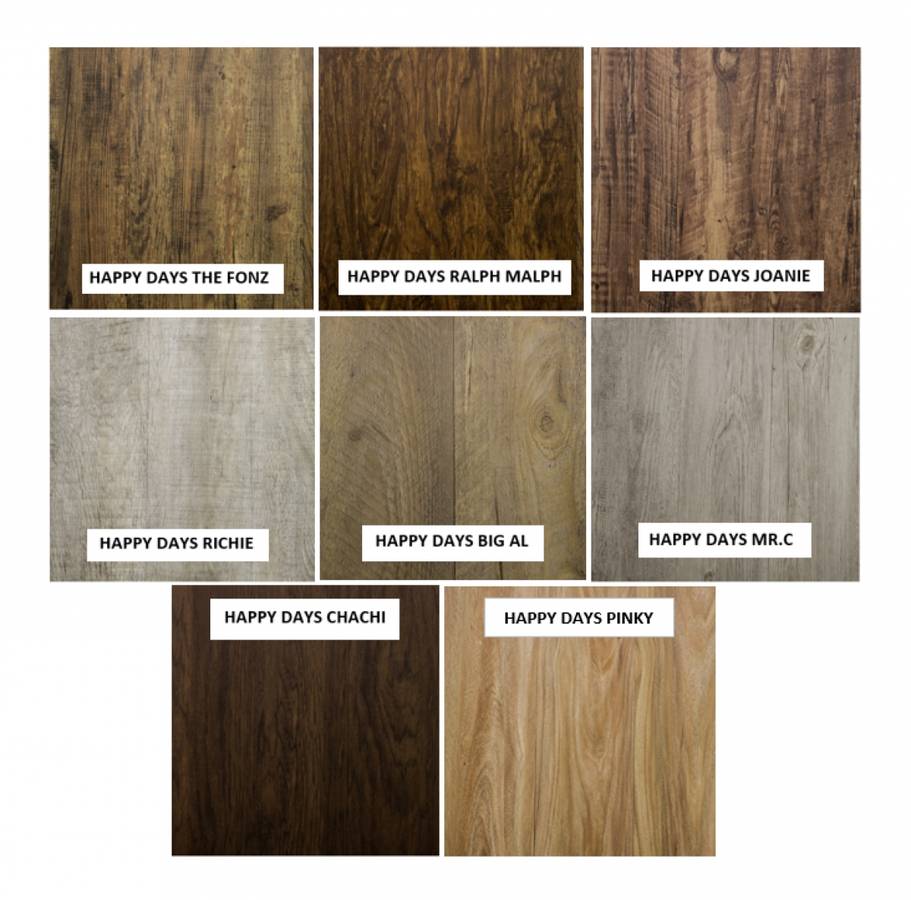
Much like how we do textures in CG, vinyl "wood" flooring is really just an image applied to a surface. But carefully chosen texture names can go a long way to suggesting the allure of natural, organic substances Vinyl samples seen on Craigslist...
-
I'm guessing the fluid properties can be animated so the gravity is normal and then zero gravity takes effect when the blob hits the surface ...
-
Yes, his "action" paintings were all done horizontally but I was just looking for an example to describe the animation of something splattering against a wall or other vertical thing. Do you think that is possible to make a blob (or other particle or sprite) stick to a vertical surface?
-
this is a cool project I tried the other day to do a Boolean cutter from scratch to make a group of 3d text engrave into a surface, but I couldn't find the setting any more on the Mac version - haven't used it for years but I was a multi-platform feature unless that changed I searched all the bone properties in the workspace and nothing, but I remember using it anywhere as it's in the standard manual and not listed as a PC-only feature anyone know if the Boolean Cutter feature is on Mac and PC or just PC? I'll try opening this project on the Mac to see if it works
-
thanks! Not with "volumetric" effects Particles. I can't think of an animated movie where that has ever been explicitly shown rather than merely hinted at. It's the kind of thing you only see in heavy metal videos. One problem is that A:M particles can "die on contact" with a surface but otherwise are not affected. A force would have to be somehow on the surface of the surface and forcing the particles out of the way. Here are tests of cigarette smoke with particles which is like a very small mist. You have to full screen it and turn off the lights to see the smoke https://youtu.be/uHHIUwYG5N0 https://youtu.be/Egdd7k5Yr2g https://youtu.be/YgJl2mTNT48
-
I chose to modeling and animating in A:M and test-Render came out as Shaded & Wireframe until I was satisfied with the animation and then exported (.obj sequence) to rendering / compositing / editing in Blender. I don't have any knowledge of script writing, so I have to import .obj to put in the Blender's Scene in frame order. Which is something that is repeated Is a boring job And takes longer than animating in A:M Lighting in Blender is easier than lighting in A:M and Blender can render quickly. And get the image to be very realistic Unfortunately, the Materials and Decal in A:M cannot be exported with .obj, but luckily, the configuration of Surface properties in a group in A: M models can be converted with .obj to some Shader values in Blender, such as Diffuse Color, Diffuse Falloff, Transparency. I also made a clip as an example. Manok_LoveMask4all_v2_mix_AM_a_0000-0132.mp4
-
Snoopy vs. Red Baron
Michael Brennan replied to Michael Brennan's topic in Work In Progress / Sweatbox
Modeled the scarf and playing with some surface properties... will work on the dog house next.