Search the Community
Showing results for 'project'.
-
Mark, Don't know if you read my latest post in the Animation Master discussions "Creating leaves with hair?", but I ran into a problem when using hair with my "growing stick" rig. The leaves follow the group if I rotate or move the stick, but if I use the pose slider that lengthens the stick the leaves don't follow. They simply stretch (even when rendered). Have you noticed any similar behavior? Got any ideas about how to avoid this or fix it? I have sent the project files to the Hash support folks, so I expect they will figure it out soon. Thanks! Bill Gaylord
-
I'll put away my train wreck helmet and say I'm proud to have been a small part of it. It was very flattering to be asked to join in, particularly since I had not demonstrated the ability to do more than four or five seconds of animation in a week. Perhaps Zach was just desperate. None-the-less it fulfilled a long-time goal of mine that I might some day good enough to be asked to work on someone else's project. I can't help but think that if we had roped in even just one more animator we would have made the 48 hour mark. It was exciting trying. Fence-sitters: you missed out. I'm sure some people will sniff at this because it's not ultra detailed and textured 3D. Screw them. I'm very impressed by the script Zach et al. produced in no time at all. I know people who are actually employed as writers who couldn't crank out a genre parody with all the elements in two months, never mind two hours. And I am most envious that Zach has such a creative entourage of friends that can contribute to his projects. My friends think they're being creative if they replace their avocado refrigerator with a stainless steel one.
-
Ran into problems with the new 11.0b update, but I think I'll be able to work them out. So in the meantime here is the toonleavs model to test out. I would like to see some of the results of your tests please. It will keep me motivated to keep working on the project. The bushes are the default model, just scaled and slider changes. The trees are imported into the model and the material dragged into your group, just like the other model was. Deleting and renaming still apply. This is designed to not use a leaf image.
-
Here're some renders from my final project last year in the modeling class that Bill Y. and Nat S. taught: http://img32.photobucket.com/albums/v97/Ji...scene6_copy.jpg http://img32.photobucket.com/albums/v97/Ji...scene5_copy.jpg http://img32.photobucket.com/albums/v97/Ji...scene4_copy.jpg http://img32.photobucket.com/albums/v97/Ji...scene3_copy.jpg http://img32.photobucket.com/albums/v97/Ji...scene2_copy.jpg http://img32.photobucket.com/albums/v97/Ji...scene1_copy.jpg Let me know what you think!
-
I'll contribute to the discussion since i've spent most of this semester working with KeeKat here at UMass. I found KeeKat to be both a beautiful model to work with, but also a VERY forgiving one. He responds well to some pretty odd positions. It's also quite fun to have the tail to work with, which is pretty unique in comparison to the boy model we worked with as well.... it opens up the door for some creative posing. A huge thanks to Bill Young for providing us with a great model to work with at the school. I figured i'd post my final project for this semester, since it includes KeeKat. Credits go to Bill for the KeeKat model (the bike is my own)... even though i forgot to credit you at the showing, lol! The Fast and Not so Furious ~Justin Parker UMass Senior
-
How about some toon plants for my project.
-
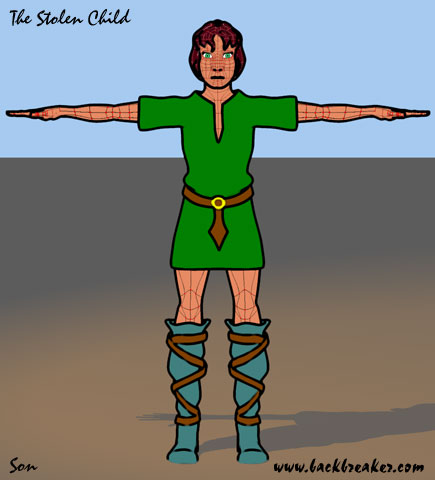
Well, I've been kind-of bad this week and didn't get as much done as I would have liked. I did, however, finish off the final modeling touched on the 'Son' (i.e. teeth, eyelashes and the such) and am now on setting the model for texturing. Right now, I've got all his hair and skin templeted and ready for painting. I was hoping to have all of him done today, but I got sidetrack on another project (re-redering an earlier short, 'Yote Tail for posting to the AMFilms site). More next week!
-
Thanks Sharky! I'll finish it though it will be awhile. This one is my 'when I get time' project. My short is taking precedence. Doug
-
Hi Parlo! It's a great stuff,and I too like your lip sync animation! I ask you that please help me in lip sync topic! I have a big problem with my lip sync animation. I'm working a project and I need to animate a dialogue,what I made it,but my problem with it,that my models's mouth is moved very fast and much!!! What's the problem with my animation? Can you help me and please show me how can I do this? How could you make your lip sync?( I'm interesting in animation in particular!) Thanks before and I'm waiting your answer! Sharky
-
Well, at long last--well, only two days, but that's as long as it took to make the darn thing--our animated entry in the 48 Hour Film Project for Washington, D.C. is available on AMFilms: http://amfilms.hash.com/search/entry.php?entry=744 A larger version (640x480, 33MB) is also available: http://www.shipbrook.com/mpegs/DuckSauce.html Just to remind everyone, this was created from start to finish--writing, acting, modeling, animation, rendering, editing, and music--in about 53 straight hours by a team of ten: six people local to D.C. and four others scattered throughout the Internet. We were given a series of elements we had to incorporate (the genre was ours alone, but the rest were given to every team): Genre: mystery Prop: rubber duck Character: S. Baxter, professional photographer Line of dialogue: "You know I love the _____." It was screened at the American Film Institute's Silver Theater (Silver Spring, Maryland) on Wednesday May 11 to thunderous laughter and applause. Although it was handed in past deadline, and is therefore not eligible to go on to the Best of City or Best of Year competitions, it is eligible for an Audience Award (the audience's favorite among the films shown at that particular screening--about ten films, I believe). Interestingly, one of the other teams' leaders came up to me afterward and said he knew none other than Martin Hash himself, from way back in San Francisco. The world is not small, it's microscopic. A fuller account of the screening, for those who are interested, is here. We'll be polishing up some of the rougher spots and releasing a Director's Cut later in the year (hopefully before SIGGRAPH). Hope y'all enjoy it!
-
I was playing with dynamics and forces today. Here a test movie. The three models are the default settings in the project I'm working on. Stilling tweaking the settings. Made things easier.
-
My project is getting closer to completion. I had an idea last night. I had 1 leaf emitter model, 1 tree target model, and one action. I'm now adding two more of each. That way you can generate 3 trees in one shot instead of 1. You have to revert or reload project to make more. I'm trying to make more of a variety. The third ones default settings are more of a bush type plant. Still working on it. I'll try to post a pic. Have other ideas, but haven't gotten around to testing them yet.
-
Mark, Very nice. This year is looking mighty good for trees! Now I just have to figure out how to work some into a project!
-
Just catching up on reading the Forum. Looks very cool. Would be very useful for a timelapse segue in an Animation. An example project file would be great and with documentation fantastic!
-
I can't speak for everyone, but I know I will use it. I have a project that requires creating a forest, so I am interested in it. I can't wait to see the documentation. Thanks
-
It will be part of the project file I'm creating. Still updating project. I have to write up the instructions, but I'd like to know if people are interested in it first before I do that. Haven't had too many reply to my posts.
-
Hi Shaun! Thanks your answer! I'm checking this tutorial,and I'm looking this is a photoshop tutorial! Yes? But I'm interesting in your eye model in particular! How did you make it years ago or now? How much sphere did You use these eyes? How did you render it? Did you use the lights in the eyes?, etc. Ps.: I'm so waiting your lip sync rig and animation tutorial keyframe by keyframe! Because I'm working a big project and I need to be a good lip sync in it! I'm waiting your answer! Thanks before, Sharky
-
Added new slider to model for fruit or flowers. 30 frames vga qt sor3 multipass on 4 passes 14 sec a frame 7min 26sec total aprox 15 min to build tree and render movie with project I'm putting together.
-
I'm not sure how long it took to render, not that long though. I'm creating a project that has the leaf emitter model and a basic tree model to use with Treez plug-in v.3. I found a way to transfer the hair material to the tree model without losing the sliders for the hair. It will include leaf and bark images. If people are interested I will create a folder with project, images, 2 models, the treez plug-in file and a text file with instructions on how it all works. I'm still working on gathering images and attempting to add a second emitter to add more density or to add flowers or fruit to the tree. I found a couple of problems with the first model that if you add it to the tree branches they take on the color of the material, if the tree is not decaled (v.3 treez plug-in decals tree). The second is if you add it to a group that is not attach to the tree the same happens. You need to set the transparency to 100% on the group and 0% to the material. Now back to finding more images.
-
Another hair update. *note* I did not model the hair. I took it off the CD from the Jane model (merely as an experiment, but man do I like the look). If I could model her hair like this I would. If not, is it legal to use a portion of another's model in one's project? I'm pulling my own hair out trying to get what's in my mind ! Comments welcome as always. Cheers. Doug

-
Here is a director's chair I built the other day. I found a free wood working project with schematics! No really! I used the diagrams for the wood working project and traced in A:M. Cool way to test out wood working projects I guess. I also used Jeff Lee's fantastic web based sky light rig gizmo! That thing rocks! Anyone needs a director's chair I will post it somewhere... it doesn't fold up though. Vernon "!" Zehr

-
here, the project grass_test__by_cronos.zip
-
That is a toughy. It all depends on how brave you are. You may want to model the clothing into the character on your first attempt. On the CD Jim Talbot uses a really cool method on the Tarzan and Jane characters where the (minimal) clothing is attached to the model. On the other hand there is no reason you can't model the clothing separately even if you do not use the cloth wizard built into AM. You could do it this way and just bone, smartsin and animate the clothing by hand, constraining it to the body bones and at a later date when you feel confident with the tools you can try using the cloth wizard. For the most part I have seen clothing modeled into the character with "extra bits" extending beyond for "flowing" stuff like skirts, dresses, sleeves etc. This way you could create separate versions of the character and change the outfits by changing colors, materials, and altering the clothing part of the model without a ton of effort. The few "humanoid" type characters I have done just wear really tight body suites so not an issue. I have to address some of this on a current project and will most likely have loose fitting clothing models over the character. Vernon "not an expert" Zehr
-
OKay, I've been working on more rigging and now have the neck, wrists, hands done, but I got issues with my primary rig so I may change things in the base rig once again... but I did do some animation again to test the rigs. The results made me consider more changes to the rig because of some parts not responding the way I want them to. Mainly, the elbows point at a target controlled by the hand ancor/target. Everything else seems to be okay for animation, but I want more control over the elbows, so back to work . New animation (discr: jump backward, 3 sec, 640x480, 1.53 Mb, cinepak-avi) : Jump backward animation New updated project (Just the necessary parts: model + action; 1.81 Mb) : Project: KaractorKageB For this animation I worked a lot harder on using the tools AM gives us, so I tweeked a loooooot of movements in the timeline. It's so much eaisier to do it there rather than in the action window. You have to choose two views for the action window as opposed to using the time line, in which you just adjust one value and if you hold the "1" and/ or "2" keys you can shift the values without screwing things up. I love the fact that the timeline is intuitive. Depending on whether you want to add a point to the curve or move a group or another point. A:M has an EXCELLENT INTERFACE!! I've decided on a workflow: Block out Pelvis, Hand and Feet placement Elbow, Knee and Head then Shoulders and Hips and finaly, Fingers and Toes. Note: Of course the order would be based on the focus/object of the shot. Obviously, if it is a closeup of a character speaking, you won't be animating the feet, unless your character happens to be in front of a reflective object that the entire body shows up in, but that wouldn't be the case if your character happens to be a vampire. LOL Okay, I'll stop now. Thanks for your time. P.S.- Using v11a.
-
A frame from the project I am currently revising. Can anyone suggest what might be causing the shadow to show through the wall and what might be causing the lines on the ceiling? The wall is double skinned, with a gap between the skins ( walls) V105R Win XP Toon Render x32pass cheers simon (there is a larger image but its 159k and didn't wish to impose )