Roger
-
Posts
2,052 -
Joined
-
Last visited
-
Days Won
46
Content Type
Profiles
Forums
Events
Everything posted by Roger
-
I'll take a look at that, thanks. I think I screwed up somewhere along the line, because I posed my character in a Chor window. When I clicked the Action button, then picked New > Pose and set to On, my carefully posed crouching Rabbit disappeared and was replaced by Rabbit in his default pose. I think I probably should have been in the Action mode to begin with. When setting poses, does AM "remember" or set keys for the movements you make to set the pose up, or does it just interpolate pose to pose based on the initial position and then figure the best way to move the limbs to go from the default pose (whatever that may be ) the the next pose? It took some futzing to get my pose the way I want, I'm not sure I want all those movements to be visisble when going to the crouch.
-
Are the default models that ship with AM set up with IK or FK? (keekat, rabbit, etc) I've been trying to do the IK drag, it just seems easier to me to individually manipulate the bones with the rotate manipulator. I get less unexpected behavior that way. When I try to drag something around, I end up with wierd stuff happening like suddenly the arm flings itself backward like the character dislocated his shoulder, or other wierd stuff. I just set Rabbit into a "duck and cover" type pose, if I want to set this as a resuable pose or use with a pose slider, how would I go about doing that?
-
That makes sense. There are probably very few instances where you would want to translate a bone that is already rigged to a model.
-
Hello Working on the "move it" tutorial, using the Rabbit. I've noticed that sometimes when I select bones, only the rotate and scale manipulators are available. Why is that? Shouldn't the translate manipulator be available as well? Am I clicking on the wrong part of the bone? I am in skeletal mode, so that's not the problem. Not sure what I'm doing wrong.
-
Yep, that was it, not in Chor mode.
-
Here's the wierd thing, though: when I click View > pose sliders and then click on the All tab, I don't see any defined poses. I didn't think of this til just now, but I think I may not be in Choreography mode.
-
I'm a bit stuck on my personal project right now, and waiting for a new license key, so I'm back in v13 at the moment and thought I would go through the tutorials. My thinking is it is better to be doing something than nothing. I sort of glossed over the earlier tutorials in favor of the modelling tutorials, as that is what I was having problems with at the time. I loaded the Keykat model and noticed there is something a bit off about him - his eyes look like they are too far back in his sockets and one of his fingers has a CP jumping way off it. Is this normal? I loaded him directly from the CD. I can fix the eyes simply enough, by moving them forward, not sure if it will be as easy to fix the finger. Maybe I'll just use one of the other models for the exercises.
-

Would there be interest in a Bouncing Ball Bootcamp?
Roger replied to robcat2075's topic in Showcase
I've done these exercises in 2d before, and think I have a good grasp. I'd be interested in redoing them in AM, though, as a refresher. I am working on digitizing some of my old stuff, of which there is a bouncing ball exercise, I'd be interested in a critique. -
Dragons need treasure to guard, right? So here is a rough start at a treasure chest. I am wondering if maybe I should extrude the interior panel (currently has a knife edge) to try and give some depth to the front and back. I also think it might be neat to do a bevel around the edges, or maybe model some iron bits to reinforce the corners? Maybe strapping or something? I'm going to grab the padlock I modelled from a while back and see what it looks like on the front. I think I am going to do a half circle extruded to make the top.

-
Working on some odds and ends today - thought I would do some scenery. To that end I remodelled the dragon cave (lost the original somehow).
-
I ended up struggling through it and got something that looks ok, I just need to reapply the patch colors. Maybe I'll try the fix you did to the corner of the beak, it looks better than what I have now which is a bit of a mess. I'm wondering about something, though - when I do "refind normals" it gets rid of the crease/shadow on one side but it pops up on the other. Should I have done this operation before doing the CFA? Or would this happen no matter what? All in all I think it looks ok but I feel like I spent way too much time on this.
-
Yay! I right-clicked one of the problems splines and chose "refind normals" and that did it.
-
I tried selecting one of the patches that has a dark corner, then right clicking and choosing "flip normal" - doesn't seem to have done anything though. I though that there was an option to display normals but I can't seem to find that.
-
Thanks so much, I'm going to check that out. In the meantime, I'm just going to live with the creases. I'm not sure they will be all that noticeable when I apply the clay shaders, anyway.
-
I also have some bad creases around the mouth but I'm not sure thats going to be possible to fix.
-
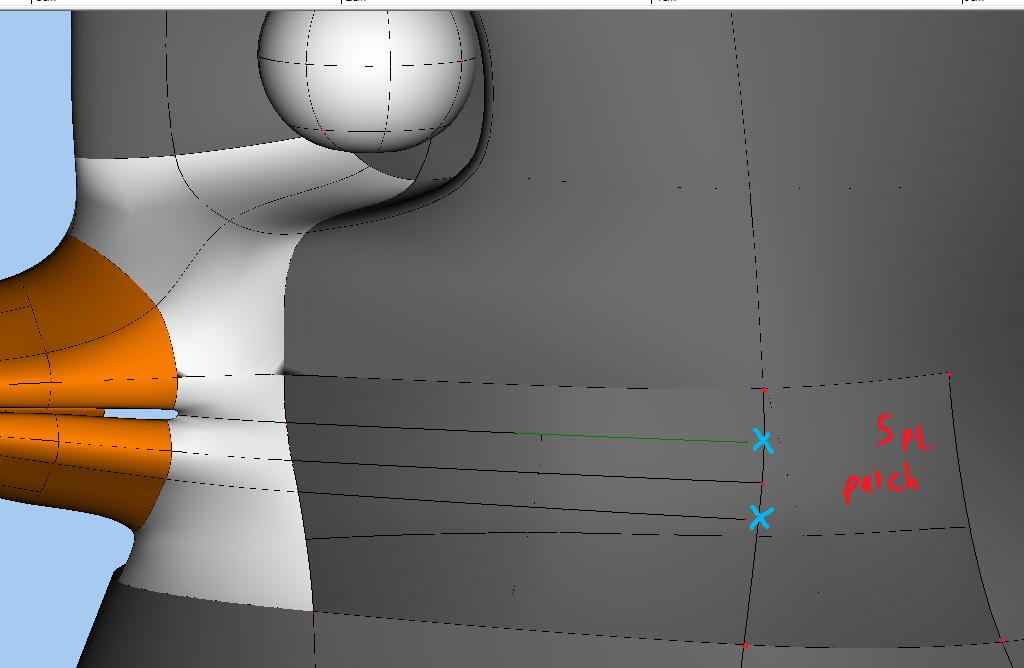
Ok, well that kinda worked. I have a ton of 5 point patches now (marked w/ red Xs) - do you think this will be a problem? I wasn't planning on doing a lot of facial animation, but the xtra rings might make it easier. At least it helped me solve the problem of how to close those patches. I will need to spend a lot of time adjusting individual CPs though, as the model looks a touch lumpy now.
-
I think I have something that might work - if I could get that large patch to be a valid 5 point patch. I've tried making it a 5 pointer and it doesn't want to be a 5 point patch no matter the order I select the CPs in. I would then hook the other 2 splines in where the blue Xs are.
-
I wonder if the reason it will not attach is that there is already a hook above and below it. That could be why its having so many issues trying to "figure out" where to hook in.
-
A hook won't attach where you've drawn it? Unfortunately, no - it would be wonderful if it did. It jumps either above or below that point and ends up looking awful.
-
Ok I've done some stitching in of new splines, I have that half of the face closed off. I'm not sure if I should use a hook to join the proposed spline (in red) to that patch to close it off, or if I sould make that a 4 point patch by putting a cp there, but ten I'm lef with the problem of how to close up that patch to the right - I can't turn it into a 5 point patch as there would then be too many CPs. I'm also concerned I'm creating to much geometry. If I hook it in, it will close everything off and leave valid patches, but the hook wants to jump to an odd position on the vertical spline, leaving the mesh looking messy. The other thing I am wondering is if I will need to redo my carefully done rigging now, since I will have all these additional splines.
-
Ok, I see where you're going with this. Do you think it would be better to fix one half of the face, then do a CFA or just fox both halves manually? Also, I'm going to be tweaking the proportions of the head in relation to the rest of the body to see if I can get a "cuter" looking penguin - do you forsee problems doing this? I'm worried that it may have been easier to just model it that way from the get-go, I'm more or less pleased with the model but I want to get it looking closer to my sketches.
-
Are you thinking of something like this? Get rid of the spline w/ the X on it and make that patch a 5 point patch?
-
This might work, but I am thinking it may look kind of odd. I have a feeling I'm going to have to futz with it a lot to get it to look right.
-
Do you mean a spline running horizontally or vertically?
-
I think I have the first bit nailed, and some idea how to hook the lower beak/jaw into the face - what I'm worried about are the corners of the beak/mouth - the part I circled in green. Not sure how exactly I'm going to get that area to be a valid patch - will probably have to be a 5 point patch I'm guessing but there are 6 points so far that make up that area.