Roger
-
Posts
2,059 -
Joined
-
Last visited
-
Days Won
46
Content Type
Profiles
Forums
Events
Everything posted by Roger
-
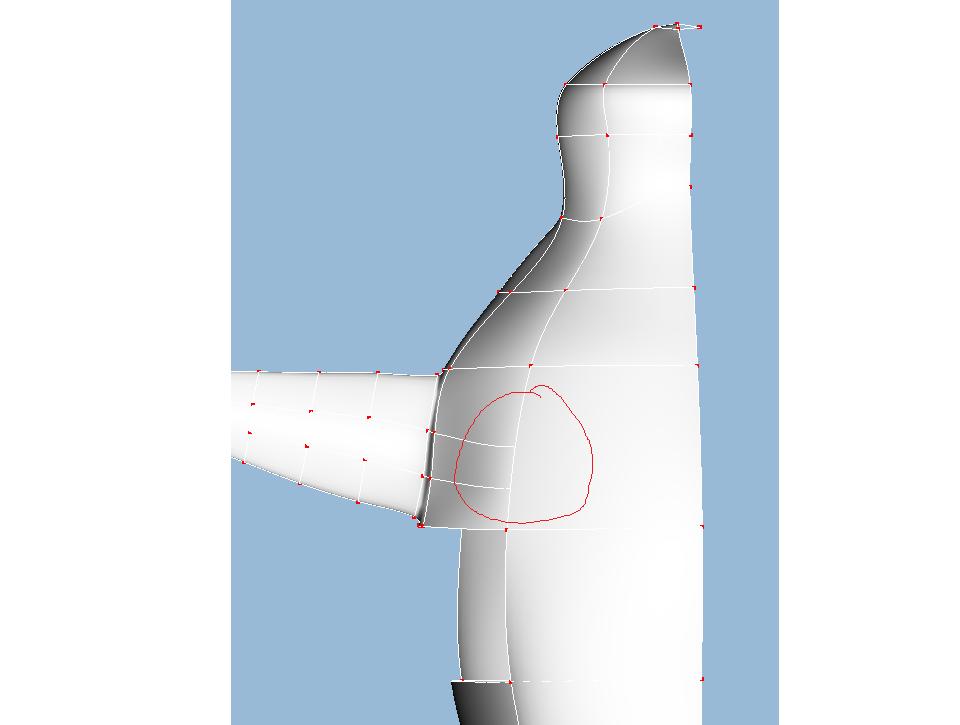
Robcat, Making some adjustments to my penguin, I used some hooks so as to not carry the splines all the way across the chest (as you suggested) but it looks a little funky. They did not want to attach at the points that would have made for the straightest lines. What do you think? I can't use hooks any earlier in without messing up the 5 point patches right where the flipper attaches to the chest. Roger

-
Yeah, I think you're right. I may need to take another look at that. I am not sure but I think that spline that makes up the front of the ankle may end in a hook, which may make it tough to adjust. I'll have another look at it tomorrow.
-
Ok - thought everyone might like to see an update of the body - I think it looks much better than the old one. I have been working on this since about 1pm CT and my brain is fried. Going to take a break. What is the etiquette regarding WIP posts? I really want to start a new one w/ my tentative title as the subject, since it will be easier to find when searching. I know I have like 4 different WIP threads going, I may put links to the old ones in the new one but I want to consolidate everything in one thread. Thanks to everyone that has helped.
-
Ok- I don't think this looks too bad. I used 5 point patches near the shoulders and hips, I think it looks ok - not perfect, but then what is? I think it will be easier to animate than the old quad leg setup. Posting a screencap, let me know what you think. Roger
-
Hello, decided to rework my dragon model as I lost backups - and I wasn't happy w/ it to begin w/ anyway. I am ditching the quad legs since I think it will be easier to animate. I also have been doing some of the tutorials in my spare time to fill in the gaps in my knowledge, and modelling is getting easier - at least, I am having an easier time figuring out how to keep splines continuous when joining limbs to the body. I have just about got his leg attached, and think I can finish the holes w/ 5 point patches - however, I don't think AM is crazy about having 5 point patches adjacent to each other, and that's causing some problems. I can put a 4 point patch between them, but then I'm having to carry the extra splines all the way down the leg --since I can't seem to get a solid patch w/o doing that. I am posting 2 pics, let me know if you have any ideas. Roger
-
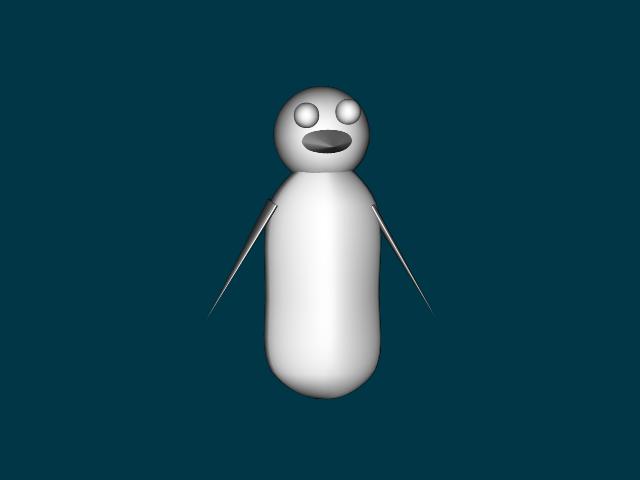
Here is the penguin after the cfa (but w/ no legs right now) I verified that the splines down the center are a continuous. However, does anyone see anything that jumps out as being obviously bad (too much/ too little detail in the wrong areas) ? The flippers seem wrong to me, like maybe they're not wide enough and there are too many cross sections. I still need to model eye sockets, a beak, legs/feet, and a tail. Thoughts on a beak? I was thinking just a simple, solid beak, since this character doesn't say anything but maybe it would be better for me to make an actual hand-puppet type beak. Anyway, things are coming along.
-
I don't know that this is the problem but in the interest of good splinesmanship that center spline shouldn't divert down the leg. That should be a spline that continues under the crotch and back up the back. Fix that first and see what happens. Yeah, I'm not sure why that happened. I made the body by extruding a circle, then when I got a rough penguin shape, went back and cut it in half so I could model one of the legs as and then CFA as opposed to trying to get them to match. I have another version of the penguin but it has no flipper, and I'm not happy w/ the legs, and I'd have to do a CFA anyway to get the flipper on the other side once I model it. I am going to try deleting the crotch as you suggested and see if that handles the continuity issue. Roger
-
I am working on a penguin now, I have one half the way I want it but need to do a copy/flip/attach and despite help from some of the forum, it just does not seem to be working. I think the problem might be that the spline that makes up the vertical cross-section is not one continuous spline---I have posted some screencaps of the geometry to illustrate (feel free to point out anything else that might cause issues) How do I go about fixing this? I would have started a new WIP but thought I'd go back to an old one. I would prefer to start a new one and consolidate everything under it but I guess I'll just use this one. -Roger
-

Have attached arm and hand, let me know what you think...
Roger replied to Roger's topic in Work In Progress / Sweatbox
Thanks for the comments: The current penguin I have posted is a bit dodgy. The one I am working on now looks a lot better. I somehow managed to fix the 5 pt. patch problem, not quite sure how I did that but the damn thing fills in now so I'm happy. I think I got the one eye just a little higher than the other when I was throwing it together, so I don't think its the angle. I will be sure to post the better-looking version when I get it done. Johnl3d, thanks for the penguin model. I don't think I will use it, but I would like to take a look at it for reference to see how you solved some of the issues that I am struggling with. It may be a big help in that respect. I am having a hard time getting the legs/feet to look right now. Thanks again for the comments. --Roger -
Have attached arm and hand, let me know what you think...
Roger replied to Roger's topic in Work In Progress / Sweatbox
I have decided to attempt a unibody model for the penguin, with the exception of the head which is just going to sort of sit on top of the "neck". The leg came out ok, it doesn't look great but it will do. However, I am having a problem w/ 5 point patches. I seem to remember there being an issue w/ 5 pt patches where if they are too close together they won't work right. However, I have 3 in close proximity and haven't had any problems with them. However, the last one I need to close off won't close off. The ellipse in the center is the start of the penguin's flipper. Any ideas or suggestions as to what I should do? If I can't get this to work, I am just going to model a flipper separately and have it just sticking out the side, seams be damned. I thought about running another ring of splines around the bottom of the flipper hole to turn those 5 pt patches into 4 pointers, and then doing the same with the top (although there is no problem up there, I'd just be doing it to be consistent. ) But then I would have the problem of too many splines crossing at the bottom cp of the flipper socket. I have included a screenshot. Patches w/ yellow x's are rendering correctly, the one circled in red is the problem patch. Roger
-
Have attached arm and hand, let me know what you think...
Roger replied to Roger's topic in Work In Progress / Sweatbox
And yes I know I still have to add feet and texture it, but in terms of just a rough model, what do you think? -
Have attached arm and hand, let me know what you think...
Roger replied to Roger's topic in Work In Progress / Sweatbox
Ok well I am taking a break from rigging and I decided to model the other main character. So, here is a quick and dirty penguin: From my penguin image googling, I think I got the head a little too big and they have two stubby little legs, so I need to maybe fix that. But, not too bad for about a half hour total. What do you think? Also, anyone know if there is a way to rename a WIP thread? I'd like to change this thread to the working title for the film, rather than go and create a whole new thread. Roger
-
Have attached arm and hand, let me know what you think...
Roger replied to Roger's topic in Work In Progress / Sweatbox
OK I am jumping back in with this, but I am having some problems. Its been some time since I was last working w/ AM. I have opened a new chor w/ my rigged ( admittedly poorly but I am working on that) model and am trying to create actions. Once I have the new chor open, I import the model then go the File > new > action. However, when I select the bones to start moving them around, the geometry does not follow. The splines are also a light gray. Am I missing a crucial step here? Seems like I am. If someone could please send a post of what I am doing wrong, I'd appreciate it. In the meantime, I am going to consult the manual. Thanks Roger -
I have to echo Rodney's sentiments here. If I had been steadily working with AM since I first purchased it, I would have done several films by now instead of still be working on one. If you have gotten fairly proficient with a polygon modeler, it will be difficult to unlearn that as the modeling paradigm in AM is completely different. AM is very stable now, however there was one version ( version 9 I think) that was horribly unstable and it turned me off AM for a year or 2 since I really couldn't get anything done with it. AM is beyond these teething pains now and is every bit as good as a "pro" package. It has every feature the other packages have, and some they don't. You also can't beat the price. If you have spent the money on Maya, whether you bought Complete or Unlimited, the price for AM is a drop in the bucket. Get it. If you like it, great. If not, I believe Hash has a money back guarantee. I do have to say that coming from a background of modeling with a poly based modeler that learning how to use splines was the hardest thing about learning to use AM. There are no booleans or other tools like that, so you may be disappointed. It doesn't make any sense to model with primitives the way other people seem to model in polygon-based programs, since its much easier to just draw what you want. Give it a try. I don't think you will regret it.
-
Have attached arm and hand, let me know what you think...
Roger replied to Roger's topic in Work In Progress / Sweatbox
Well..... I seem to be making some progress w/ rigging. Once I get all the cp's assigned correctly (I have some areas that are giving me fits) I will post Mr. Dragon in some poses. At least I know now its not the constraints but the fact that the auto cp assign is less than stellar which is causing the problem. Anyway...thought that those of you that are following this thread would be interested in an update. Thank god my other 2 characters are simpler. Anyone know if there is a female in an evening gown that might be pre-rigged? I am surely going to modify the head to have a more cartoony look. Roger (who is beginning to wonder if he will ever get to the animation bit) -
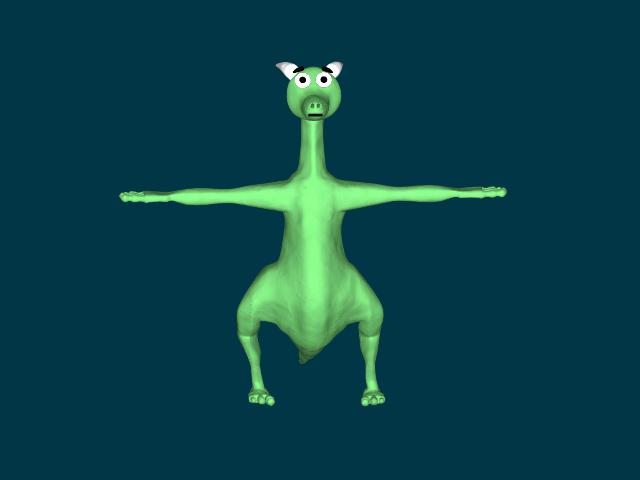
Well....... I ended up just deleting them.......my char is a humanoid dragon.... I could try and post a pic with them, if you are curious just to see them. I am using AM 12.0w and TSM:2 (not sure what point version) In my version of setup machine there is a checkbox for wings/no wings along w/ biped legs or quad legs (on the bipedal char tab) Roger
-
OK.... For those of you familiar w/ TSM, for some reason when I am generating my rigging w/ tsm builder, even though I don't have the wings box checked, it generates wings. I checked the other tabs and I don't have it checked there either. I guess I can just delete them, but I am not sure why its doing this and would kinda like to figure out if I am doing something wrong or if its just one of those wierd things. Maybe I should close AM and reboot??? Roger
-
Heya Yeah, this looks pretty good. From what I remember, butthead had a pretty large pompador (sic?). You might want to adjust the skin tone a touch, it looks off for some reason.
-
Oh it doesn't have to be all that big. A few years back I came across a web site describing an experiment that put a 25MHz 486SX machine inside a domestic fridge-freezer and managed to cool it enough to crank the clock speed up to 247MHz.... (link) LOL I think that might be more than a little bit of exaggeration......but it was funny...also involved chilled vodka, if I remember. Ahhh, the cockles of my heart (what are cockles, anyway?) are glowing with a nice, warm fuzzy feeling now. Glad I was able to help you. I was pretty sure that's what it was, because that was exactly what happened to me several years ago, only w/ a pentium 75.
-
What ddustin said plus this: Chances are if you have a store-bought pc (emachines, HP, Dell, Gateway, etc.) it came with a rather wimpy heatsink/fan combo. The fan on the heatsink may have died, and if its a small heatsink it may not be able to radiate heat away from the cpu fast enough. Try blowing the dust bunnies away from the heatsink first, if that doesn't help and/or the fan doesn't even spin up, remove the heatsink/fan combo from the cpu. Go to any computer store (Best Buy, Circuit City, Frys, Radio Shack) and get the largest heatsink and fan unit you can find for your processor and socket type. i.e if its a p4 make sure you get a p4 heatsink/fan, athlon xp make sure to get that type. You may need to write down the model number of your cpu by looking at the top of the cpu or at the bios when the screen comes up and going to a KNOWLEDGEABLE tech at the store and asking for a heatsink that will fit that. Make sure you can bring it back if they tell you the wrong one. Also pick up some heatsink grease/compound. You should be able to find this at a Radio Shack or a smaller independent electronics supply store. You could probably also find it online. Take the old heatsink/fan unit off, scrape off old thermal compound, and apply a little bit of new thermal compound. Then put new heatsink/fan unit on, hook it up to the appropriate power cable and you should be good to go. Make sure that any cables are not touching the fan, as this can prevent the fan from spinning up. I recently had a problem with this when I went to a small form factor case, my cpu heated up so hot that if the thermal shutdown hadn't kicked in I would have had a meltdown. Alternatively, you could probably just buy a new fan to sit on top of the heatsink, but I would go with a whole new unit. It shouldn't cost more than $20 or so, and if its for a modern cpu it should feel heavy enough to bludgeon someone with. You could probably have the store do the installation for you, but be prepared to spend $50 or so for the hardware and install. Hope this helps. Roger
-
Have attached arm and hand, let me know what you think...
Roger replied to Roger's topic in Work In Progress / Sweatbox
OK.... I didn't care for the way the modelled mouth was looking, so I sorta did a Gumby/Killer Bean type mouth. It worked for them...*shrug* I think it looks better. I also modelled some floating eyebrows, to allow for more expressions since I am not planning on having lids. I widened the chest, so its not quite so thin. The legs were moved in from before. All in all, I'm pretty pleased with the way it turned out. I need to tweak the textures on the eyebrows, mouth, horns and eyeballs but other than that I think he looks ok. I may add some decals to him, he seems to be missing something. I need to get busy rigging, but I don't know if I feel up to it right now. Maybe I'll model some of the other things that I need to get done. Comments??[attachmentid=19268][attachmentid=19269]
-
Have attached arm and hand, let me know what you think...
Roger replied to Roger's topic in Work In Progress / Sweatbox
OK..... Here's another shot....I was trying to add a mouth. Its not done yet, but I think it looks a bit funny right now and I am not sure its going to look better once I add the mouth interior. I am going to leave the eyes the way they are, but add floating brows above to allow for more emotion. Thing is, just the snout w/ no nostrils or mouth looks ok, it looks a bit off like something is missing.... but when I added nostrils and a mouth it doesn't look quite right either. This character is not supposed to speak or do anything like that, if I leave just the nostrils I can still have him "breathe" fire. In my original character design, its just a snout though. Any votes on which way looks better? [attachmentid=19236]
-
Have attached arm and hand, let me know what you think...
Roger replied to Roger's topic in Work In Progress / Sweatbox
OK I've got some nostrils now, let me know what you think. I had modelled an interior for the mouth, but unfortunately, it seemed to have screwed up part of the muzzle so I am going to try again. As far as the eyes go, do you think I made the right call to put them in actual sockets? I am not sure how I am going to make proper lids for them, though. I don't know that I like how these look, he looks constantly suprised. I was going for a sort of Wallace and Grommit look, but I seem to have missed the mark. Let me know what you think of the modified snout. [attachmentid=19221]
-
Have attached arm and hand, let me know what you think...
Roger replied to Roger's topic in Work In Progress / Sweatbox
Hey there... I've decided to take a break from rigging and go back to finish up some of the modelling tasks I was putting off. While nice, setup machine is not as "automagical" as I thought it would be, and rather than frustrate myself needlessly right now I am going to finish the modelling stuff and maybe do some of the rigging tutorials in conjunction with Setup Machine so that I will be able to use it better. I thought that the dragon, while ok, needed to have an actual modelled mouth with nostrils and a tooth or 2, and rather than having floating eyes I'm going to build sockets with actual eyeballs and lids. While I'm at it, I will fix the horns. Once I fix these things, I'll post something here, I think he'll end up looking a lot better. Hopefully I will have an animation test to post soon. I wish I didn't have so much other work to do, I still need 4 environments, 2 other characters, and a few misc. props. I think it would be a miracle if I got this done in 3 months, let alone 3 weeks ( I set an arbitrary date of 6 weeks a while back just to see how much I could get done----not actually have a finished product). So, as I tick a few of my milestones off my list I will post them in here. Thanks to everyone that has offered suggestions, aid, etc. Roger -
Have attached arm and hand, let me know what you think...
Roger replied to Roger's topic in Work In Progress / Sweatbox
OK.. Here's another shot with the legs fixed..... I moved them in just a bit. Not sure if I really want to screw with the chest, I tried it once and couldn't do it without messing it up. He's pretty close to what I want though, in terms of concept to finished model. Maybe after I have some food I will be a little braver and try to go back and fix the chest a bit. [attachmentid=19168]