Kelley
-
Posts
768 -
Joined
-
Last visited
Content Type
Profiles
Forums
Events
Everything posted by Kelley
-
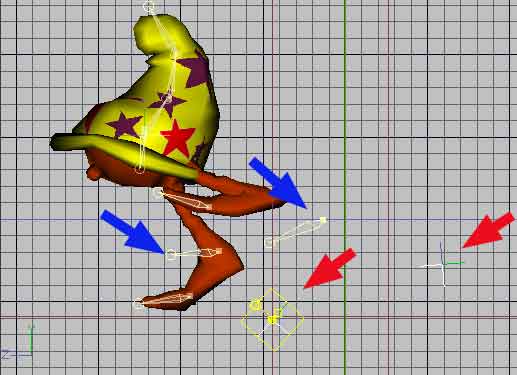
I got Boneless Thom to walk...thought Cheech would be easy. He's just Legs and Spine. But something has gone awry. Perhaps I missed a step. The Knees and Foot Targets don't want to stay with the mesh. Feet flip around backwards. This rig of Cheech has the Head, Hands and Arms deleted. IK Leg Setup is ON, IK Arms Setup is OFF, and, as in the tutorial: Steady=0, Balance=100 and Balance Rigid=30 [The Blue Arrows=Knees, the Red Arrows=Foot Targets] Hips/Pelvis and Spine bones have no problem. Where have I gone wrong?[attachmentid=14619]

-

Remembrance of Things [Hats] Past...
Kelley replied to Kelley's topic in Work In Progress / Sweatbox
Thanks, Rodney. I think I will, just for the practice. Then it's back to working with my two troopers. -
Remembrance of Things [Hats] Past...
Kelley replied to Kelley's topic in Work In Progress / Sweatbox
Thanks, Paul. I found these a few months back. On a whim, I went looking for whatever was out there on the 'net about Bode'. Seems that just about everything worth looking at is contained in the links you reccomended. Thanks again. -
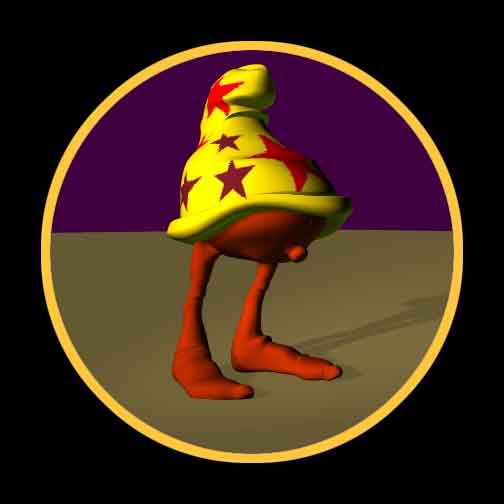
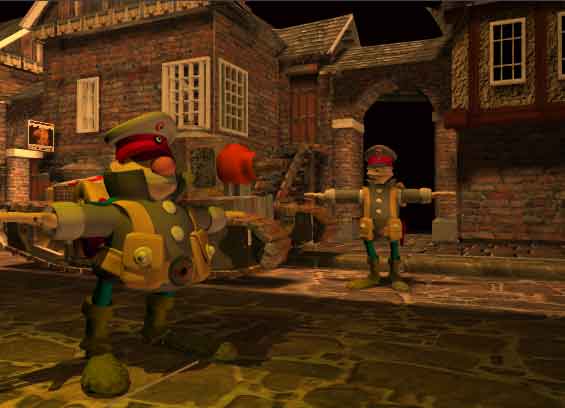
After I posted the two troopers and the tank, I was very pleased at how many people remembered Vaughn Bode'. As I've been working at getting the troops to walk [it's actually going rather well] I've had Bode' on my mind, and so, started digging out all the old comics from the vault. Here's a shot at Bode's star character: CHEECH WIZARD.[attachmentid=14551]
-
-
I started to build another pseudo-WWI tank. The lower hull uses a stamped steel pattern. Each section is a closed six-sided box. Each side of each box has been individually selected and all other CP's hidden, and the steel pattened decaled on. All twelve sides should look alike. The project has been saved many times. However, upon re-starting A:M and opening the project, or, sometimes after a freeze-up and re-start, some sides will look smeared...as though the decal had been applied to one side without hiding the rest of the box. On this example, the side of the lower box is smeared fore and aft, while the bottom is smeared left to right. The other side. and the front and back, are just fine. It's the illogic of it all that stumps me.[attachmentid=14423]
-
Sorry to hear about losing your model. I know it well. 11.1 freezes up on me all the time. I thought that it was me: I'm an ex-polygon modeler and tend to work 'heavy'. I can see 11.1 responding slower and slower as the model grows. I've just learned to SAVE often! I hope you meant to say that you are using a Gb of RAM, not a Mb?
-
STUART: I do realize that Tubs and Pepperbox [as Bode' named them] do get a little lost in some shots. Everything should be considered provisional at the moment until I get the walking smoothly. And mouths moving. [going for the Big One there.] Camera angles are pretty close to final, but focal lengths, exact placement, lighting, etc. will all needfine tuning and I'm warmly appreciative of all the help and suggestions. I print out and file interesting problems/solutions. So...to that end, would you go ahead and explain Gradients Materials, also Light Lists. I think I'd like to change that Klieg in the alley back to a Bulb to get my long shadows back. If I recall correctly, you said a Light List could specify which objects got the light? Is the 'Briar Rose' entrance test viewable on the web?
-
No Ken, I've not been lurking about, but I have been through a fair number of 3D applications during the past ten years. I love 3D work, and will go to see just about anything that's computer animated. [Let me warn you off "Hoodwinked"! It's a clumsy, amateurish mess.] But I started with A:M about four or five months ago after a buddy saw a demo and called me and said: "You HAVE GOT to get this program!" Took a little while to get my head around Spline Modeling, and Decaling drove me crazy until I updated the drivers on my Radeon. {I now consider the A:M Decaling system to be the best I've ever worked with.] Thanks for the compliments. I don't think I'm tied up so much that I couldn't pick up some peripheral details on TWO. During the summer season, I work the golfcourse from 6:00am to 2:30pm. Home by 3:00pm. Basically all my spare time is spent at the computer doing 3D...I just don't put in many late nights. In the Winter, we're laid off from early December until the start of April and I can do just about anything I want. Keep me in mind if there's some small 'starter projects' that I could help with.
-
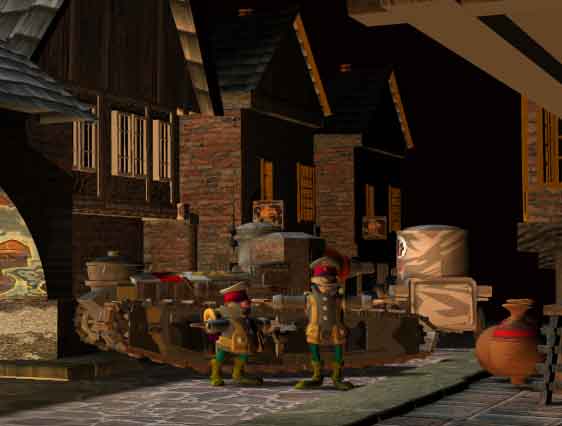
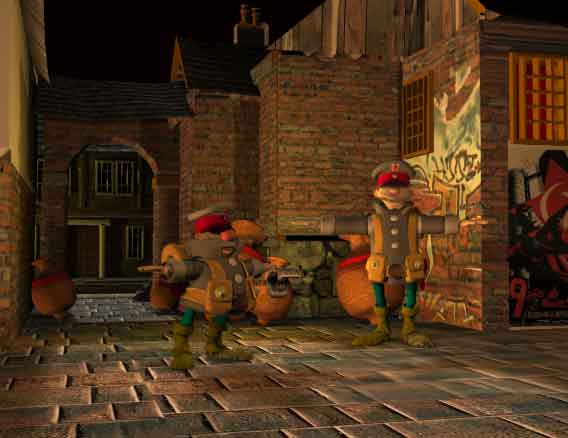
OKOKOK, guys...I'm on it [LOL] Damn. I kinda figured that if I declared the project, and posted it in the Showcase, it would serve to keep me moving along on it. Lots of other animation projects have foundered in other programs just because installing bones is such a pain in the butt. ['just came over from Carrara]. I thought that if I decided to be a Show-Off-In-The-Showcase, I'd have to stick to it & deliver the goods, or, six months from now, someone would say: "Aren't you the guy who was doing the thing with the tank and the two troopers? What ever happened to that?" And I don't want that. I am very happily surprised at the response to the sets so far. And pleased ['exultant' would not be too strong a word] that I got bones installed in Thom, and last night I took him on a 15-sec. walk.['been a long time comin'...didn't sleep a wink last night] Now to practice with SmartSkin, and building some walk cycles from scratch and some smaller detail things. Expect clips by the end of the month, if not before. Thanks again for all the kind words. Here's a few more pics. of the street.[attachmentid=14336][attachmentid=14337][attachmentid=14338]
-
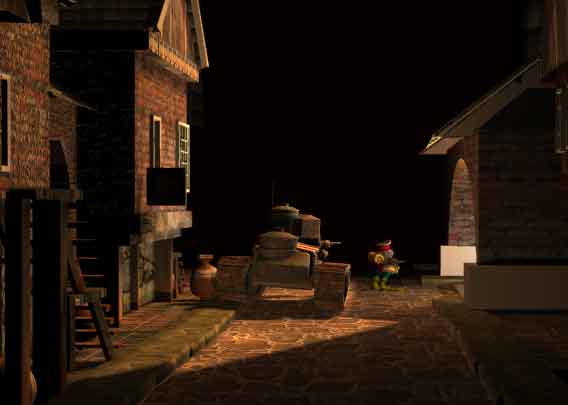
Thanks for all the comeback. Also, it's good to know that Vaughn Bode is still remembered. The news from the Project is good: I sat down with the manual today, summoned up 'Boneless Thom', and by 10:00pm had him fully boned and walking. I did take a shortcut and did not apply SmartSkin. [He really needs it] However, I did do the leaf tutorial. I'll play with that some more, and some bending cylinders, and then put bones into my troopers. I feel a major hurdle has been put behind me. [blessings on Martin Hash!] About the lighting: Admittedly, it is dark. Partly, I'm making this happen at night so I don't have to line the street with houses. The model is CP heavy as it is. I don't want to have to do a whole city block in order that the camera not see empty space. The other cause is that I, being semi-retired now, work on a golfcourse grounds crew during the summer. The winter months I have off, and that's when I really lay in on the 3D projects. Left to my own devices, I tend to sleep long in the mornings, putter about in the afternoons, start serious work at around 5:00pm and work through the night into the early morn. With just a small desk lamp by the monitor, colors look brighter and sharper to me than they do in daylight. So the lighting will be fine tuned with some brighter 'hot-spots' to accent what's going on. But for now, the first walk cycle is a big leap forward. I'm appending two more pics.[attachmentid=14318][attachmentid=14319]
-
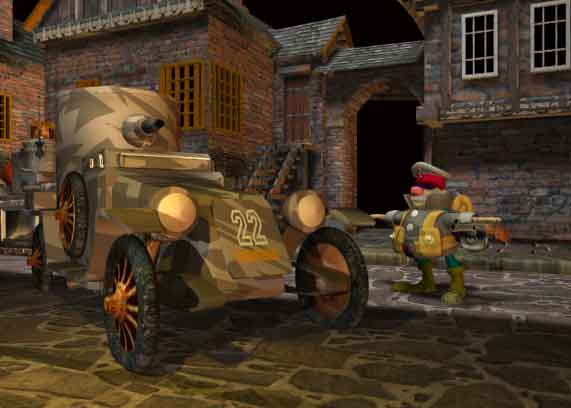
Here's a sampling of my 'movie set' for a first animation, [if this looks to be CP heavy, well, I've been a polygon modeler for over 10 years] and my first two characters. All they will have to do is walk down a long, straight alley, down a set of steps, across a courtyard and emerge on the street near where the tank is parked. Then cross the street. Simple. [Yeah. Right!] Will they talk? In the process of learning to install bones, I'm sure I'll do the "Can You Say That?" tutorial, and by the time they can walk...well, maybe. I expect the boning procedure will not be a short one. I approach 'bones' with great trepidation. Tried them in Carrara. Never did get it right. Tried in A:M with TSM2 and it's not right yet. However, I did install bones by hand in an A:M Fish model and they did work. Sooner or later, we all have to jump in at the deep end of the pool. Now it's my turn. The troopers are modeled after two characters by Vaughn Bode' [1971] The tank is patterned after the British WWI 'Whippet'...so named for its speed. [it could do close to 8mph, where the larger tanks could do no more than 4mph.][attachmentid=14201][attachmentid=14203]
-
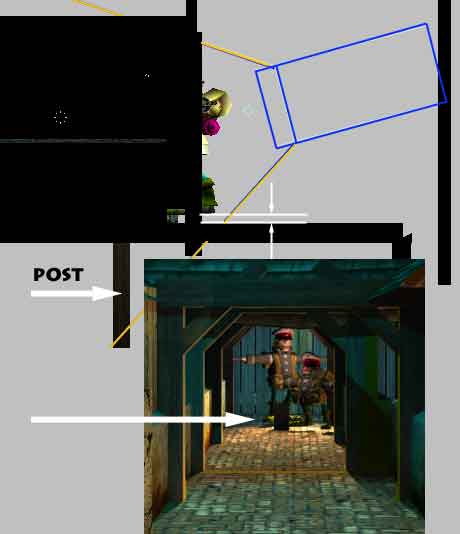
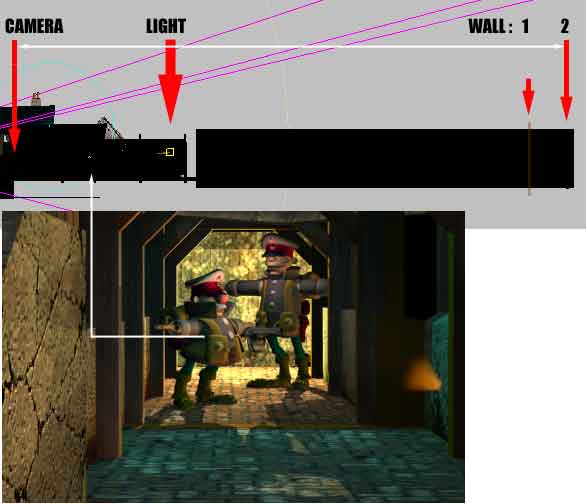
Here' a diagram showing the alley, light & troops. [side View] The Kleig is enhanced a bit in Photoshop, but you can see the bedroll and bootheels of the tall guy, and where I duplicated a post and centered it in the alleyway. It throws no shadow. There's a small, rather weak Bulb Light above the two troopers. It throws enough light to show that, in fact, their feet are off the ground. Stuart: I had been moving the troopers up and down the alley to check how the light was falling on them. At the far end of the alley, there's a set of stone steps. Step#1 is a bit higher than the floor of the alley.[attachmentid=14194]
-
Dhar: Thanks for the kind words. Where do I access the 'Showcase'? Ooooops! Just found it!
-
In frustration, I switched the Bulb Light back to a Klieg...and, happily, whatever was causing the flare is gone on this light. On the other hand, my Klieg is not casting long shadows down the alley. It's right behind the two figures, [at about waist height] Intensity=333%, Cone Angle=66%, Fall Off=222', and Shadows is definitely turned ON, Darkness=100% I've tried upping [and decreasing] these values, but the long shadows just don't/won't happen. Thanks for all the advice so far. I'll definitely be back when it's time for Light Lists![attachmentid=14182]
-
This is why "John doesn't model."? I love this guy. John should model constantly!
-
Korken: Nothing's EVER good enough when you're starting out. I spent six years trying to learn to draw comics. I rated myself against the best: Milt Caniff, Jack Davis, Moibius...and many others I admired. I came up as the Purveyor of Junk. Every time. I never did learn to draw like any of them. But I did learn to draw. Took me a long time to realize I had something worth showing. I left 2D and used all that learning in 3D. So never stop. Just make more models. Look at other great stuff you admired. Figure out how they did it. It'll come.
-
The only thing that really catches my eye is that the left [trailing] foot should point in the same direction as his chest.
-
I guess the title says it all. Now that I'm not stumbling over my thumbs, [as much] it's time to jump into the deep end of the pool.
-
Not a bad plan. Adding lights can increase render times and, in this case could have unpleasant side effects - if your trooper gets to close to a wall then the face light will illuminate the wall too. Not to worry - when you get to that point, ask us about "light lists". Thanks for the help, guys. I'll try to keep the troopers sober and walkin' straight ahead. [lol] There is one thing more puzzling me about this lighting problem. Looking at the diagram above the troopers, you can see where the light is positioned. [there is no roof above it.] Look at the picture and you can see how the light falls off. [it's a bulb, and should fall off equally in all directions, yes?] Why then, is the wall at the end of the alley so blindingly bright? It's sitting in a four-sided black box...about a half mile away. With another wall in front of it, also black, and a 50% transparency on it. Where's all that light coming from? In the rendered picture, I've installed the small, soft lights at eye-brow height on each trooper. Shall I use 'light lists' to make these move along with the troopers? I was thinking of using a 'Translate To" Constraint with an offset. What do you think? [attachmentid=14161][attachmentid=14162]
-
Is a Key Light and a Klieg Light the same thing? The icon in the Choreography looks like it could be either. I changed the light type to Bulb, and the flare went away. For the nonce, I'm not going to trifle with success. Gone is gone. As to whether it's the camera or the light, both are under suspicion. I'm attaching a second pic. [the first in which this happened, tho'] In this pic. the camera is not looking directly into the light. [a Key Light] The light is behind a window grating. I took the frame, extruded it back three times and pinched off the last cell to make an enclosed box and then shone the light out the front. The results were not what I expected, tho' not unpleasing. I expected window pane shapes on the far wall and tiles. Will have to experiment further with with gels. I thought about a light fog in the alleyway, but got hooked on the troopers casting long shadows down the alley as they walk toward the camera. I'm going to simply change the color of the far wall to something darker, and attach a very small, soft light to the front of each trooper for some facial detail. [attachmentid=14140][attachmentid=14141]
-
How about a kleig light? it's directional, it shouldn't make any hot spot at all on the wall behind it I've got a Key Light installed, which indicates that it's directional. My solution to the hot spot, at the moment, is to move the back wall farther back. [an Ad Hoc solution until I get better control of the lighting]. But what about that flare? Where is it coming from? I think it's a function of the camera. It seems to move [a little] when I move the camera.
-
As the last bit of the "Moving Foxhole" set, I'm building an alley where the action starts. I want it narrow and dark. So far, so good. But the lighting is giving me fits. I want a bright light at the far end so the characters throw long shadows in front of them as they walk forward. It's coming. But slowly. [ Biggest problem is that the right amount of light to produce the shadows makes a a burned-out, hot spot at the end of the alley]. But my biggest headache is the yellow rays indicated by the arrow. I searched Tools>Options> and there's no fog or volumetrics turned on. I looked in Properties under the light used in the alley: Volumetrics WAS turned on, now it's off, but the flare is still there. I checked the Camera in Properties and Lens Flare is turned off. Any thoughts on where this is coming from?[attachmentid=14124]
-
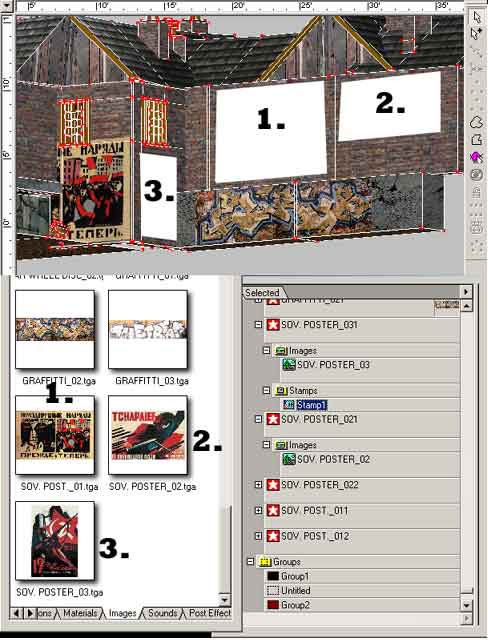
Vern takes home the marbles on this one! It was the 'dot' [.] in the poster name. I deleted each .tga from the Library, re-named them on my hard-drive, and dragged each back to the library. Problem solved. Then Poster#1 disappeared! Following Ken's lead, I was looking in Properties and discovered that where it should say Image:color, it said Image:none. [also, the icon had disappearred in PWS] Poking around, I opened the little arrow next to 'Image:' and got the whole list of icons from the top section [images] in PWS. I found that the Poster#1 name with the dot had somehow not got deleted and it was defaulting back. After deleting it, and specifying the replacement, all is well. Dhar: your comment, 'what's with you and duplicating?' is still a good one. Both my Decals folder, and Groups, are filled with duplications. But I'm going to open another thread on that. Thanks for all the help.[attachmentid=14048]
-
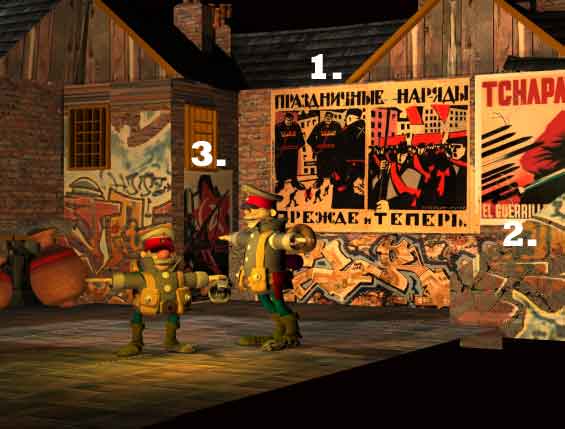
I've been applying decals of Soviet Revolutionary Posters over brick wall. The posters go on fine, then after a while, disappear. The white areas on the wall show where the posters were. The one remaining [near ground level] has since disappeared. The container in the PWS then changes from 'SOV. POSTER_01' to 'SOV. POSTER_011' [or...SOV.POSTER_03' to 'SOV.POSTER_031'] The 'Image' inside the container says 'SOV.POSTER_01'. Is the brick [as first decal applied] over-riding the poster? Something else?[attachmentid=13991]