Kelley
-
Posts
768 -
Joined
-
Last visited
Content Type
Profiles
Forums
Events
Everything posted by Kelley
-
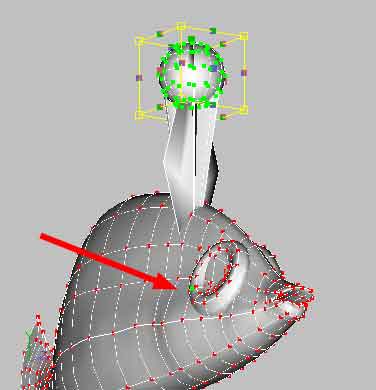
I attempted my first bird flock yesterday. Ten birds flew right to left for four seconds. All was well. After that, things went steadily down hill. I have a few questions: [1] The Area of Influence. I can shrink the yellow circle, but the birds stay where they originally appeared. [2] Is is possible to string the birds out in more of a line, instead of a sphere? [3] I re-opened the original doc. that performed well, and added birds [for a total of 30] and extended the time to 18 sec. The birds performed normally for the first four sec. and then flapped wildly like sparrows. [They are seagull types]. I struggled for the rest of the evening trying to find a setting that would cure that. No luck. [4] Late last night, just before calling it quits, I noticed a question mark in front of "Shortcut to Birds 1" [the flock] in the Choreography. [see pic.] Is the doc. corrupted? Or is the Flock behavior just confused? Conflicting settings? Can't find something? [5] The most interesting of all: When I deleted the "Shortcut to Birds 1" and installed a new one at Frame :00, the birds tumble wildly as I move the scrubber to 00:18:00. This is before I even move them to their new position. And when I do move them, the tumbling does not cure itself. Why is A:M giving me the bird? [attachmentid=16228]

-
I did a lot of fussin' with settings and moving things around before I got your posting, but I suspect that you were right. Thanks.
-
Lately, I've been having a problem with in the Choreography. If I have, let's say, four key frames on the Timeline, and I hit the 'Play' button, the action will go the second, or third, key frame, and then cycle back to the beginning. If I step through the action [not to be confused with an .act file-type action] it will go all the way to the end. But what's causing it to fetch up?
-
Sorry, guys. False alarm. From above, the bones were within the mesh, but from the front view, they were 'way above. Problem solved.
-
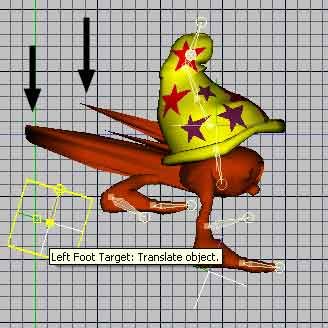
I've installed a simple 'One bone in the body-two bones in each wing' and assigned CP's to each bone. When I try to flap the wings, the bird swings around and parts fly off. What am I missing here? [attachmentid=16190]
-
AHA! Thanks Ken. [and...I'm assuming that the light on the ground is a Kleig?]
-
Luckbat: No, I don't want to 'see' the light. At least, not right now, though I may add volumetrics later. MMZ_TimeLord: I know that I'll have to install a Kleig to throw 'real' light on the street...but I didn't know that I could add it to a bone chain. I was going to do a 'translate to'. Thanks. What I'm looking for is a sense that the object [headlight lens] is transmitting light from behind. When I was using Carrara, there was a simple dialog box into which you could insert a value, and the object would glow like a Japanese paper lantern. It wouldn't actually throw any light. You still needed an outside source for that. What I need is that sense of an internal glow.
-
I want a clutch of these motorcycles to run through a scene with their headlights [and red tail lights] on. So far, as I look through manuals, A:M can make a halo-type glow around the object, but I see nothing on how to simulate an object that is emitting light. I did a fair approximation by creating a cube, coloring it yellow-orange, installing a light inside it and setting the cube's Translucency to 50%. Is there a better way? [attachmentid=16039]
-
When a scene renders [and I'm thinking about multi-frame animations] does the program have to calculate every CP in the model for every frame, or just what the camera sees?
-
No, he has no part in the Soldier's Short. I've got enough on my plate as is.
-
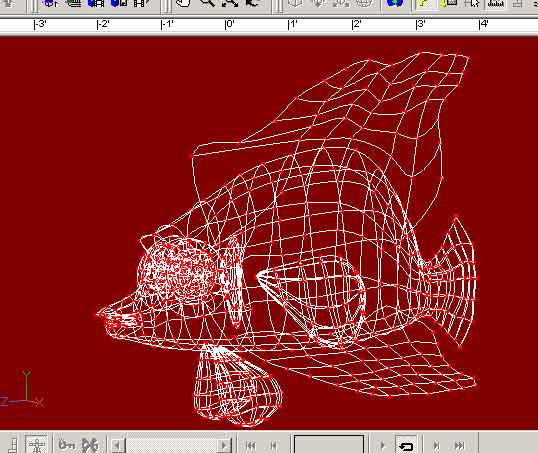
True. I had started with the mouth [forward of the eyes] and when I decided to build a fish from what I had, I just started extruding backwards, re-sizing as I went. So I have more cross-sections that would be necessary that if I had planned to make a fish right from the start. But hey, I'm a reformed polygon modeler...and we know what they're like when it comes to CP's!
-
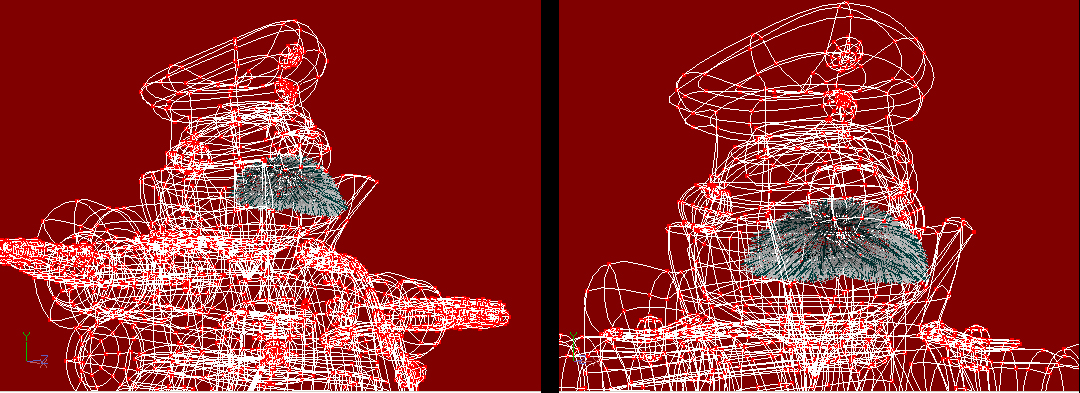
Sure. Here's two on the avatar. I'm just posting the head because [being a soldier] he's packing equipment [belts, ammo pouches, gas mask cannister, bedroll] and the wireframe gets to be a jumbled mess that's hard to decipher [and I put all that stuff there] and my screen isn't big enough to zoom in and see everything in one shot. And then the fish...whom I've taken to calling 'Flo', after the aquarium fish in "Finding Nemo" [Deb] who thought her reflection was her nutty sister Flo. [attachmentid=14838] [attachmentid=14839]
-
Started out trying to build a mouth that I could stich to an existing head. After hours of pulling CP's around, I had something that could be the front of a fish. So I went with it. [The fact that I just re-watched "Finding Nemo" a few days back could have something to do with it][attachmentid=14832][attachmentid=14833]
-
That was it. You did it again! Thanks.
-
Today I undertook to lathe a sphere. I made a diagonal spline, lathed it into a cone, deleted the top CP's, rotated the remaining ring, and lathed that. Standard stuff. Done it many times before. Today, as soon as I select the sphere and attempt to move it in any way [with either the Translate, Scale, Rotate, or the regular Select arrow cursor] a single point leaps out from the surface. The red arrow indicates how far. If I actually move the sphere's position, the point moves away in the opposite direction. I tried Saving and closing out of A:M, then re-opening the program. It still happens. I can move the model. I can move the lathed cone. I just can't touch the sphere. Any ideas?[attachmentid=14822]
-
Amazing! After all the time spent assigning CP's to bones I never thought this would happen. Might it be because I let the program compute the Control Weights? After I got the points weighted to the bones they were supposed to be with, the model behaved better. It's not 'there' yet, but the Foot Targets and Knees don't float around quite as much. Thanks.
-
Along with my ongoing problem of Foot Targets drifting away from the mesh, I now seem to have Control Ponits permanently affixed to some point in space. I've examined the model in the Action window. All points are colored and all seem to be assigned to a bone. There are no rogue, uncolored points. So what are these guys hanging on to?[attachmentid=14755]
-
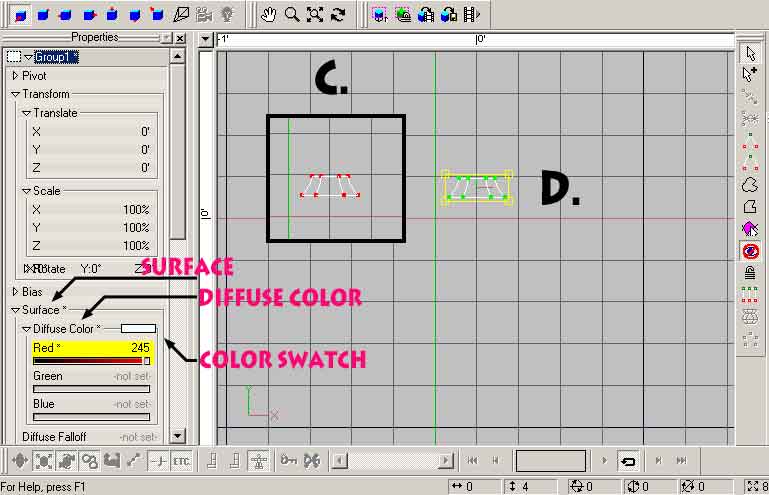
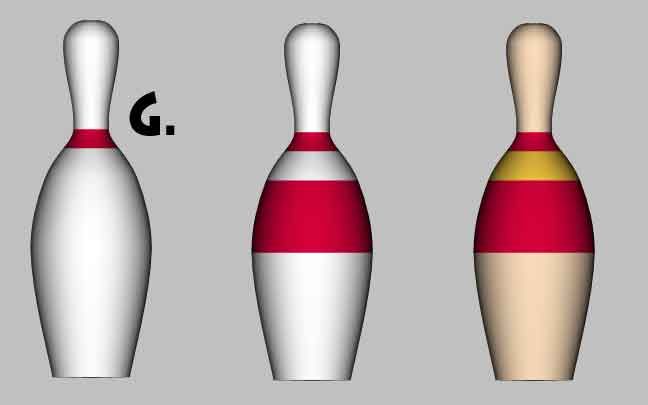
Here's some pics that may help. It's not necessary to build in seperate pieces. I made a bowling pin [A] and selected a group of CP's When those are highlighted, you'll see a red eyeball in the Tools Menu that houses your Selection Arrows. Click on that eyeball and everything disappears except what is highlighted. [C] Now that it's isolated, you'll see that it's no longer highlighted. Select it again and the Properties Menu will come up. [D] Below the 'Transforn' section you'll see 'Surfaces'. Click the tiny arrow by the word 'Diffuse Color' and three color bars show up. Click in any one of those and a Color Swatch appears. Click in it and you'll bring up a Color Picker Table. [E] Choose a color and click OK.[Forget about the 'F'...I got side-tracked] Having clicked OK, you're back to the Modeling Window. Go to 'Shaded Mode' or make a snapshot, and you should have something that looks pretty close to [G]. Repeat until all horizontal bands are colored. [attachmentid=14750][attachmentid=14751][attachmentid=14752][attachmentid=14753]
-
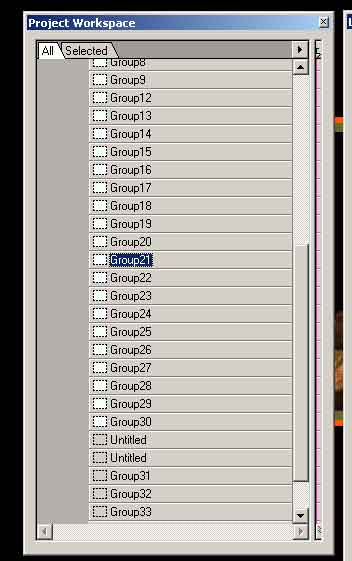
Ken/Rusty: I think this is starting to make some kind of sense. Do I name my Groups? Basically, I don't. Not unless the Group will have an animated function, like a wheel or turret. Then, instead of hunting for all the CP's [and inevitably missing a few] I will be able to call up the whole Group. So far, that hasn't happened much. I realize that when I select a few CP's, a Group called 'untitled' is made. And I do try out lots of variations. It would seem then, that A:M is saving all those variations, even without me doing a CTRL_S save. And the huge repeats of Groups must have come from when I selected a large section of the model and did something to it. [maybe re-sizing?] Rusty: Thanks for the lucid, detailed explanation. Today I just discovered the 'Remove Groups' function. That helped in clearing patches for color changes. And I've just come to realize that their order in the list is so important. But I had not realized that changing any surface attribute created a new Group. I am assuming then, that when I set the Specularity, it resides in one of the Groups, not on the model per se? And setting Specularity on, let's say, the engine nacelle, would create a Group, and another setting on the fuel tank would be another? I had been assuming that those Groups with no color swatches had no function. Even most of the colored ones seem to have no function. When I click on them. I most often get a teeny, miniscule yellow bounding box that bounds nothing [often at some distance away from the model]. I delete it and nothing changes. I guess the only way to weed out the useless ones is to name every function, and weed as I go. Or...ignore them altogether and just accept hundreds of Groups. Still, I wonder about those 37 Groups. There were only six when I shut down and went for dinner. There were 37 [in addition] when I re-opened. I guess when you sculpt with 1's & 0's, you have to accept these mysteries. Thanks again.
-
Thanks Ken. Here's a related question. At least I think it is. It seems to me that A:M doesn't like to sit for protracted periods of time with no activity on the screen. [Don't walk away and go to dinner] Things, like some patch colors, have a way of changing. So this evening, I did a Save, closed out of A:M, and re-opened two hours later. First, my Specularity settings were gone. [and not for the first time] Secondly, I had an enormous number of new Groups in the PWS. Nearly 40. With no colors assigned. There were about six when I closed out. It seems that A:M really likes to create Groups, and then replicate them. I've had cases where I'm using lots of patch colors [not so much lately] and I've had well over two hundred Groups. I know the list is replicating because I can see the repeat patterns: 3 Green, 5 white, 1 Yellow, etc. Is there a way to stop this? Also, every time I perfom a function, the Groups Folder opens. If there's a lot of Groups [as above] it means that I have to scroll all the way back to the top to close it and then go find the PWS Control that I wanted. Is there a way to keep the Groups Folder closed? [attachmentid=14726][attachmentid=14727]
-
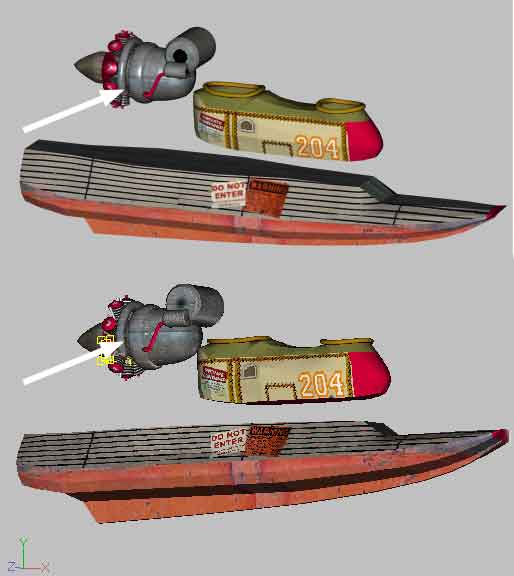
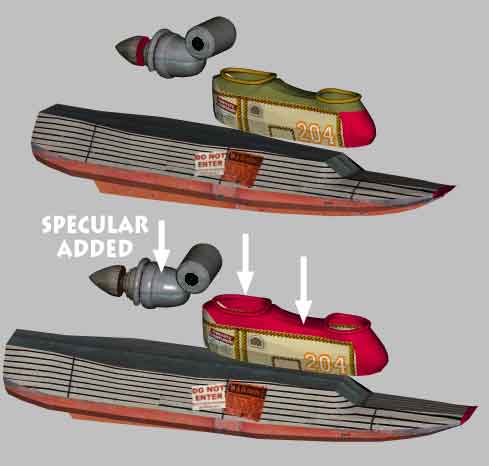
Continuing my fascination with clunky World War One-ish things, I started to build a seaplane. [bi-plane, center pontoon hull] Last night I was setting Specular highlights. I had done most everything: the hull, engine, fuel tank. nacelle, and the cockpit. [and had Saved] Just before wrapping up for the night, I came back to find that the cockpit nacelle's dark green upper surface, and the brown leather rims, had defaulted to the red used on the nose. Today, I undertook to repair that. After three attempts, I gave up. I can change the colors back. [i remove them from Groups first] But as soon as I assign Specular color, it snaps back to red. Might I have exceeded a limit to the number of colors I can apply to patches? Any ideas?[attachmentid=14721]
-
"Your mileage might vary". I prefer to not use bells-and-whistles like auto-balance - you might, you might not. I just thought it might be worth mentioning. Stuart: Then do you delete the six 'Balance' bones? Or ignore them?
-
Sorry, Stuart. As you feared, it didn't affect anything. [YMMV?]
-
This is new ground for me, so it took a while to ferret through all the manuals to figure out what "'zero slope' the Interpolation Method" actually meant. The Good News is now I know what those little bouncy graph lines mean. The Bad News is, that setting the Interpolation to 'zero slope' seems to do nothing. The model in the Action Window behaves exactly the same way. One thing I noted is that 'Right Knee' does not appear in the Bones List at all. Until I clicked on it [on the Model] Then it appeared in the PWS list, but it has no "+" and cannot open to show Interpolation Graphs. I am beginning to think my best bet is to simply clear the bones, and start fresh.