


williamgaylord
-
Posts
907 -
Joined
-
Last visited
Content Type
Profiles
Forums
Events
Posts posted by williamgaylord
-
-
I'm now working with 12.0g. Still has the same problem with the disappearing/reappering hair as a moving camera view approaches edge-on. I've reported this.
I've also noticed the behavior of the alpha channels has changed a bit. Heath Hash tells me I should talk to Yves Poissant about that. Apparently the treatment of alpha channels has changed and there are some new features or properties that are available to control such things.
Nevertheless, this weekend I will proceed with the assumption that the hair bug will be fixed and will work some more on trees/tree limbs that can be used fairly close to the camera. I'll try to work out a fairly easy to use kit.
I recently invested in a couple of tree reference books. I should now be able to identify the leaves in the collection of leaf images I provided.
Bill Gaylord
-
I haven't got A:M 12 yet so I can't answer your question, Bill, but it seems to be working alright in 11.1i now. I don't know though, I would have to do some testing with close ups to be sure.
I used 11.1i. It almost completely works. The example I posted earlier shows how the leaves start to randomly disappear and reappear as you approach an angle close to edge on. (The project file is also posted on the same page if anybody wants to test it.) The problem only shows up in the rendering phase.
Several folks have posted similar problems. I don't have 12.0 yet, so I haven't been able to test it. If this problem gets fixed, we'll be able to do some nice dense folliage on closeups, too.
Sooooo, close to working like we need it to!
Bill Gaylord
-
I've been away for a bit. Does anybody know if the problem of hair disappearing randomly when a flyby camera view approaches edge-on has been fixed in version 12? (Refer to my initial posting earlier: Disappearing leaves...).
Bill Gaylord
-
Interesting new character, Colin! Sort of a "Clydesdale" satir. Will he have horns? Head and/or facial hair? Animal ears? Menacing teeth?
Bill Gaylord
-
Wow! Love your furniture designs! Very distinctive style you have going there. And yes, I like the clawed feet, too. Somehow the furniture looks like it was made by an otherworldly being trying, but not quite succeeding at making it look like "normal" stylish furniture in the human world. Sort of like the Munsters or the Adam's Family trying to fit into modern suburbia... Nice work!
Bill Gaylord
-
Good point William. Checked to make sure. It's a bug. I've reported it.
Paul, I love the birch texture. Birch tree trunks and main branches are usually fairly long, straight, and slender, though. Great work so far.
Bill Gaylord
-
Are those leaves on invisible spheres inside each other to get the layering?
Not spheres by rather slightly domed surfaces. Here is the project file:
This also includes a leaf cluster on a long narrow curved surface, too. And some other stuff.
Bill
-
Nice progress on the trees, Paul and Ken. To get to the "Shrek" level of quality we'll eventually need to pay more attention to the forms of real trees. But that can come later.
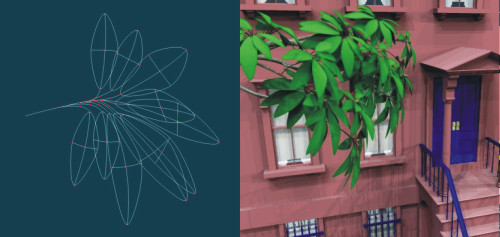
Here is a test of hair for dense leaf clusters up close. This is a closeup flyby using V11.1i which fixed the "Face Camera" property. It did indeed fix the problem.
 (Thanks, Mr. Pickering and crew!) However there is another problem that seems to occur when the camera angle approaches an edge-on side view of the hair leaves. They start disappearing and re-appearing at random. I'll post this to AM Reports to see if this can be fixed. Close!! So close!! If we get this working right, this will help us produce authentic looking dense folliage, even up close.
LeafClusterTest (Warning: 1.9MB, so right-click and save if you don't have DSL.)
Bill Gaylord
-
You are quite welcome!
Bill "Van Gogh" Gaylord
-
In case you might be interested, I've posted more realistic ears for anybody who is interested. Ears are pretty difficult to model, so I've offered both human and pointy elven (or orkish) ears. Great work Patrick!
Bill Gaylord
-
OK! Changed my vacation plans just so I could join the group on Saturday. How's that for dedication! We just decided to leave a couple of days earlier to go to Chattanooga. (We plan to visit the new wing of the Tennessee Aquarium, amoung other things.)
Bill Gaylord
-
OK, I'd like to be there, but I'm likely to be in Chattanooga, TN, on vacation with my family! How ironic--I'll probably pass William Sutton on the way.

Bill Gaylord
-
I took some time collecting some leaves, scanning them, and creating Targa files with alpha channels for decals. My tree books were too limited for me to identify them all. There are maples, oaks, a dogwood, and a pecan for sure. The others I'm not sure about. One might be a poplar. Except for the pecan, the leaf images are labeled by number and letter--number for leaves from the same tree, letters to distinguish the individual images in that set. Later I'll rename the files with the specific common name of each tree in the collection so you can match the leaf to the specific tree. Until then at least you have these to try out.
Anyway, except for the two compound leaves, each filename has the size of the leaf to the nearest centimeter, measure from the leaf tip to the point where the stem joins the leaf (it does not include the stem in the measurement). The compound leaves are measured from the tip of the end leaf to the end of the stem. For hair you can use the whole image. Otherwise I would edit out the stem by painting it out of the alpha channel, and use a spline set to render as a line for the stem.
Leaf Decal Collection (Zip archive, about 12.5 MBytes)
Enjoy!
Bill Gaylord
-
Nice work Ken!
Here is an example of how a simple mesh intersection works with some bark texture applied. The butt end of one branch simply intersects the surface of the other one. I've only applied a slight flaring of the butt end. A little tweaking can make it fairly smooth. This gives you the freedom to scale the textures of different size branches separately. If you group each size of branches together you can apply a material to the group and scale the textures of all of them at once. Saves a lot of time and gives you a nice graduation of texture scale from trunk to twig.
Bill Gaylord

-
Here is another tree kit similar to Roger Reynolds'. This kit allows two approaches, or a combination. One approach is to build a "unibody" from the basic building blocks using the nicely formed "y" joints. The other is to build the tree from basic cylinder parts, simply intersecting the butt end of each part with the part it "grows" out of. You can flare out the butt end a bit for a smoother transition. The advantage of the latter approach becomes obvious when you consider how to texture the model. It is much simpler to texture the basic building parts first, in their simple cylindrical form than to try to texture the whole tree after the fact. Even if you use materials, if you organize the various branch sizes into a few groups as you replicate various size parts, you can apply the material to each of these groups and then make texture adjustments on a small number of groups. Decals and bump maps, etc., are much easier to apply to the basic parts first.
For leaves, I use the 4-patch form, adjusting its shape to accommodate a leaf decal with an alpha channel. The 4-patch form allows you to give the leaf a nice curl, without a high patch count. Then I build a few small leaf clusters according to how the leaves grow for a particular tree, and use splines set to render as lines for the leaf stems. You can then replicate these to build larger collections of leaves.
Hair is a more efficient way to generate a lush coverage of leaves. I'm still experimenting to discover the best way to do so and still get something that looks good up close.
I'll follow up with examples.
Bill Gaylord
-
Just got word from Will Pickering that the "Face Camera" property on hair is fixed in the 11.1i release that's due shortly. In the mean time I'm working with hair for leaves good enough for closeups. Should have something to post this evening.
Bill G
-
The "Face Camera" property does not turn off at 0% as it should. The leaves twist to follow the camera, which looks rather bizzar when in a close view as you pass by a branch or tree. I've posted this issue on AM Reports. If it is not fixed, it could preclude using hair for foliage in scenes where the camera tracks. Bummer, man! Hope the Hash folks can fix this soon.
Anybody trying this in v12?
Bill Gaylord
-
Actually to get realistically lush foliage up close, you'll need an awfull lot of twigs with emitters. Dense leaf clusters hide almost all of the twigs, even in fairly close up views, so I think this "dome" emitter approach might actually work well in both cases, and will likely save a lot of construction time.
Even better--use the emitter twigs where the coverage is sparse and the twigs are clearly visible and use the "dome" approach for the really dense areas where the twigs are not visible. That will probably be the optimum approach.
I'll make one that can be checked out from any view as an example. I'll set up photos of real trees for reference on one of my web sites.
Bill Gaylord
-
...Any chance of posting a model so we can play and adapt it?
Yes. I'll package it as a project, so you can see the how the light settings and the hair settings relate. Paul will obviously have some similar contributions available soon.
If you can't wait, here is a basic recipe:
Make some meshes you can layer (in the geometric sense). Make them roughly dish or shield shaped with a gentle curvature. Use a fair number of patches, though, on each, since Paul discovered that too few patches amplifies the hair's sensitivity to the curvature of the surface. If a patch is too sharply curved the hair behaves oddly.
Make images: One for the meshes as a decal in "cookie cut" mode to make the mesh invisible and a leaf image with an alpha channel for the hair. The cookie cut image I used is a square (maybe 100x100pixels) Targa (tga) image, painted all white, with an all black alpha channel (a 32bit image). Select the whole mesh, right click (PC), and "Apply image". This will apply the image to each patch. Then in the PWS under the corresponding mesh click on the image shortcut and change the "type" to "cookie cutter". Turn off the property that adds the decal's color to the shadow...I can't remember what it's called.
Make your Hair material: Under Material create a new material and select Hair. You apply the leaf image to your Hair material. Adjust the hair width and length to match the proportions of the image (I used 10cm long by 5cm wide). I leave a little bow (~20% or less).
Apply the hair to your mesh and then tweak the settings in the original material under the Materials folder. Set the Face Camera to 0% (this does not completely turn it off for some reason in V11.1). Use the "hair brush" to brush the hair fairly flat against the mesh. Set the "cast shadows" on in the hair's properties.
Once you've prepared all three or so meshes, overlap them and space them out a bit from each other so you will have three or so layers of leaves.
Make sure you key light is set to cast shadows.
BTW, sometimes if you move or rotate a mesh with the hair applied the ends will stay stuck in place so the hair stretches in a wierd and alarming fashion. Hitting the space bar after you move or rotate it should clear the problem.
I've left out some of the details, but you'll probably figure them out by the time I check back in...Have fun!!
Bill Gaylord
-
Here is how I make leaf clusters for my growing tree animations. The leaves are simple 4 patch surfaces and the leaf stems are splines rendered as lines. This geometry allows you to give a nice 3D shape to the leaf. You can decal the surface with any leaf image (adjusting the width of the surface of course). Seems to render much faster than hair, but then, I haven't matched the total number of leaves yet to be sure.
Either way, we have at least two workable methods for building lush, realistic foliage we can use.
Bill Gaylord
-
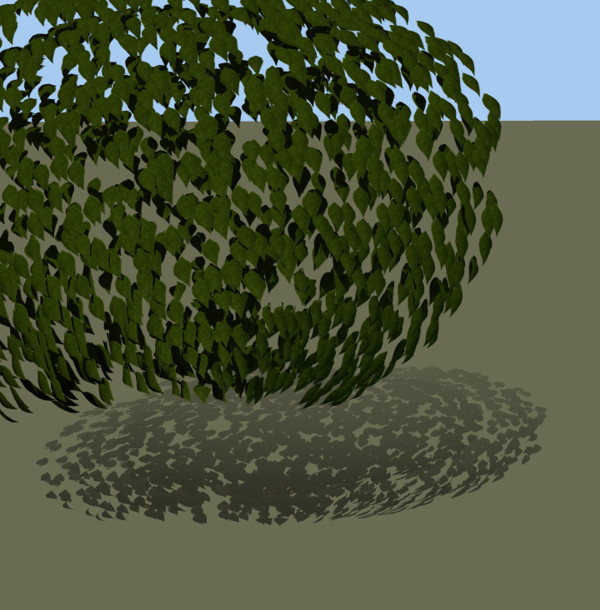
Here is a first cut at using hair for leaf clusters. I layered three transparent curved surfaces and used a mint leaf image on the hair. The surfaces are spaced apart to lend depth to the cluster. Combed the hair to get the leaves to follow the surface more closely. Needs a bit of tweaking to get a more realistic look to it, but not a bad start. Long render times though!
Bill Gaylord
-
I take it you prefer fuzzy characters.
I like your pipe cleaner family! Look forward to seeing their story.Bill Gaylord
-
Depending on how you model them, trees could be a challenge to texture because of the number of branches and joints. I'd recommend making each "stick" of a branch a separate tube, and then assemble them to make complex branches simply by intersecting the butt end with the mesh of the part it branches from. No need to connect the meshes. The joints won't be perfectly natural, but by using similar texture at the joint it can look rather good. The texturing is much easer to handle this way, since the fundamental geometry is a simple cylinder.
This approach also has the advantage of letting you start with a hand full off basic elements you can then replicate (trunk, large branch, medium size branch, small branch, etc.). Very important if you want to build a realistic full grown tree in a reasonable amount of without a plug-in utility to do the work for you.
Leaves are another challenge if you want something realistic, though hair should make it much easier. The trick is that the leaf clusters are several layers thick...more like a cloud of particles. Two or three separate overlapping surfaces might do the trick, with the leaves just sparse enough on each layer for the lower layers to peek through. This will take a few tries perhaps to get it right.
Bill Gaylord
-
Maybe I'm missing something, but I thought you can only render a single camera view (shot) at a time, anyway, so the total render time should be the same. The setup time seems like the main issue if I am understanding this.
I think maybe some planning ahead of time could save you some work and still give you multiple shots for interesting flexibility in post production editing. First a storyboard, followed by an animatic made of single frame renders. You can get a really good sense of the lighting and camera angles (and even story flow) without a lot of render time.
Can you not copy a choreography and edit the camera and lighting for a new shot? Then store the choreography in a separate folder?
Bill Gaylord
Call for Models....Plants/Landscape items
in TWO Modeling
Posted
Nancy, you have such a unique and wonderful style and flare! I love it!
Bill Gaylord