


williamgaylord
-
Posts
907 -
Joined
-
Last visited
Content Type
Profiles
Forums
Events
Posts posted by williamgaylord
-
-
Thanks for the diagram. I found it so helpful I printed it BEFORE adding a post to this thread!
A lot of this stuff won't be obvious even after a few rounds of looking at it. It takes time to get enough of the pieces floating around inside your head to be able to start seeing how they relate to each other. Diagrams like this sure help, though.
Sometimes it takes a few episodes of dreaming about this stuff after staying up waaaaaay too late working on it. "Thanks Shaggy! I never would have seen it that way on my own. And the way you used Vernon Zehr's Terminato to demonstrate dynamic constraints was truly amazing....and Eugene's lecture on bones and Smartskins using Ezekiel's vision of dry bones really helped me make all the right connections..."

-
I could have seen it at the Atlanta Film Festival! Sorry I missed it! In fact, this year I missed the whole thing. I have to say though, your film would have been plenty of motivation to make a special effort to attend the festival this year. I should have checked the schedule on your website earlier. I'll be kicking myself for quite a while. (Thump!...Ow!...Thump!...Ow!...)
Congratulations on your success so far!
-
Congratulations! Wish you all the best in your new career!
-
Brilliant! Is this based on personal experience with cats, or have you been watching a lot of re-runs of The Planet's Funniest Animals?
I currently have two cats who I know would react quite differently in this situation: One would scrabble frantically while looking ever so embarrassed. The other would simple go over the edge without any struggle and with a very round-eyed look of surprise on her face.
-
I have DiVX6.8 installed and Quicktime 7.5.5 and neither recognize the existence of the other, so I can't get the trailer to play. Quicktime will play the audio without displaying video. Windows Media player will display the video, but will not play the audio. DivX6.8 complains that Quicktime is missing and needs to be installed. Anybody out there have a clue what's wrong with the Quicktime/DiVX link?
Correction: DivX6.8.2 plays only the audio just like Quicktime.
So in Windows Media I could see the trailer and in Quicktime I could hear it. Beautiful work!
-
I updated to V15.0d and tried the render again. Identical rendering artifacts. So close!
-
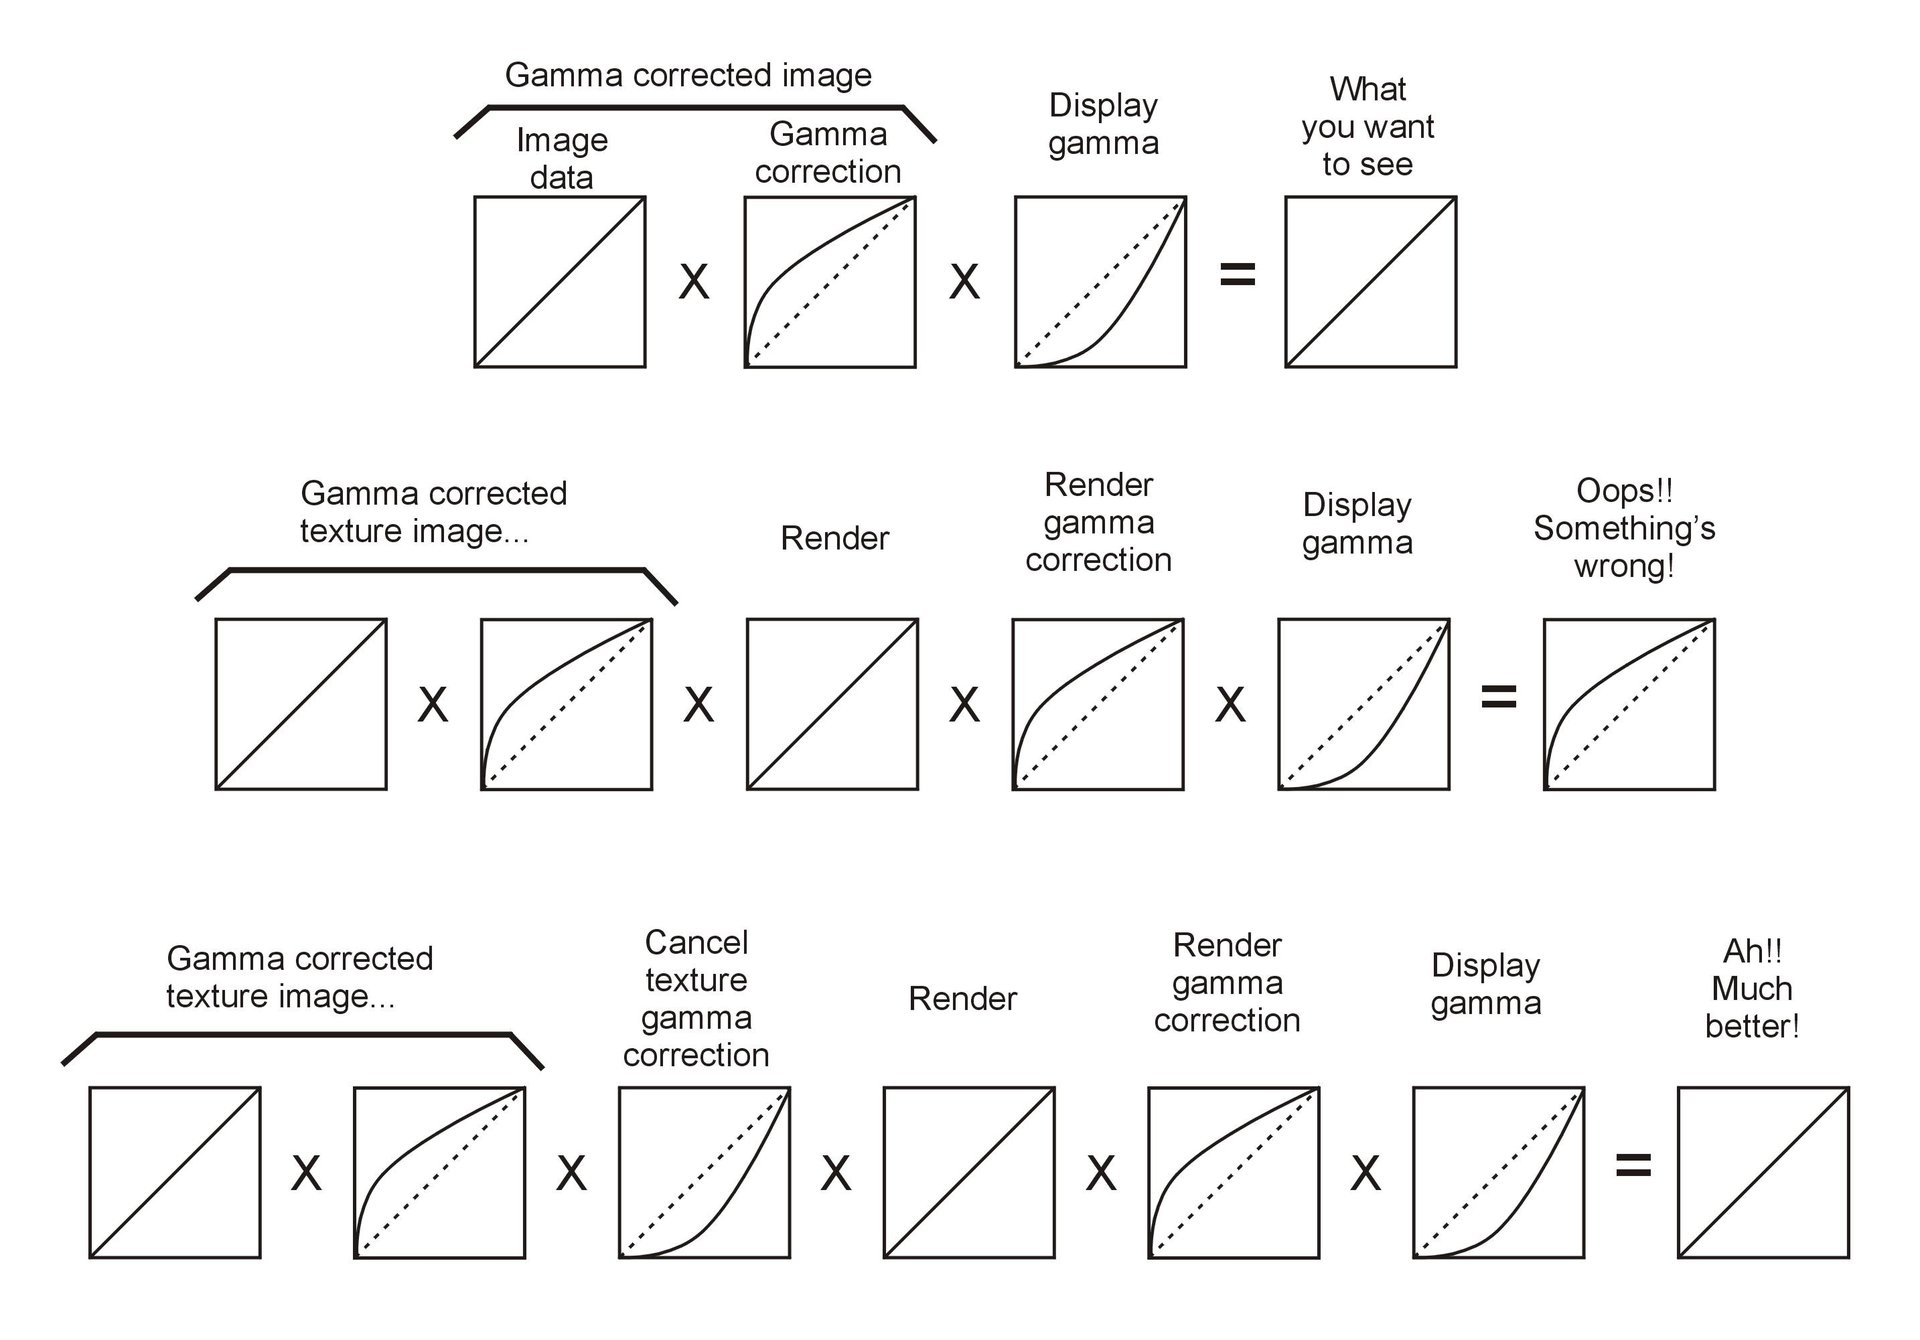
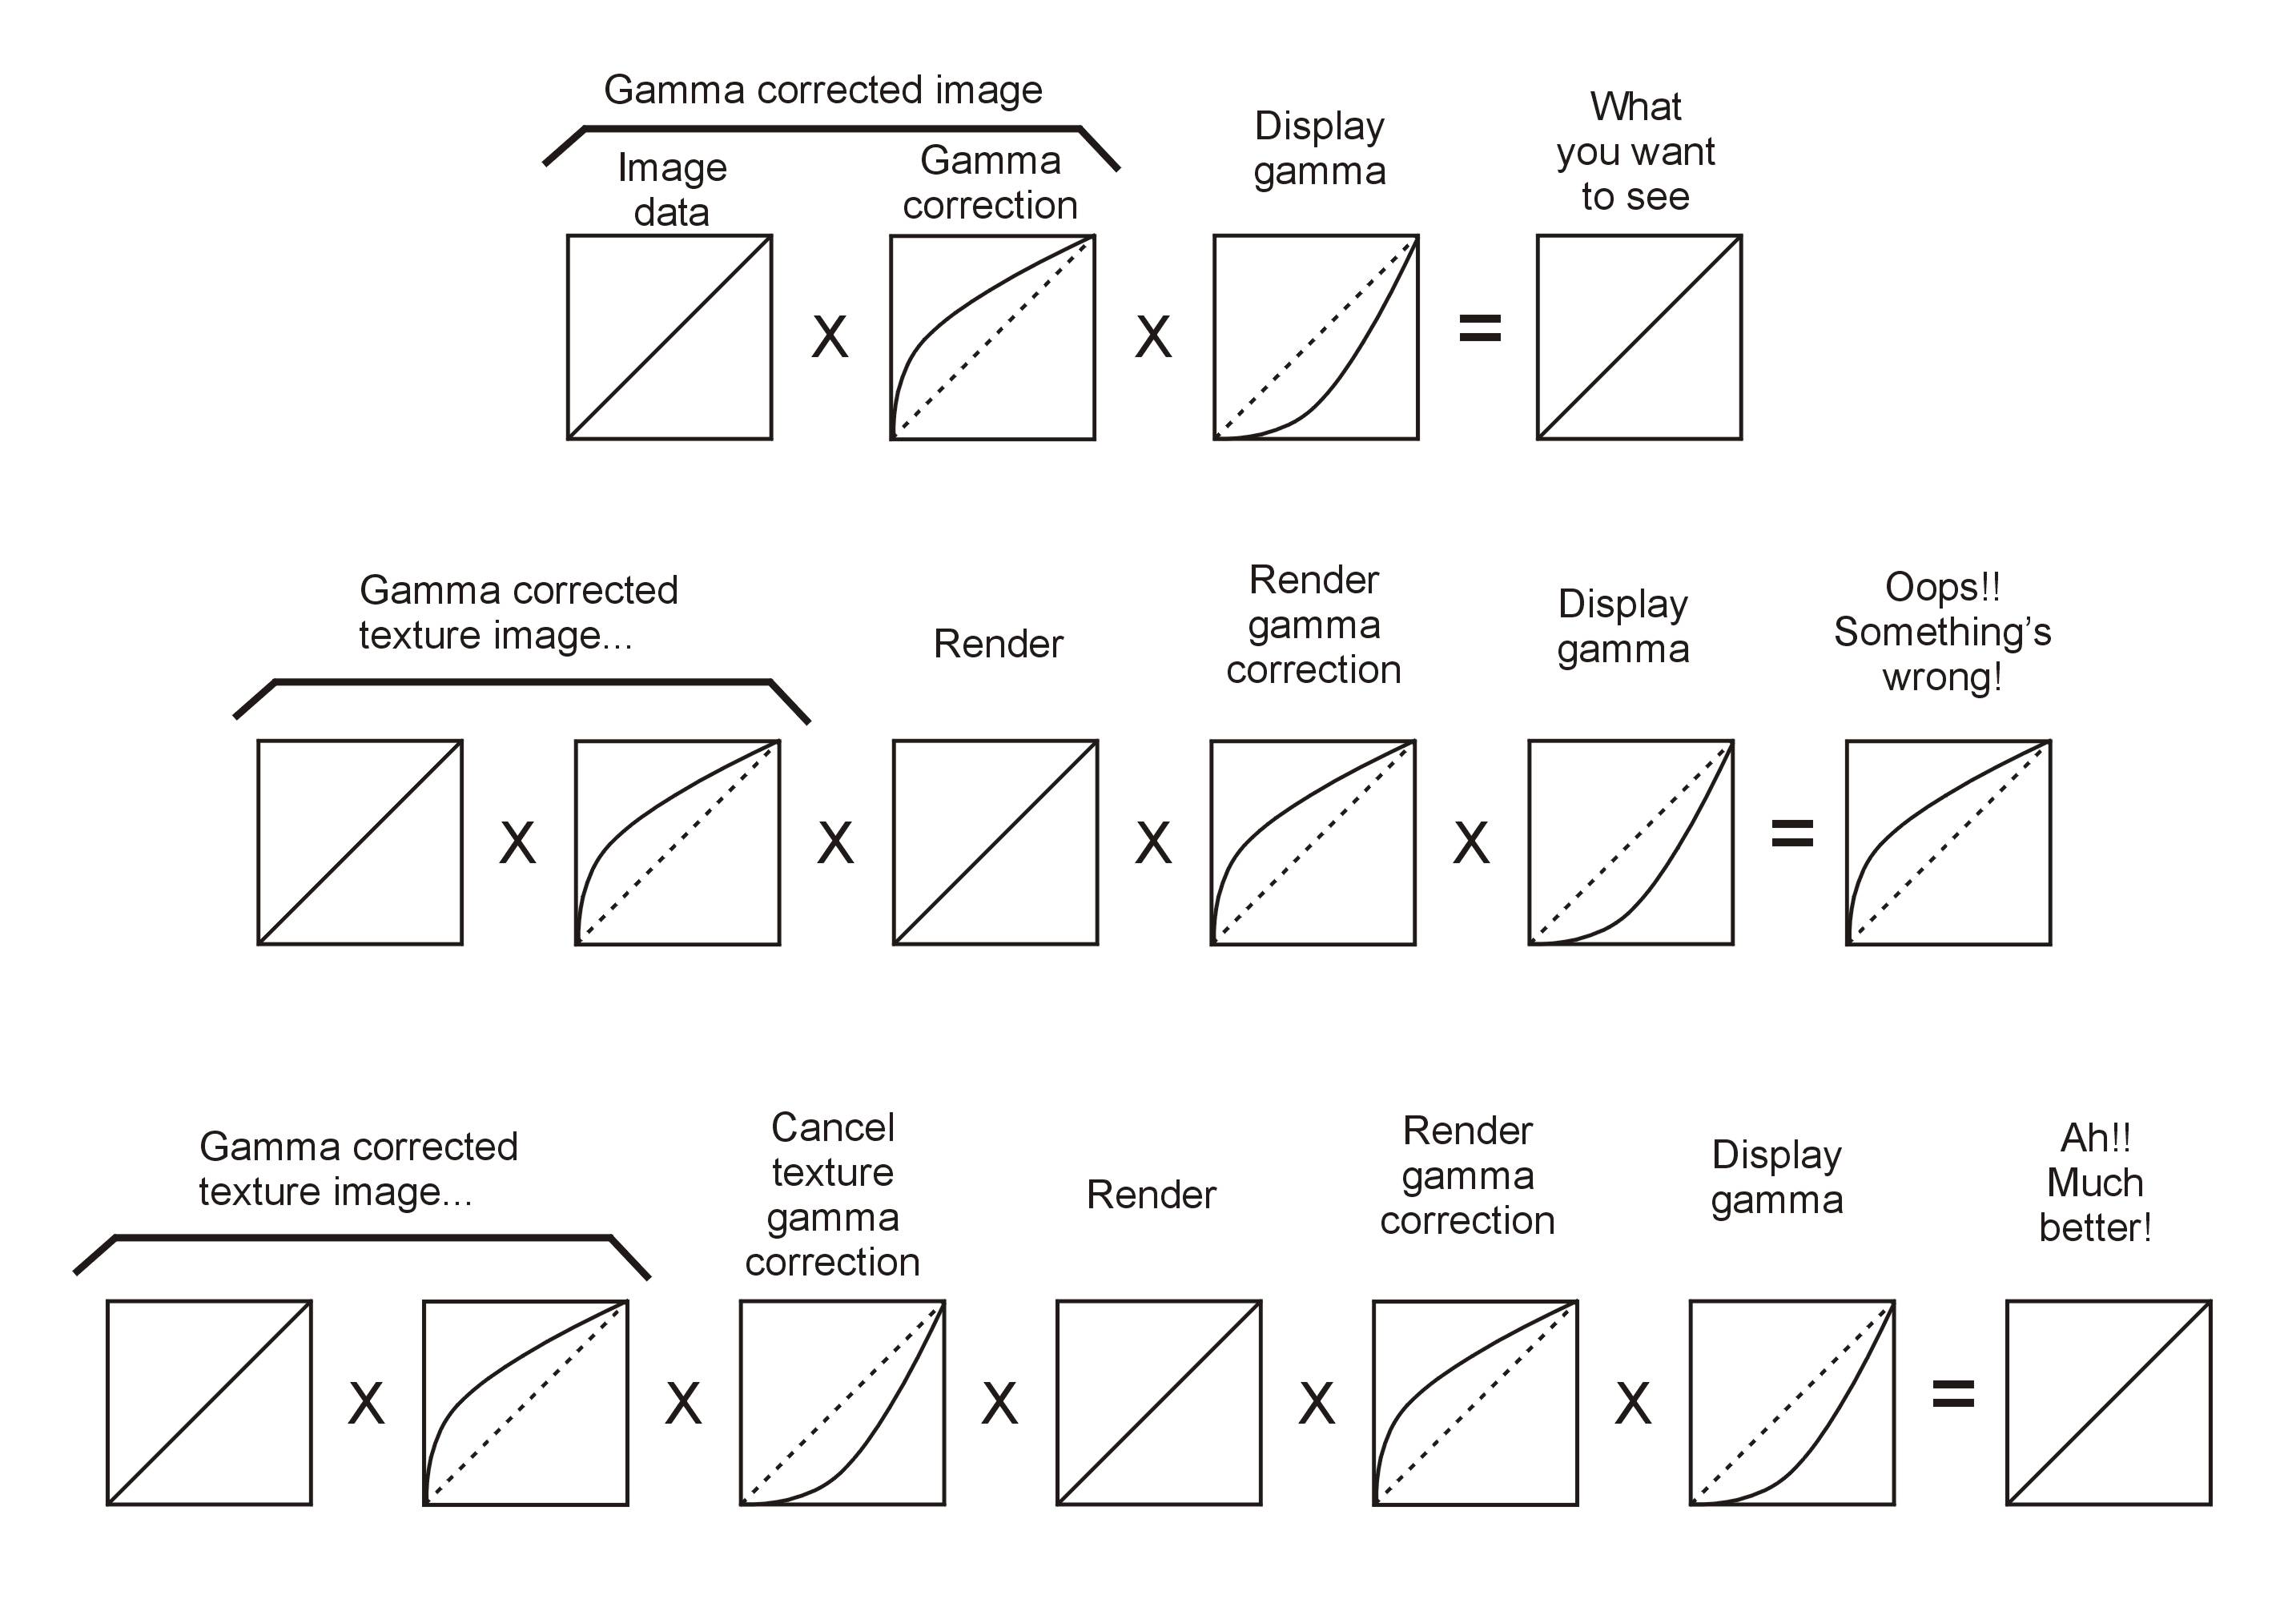
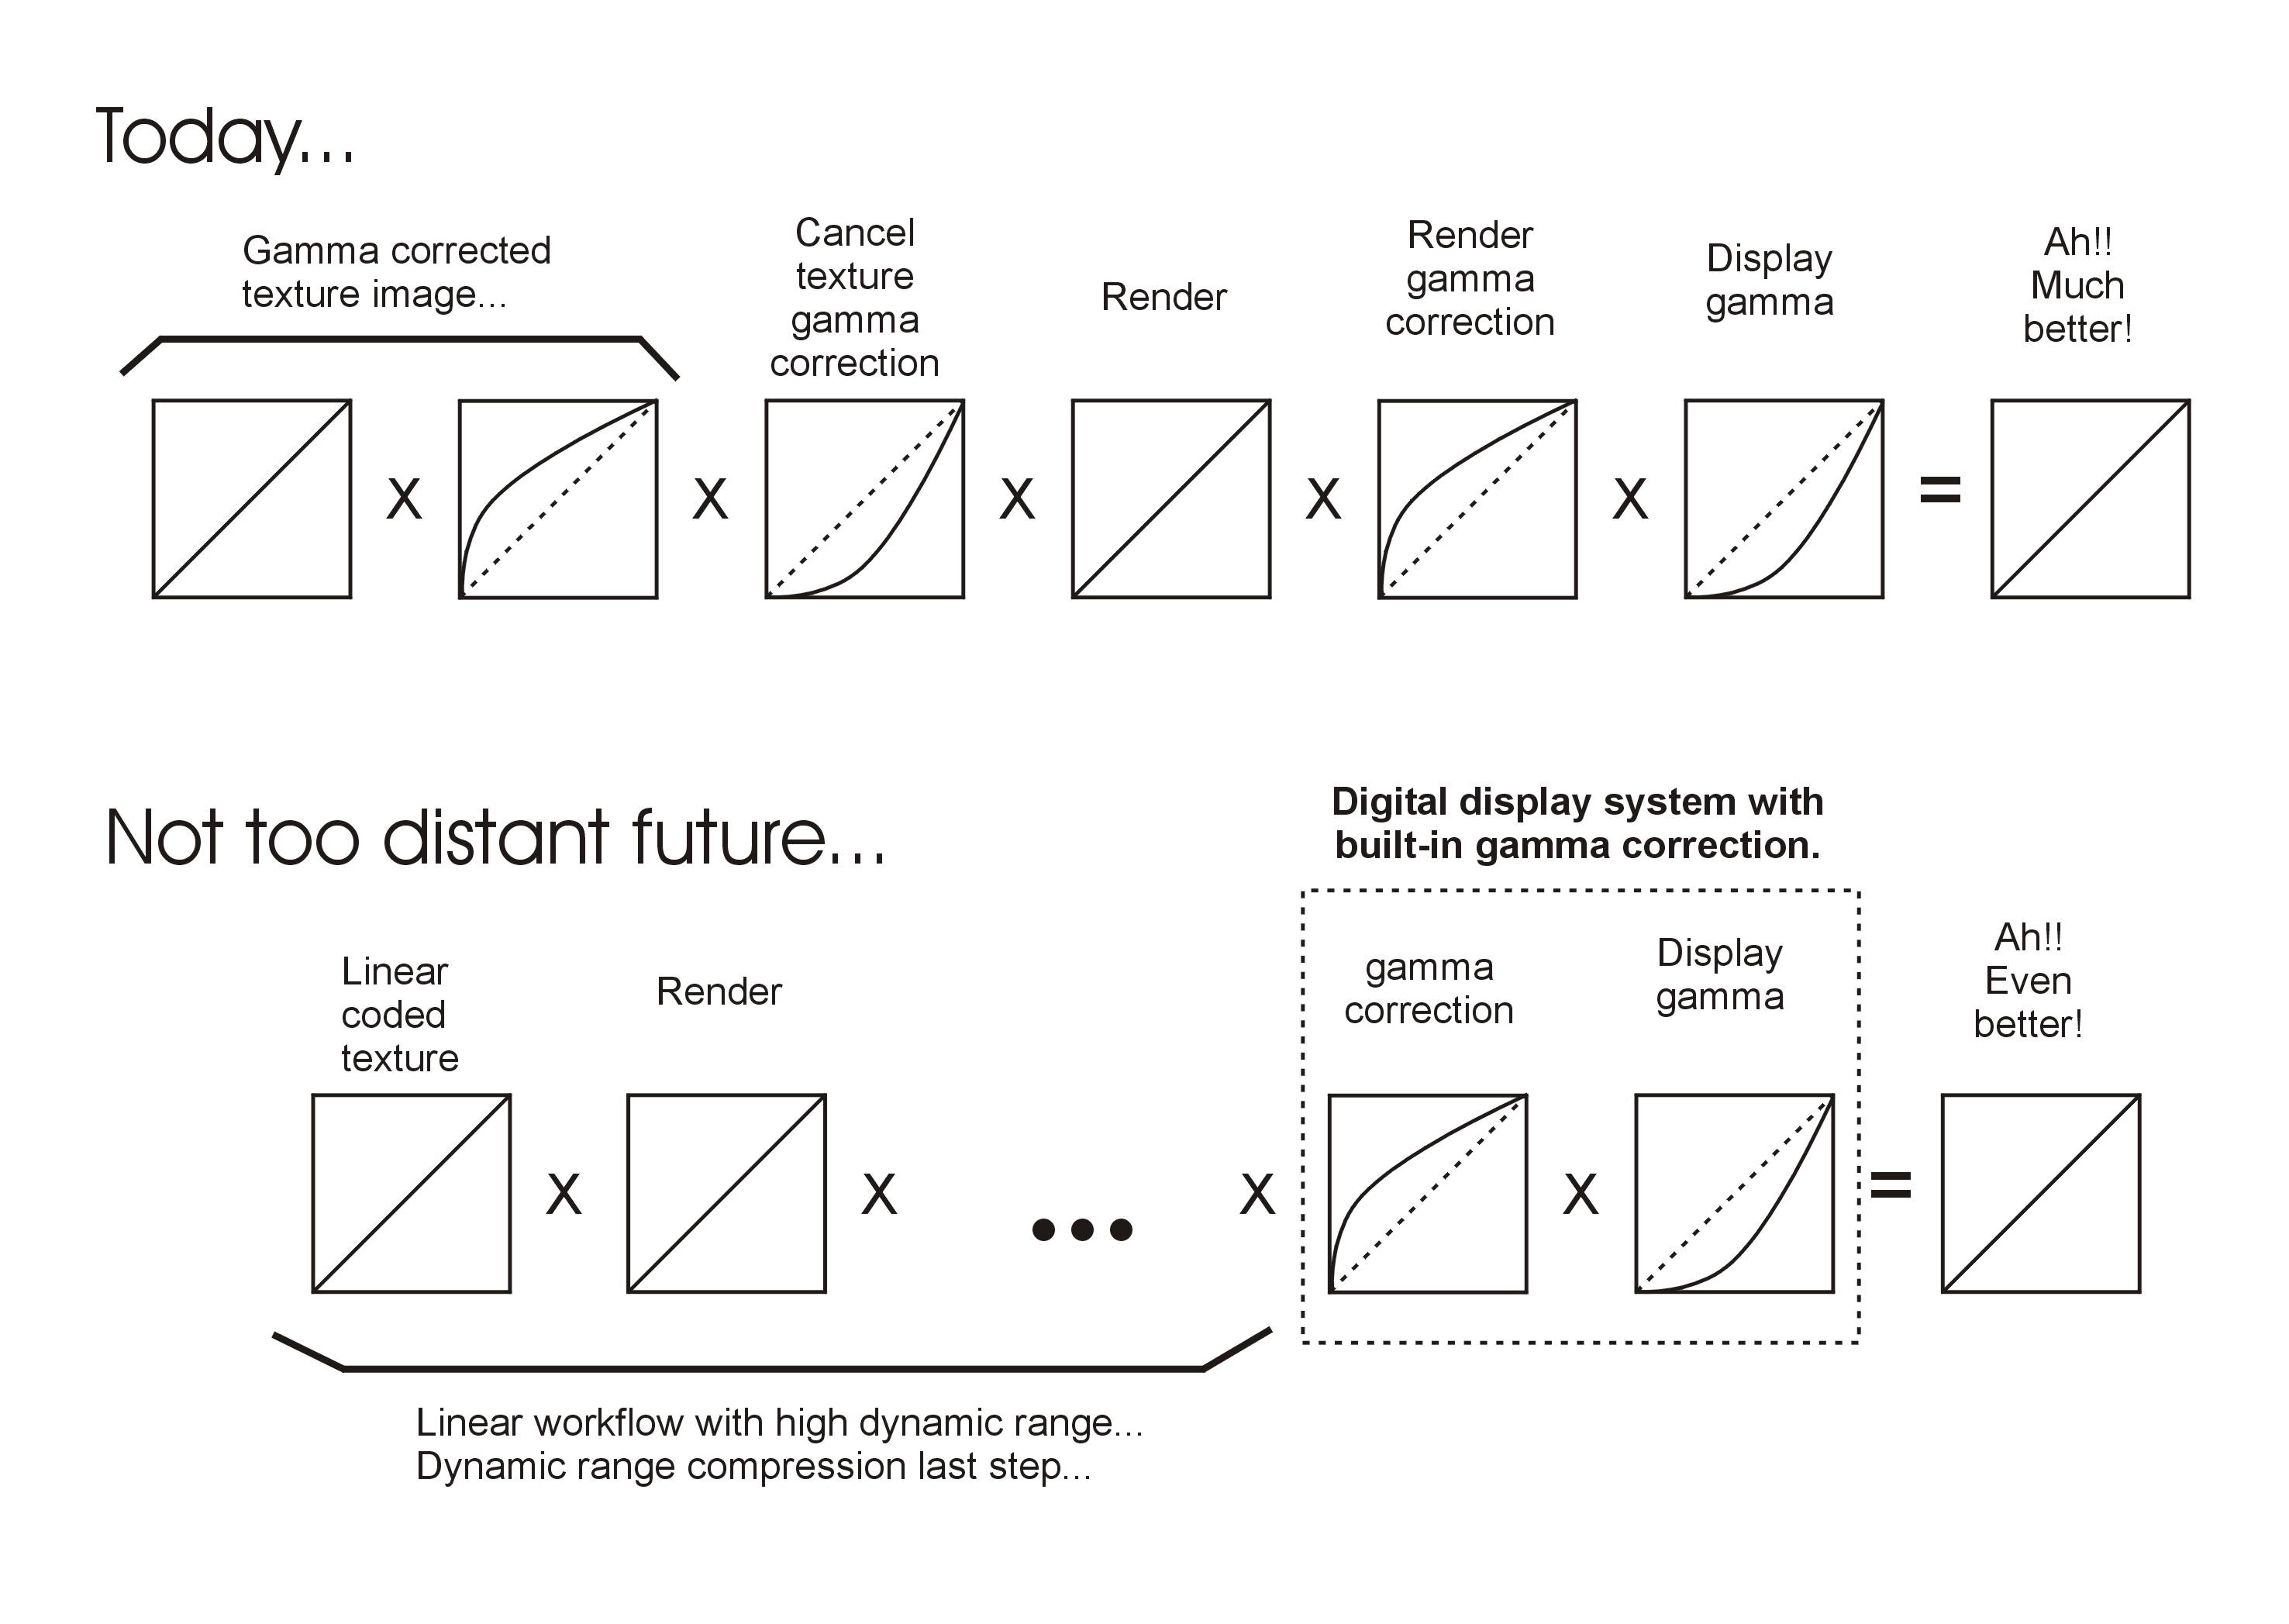
Yves, you might want to draw a "workflow" diagram that shows where the nonlinearities come in.
The diagrams I posted earlier are a start. If I can squeeze in some time I'll expand on these and Yves can then critique these and suggest any corrections, improvements. I work for AT&T at their Atlanta, Georgia labs, and video technology is my main specialty. I think diagrams like these can help clarify what happens where without having to get too technical. I won't make any promises for time frames, though, since AT&T's IPTV has me spread pretty thin these days. This will be a good exercise for me to learn more of the CG world, since most of my experience is in television technology.
What Yves has done a marvelous job of already is showing how all this translates into the art of creating the image you are after.
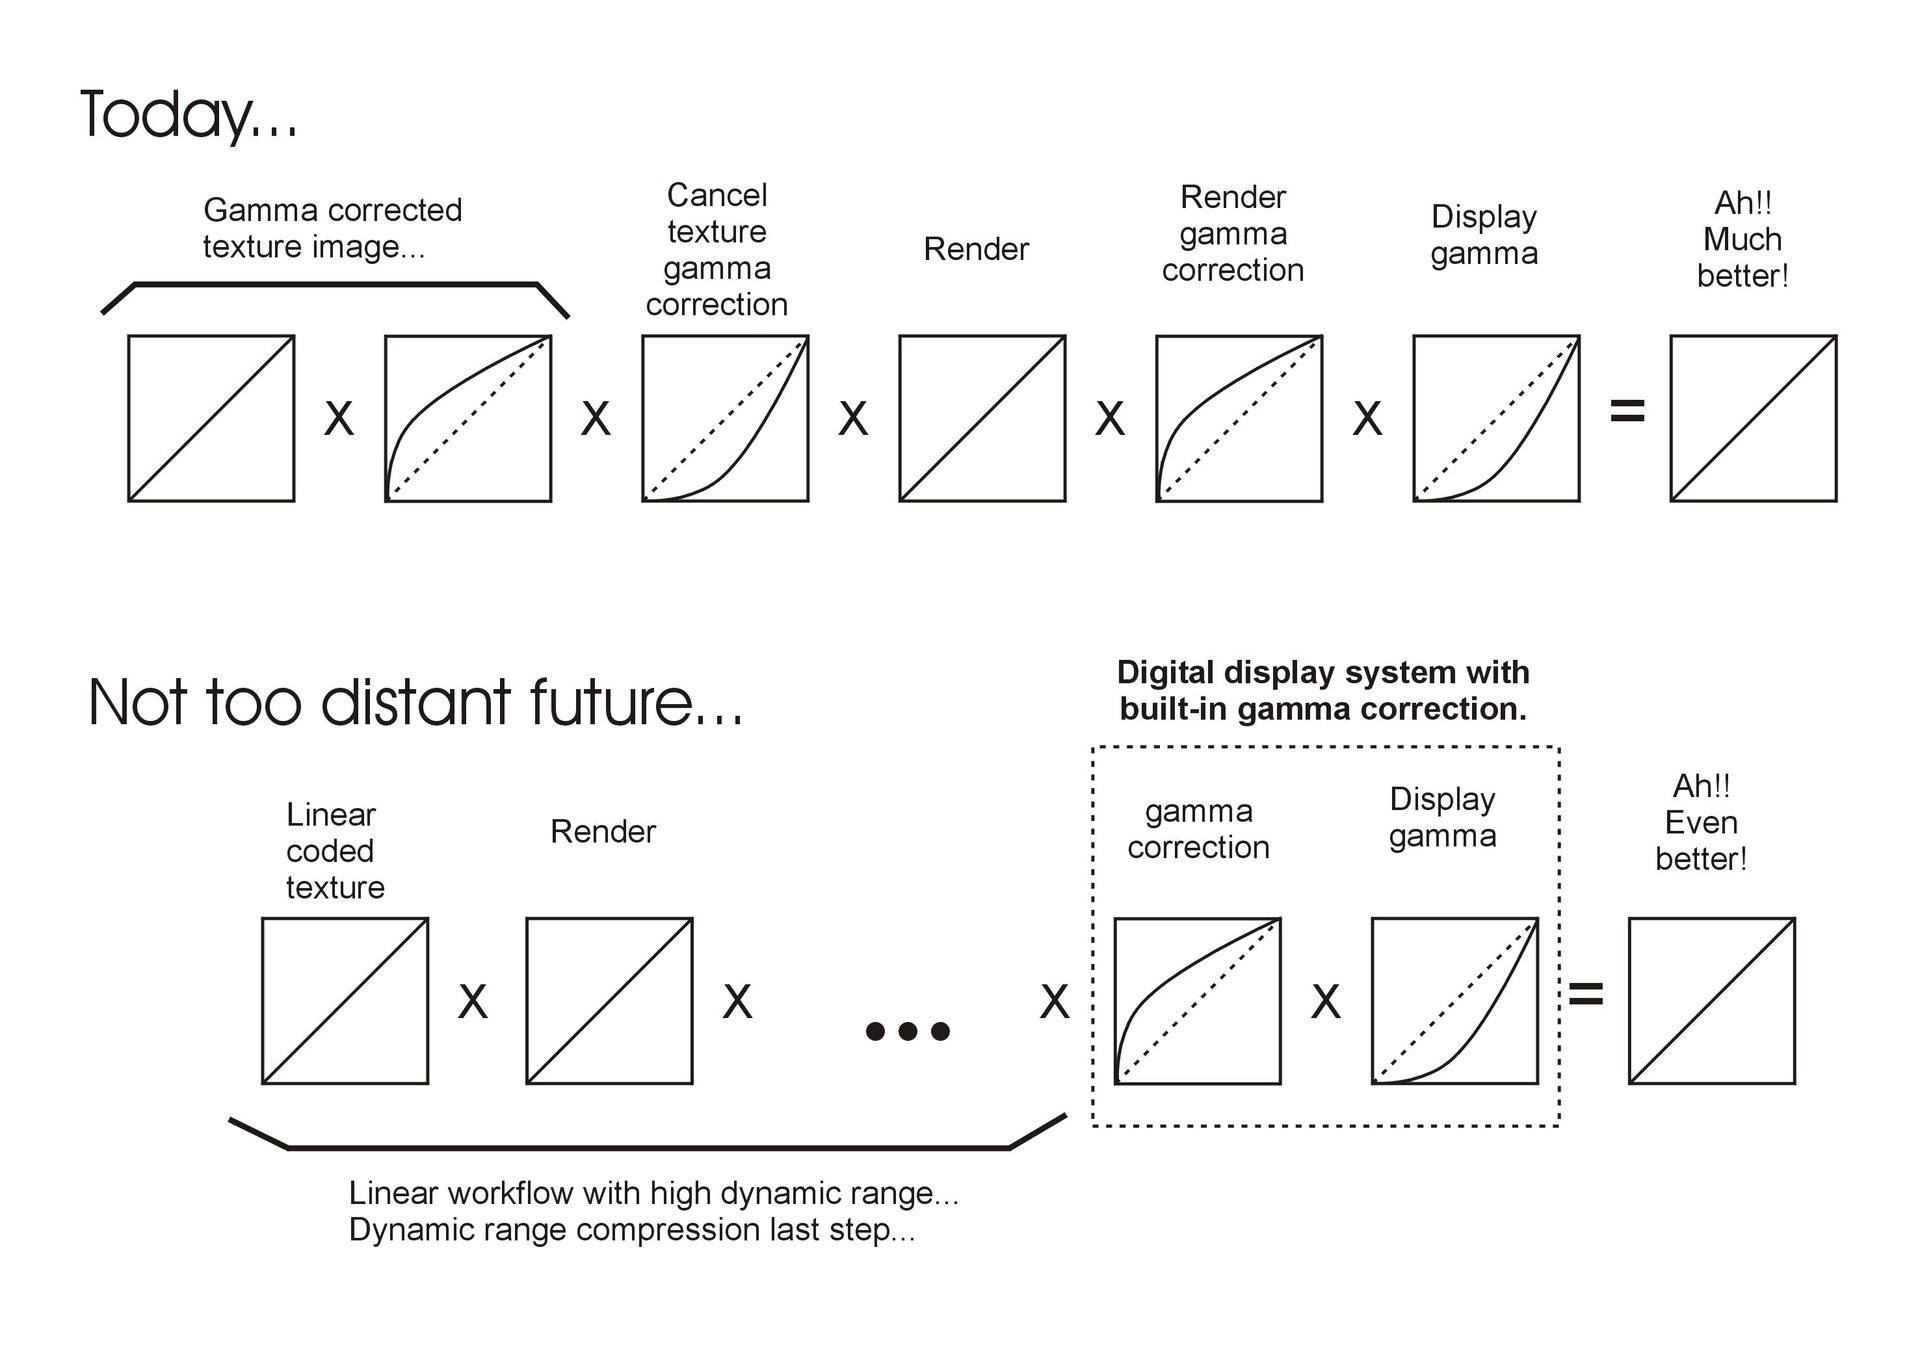
The last diagram I did I would certainly change to emphasize that the display industry has currently taken the approach of standardizing display response to the 2.2 gamma curve, whether or not the underlying display technology's native characteristic follows such a response curve. Look-up tables (LUT's) essentially make the display's natural response appear to fit the 2.2 gamma curve so that any gamma corrected image data matched to 2.2 will display correctly. In the future with digital interfaces and build-in display "intelligence" it would be more appropriate to move the gamma compensation into the display itself, opening up a completely linear work flow right up to the display input. Today, however, we conform the image signal to match the display instead of the other way 'round.
-
BTW, I am really pleased with how fast this rendered! V15 Rocks!
-
Next I want to tweak the lighting. May try the Skycast rig again, which worked great in earlier experiments. Might be a good time for me to actually learn lighting in A:M and get familiar with OpenEXR outputs and post processing.
-
I'm posting the project file here so Hash can access it. Feel free to check it out, anybody, but just bear in mind that I'm reserving copyrights for a client project.
-
Did a lot better, but still some rendering glitches when the leaves start to grow. I'll send a copy of the project to Hash and see if they can figure out why. Much better than previous tries! So close!
-
The animation is in the works! Tripped over a couple of querks in the import to V15. Don't know if I had the choreography length set wrong in the original, or it imported with a default length, but the imported project had a choreography length of 5000+ frames, rather than the intended 300. On top of that I did not notice that when I played out the animation, it only showed frames at large steps. The last frame in the playback was the last even step and the last frame of the sequence did not show--so the pose sliders that would show 100% only showed ~94% which corresponded to the last playback step. That threw me off and made me think the choreography relationships were messed up. Nope! Just a querk in the playback. Once I figured that out things have gone smoothly.
I still have the small branches to set up, but once that is done I'll do a test render of the whole growth from seed to fully grown tree.
So far so good!!

-
I'm thinking assembling in an action with the trunk as a proxy and the branches as action objects. But if multiple models can be used in a pose, that might be even better. I want to use the whole set as though it were only one model so I can use it in multiple instances (9 if I can manage it), rotating the tree a bit so it will effectively look like a different tree each time.
Another option might be to render the tree in a separate chor and fake the multiple trees as flat video images (that will cast shadows) since they will be in a long, extra wide shot of a city block with nine brownstones in view. The end product is the important thing, so any effective short-cuts will be appropriate.
I used similar tricks putting the "Plateau of Leng" image together for the "Lost World" contest last year, but this is more complicated being an animated sequence.
Basically a brother and sister will be planting seeds along a city block and the trees will magically grow up as they work their way down the block.
-
You did so well for the contest I was wondering, "Is that little robot just composited into a photo?". Amazing work there, Stian!
-
A:M will correctly adjust for imported gamma-corrected images (used as decals) if the gamma is embedded in the file - like with Targas.And PNG too.
I suppose since video cameras apply gamma correction, video file input gets a similar treatment? (Knowing how sharp you guys are it's a pretty safe bet the answer is yes, without even having to ask.)
-
What ever process you're using, it looks like it's working well. I'm not sure what you mean by "iteratively build the whole tree".Just an idea: why don't you create the tree in one model, and rig every branch?
The tree is actually a set of models: one "trunk" model and a set of "branch" models of various sizes. The branch models are constrained to the spline that guides the trunk growth when the tree is assembled in the choreography. I did it this way because the overall workflow was more efficient. Tree parts are simple, but there are so many of them! Coordinating the animation of all these parts was the real time killer. Easier to set up a "branch" model with it's own action and then replicate it. I change the shape of each branch by altering the splines that define it's shape.
If I could do this iteratively to build a model I could do this in a single model. Otherwise a single model would require me to animate every single component--many hundreds of them.
The model's animation is guided by a set of splines that define the final form of the tree. The basic building block is a spline path and a simple tube with a bone asigned to each spline ring of the tube. The bones of the tube are constrained to follow the path. I set up a set of sliders to control the position and scale of each bone/ring. An overall slider control controls the whole set. I build a branch by constraining the bone of each individual spline path to a point on the spline path that supports it in the tree. As the point in the "growth" of the supporting branch reaches the point where a new branch is located, the new brach's visibility is turned on and it starts growing. This all mimics the fact that tree growth happens at the end of the branches--once the branch form behind the growth at the tip is established, it keeps it's shape and just thickens over time as growth rings are added. Simple scaling of parts does not work, since that is not how a tree actuall grows. (That being said, I actually cheat at the last step by scaling the leaf clusters--but in that case it looks natural enough to work. Another compromise is that the tube stretches along the spline path, so the bark texture flows with it--in a real tree the bark stays put and just thickens.)
So, if I could build a "composite" model from a set of smaller models, with all the constraints and controls remaining intact, I could build it as a single model instead of having to assemble separate branch models to make a tree in a choreography.
It would be great if I could export what I animate in the choreography as sort of a "model group" with an overall animation control, so that, even though it is not a model, you can import it back into a different choreography as though it were a model. That might be more practical than an "iterative" model feature, since it would group a set of actions with the set of models.
In the first test animation the first stages looked very like a trunk model was just scaled up. If you could get some root movement in there as well it would be all the better for it.Yes, I need to work on that a bit to make it more natural looking. In reality, like branches, roots grow from the tips and thicken. In this case I should probably animate the shape of the spline rings at the base, not just scale them.
-
Now that I know V15 handles this very complex "model" just fine, I'll set up the keyframes and do a render of the thing growing today and give it a whirl. Then, if that goes OK, I'll put the brownstones back in and put in a better lighting setup. Stay tuned...
-
Not sure where the old thread is in the archives, if it's there at all. This is a render in V15 of an older project where I was trying to animate this tree growing from a sprout to a full grown tree. This is the full grown tree. This tree is actually a large set of smaller "branch" models assembled in the choreography. If I could assemble them as a single composite model it would be preferred, but I haven't figured out how to do that yet. I wish I could iteratively build the whole tree from a small number of tweakable branch models. Any ideas?
Here is an early test animation with a scaled down version:
And a closeup:
Image attached is the project render in V15. Wahoo! It works without rendering artifacts!
-
I for one have a boatload of learning yet to do on this stuff. (Think "Titanic" when reading the word "boatload".) I think it would be great to have a new special topic on lighting/gamma/tone correction/color correction/HDR etc. (What category might tie these "image fidelity" related topics together? Rendering?) A good start might be pointers (in one easy to find place like a special topic) to some of the best tutorials we already have, including Yves' excellent collection of tutorials on these topics.
Although my background is digital signal processing and video/audio compression, I'm a babe in the woods still when it comes to tone correction, color correction, CG rendering, lighting, image file formats, etc., that are the bread and butter of creating CG material.
It might be handy to have an overview of what processes/data should be kept linear (eg., scaled instead of compressed) and what processes/data benefit from non-linear processing (eg., to compensate for non-linearities in display device characteristics) and the proper processing order for the best results. A wall chart might be a good format for such an overview. A trivial project--NOT!
The Hash Forums in general have been a fabulous resource for learning a lot of this stuff and the generosity of many of the more experienced and knowledgeable members is something to be proud of, folks! Thanks a million!

-
Some pictures might help...

-
Bill, You said you had a good chat with William Stout.
I want to hear more about that!
He remembered the image of the "Old Ones" city "The Plateau of Leng" I did for the "Lost Worlds" contest last year, which was cool. I learned that his fascination with dinosaurs started the day his parents took him to the movies to see King Kong--at the age of three. I asked if he was going to work on Del Toro's version of "The Hobbit" while the production of "At the Mountains of Madness" was on hold. He said it wasn't his kind of thing. As he put it, "It's too much like working in a Rennaissance festival" for his taste. We then talked about some ideas I had about the Old Ones--he may have just been being gracious, but he seemed to be genuinely interested. We talked about various aspects of H. P. Lovecraft's description of the Old Ones. He's definitely very familiar with it. One idea was about the wings, which to me seem pretty useless for normal flight. I told him about how I imagine the wings building up a corona, then arcing like one of those "Plasma Balls". Then the Old One would take off suddenly like a rocket by directing a plasma jet with it's wings. That seemed to really pique his interest. Another thing we discussed was how something with five legs would walk. The best walking pattern I've come up with so far is where it lifts two legs at a time in a rotating sequence. It makes for a smooth, natural looking motion in any direction, so it turns out these things will move more gracefully than you might guess from a still image. (For a faster pace I imagine it hopping.) I'm going to have fun bringing this thing to life. If I bored him talking about my ideas, he certainly didn't show it. He strikes me as being a very down to earth, generous person.
Sadly I missed the Dragon Con art show "Iron Artist Contest" this year, which he has won for several years in a row. He says that's what brings him back to Dragon Con year after year--has to defend his title!
-
Man, this one was difficult to chose! Some great entries this time. Congrats to the winners and great work to the runners up!!
I had hoped to have a scene ready from "At the Mountains of Madness" by H. P. Lovecraft, but just didn't get enough time. At Dragon Con (one of my excuses--I work in the art show) I did have a good chat with William Stout about ideas for the Old Ones. He'll be working on Guelliermo Del Toro's version of "At the Mountains of Madness" which will start once Del Toro finishes The Hobbit.
-
Gamma correction is actually not that difficult to understand. It is becoming less important as more and more displays have the gamma correction built right in--which is really the best way to do it. Almost all types of displays have a non-linear response. They are less responsive at low values and more responsive at high values. Most have a response curve that follows a "power-law" curve that looks pretty much like a loose string connected at a point on the floor and a point on the wall. (The "gamma" is the exponent applied to the original value--the "power" it is raised to. A gamma of 2.0 is the "square" of the value.) The curve is roundest near the floor (where the weight of the string has less effect) and straighter near the top (where the weight of the string pulls it tighter). The overall result is that--relative to mid-range values--dark values become darker and lighter values become more bright and saturated as compared to the values as captured by the camera. Gamma correction essentially "pulls the string straight" by applying the inverse of the gamma.
The problem with gamma correction is that it depends on the particular display. In the television world, CRT displays were standardized, so the gamma was predictable. The television signal was altered to correct for gamma.
In the world of PCs, and the new world of digital television, there is a plethora of displays with different gammas, so there is no one gamma that fits all. You basically have to match the gamma to each display. However, newer displays with DVI or HDMI digital inputs are building the gamma correction into the display itself. This eliminates the need for gamma correction to be applied to the video signal or still image data and is the smart way to handle gamma. Even with these displays, as the display ages, corrections have to be made, but all this can be built into the display itself, so the user can tweak the display using a built in test pattern.
If you have a newer display card that can apply gamma correction to match your display (assuming the display doesn't already apply it's own gamma correction) you can program the card to apply the correction. This case also essentially removes the need to apply gamma correction to the video or picture data.
In digital video and images, both the non-linear characteristic of human vision and the need for gamma correction affects the visibility of quantization steps making artifacts like "banding" more visible at some values than at others. As it turns out, human vision and gamma correction have roughly an inverse relationship, so video or images that are encoded in a gamma corrected non-linear code are less succeptible to banding. Higher bit depths are rapidly making most of these issues a thing of the past.
The need for gamma correction outside of the display, to correct for the display's effects, has complicated the work-flow of digital image production--something Yves' tutorial explains quite well. As displays (or the display adapters) take over the job of gamma correction, the entire work-flow from the output of the camera, to the input of the display, becomes linear and the work-flow becomes far more consistent and straightforward. We are on the cusp of this era of digital production.
So, that's another long answer.
The short answer is that a gamma of 2.2 is usually a good rough guess for displays + adapters which do not provide the gamma correction. So your video/image gamma correction would have a value about .45 (the inverse of 2.2). Macs typically have a gamma of 1.8 (still pretty close to 2) so your video/image gamma correction would have a value of about .55 (the inverse of 1.8). If you correct it for a Mac and send it to someone with a PC, the darks will look slightly darker and the lights will look slightly more bright and saturated, but should still look reasonably good. If you send it to someone with a gamma corrected display, it will look pretty washed out. So Nancy was right...it all depends!
-


My Hand
in Work In Progress / Sweatbox
Posted
This is an interesting diversion from your usual brilliantly crafted mechanical modeling. Looking quite good.
About thumbs:
The thumb has the only metacarpal bone that moves freely.
It only has two "phalanges" (finger) bones sitting on top of that metacarpal.
The other fingers have three "phalanges" bones each sitting on a metacarpal that does not move freely.
The thumb and its moveable metacarpal sit on a carpal bone that juts out from the plane of the palm--like a little shelf that sticks out at a right angle to the palm. If you feel where the metacarpal of the thumb joins this little shelf as you look at your palm, you can feel that the thumb is jointed almost exactly in front of the index finger metacarpal--not to the side of it. You can also see that the joint is right near the wrist joint just a little to the right of the biggest tendon there at the wrist.
If you place the model's thumb bone accordingly, you should get a more realistic movement of the thumb, and the palm will fold more realistically.
Pretty amazing work consider you had to duct tape the mouse to the stump where your hand used to be attached! What dedication to the craft!