
williamgaylord
-
Posts
907 -
Joined
-
Last visited
Content Type
Profiles
Forums
Events
Posts posted by williamgaylord
-
-
Another thing to notice is that the branches tend to spread out somewhat horizontally toward the ends until you get to the leafy branches that tend to stand up and out. The leaves sort of follow a curved surface as though they were cascading up and over the ends of the branches. There are of course leaves farther back, but most of the leaves are concentrated toward the ends. The leaves also face mostly up and out, rather than facing in random directions.
-
Okay, this is gonna probably sound like a dumb question, but are most peoples leaves the "sprite" emitter?
Ever since AM hair, probably yes. It's a wonderful way to add leaves to a tree! A lot less labor intensive than making your own!
I started making a rough tree a while back and couldn't figure that part out right away so I started puting leaves in manually, copy paste...copy paste...etc. It got a little cumbersome.For my trees I actually build the leaf clusters. In this case I am animating trees growing from sprouts to full grown trees. I tried hair for the leaves, but discovered that the hair does not grow very smoothly...the decals jump in size in large increments so the result is very "poppy". (I'll have to try the latest version to see if it still does this.) I build leaf clusters using a very simple leaf design with only four patches. This allows me to give the leaves a nice curl. You can use a decal on this simple leaf surface to get any shape leaf you want. To reduce the patch count further, I use splines rendered as lines for the leaf stems. It is very labor intensive!
-
What kind of render time are you getting when you include the leaves?
Great idea--post them hereHere is a picture of a fully grown version of my tree:

-
Nice work, William. Guess I'll have to get back to work on my trees. In my case the goal is to make it grow from a sprout to a full grown tree. Quite a different challenge. I will be interested in how you do the foliage and how well it renders and how computationally intensive it might be. BTW, how do you set up a thumbnail picture with a link to the full size (as a curtousy to those with narrowband links or simultaneous rendering going on)?
Tree growth animation thread...
Bill Gaylord
-
I think there should be a vid on how you should chew marshmallows real good ...
Or maybe a Marshmallow munching on a bag of little humans?

Bill
-
So what's the first "Safety" film subject?
Haven't decided yet. Probably one of the simpler sight gag ones. (The list so far is on the first post of this topic.)
Actually the first Marshmallow film will be a spoof of something Justin Barrett did. Can't say more--it would spoil the surprise.

Bill Gaylord
-
Here is a closeup movie of the shoulder in action:
*Warning: Imbedded Movie--will automatically play in a window.* Closeup of Shoulder
Bill Gaylord
-
Why so much rigging for such a simple arm?
I'm just experimenting to learn more about various options. A single fan bone would likely work with this shoulder, with a bit of Smartskin to clean it up.
I can't quiet make out what your doing in from the illustration you gave. Is it fan bones?The array of bones around the ring that pivots is SonofPat's idea--very similar to Victor Navone's mouth rig in some respects. They are basically fan bones, but one for each control point (children of the shoulder bone with orient like constraints to the upper arm bone). You adjust the enforcement for each one. You can find the explanation on this technique on the ARM site...under the "constraints" tutorial section. Works great for hip joints, too.
and what are the translate to constraints for?The "translate to" constraints on the "target" bone keep the "axel" bone's "aim roll at" target to one side. If it were to cross to the other side, the roll handle would suddenly pop to the other side. That makes for a very badly kinked shoulder. It also limits how much the shoulder rotates to follow the roll of the upper arm.
The "axel bone" idea is was one way to get the shoulder to rotate to follow the twisting of the upper arm bone to help reduce kinking, even while the joint is at an angle. A "roll like" constraint might be simpler.
BTW: What's got into Major Innovation? His little dance in your icon looks like he's telling a funny story to some kindergarten kids. Looks very natural by the way--quite impressively so--but just a bit goofy.
Bill Gaylord
-
Yes. Another annoying habit of mine is to directly imbed relatively large pictures, instead of a small replica with a link to the larger one....
Guess I should provide clearly labeled options.
 Thanks for the suggestion.
Bill Gaylord
-
Here is a little movie of how the shoulder rig works. It's a bit small to see the shoulder but you can still get an idea of how well it performs.
*Warning: Imbedded Movie--will automatically play in a window.*Shoulder Rig Test Movie
Bill Gaylord
-
Haven't had much spare time in the past two weeks, but have squeezed in time to experiment with various ways to rig the Marshmallow's arms. Here is what I did for the shoulder. The idea is to make the main shoulder ring pivot like it is fixed to an axel. The next ring is the actual pivot point and acts mostly as a hinge joint. The result is similar to a universal joint that connects two rotating shafts at an angle. This is a simplified shoulder design for simple characters where the shoulder does not really need to be joined to the body. The following picture shows how it works:
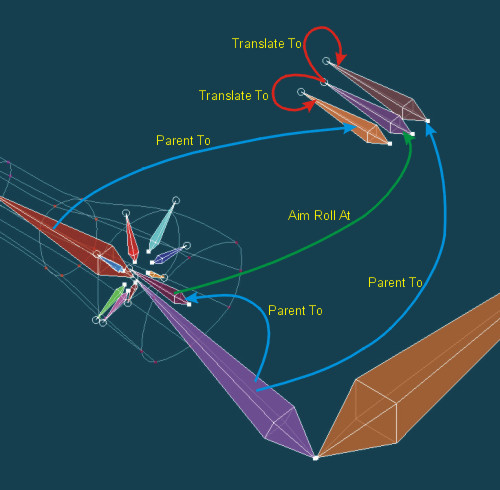
The "axel" bone is a child of the shoulder bone. It has an "aim roll at" constraint to a target that is in turn controlled by the angle and roll of the upper arm bone. The target bone has two "translate to" constraints--one to a bone that is a child of the upper arm bone and one that is a child of the shoulder bone. This combination allows the arm to rotate forward beyond 90 degrees without the target bone passing to the opposite side of the axel bone. If it did, the roll of the axel bone would suddenly pop to the other side causing a gruesome kink in the shoulder.
I use Sonofpat's idea of using several bones with "orient like" constraints around the shoulder ring associated with the pivot point. That does most of the work of smoothing the shoulder mesh. I then give it some final tweaks using a Smartskin on the upper arm bone, setting just four extremes--forward, backward, up, and down. Works great with the TSM2 arm rig!
I'll do the same with the hip joints as the Marshmallow has no hips, strictly speaking. ("He has no butt!!!")
I may post an animation of the arm rig to show off it's performance.
Bill Gaylord
-
-
I'm not sure how to avoid the crashing, but I find that some times adding or changing something in one of the poses makes the crash go away.
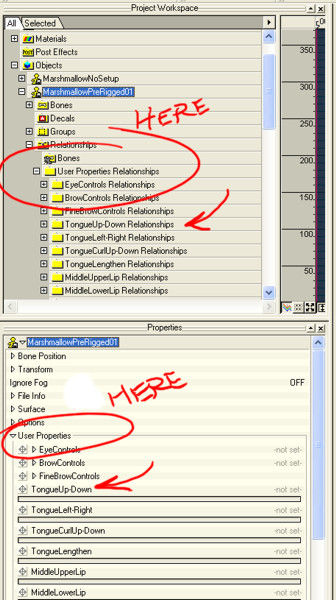
What I can help you with is how to properly delete poses. The confusing thing is that you have to delete a pose in two places to completely remove it. First delete the pose listed in the Project Work Space under Relationships and then click on the model and delete the same pose under User Properties in the Properties window.
Bill Gaylord
-
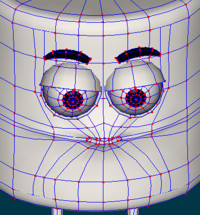
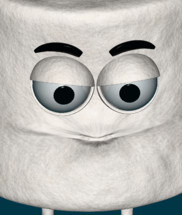
I think I finally have all the fine mouth controls sorted out. Here are sample pictures:
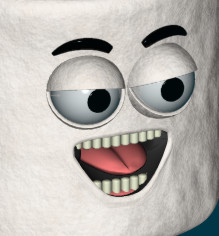
Now he can even whistle!
-
Most of the facial rigging is "bone free"...mostly muscle mode or simple translations controlled by percentage poses, except for the eye rig, so not much would be visible as in a normal skeletal rig. I will share as much as I can, though.
Bill Gaylord
-
Actually this was in an action window, so lighting is not ideal. This was just a test of how well the "puckering" of the lips works. Normally they won't "pooch" out like that. I am very pleased with the lack of creases or ridges in this mesh design.
Soon I will have all the mouth controls configured and will move on to the rest of the rigging. I wanted the mouth to be one of the high performance pieces of the model so I could get a lot of mileage out of the mouth and eye expressions.
Thanks for the input!
Bill Gaylord
-
Wahoo! The small mouth and new mesh design work great! Here's how the extreme of the pucker looks in the smile/purse extremes:

Smooth! I think this is a keeper.
Bill Gaylord
-
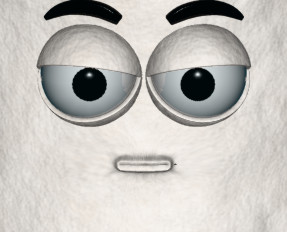
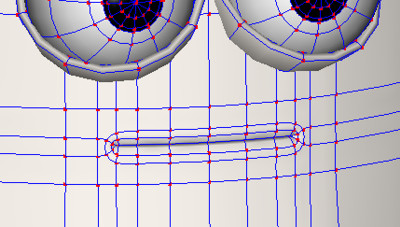
Here is the smallmouth variety of Marshmallow...
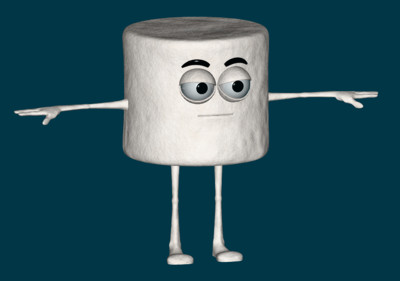
The mouth slit is just visible, but should give you a sense of relative size. I think this looks more appropriate and should be much easier to rig. Also added another spline ring around the mouth that should help quite a bit.
Well, round two of rigging a mouth!

Bill Gaylord
-
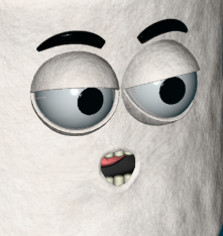
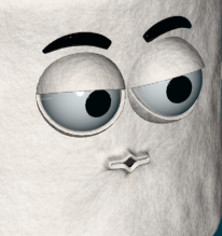
The wide mouth design is creating challenges. For most mouth movement it has worked out OK, but an extreme combination of pursing and puckering the lips looks a bit ugly in my opinion. Let me know what you think. I'm seriously considering redoing the mouth mesh.
Here are some pictures to illustrate. The first is the neutral mouth. The second and third show the purse/pucker. Note the ridges that form in the extremes.
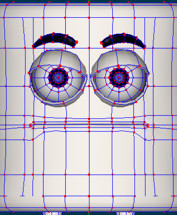
Here is an early thumbnail sketch of the marshmallows. This design has very small mouths. Any opinions on whether I should make it small as in the original sketches or extra wide as in the current design or something in between?
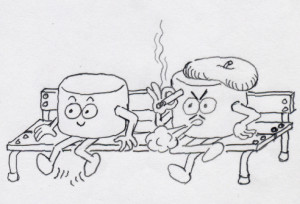
Smaller would behave better, but give me your votes! Or mesh design suggestions that might make the wide mouth work better in the extremes.
Bill Gaylord
-
Fixed the link. You should be able to download a "zipped" copy of the project file.
Enjoy!
Bill Gaylord
-
I can't download the project, so I'm wondering if the link is working for you?
Bill Gaylord
-
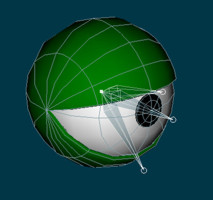
Tried some experiments and came up with this: GerryEye Project
You can check out the project to see the details. I wound up assigning a bone to each semicircular spline, instead of using Smartskin. The in-between bones have orient like constraints such that rotating the main eyelid control bone also rotates the intermediate bones by a proportionate fractional amount. This gave the smoothest results. There is a bit of distortion, but it looks very like the normal bunching of a real eyelid. For some reason I am unable to adjust bias in a percentage pose--have experienced this before and have reported it to Hash support.
Hope you find this useful.
Bill Gaylord
-
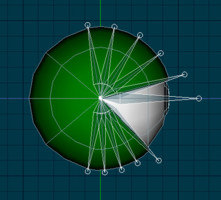
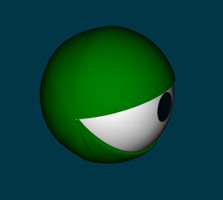
Yep, that's how it works:
Since the lids are fixed bowl shapes I assign a bone to each lid and center the bones origin at the very center of the eye. That is the way I get the lids to follow the curve of the eye. I then use a set of additional bones, constraints and percentage poses to build a set of controls for actual use in animation. I would highly recommend Raf Anzovin's "Rigging a Face" tutorial CD. He presents a way to rig the eyelid controls that is easier to use in animation. It takes a bit of time to learn but is worth the effort.
What I would recommend for your model is to use one bone each for controlling the top and bottom lids in your model that pivot at the center of the eye. Then use a Smartskin relationship for each of the upper and lower lids. Use the bone rotation to control the rotation of each of the semicircular splines in the moving part of your eyelid. Make sure you go a bit farther than you expect to give yourself enough range of lid motion. Once the Smartskins are keyed, you will have four main control bones that control the four lids. Then you can add constraints and percentage poses that in turn control these bones to give you a nice set of animation controls.
Bill Gaylord
-
Hi Bill - yup it helps a lot, but I should have been more specific. What I was wondering about was the opening and closing of the eyelids. Is is a pose slider? How do you get the lids to move in the same curve as the surface of the eyeball?
Since the lids are fixed bowl shapes I assign a bone to each lid and center the bones origin at the very center of the eye. That is the way I get the lids to follow the curve of the eye. I then use a set of additional bones, constraints, and percentage poses to build a set of controls for actual use in animation. I would highly recommend Raf Anzovin's "Rigging a Face" tutorial CD. He presents a way to rig the eyelid controls that is easier to use in animation. It takes a bit of time to learn but is worth the effort.
What I would recommend for your model is to use one bone each for controlling the top and bottom lids in your model that pivot at the center of the eye. Then use a Smartskin relationship for each of the upper and lower lids. Use the bone rotation to control the rotation of each of the semicircular splines in the moving part of your eyelid. Make sure you go a bit farther than you expect to give yourself enough range of lid motion. Once the Smartskins are keyed, you will have four main control bones that control the four lids. Then you can add constraints and percentage poses that in turn control these bones to give you a nice set of animation controls.
Bill Gaylord
dancing monkey
in Work In Progress / Sweatbox
Posted
Like da monkey! One suggestion on the wind animation...maybe his ears could flap in the wind a bit...
Bill Gaylord