


frosteternal
-
Posts
826 -
Joined
-
Last visited
Content Type
Profiles
Forums
Events
Posts posted by frosteternal
-
-
After several weeks of work, I (with some helpful input from Dushan, my roomie) have finally completed and entered my commercial entry for the Heinz "Top This" challenge.
It is done, and I am very satisfied. The music/sound-effects are a combo of stuff supplied by Heinz for the contest, as well as public domain bits, and my own home-grown effects.
*whew*
You all can view the entry on youtube at...
http://www.youtube.com/watch?v=1pj2OMLr0xQ
It took remarkably less time than I had intended, as I had blocked out ~2 months for pre-production etc.
Wish me luck! I have seen the other entries and I think this really has a shot at the grand prize.
(Hopefully you all will vote for me when it inevitably reaches the finals.
 )
)(Now we can get back to the Mountain project. Although, a break was welcome and refreshing!)
-
My thiught is that the chracter would walk to the end of the path, stop, and then turn toward the back. However, when I play the scene to that point, the chracter begins his walk and then part way through it he begins to turn to the back. I thought that when I defined a key frame at the end of the path that is where the turn would begin. Am I missing something?
You need to set a keyframe at the point right before the turn begins. Keyframes are as follows: 1) starting direction, 2) ending direction, 3) turning direction, 4) ending direction #2
My guess is your character is beginning to turn throughout the animation, you just need an extra keyframe to define where one facing direction is to end.
-
At any rate. The old rig had lots of issues and so i've been able to redesign him incorporating all the new things i've learned since 2004! I'm still trying to decide if I like the more realish look as compared to the older more cartoonish look. Also the new one takes 13 seconds to render as opposed to 6 on account of all the high resolution texture, bump and trans maps. Any thoughts or comments good or bad?
Ethan -
The new one looks more youthful and bright-eyed. You consequently have made him enormously more appealing - a very important thing for a kids film. I like the more realistic decaling, too...The only thing you might consider changing is taking his colours "up" a bit; make him stand out from the backgrounds. I have seen the original film and it was good, but I recall thinking "oh how muted the colours are" which is nice, but might not grab a kid-of-today's attention as effectively.
New character shape though - MUCH IMPROVED.
Great job!
-
Hmm, thats getting closer.
But, is there a way to make a "rings on water" effect?
Maybe with a material?
Edit: I mean; my shield looks abit like glass and when something hits it I want it to look like rings on water. Like when you throw a stone in water.
Thanks!
Use a material effector with the "ripple" material in the Hash plugins material type. Anything the effector touches will have ripples on its surface.
-
Hello, Head Gizmo V2...
Exquisite. I LOVE these controls - so intuitive!
Martin is right - this would be perfect for animation students...although advanced enough for other work too.
Great work!
-
...
I tried to make KeeKat look a little shady with his posturing at the beginning, but instead of having him get angry, I chose to have him become disappointed.
...
The disappointed pose is especially nice - great job!
-
I've had the same problem. The timeline fits a spline between keyframes, however far apart they may be. I used to go into the timeline and set the points to "zero slope," but now I just add words to the dope sheet to force mouth closure: "hmm." The character doesn't actually say that, but it keeps the mouth closed.
This is the correct solution - since an automated lip-syncing tool produces varyingly acceptable results, it is common to tweak the channels' tweening curves. Adjust the timeline curvatures for tweens that need to hold (like "hmmmm") or other such oddities. Probably no need to even set all curves to zero-slope, in most situations that is over-kill.
-
Hi Again - I have an object grouped and gave it a name and colored it red. I wanted to change a color of the portion of it to black, so I grouped that portion and gave it a seperate name - I tried to change the color of that to black - it is showing as black in the properties box but the model is still red- can't figure out what I am doing wrong. Thanks.
Two things : One, is your red grop below your black group in the project workspace? The lower group should over-ride the group above it.
Two, it would be best to remove the black patches from the red group.
The best way to do this folows :
Click on the black group's icon.
Press the "hide" button.
Now only the black patches should be visible.
Now, click on the red group icon.
.Since the black group is part of the red one, the patches should highlight. Hold down the "ALT" key, and drag a selection boxed around the patches. They should de-select. Now they are a member of the black group, but not the red group.
It sounds complex, but this is the best way, in the long run.
-
Thanks for the info! I probably should have clarified that the foot wasn't modeled using Hash patches, but it's helpful to learn that hash Patch modeling is different from subdivision modeling.
I do have one more question... On page 128 of TAOA:M, it says to "Avoid attaching hooks to a spline that makes up a 5-point patch! Or multiple 5-point patches next to each other!" But the Giraffe exercise has you create two adjacent 5-point patches and there don't seem to be problems... How many adjacent 5-point patches is it ok to create? Or does it depend more on the geometry than the number of adjacent 5-point patches?
Yeah subd's are totally different - best to not even think that way. I haven't found any other modelling paradigms that really are at all similar to hash patches. This is a good thing!
As far as adjacent 5-pointers...it does depend greatly on the geometry. 5-pointers are best used in areas where the surrounding geometry provides plenty of curve detail. 5-pointers extrapolate their shape based on surrounding shapes, so while in one case two of them adjacent might not cause trouble, another case it might. I usually try to separate them by one quad (standard) patch, but have successfully joined two at a common edge. Just do plenty of test renders, certain shading options (like porcelain, which averages normals) are trickier to use with 5-pointers. Just remember, if it looks right (and animates properly), it IS, in most cases, right.
Oh, and to answer one of your earlier questions about intersecting splines...you should not have 3 or more splines ending at any given point, it will crease. Caveat : this may be desirable sometimes. Not usually.
-
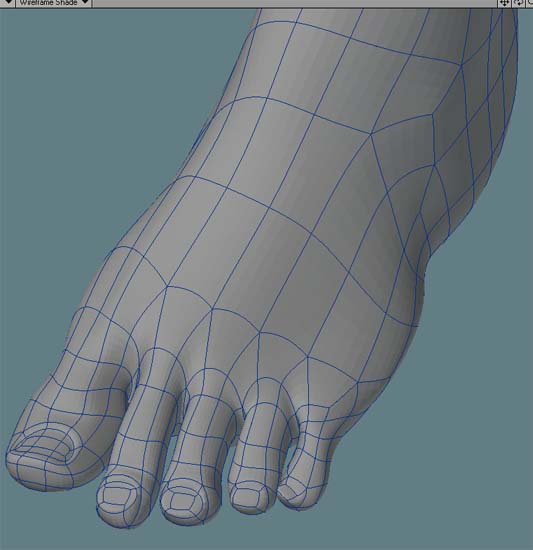
I was wondering what is considered good spline and patch design in A:M. So far I'm up to exercise 11, and it seems like TAOA:M always has 2 splines running through each control point - as a result, 3-point and 5-point patches are necessary. I have an acquaintance who is very experienced at modeling, and he claims 5-point patches are a bad habit and should be avoided; according to him, models should be made entirely out of quads to prevent creasing. However, he works with LightWave, so I don't know how applicable that advice is to A:M.
Here's an example of a foot he modeled: (copyright oDDity)
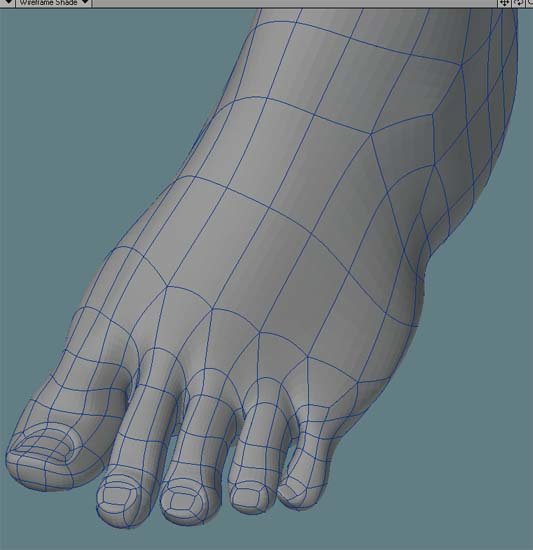
Although it's made entirely out of quads, that seems to necessitate occasionally having an odd number of splines meeting at a control point. Is that ok to do in A:M or is it generally frowned upon? Also, is it ok to have more than 2 splines passing through a control-point? Thanks!
5 point patches are not a "bad habit" but can be a very handy tool to use, when needed. If the foot WAS modeled from Hash patches as pictured (which it is not, those look like subd surfaces) it would crease on the toenails, and also the ridge where the foot connects to the toes. The splines would be "dead-ending" on each of those little arches (which might be okay for a foot, but most likely not).
5 pointers come in handy most often, in my experience, in hands (connecting fingers) toes (connecting toes) and the cheeks of a face.
Look around the forum and study the spline layout of some other models, or check out the ones on the cd. Spline layout is an art, and can't effectively be studied by looking at other modeling methods for examples.
-
ok i installed the paint.net and am starting to understand but everytime i get to the magic wand and when i click the part that is lime green is only selects a pixel instead of the whole shaded green part
If the image with the lime green background is a JPG file, the background is probably not all one shade of green, due to compression artifacts. You need to bring the magic wand tool tolerance up past 0%...maybe 1 or 2% maybe even 5%.
If that doesnt work post a screenshot.
-
In the end I edited the audio in Ulead VideoStudio 10
Added the movie, seperated out the audio, added my original audio and some titles .. and saved it - Not really a fix !! :-(
Not a fix, but definitely a better workflow. (Rendering to MOV/AVI is really just for quick previews, in my opinion)
As far as what happened with your a/v synch...is your source uncompressed? A:M only handles uncompressed WAV files.
It could also be your quicktime output settings. I have noticed that some quicktime a/v codecs lose synchronization on slower computers, or sometimes even from converting between codecs or just for no reason at all.
I always use sorenson3 with uncompressed audio for quicktime output when previewing, no probs.
The real answer - it could be any one of a myriad of possible reasons; and w/o sitting down in front of your computer these are all blind guesses. Since nobody else has claimed to have encountered this yet, there's a very good chance it is not a problem within A:M.
Glad you found a way around it!
-
-
It's not hard on render times.....it might even be a "2D post effect"......but that can work for fog as even if the camera moves, you can only see the same distance ahead as before anyway. As I say, it can be subtle.......the back of the ship can be crisp (higher start value) while there's a hint of fog on the front. See what you think...
You can also make objects ignore fog. This is in the properties for objects in the Chor. This would add depth cues to objects that need it, but not things like stars planets, etc.
And fog is very fast.. not a post-process, and I've never seen any rendering time hit at all. (I think it is encapsulated in the a-buffer rendering process, but it doesn't really matter.)
-
Well hot off the ol renderer, the second elemental unit.
Gonna try rigging this fella with the posable squetch install this evening. Which promises to be a challenge. Hey at least this guy has
Wow...very nice model!
Complex in its simplicity...
For rigging, might I recommend liberal use of CP weighting - the "Balance Connected" tool will work wonders and keep the various stones as solid objects so they don't flex in an un-stone-like way.
I can't wait to see this one moving....I can see it in my mind already.
-
to add fog or "dust" can i just turn the fog function on from the camera? Does this always equally distribute the fog or can i make clumps of it? Are there any other easy fast ways to create clumps of dust?
Fog is simply applied based on distance from the camera.
To do clumps of dust, I've had great success with sprite-type particle emitters, containing bitmaps of dusty clouds. These can be effectively animated over time in transparency/size to get a nice dust-cloud effect.
You could also use Layers to position dust clouds, but I would suggest rendering the dust effects separately and compositing on top of the rest of the shot to keep unsightly object intersections from giving away the 2-D-ness of Layers.
Just a few ideas.
-
Try using uncompressed video files. The look better, and you don't have to worry about conflicts from the codec...
-
...My goal was to have fun with something funky.
Excellent work! Reminds me of an air-brushed piece.
It's very difficult sometimes to keep the spontaneity of hand-rendered art.
Gorgeous!
-
GREAT GREAT GREAT! Exactly what i was hoping to hear. I remember seeing the alpha channel but i dont remember where i go to turn it on.. Also, what resolution do u think i shud render the explosion in so i can make it shrink and grow? And what resolution do u recommend for rendering all regular scenes? Thanks so much you are a life saver
When you choose to "Render To File" under output there is a section called "Buffers". This contains the "Alpha Channel...ON" switch. (If you render to uncompressed quicktime you can also save an alpha channel, it can make it easier to manage instead of long lists of targa files.)
As far as the resolution, I would render it about double the resolution of the final product, maybe triple. Also keep in mind to set the camera far enough back so as to not have any parts of the explosion go off the edge of the rendered image. Depending how much spread the explosion has, it may be quite a large file. (1024x1024?) If it is just for a background explosion, I would use a lower-res version, maybe 640x640.
Glad to help, let me know if you need any more help.
-
...Will the model that the video file is playing on be seen if objects are behind? Cuz when i render the explosion first, it will obviously have a background attached to it. Is there a way to rotoscope or cut out the background? Is that what the alpha channel does?
The Alpha channel is an extra bit of data usually embedded into a targa file (in A:M). It is best thought of as a "Transparency" layer.
The Alpha Channel is going to become your New Best Friend.
The explosion will render, but the background of the render will be see-thru. Also, if parts of the explosion are semi-opaque, that will be saved too. So it should be almost indistinguishable from a non-prerendered particle explosion.
So cool.
The object that you use to put these explosions into the scene are called "Layers". They are basically rectangular, 2-D images that can be moved in 3-D space, like a cardboard cut-out. To create one, right-click (or ctrl click) on the choreography, and choose "New:Layer" from the context menu.
Without The Alpha channel, the world of 3-D animation would be a much more dismal place indeed!
(I've attached a zip file of a quick version of what I mean in a v12 project you can load to dissect and figure out if you like)
-
good thinking, i was considering this but it would not work for 99 percent of my shots since i have tons of different models in each scene it. It would take absolutely forever to scale down everything for each explosion and zoom in just right. ALso, much of the time, the explosions are not the focal point of the scene and they are in the background making it impossible to do this.
Render out the explosion at a very high resolution at double or triple the frame rate with an alpha channel, then use the resulting animation as a Layer object in the choreography. You can animate the frames in each layer in the choreography to make the explosions last different time periods (that's why you want the extra frames). You can also alter the size of the layer object per-instance. This is not only easy to set up, but eliminates the delay to re-process particles when you scrub through frames. If you need more variation/complexity, you can use this technique in addition to sparsely populated sprite explosions, or render out 3 or 4 different versions of explosions to use.
This is the easiest method, and will render most efficiently.
-
I like the living ball idea. That ball has the most personality I think I've ever seen a bouncing ball exude.
Now I can honestly say that I know people more boring than a rubber ball.
Nice work!
The squash & stretch, as Robcat pointed out, is not perfect in its volume-maintenance, but I think it doesn't hurt the piece at all in this case.
-
Damn! Any other job interviews you have lined up? Or does this free you up to continue working on your movie?
 .
.- Michael
Ha ha. While this does free up my time, I need to spend that time looking for a new job. I AM doing some work on the film, lighting some of the finalized shots.
I have a few other interviews lined up, but they are dreadful retail/service jobs - nothing even remotely related to computers/graphics. Fortunately I go back to school soon, so once I finish my degree (finally) I may actually have a decent chance at something I can enjoy/be challenged by.
Once I resume earning money, be it whatever job I can eke out a living from, I will be going back to "The Mountain" film production in earnest.
Grim times. <_>
-
Anyway, I also wanted to ask, how did the job interview go?
I did not get the job, after all. Which makes me wonder - who did? I can't even begin to imagine their reasons; everything seemed to be going so well.

Killer Ketchup
in Work In Progress / Sweatbox
Posted
Nancy, Luuk, Martin - Thank you all for the positive response, it is good to know that the giddy tingly "wow I think this is good" feeling isn't just all in my head.
(I believe the final voting will be done on the Heinz website in late august, after their judges narrow it down to 15 entries.)
I'll keep everyone updated.