


frosteternal
-
Posts
826 -
Joined
-
Last visited
Content Type
Profiles
Forums
Events
Posts posted by frosteternal
-
-
Toon looks creepier, more sinister. So it depends what look you're after. Nice work!
-
Hi all,
I'm trying to render a scene with some furry animals stampeding. In the initial test renders the fur goes crazy stretching beyond it's length and penetrating the kows's bodies.
Try adjusting the "Bend Angle Limit" on the fur. The default is 180 deg., which tends to be way too free. Try maybe 90 and then adjust from there. Also, the mass of the fur may be too "heavy" for the stiffness settings. It looks like the "stretching beyond its limit" is long fur going through feet, etc., so the other thing you may want to do is adjust the length of the fur on legs, feet, etc. so it is not all the same length. I have gotten fur dynamics working properly before, w/ collision detection on, it just took some tweaking.
That aside, I do like the "kows" [?]; they bound oh-so-amusingly.
-
First pass at an attack-
http://home.alltel.net/collinsfamily04/fliptakedown2.avi
Detail of slobber and slimey mouth-
 -
-http://home.alltel.net/collinsfamily04/slobber.avi
Cory
Wow. I especially love how you can see the skin moving and twisting over the creature's ribcage. Amazing detail. I really get the feeling that the creature (despite being fantasy) is really alive and breathing.
I almost wanna dissect it =)
-
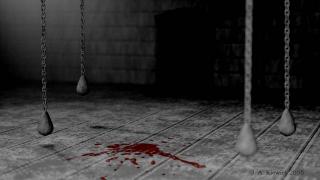
IThe green you see on the floor, has been changed to a dark red. I decided to make it dried rivers of blood, so disregard the green....
Yea, I know....it's already been changed. "Hey Kool-Aid.....Oh, Yeah!" lol
Does anyone even drink Kool-Aid anymore? I don't recal even seeing it advertised any longer...
Oh yeah...the rivers of soon-to-be-blood...VERY nice and icky. Love it!
-
"If you don't love your 3-D software, it's NOT Animation:Master."
-
Well here is my latest update. I completely changed out the textures for the flooring and walls.
Yay! Blood-stains!!
Looking much, much more creepy. Nice work and best of luck with this project!
-
And yes, the wood beams are a little too perfect and new looking for this scene. Some tweaking will have to be done. For now, I am going to concentrate on getting my modelling detail done, then worry about aging later.
Aside from the walls and floor, everything else is textured with materials. I might want to re-think that if I want to use the set for animating.
An easy way to "rough-up" the scene is using some volumetric lighting (makes it look dusty) and maybe stains etc, also shallow depth-of-field really adds to the claustophobic "feel" of a dungeon. I threw this together last year as a web-site background to promote one of my books, it's not perfect, but might give you some ideas as far as texture/lighting/etc. [attachmentid=14980]
Nice work thus far, I particularly like the ghostly-lit head with the eyes. =) Gorgeously creepy.
-
Well, here's an update:
IMy best solution as of yet:
I must found out how to import the good version of the chor action from the test project into my original file so I can complete this project before I die of old age
Does anyone know how to do that without screwing up the original (screwed-up) file? I have already animated other characters in this project, so I don't really want to scrap it and start over.
Yes.
Open the working choreography. Expand the character shortcut in question. You will see a "Choreography Action" under the "Actions" Folder. Right-click it, and you will see "Export as Action". Do this. Save the .ACT file. Now you can scrap the Chor action from the broken project file, and dump in the exported action. (On the right character, that is.)
This is far easier than the alternative of sacking the whole mess.
 Let me know if I can make a bit more sense in any way, just woke myself up with a horrible nightmare and I might not have been terribly clear in that explanation, but my facts are all in order.
 -
Well, yes.
But what I want is to make anime and almost-real-looking characters. That is my dream with A:M. But as I said I must get more skill to make things right.

And about v12, v13 isn't it easier to get nice cloth?
The one in v11.1 is kinda "buggish" and goes threw things.
//Korken
1. Anime and almost-real characters: Start simple, maybe even with a real head (like someone you know.) My first decent human head was my mom. When I say decent I mean it looked mostly-not-like-lumpen-horror. I'm not sure if she ever modeled for me again, come to think of. =) Oh and study other people's face meshes..you will find striking similarities between the good ones; like how the slipes are laid out, etc. (Dushan, my co-creator for the Mountain film we are working on never did any human modeling and was able to get a workable face for the woman character in about 3 or 4 intensive tries by studying meshes and having me critique his work. Of course, I still had to rebuild parts of it, but he's a newbie.)
2. Cloth. I can't speak for v13 yet, I cannot change versions in the middle of a major project; that would be suicide, I fear. But the SimCloth plugin is the same in both versions, and although squirrelly, it is capable of very effective cloth. BE PREPARED TO TWEAK THE HELL OUT OF ANY I MEAN ANY PHYSICALLY SIMULATED ANIMATION! Technology has not progressed to the point where it doesn't take days of settings, weeks of experiments, and many tears to get physical simulations to look right. But it's worth it, now, my Old Man's coat will be almost automatic. I'll post a tutorial on how it was done once the project is all finished.
The summary, since this has become PostZilla,
 is that it will take a while, and tons of practice before you are "proficient"...and even then, continue working at it.
Oh, and when all else fails, start with a walking easter egg. That was my first A:M character. (He looks like an M&M now, looking back)
Best of luck!
-
No. I rendered in "final" mode immediately after rendering in "shaded" mode without touching anything else. This problem occured each time. Each time I did the exact same thing.
Any guesses?
Yep, I gotta guess. Do you have a pose in the user properties, perchance, that is set to "ON" or some %tage by default, when it should be "not-set"? This happened to one of my Old Man set-ups and it was making me nuts.
-
[hmmm, well, i doubt it
as i have attempted to explain before
even after i have fixed it, and saved it.
when i shut down the program and try to access the file again
the decals are all wrong
On your next try, snap a screen-shot of what it looks like BEFORE, and one AFTER (after the model reloads with incorrect decalling) so it is more clear what exactly doesn't look right the 2nd time. I gota say, this seems to be a bit of a stumper, but before and after shots may give us some clue.
Frustrating!

-
yes, i luv photoshop
... alpha ... channels???
i don't really understand how exactly i can use alpha channels in regards to decals
Alpha channels on decals will allow your decal to have transparency. Like if you wanted an irregular shaped decal, or to have a hole where a material shows thru.
Oh, and I opened your model file; I assume you are referring to problems like places where the stripe decals don't line up, like on the wings?
Oh and why are all of your control points peaked? Just curious.
-
I have u/l wire frame.
Hmm..high spline? Not terribly, unless you are comparing with ..say...me. ('m obessed with low-res geometry because I have an obsessively slow&behind-the-times computer.) Seems fairly economical, really. I could eliminate maybe 10 or so splines but that's it.
-
I have tried extruding the bottom circle and then making it smaller, but that makes "smooth" lines which bows out the bottom of the foot.
Any help would be much appreciated
Extrude he bottoms of the feet, then "peak" the edges, selecting the vertical splines that create the bottoms of the feet. Easiest way is to select the bottom-of-the-foot geometry, then press "p" on your keyboard. This will peak the whole bottom of the foot, including the edges. click on one of the horizontal edges, press ",". this will select the lathed spline. un-peak this spline; it's the tool button that looks like a parabola (i don't recall the shortcut key for smoothing splines at this hour of the morning)
Good work thus far!
-
This is the first model I have been able to shut the eyes properly. I have a lot of clean up.
Very nice; the eyelids in particular are beautifully modelled! Can't wait to see the finished product.
-
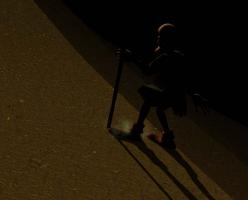
Your guy has an amazing sense of balance, or a very low center of gravity. Anyway, what i'm trying to say is when one walks up a hill or a % grade their body is strait up. Your guy looks sort of wierd walking perpendicular to the dirt. still looks pretty good.
Ha ha his balance is INCREDIBLE. Yeah I know I know, at 3 am it looked fine for my purposes. His final walk will not be cycled either; he needs to struggle and lurch up the mountain, with pauses and to catch his breath. My next posts will be likely much more production, much less test bits...
Thanks for the "heads up"
NOTE:
All posts from now on will be under the topic "The Mountain", as they will no longer be just the Old Man...
click here to go there
-
Did you use the displacement foot print plug-in for v13 Alpha to do the foot prints?
No, all hand-modelled geometry, and my own process. =P perhaps I WILL check out this displacement thingy...I AM lazy after all. (although I know better than to change versions mid-production, that is asking for trouble, 12q is nice and stable for me.)
Cheers & Happy Chinese New Years
-
I can't wait to see more.
Here's a little more. I agonized over footprints, and dust, from walking. Yeah, it's rough, and he is un-cloaked, but the main test here was the environment reacting to him walking...*whew*
-
Interesting angle shot. It will be interesting to watch how this one develops. Are you going to continue with these type of angle shots? It could prove to be a very different type of short in the end.
Yes, the angles will probably continue since the whole short takes place climbing up a mountain. (See image below.) If the ground looks level at any point it will be because the camera is tilted.
And it is going to be a very different sort of short.

-
Looking forward to more.
Just a bit more; a test render of a shot w/ some lighting and texturing trying to get the best "look" for the scene...
-
I have released today a new version from the NewtonPhysics plugin for A:M .
- there are two known problems, but I would not longer wait with releasing this version (and workarounds are available), read the known problem section attentively
Hmmm...very nice, but for some reason it hangs at "Build NewtonWorld 50%" when using any of the explode object types (explodable model created w/ the e_rebuild plugin)
Anyone else have this problem?
-
-
TSM 2.07 fixes the issues with Rigger in v12.0q. Download here.
On re-reading, I'm guessing Frosteternal didn't have an issue with Builder.
Well, Builder wouldn't ummm....build...but downloading the update now I'll let ya know. Thanks a ton, in advance! This kind of quick response is what defines great products/companies. (I've been on vacation, so my response is sloooowww.)
-
Thanks a bunch!
Spent the last week working on the animatic for the film with my friend, who designed a wonderful woman/angel for the "death" sequence...more to come.
We're both very excited about where this is going...hopefully the first of many wonderful collaborations between us...the old man is done...now we have been building sets and the final design for the evil bunnies.
(They ended up half bunny, half demon, thanks to observing real bunny photos and sending them thru the twisted filter that is my weird mind...)
Now I'm off to begin final animation work for the film. Wish us luck!!!


Powers of Darkness
in Work In Progress / Sweatbox
Posted
A quickie little film inspired by the all-too-real horrors of my upstairs neighbor installing creepy ceramic animals in the front walk-way "garden" of my apartment building.
download it here
enjoy!
(yeah I know it's weird. that's my mind.)