

frosteternal
-
Posts
826 -
Joined
-
Last visited
Content Type
Profiles
Forums
Events
Posts posted by frosteternal
-
-
Congrats on your Big Decision. That was what I did when we started on "The Mountain" 3 years ago. (There were other factors as well.)
Best of luck, work hard, and you will be fine!
-
Also, use the "reflection blend" property to get less "bright" reflections.
EDIT - yay! 50% filter, 50% blend seems to reduce bright reflections - falloff still 0" - anything else made reflection go away. Tried soft reflection - didn't like
Awesome - the muted reflections really help your Moose..er...Mouse stand out more clearly!
-
This one could be too slow and long for the final,
I wanted to try something with the 2 beautiful models by Jim Talbot.
The rig isn't great though, the rigs have so much evolved since those guys were modeled.
I might install the 2008 rig "in them".
Michel
Nice lighting, good pacing. Just a few jerky bits in the stopping of the waiter, and Lady Goodbody's grabbing is a little robotic.
But I love the concept, and the dejected look he has when she tosses the ball.
-
hmmm...Floaty you say? Uh ...in Meeska clip? or the others? or all? Can you give me more info as to where ? (sorry I didn't put a frame counter in)
...
2) tail movement is non-expressive - didn't put any effort into it. Movement needs to be more deliberate, more lagging with body, more changing of shape as Meeska turns - Tail movement should be more interesting. Finger, hand positioning needs more interesting poses.
...
4) Hair penetrates ears & movement of head hair is too springy. Maybe this gives the feeling of overall floatiness? I'd like to solve the penetration issue without using collision detection - things seem to go wonky with CD. Might try isolating groups of particle hair - and assign bones to move the groups.
...
6) reflections are too bright (don't know what to do about that)
...
But FLOATY? You saying my bal..er the balls are floaty? Eh Jesse?
Floaty could be hair springy-ness.
Also, use the "reflection blend" property to get less "bright" reflections.
The balls themselves are not floaty =) Cleaning up tail movement to be more expressive will help immensely.
You work always has a dreamy quality to it, very dance-like and choreographed. (In a good way)
I still love your work even if I am quick to give helpful critiques, sorry if I'm being too Virgo for you
 I sometimes do that.
 -
I kinda like this guy. He has character.
I like the design of the character, but still some spline continuity issues, it would appear (from all the creases.) Shaded wireframe?
-
Meet Martha Mouse.
Because I'm a lazy twit and hate to rig, I borrowed some DNA (body, rig) from the Witch (in Scarecrow of Oz) - Head/face modeled, rigged by me (not finished), texture, hair by me.
Original Witch was designed by me, modeled by Ken Heslip, rigged by Ken? using Squetch (ver 2) by David Simmons. Squetchy ball by Robcat.
4 pass - ave 23 seconds/frame - Global color = white, AI=50%, AO=0%, rim 20% (zbuf shadows), 2 suns (no shadows), reflections - 1 level, dynamic hair, dynamic constraints.
I may tweak some.
Nice mouse, creepy ball invasion. A word for when you tweak - I recommend looking at your holds/timing to get more "snap" to your movements. It feels just a bit on the floaty side.
Did I mention I love the mouse?
-
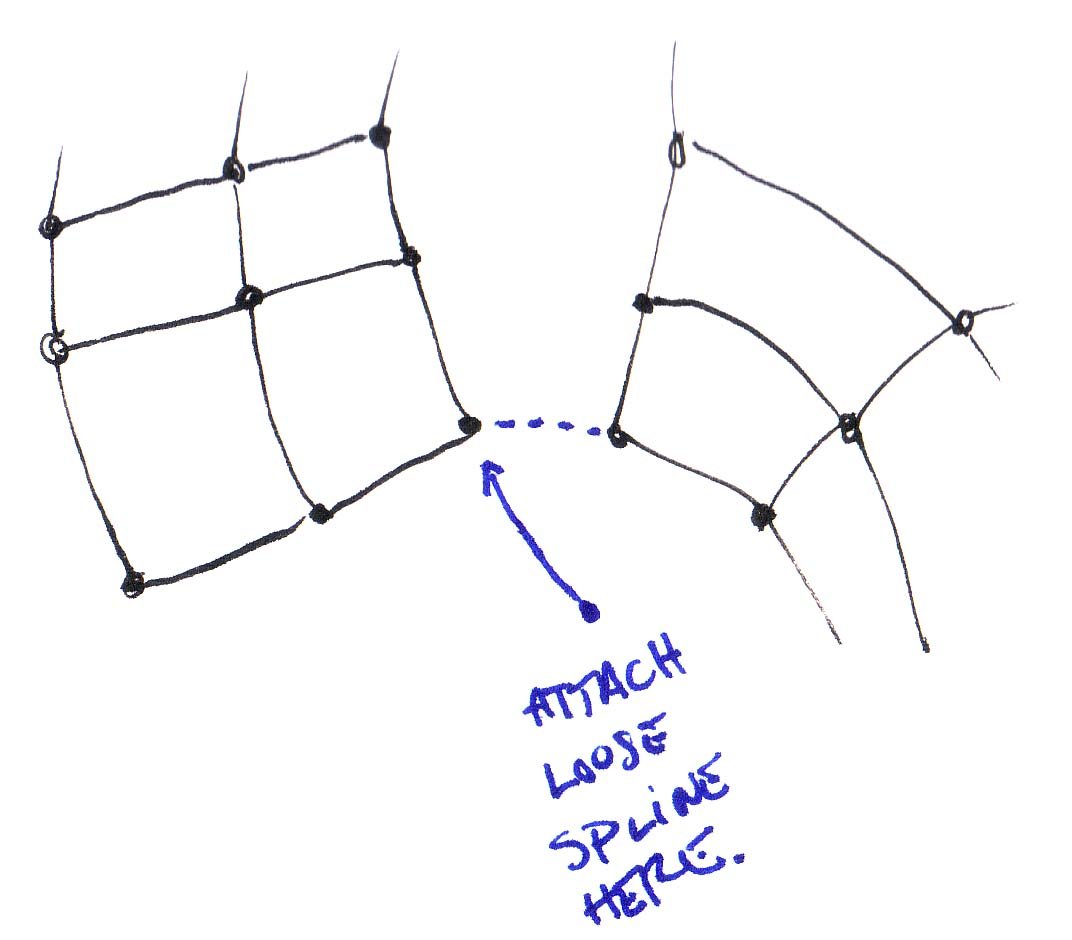
I have one question that will solve over half my problem..........
Whenever I am modeling I understand spline continuity. But sometimes no matter whAt I do it always pulls from the wrong spline.
This is the secret I need to know! How do I make sure I am coming off the spline I want and not a spline going the wrong way and causing creases?
Add a "tail." The point you want to attach to simply tack an extra line on. If it mis-connects, then move the tail off to the side. Now attach the points you want, and delete the tail. If the tail picks the proper spline, then simple run another tail from the other point to the tail tip, and then delete the extra point.
-
The eyelids I did like that on purpose, I have a plan for them.
Thanks about the ears but they came from from the extras cd

I adjusted the mouth and fixed a couple things best I could.
Yes problems CFAing.
I never auto-CFA. I'm a control freak like that. That being said, excellent improvement, especially around the mouth.
-
Start with the "holes" and profile first. I always do the side profile, then the eyes, mouth, nose, in that order. But everything is refined simultaneously 'cause spline curves all play together. =) Concentric around the eyes, mouth; everything else grows from these.
-
...
The "y" key inserts a control point along a selected spline - This is an old command (check out customize/keyboard/insert) that I just realized isn't shown as standard anymore. Try it - create a spline with 2 cps - select the spline with mouse (not the cps) and hit Y. A new cp will appear. I am now not sure that it maintains the curvature precisely.
I use the Y key OBSESSIVELY. It is invaluable.
-
Looking forward to seein' your modeling advance.
( & Nancy - thanks for articulating my advice so clearly!)
-
Seems a bit patch heavy...seriously, I used to make the same mistake - don't just distort a lathe. If you must, start with low res and work up, add splines/patches as needed. You will notice a positive difference!
-
I dig the new voice. Although, (fresh out of my editing course) I'd tighten up the dialogue. Less dead "air". Also, some cutaways to the other charactes could jazz this clip up. =)
Otherwise - rocking, as always, Kat.
-
Very entertaining work, well done.
-
I finally added hair to this model. What do you think?
Nice work, I like the expression particularly.
-
Hello

This is the last sequences to Elderwood meeting .
in this last part I added a scene as ,Rodney suggested I attempted to show elf Trell through the flame..
And fixed the lighting, so Onton was no longer grayed out.
The flame sould have some variance in height, besides that, good, good. Why are the audio levels so low? The flame is the most obvious fix, though.
-
OK i have been my self trying to get my "tentacle" to work and i noticed a problem , when a material is applied and the tentacle extends the material simple grows it dose not stretch , is there a setting i can use to stop it from doing this or is this going to require a lot of extra work to manually set

Make sure your material is set to "Global Axis" "Off"
It should stretch and deform with your patches during animation (NOT modeling.)
See project and video below.
-
I haven't used patch materials much before now so maybe there's an easy solution. Here's what I get when I drop a brick image on to a cube. As you can see the image is rotated on different patches. Is this how it's supposed to work? Is there a way to rotate them round the right way? Thanks.
Yes, select the patch, and right-click. Choose "Rotate images" from the menu.
-
Hello,
I just got a one year subscription, and when i try to do flocking, for example if i right click, select flocking, then birds, it creates the flock, but when i drag a model to 'Shortcut to Birds' the models don't show up. This is the same with crowds and swarms.
Also, I cannot create volumetric effects, when i right click, choose volumetric effects, then any effect, the wireframe circle shows up, but nothing can be seen in shaded mode.
Please help, thanks.
Make sure particles are turned ON.
-
Maybe Shirley Temple curls?
very cute!
Yeah - go curls!
-
As a visual fx/design major I have to clarify this. I HATE misused terms. (That is the Virgo coming out in me.)
DPI = dots per inch (usually ONLY used in print, and does not define the dimensions of the final image. If you are talking about the space between pixels on a crt, that is "dot pitch")
resolution = number of pixels in a given axis (usually described as height x width etc)
colour/bit depth = the amount of colour/transparency information stored per pixel
megapixels = snazzy marketing term used by camera manufacturers that gives less information than it hides (what is the horizontal resolution? the vertical resolution? the colour depth? none of this info is present in the phrase "X MEGAPIXELS!")
3D software does not render according to "megapixels." You specify the resolution as x-lines by y-lines, and set the pixels for either square pixels (1.0) or some variant, depending on final output format (DV, for instance, does not use square pixels, instead they are set as 0.9, rectangular.)
So... what is your final format? TV? DVD? Blu-ray? 35mm film? Print? If print, what size is the final copy? If you just want a pretty image for your computer screen, I wouldn't render any bigger than the resolution you can display.
Wow...I sure do ramble...hopefully someone benefits from all this info!
-
Cool! It is nifty to see the doll versions versus the CG...you obviously know your characters well!
-
This is stunning work - obviously a ton of determination and vision has poured into this! Dusan - good luck with the festivals. If the rest of this film is even half as good as what I've seen so far - you have all earned it!
-
Finally got a chance to work on the rest of the character, next I have to clean up some of the creases, texture it and add the skeleton.
Nice model - some parts are blurry.


Rubik's Cube
in Work In Progress / Sweatbox
Posted
I need to anthropomorphize the Rubik's Cube for a school project.
rcubetest1.mov
Here's a motion test. It will have a face.