Rob_T
-
Posts
261 -
Joined
-
Last visited
Content Type
Profiles
Forums
Events
Everything posted by Rob_T
-
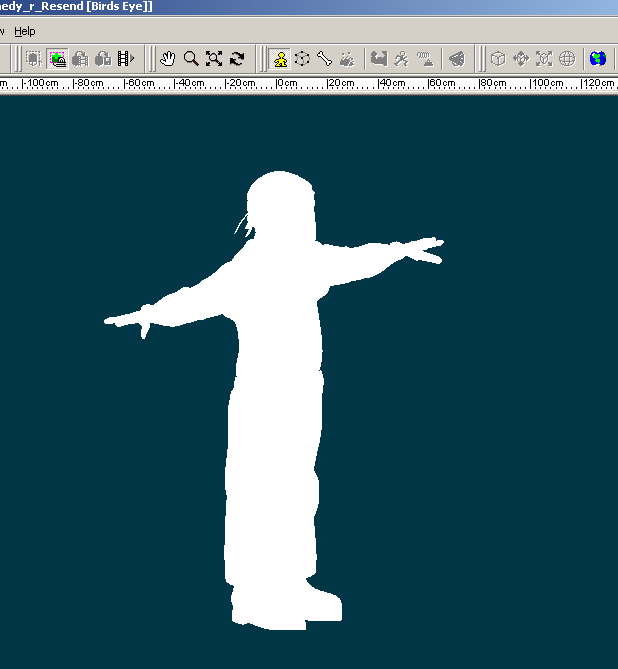
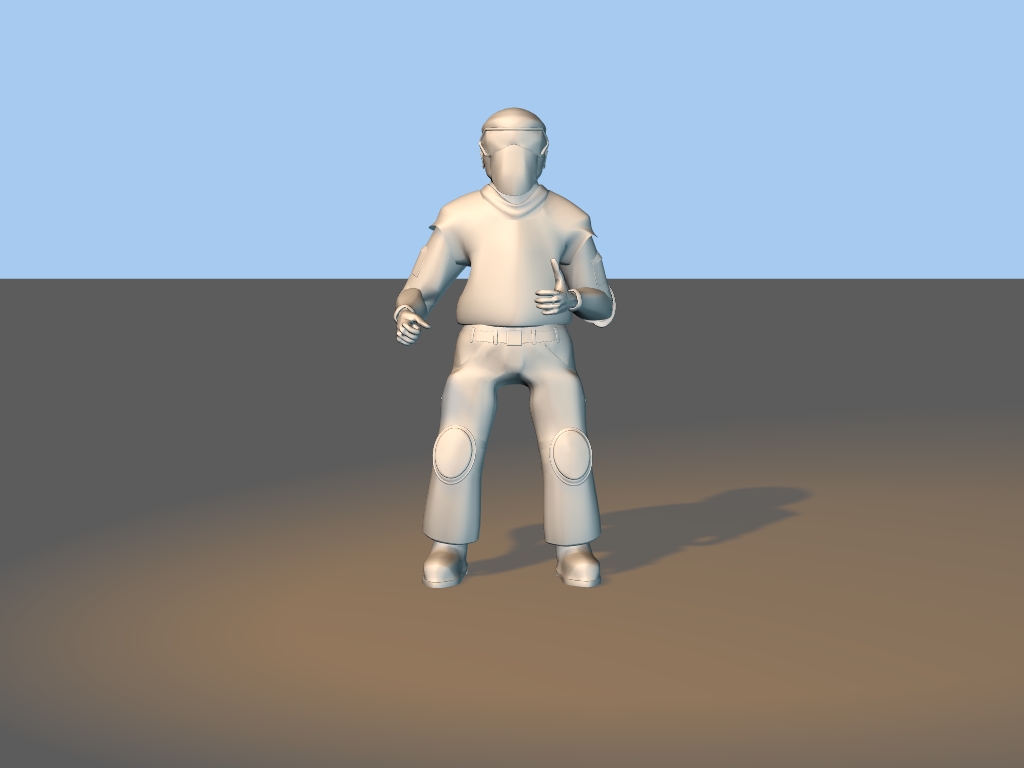
Pixel has made a wonderful Remedy model that I've been playing with but for the life of me I can't seem to get it to view right in render lock. Every time I do take a look in render lock it's nothing but IPod commercials. I've attached the model file and an image. If anyone knows what boneheaded thing I'm doing wrong I would appreciate an explanation so I can feel suitably stupid. I'm using 13.0i EDIT: I should mention that rendering to file works fine (see second attached image) it's just render lock that gives me Apple commercials. It's frustrating for me because I'm working with Pixel and Wedgie on these models and it's hard for me to tell Pixel if the model looks right because I can't look at it quickly in render lock. I have to either choose to render a static image or go with what I see in the wireframe and shaded mode which we all know isn't the best representation of what a model will look like when it's rendered. Remedy_r.zip

-
Happy happy!
-
Yep that was it. As soon as I shut off "On top" for the rotoscope I got my controls back. Sorry everyone. I'm an idiot.
-
Oh you meant in the program. My bad. Ok... I did that and a few other things. I loaded up some of my other models from my Tao lessons and the bounding boxes appear just fine. So I thought the issue might be model specific. But that doesn't appear to be the case either. It's the rotoscope. I have a rotoscope on the front view of the model and as long as I can see the rotoscope I cannot see the bias handles or the bounding box or any of the controls for the advanced manipulators (in the model window not the tool bar). Weird. As soon as I shut off the eye on the rotoscope in the PW the bounding box and bias handles appear. And in case you were wondering... my rotoscope has no yellow in it. Maybe it's because I have "On Top" turned on? I didn't think that would remove the controls though. Thoughts anyone?
-
oh sorry. XP Pro. My hardware and software specs are in my profile but I always forget to say what OS I'm using. With the total rebuild of my systems and device driver updates the spot where my controls for open GL and Direct 3d just aren't there. Not in Display. Not in Advanced Display. Hmmm. I may have to get some help on this one. I have no idea where those controls are for my video card now. :/ Oh and I clicked on the master file in my Hash folder and it opened up 15i. For the record I didn't have this issue before ugrading. I was using g before.
-
I'm sure I'm probably doing something wrong here but I'm out of ideas so I thought I'd ask. I've pulled in an older model from the Extras disc as a starting point for something I want to make. While I was at it I upgraded to 15i as my 1 year is about up. Now I'm grouping CP's (and selecting them individually) and I can't get bias handles to show up (I clicked off it and back on again) or the yellow (I"m not sure this is the right term) bounding box around multiple CP's. I've tried selecting the different manipulators and that box just isn't showing up. Although, I can still move the CP's.... I just can't see the box or any of the controls that it gives me so what I can do is very limited. I opened the model in Notepad and it said the product version used was 13.8 if that helps. Also, I tried downgrading to 15H but it didn't seem to work as 15i is still showing up when I open the program... My thought process here was maybe it was a bug related to the newest version. Which is a sure sign of me running out of ideas. Any thoughts would be appreciated.
-
Ok I misunderstood. I thought Holmes was suggesting that I could only move one bone with its associated CP's at a time and that I should get used to moving bones cause it's easy. The key for me was you saying thigh or bicep as these are obvious high level bones with lots of others beneath them in the heirarchy. This meant to me that you were saying that as l had the ctrl key pressed all the bones under the one I selected in the heirarch and all of thier associated CP's would move with them. So I tried it. It works great. Thanks to both you guys, you just saved me a ton of time. Now I just need some eyes.
-
Well sure moving bones around isn't all that tough. But considering the amount of models I have to make any shortcuts help. 26 Letters in the alphabet. + Lowercase letters + numbers 0-9. I'm looking at 62 models and that's just with the one font we're starting out with. I have some shortcuts for dealing with a couple of letters and numbers which knocks a few off that number but I stil have a lot of bones to move around. What I did was create a model of just the arms and legs and then I plop the letter in there and fine tune the CP's and then the bones to marry them up to the letter. Making the arm or leg shorter or longer is no big deal but if I have to move the leg or arm in toto either vertically or horizontally even an inch I have to adjust every bone in the arm or leg to compensate for the position change. I was just wondering if there was an easy way to move an arm with it's bones around. What about copy and past with bones? Would that do it? I'll try it. Lergento, thanks for the tips but I don't know how to do a lot of what you suggested. I might be able to figure it out if I play with it a bit. I'm just kind of crunched for time and thought I would ask if anyone knew of a good set of eyes in the freebie library that might fit my needs. I don't want to try and create my own due to my crappy art and complete lack of experience (other than a very brief TAO lesson) in creating pose sliders for the eyelids and eyebrows and pupil size and all that.
-
As I mentioned before I'm working on a new comic that we want to add around the first of the year. I'm trucking along with the models which are pretty much just letters with arms and legs but I had a question or two. Is there a good set of large, expressive eyes (something cartoonish like Keekat or Mickey Mouse) with the bones and maybe some presets out there that I could paste into these models without too much difficulty (and without any problems with me using the eyes for commercial applications)? I did my TAO lessons on adding a rig but that was a really basic lesson and I've not been about to figure out how to add things like EYE Targets or even complex joints like Ankles and hips. Since these characters are not really going to be used for animation (a couple of the comics we may make into animated GIF files but the animation will be very minimal) mostly I'm just posing them so even the most basic bones I've added to them will suffice. Thier Skeletal system is less complicated than the flower in the TAO lesson with all the pedals. I was going to draw the eyes in myself but I really suck at art so the less of it I do the better. The other question that relates to bones is I was wondering if there is an easy way to move bones along with the CP's? I made a very basic rig for the letters that I'm making adjustments to to attach to each model and I know I will have to resize and move those bones when I shange the actual size, scale, or shape of the model and CP's but in many cases I'm just moving them from one spot to another with no scale or size changing. These instances are actuall worse than the resizing because if I actually move the arm or leg I have to them move all the bones associates with that limb, despite the fact that I'm not really changing anything but thier location on the model. Any help would be appreciated.
-
Hey Pixel... that laptop you made awhile back. I went to upload it and the system informed me that it's missing 3 files. Shiny black plastic.mat...red LED.mat and green LED.mat. Any chance I can get those from you... or if they are somewhere in the wilds of the extras disc you could tell me where? my e-mail is rob@remedialcomics. thanks again for such a great model.
-
Oh boy. I'm using Premier Pro 1.5 so I'm basically screwed then because no way can I afford to upgrade right now and the ratios are obviously screwed up. Thanks for the tips and info. I suppose I'll have to start looking for some kind of translation. Time to search the web.
-
I know the pink lines are standard "safe area" lines but I've discovered that once I import my AVI renders into Adobe Premier that I'm getting thin black lines on either side of the screen. It's too late to resolve at this point and this project is just a silly fan thing anyway so it isn't important at the moment. That said, I do want to resolve the issue before I start filming my more important project. Additionally, it occurred to me that, when it came to making images (JPEGS) for my comic once I'm done modeling things, I would want to be able to control the exact size of the JPEG produced. Is there such a way to adjust what is rendered as far as size goes? I see there is something in the save to file advanced settings. My concern is that it says it's rendering in 640X480 but I'm still getting those black bars in Premier Pro. So that tells me that either A:M isn't really rendering in 640X480 or Premier Pro isn't interpreting the frames as 640 X 480. It's either that or I changed something somewhere other than that Render to File setting that is changing the final output without knowing it. And I checked by putting something behind the frame in Premier Pro to see if the black bars were in fact black bars or they represented the end of the frame. Since I could see what was behind the image I rendered out of A:M that means the frame is smaller than what Premier Pro considers 640 X 480. When I start rendering for the comic I may need some wacky shapes; and from a publishing perspective the larger I make my original images the better for me later. Also, I may want to do the Remedy Short in widescreen. So any suggestions about how to get this under control would be appreciated.
-
This is just a guess but it looks to me like you are trying to apply the decal to a patch while the view is at an angle to the patch. I think the decal has to be at the same angle as the patch to apply "flat" like you want it. Applying it at an angle will stretch it from the part of the patch that is closest to the part of the patch that is furthest. My suggestion is to adjust your view until the patch is flat on your screen, rotate the patch until you can view it from one of the standard views (front, back, left, right and so on) taking note of it's correct position and then rotating it back after the decal is applied or rotate the decal (which I'm not sure you can do and something tells me you can't although I'm somewhat new at this so that might not be the case) to the same angle as the patch. From what I've seen of your images that's my best guess. Others here with far more experience will be along shortly I'm sure. Good luck.
-
I've had this problem myself and Nancy saved me too. Thanks again Nancy.
-
Thanks that was driving me crazy.
-
I know I've been at this way too long today already but I just had something strange happen and I thought I would ask about it. I just finally got to the point where I could start animating and I'm looking through camera 1 in shaded mode. I put one of my characters in skeletel mode and start moving him. As his body departs from where he was another body, identicle to his, appears where he left from. Huh? At first I thought I had put two instances of the same character in the choreography but no matter how I try I cannot select the second instance of my character. What's more, it disappears when I run the animation. Anyone know what this is. Seems like more of a feature than a bug.
-
Nancy thanks so much. I was going crazy with my decals since I have 15E and couldn't figure the issue. Found this thread and your suggestion for decal over decal is great and appears to be working. Thanks.
-
More comics keeps your readers coming back more often and staying longer. It's a good, proven strategy for increasing traffic. Of course to really build your fan base you are going to have to start going to conventions. Sinfest is the only webcomic I know of that is very popular but never has a presence at conventions. And even he has Dark Horse selling his books at the conventions now. Have you ever seen this 3D comic? British, 3D, prett funny. I've conversed with the creator a bit, good guy. http://www.secretagentbritishintelligence....com/page-01.htm To go back to that off topic topic before... I see you guys have done a lot of pirate stuff. Have you ever done pirate stuff with a fantasy element? Magic or something like that? I ask because I have a friendly acquantance who is the senior editor for Black Gate Magazine. http://www.blackgate.com/ I could pass something on if you want, they are always looking for good Fantasy stories. Back to WBP. I think it's great you are ramping up and I agree your art is fantastic. I'm extremely jealous that you have two great artists on your webcomic and I don't even have one. Congrats. I wish you much success.
-
Largento, Wow. You can set stuff so it can't be seen but will still render? And you can set a model on or off? I assume the on or off part is the eye image in the shortcut? But how do you do the can't see it but it still renders thing? So you say and for you I'm sure it's true but in my case every time I have tried to push two models of different colors right up to each other I have gotten some bleed through from one model onto the other. Even when the models are the same color the lines seperating the two models look a little "funky" when they are pressed right up against each other. Don't believe me? Look at that flythrough of the Remedy short set I posted recently. You will see buildings right next to each other, that are the same color and you can tell where they seperate because the lines between the two models just don't look right. I don't know enough to even guess why. You Tube is a smart choice, but I know you said you were planning on making a whole WBP movie and it's a shame you can't offer that Christmas card as an extra or something. Selling it in any way would probably get you that cease and desist you mentioned (when I said sued that's pretty much what I meant, I know almost nobody goes beyond the cease and desist these days, they don't really need to). For me, I've been involved in music, voice acting and audio editing for so long that to me, that would be the easy part of a project like that. Still, as something for friends and family it's a pretty great effort. Ooooh! Cryptic and foreboding. I'm not even going to ask, I'll wait to find out with the rest of the masses. Whatever it is I hope it goes well. Just FYI the biggest webcomics centered convention in the country is coming up at the end of the month in Hartford, CT. Thanks Robcat. I'm starting to understand the large amount of Stefan worship that goes on around here. He's an honest to goodness A:M MacGuyver or something isn't he.
-
Jake I tried using 5 points and it left the walls kind of lumpy in the render. I think Robcat's solution is better. Largento, I agree completely with what you are saying but this situation is a little different as the opening shot has an anthropomorphic robot computer swinging, Tarzaan like, from bra's, ducktaped to the ceiling, all acrossed the living room of the apartment. Which means for that one shot at least, I need the entire room to be visible as well as the connecting rooms (Kitchen just has an entryway no door) without any gaps in floor ceiling or walls. Whenever I have married two models together I have had trouble with bleed through where they meet. I have no doubt someone with your experience can marry stuff together without that problem, my skills just aren't there yet. I mean look at what Robcat just showed me? Such a simple part of the program and I had no idea because it wasn't in any of my lessons. You guys and experience are my only teachers now and as that's a slow way to learn I'll be doing a lot of things the hard way as I go along. I've pretty much accepted that. EDIT: I loved that video by the way. I saw it awhile back when I first found WBP on the Half Pixel forum. I was surprised you used someone else's IP though (Dean Martin). I mean, I completely understand the reason you wanted Flemm to sound like Dean Martin, I mean, who wouldn't? But there are plenty of Chiristmas Carols that are in the public domain because of thier age and expiration of copyrights and whatnot. Why not get a few friends who can play instruments together and a voice actor who can sing and do your own version? Then you could include it on your DVD and not have to worry about getting sued. I can only assume that the reason you guys don't have a bunch of other shorts is because you are going for quality of quantity but I am eagerly awaiting the next entry.
-
I just screen captured. but you can render shaded mode with Show CPs ON. yup the effort... the... effort... four... rooms... can't... go... on... it's not that hard. newsplinet0005H264_150.mov Your sarcasm is almost as amazing as your workflow. Almost. Wow. Ok, see, you have to keep in mind that you basically just showed me an entirely different way of modeling there. That stuff with the "Y" key? I had no idea. I've hit the Y key about a jillion times when I meant to hit the "T" key and that never happened. Is it Shift Y or just select the spline and Y? Ah who cares I'll figure it out. In my defense, for me to do that would take hours. Because the way I would do it, the way I learned from Tao, for every CP I wanted to put in there I would make three, insert the one and then delete the other two and then have to move the one remaining into position. I've done it a few times. It takes $@!&$ forever. Doing things the way you just showed me is an obvious fix for the issue considering the short amount of time it takes. With my workflow I'd be at it for hours and hours. Thanks a ton man. I might just have to take another look at that wishlist if you keep this up. MJL, Largento, John and Frost, Thanks a ton for the suggestions (although, Frost, the next time someone tells me to slap something that I don't understand in the least I may have to start slapping myself with insanity... have you been talking to Homeslice because the two of you are slap happy.... in essance.... no idea what a cookie cutter map is). DJBREIT: it took me an obscene amount of time to make this rather pathetic model and you seem to have recreated it in very short order. Thanks for shining a light on my personal inadaquacies. LOL. I've downloaded your version and I'm going to take a good long look at it. Thanks man.
-
From what I can tell from the picture yes the closest room is what I'm trying to do (with the exception of the ceiling being gone.... the room needs a ceiling and I think therein lies the problem... I could have done what you did but that CP at the top of the wall = no ceiling). How did you get it to render showing the CP's and splines? I haven't been able to figure out how to render that way (or I would have for my examples with this question). I can see that if I connected the two CP's at the tops of the walls I would have my ceilings back, but the effort it would take, to string in all those CP's and splines into the existing model... in all of the 4 rooms with the problem... that was the domino effect I was referring to and trying to avoid. If that's the only solution then I'll probably leave the 5 pointers for now. I think the doors, entranceways and windows I'm going to add in may allow me to delete those 5 pointers later on. I was essentially lookiing for a quick fix but if there isn't one then there isn't and I'll make due with what I have at the moment. Thanks a lot for all the help though.
-
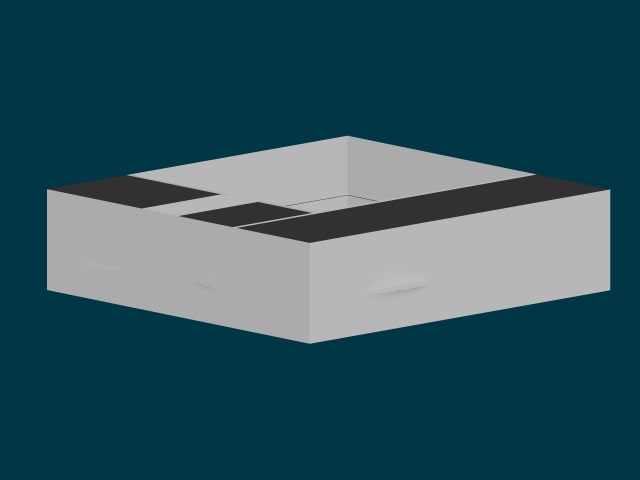
tip: don't save over your old work. save a new file with a version number. Because the day is going to come when you're going to wish you hadn't done something you just did and you're going to want to have it back the way it was. Oh right. Yeah I do that. But that's not what I meant. I can show you, in fact here are two renders from an older version before I fixed it. I can't "show" you because as soon as I render it the patches hide the problem. This, I think is the best I can do. In image one the entire model is visible. In image two I've hidden the ceiling CP's so the render is just from the "Chair Rail" CP's down to the floor rail. As you can see though, the two bedrooms, the kitchen and the bathroom all still seem to have a floor. They in fact have 2 floors and two ceilings in this instance because every time I made a bloody square to outline the walls of the room the program made a horizontal patch to go along with it that sliced the room in halves or quarters or whatever fractions you want to use. As I said, the extra CP's I inserted resolved the issue and got rid of the extra patches. As I also said, the creation of the 5 points, the only way to make it work, make the walls bulge a bit and look kind of crappy. You can see that in the last image I uploaded. So I'm still looking for a better solution if anyone has one. I'll attach the older project fle too so you can look at the model itself it you want. I'm sure this is an easy problem to fix I'm probably just not explaining it right. Apartment3.prj
-
I can't really show an example because I fixed them all already with 5 points. I will post a picture of what I'm making though to give you all a better idea. It's an apartment. And the middle rring of splines throughout the living room, kitchen and bathroom are there to support the modeling of chair rails it in the case of the bathroom, whatever you would call the divider that seperated the top half of the bathroom from the bottom half. Because these CP's exist in the walls they are connecting with each other and horizontally dissecting the rooms. It's hard to see because the one room without a floor or ceiling doesn't have the problem I'm talking about. And, as I said, I've already eliminated them by adding cp's and usinf 5 points. But as you can see from the render the 5 points don't exactly make the walls look nice and smooth. Anyway, I hope this helps explain what I'm struggling with. Thanks for the help.