Rodney
-
Posts
21,633 -
Joined
-
Last visited
-
Days Won
114
Content Type
Profiles
Forums
Events
Everything posted by Rodney
-
When you dropped the specular highlights I think you surpassed the quality in the original image source. Nice. Maybe Jody can borrow your scaled image (or at least the layout) for the thumnail image on the Extra DVD? It definitely lets everyone know at a glance the relative scale of the planets.
-
that'll do.
-
Martin is very protective of forum contributors' time isn't he? He gets right to the point and bottom line he's right about TAoA:M; completing TAoA:M resolves many of the issues presented here in the forum. Those it doesn't resolve it usually sheds some light on. I'm there for you in the TAoA:M exercises if you want to work through it officially online. To answer your question on the Extra DVD: It is slated to have some tutorials on materials, texturing and decaling. Martin may step on your toes but take it in the way its intended. He wants you to succeed. It may sound strange but you'll find yourself wishing he'd stomp a little harder the next time. Best, Rodney
-
Starting to really get the look of being a world that is lived in. If you don't put in some concrete curb barriers you might want to dent up the lamp post. I'd imagine someone would have hit that many a time being in the parking space like that. It reminds me of the time I was in Japan... backing into a parking spot and found out designers do indeed place huge posts and poles in parking spots. The pole was really really huge and yet somehow it had been hit many times before. Umm.. and it was my wife's car. Great improvements!
-
Cool. Thats good news. I need to look at Bitmap Plus anyway. Right now I can't get it on the schedule as I'm deep into putting the Extra DVD together. Can't afford to miss that deadline. (I'm behind too... I was suppose to upload the directory/DVD structure 1 August!) Eeek. Extra DVD vAlpha2 is burning in the DVD drive right now.
-
Glad to see you're making good use of your free time. Forgive me if I don't show my wife as it'll remind her that I need to throw away a lot of 'stuff'. ...and YES everything I have is needed thank you very much! I know this isn't a WIP but I'll add this: It would be nice to see the scene with some more texture... dirt, dust, grime etc. but that's just me. The lighting experts could weigh in on that aspect too. The composition (from camera POV) could use a minor adjustment to really finish the image. Cropping the image to balance the top and bottom a bit more would accomplish this too. The empty space at the bottom doesn't contribute to the theme of the image; "garbage", so could be removed. But... 'Garbage' tells the tale as is. I like.
-
Hmmm.... I haven't launched Bitmap Plus in v13 so that might be the problem. Will have to investigate.
-
There is an entire forum area dedicated to experimentation and refining of materials. It's forum 46 on your A:M dial: The Material Laboratory I mentioned it briefly before and I think you should check it out. In the Material Laboratory you should find information about Bitmap Plus. I now thing Bitmap Plus *is* the solution you are looking for as it combines the power of materials with the flexibility of decal images. Here is the link to the pinned topic: Bitmap Plus A plugin by Marcel Bricman* *He knows bricks apparently... he's a bricman.
-
Save your project file (Embed everything first!) under a new name and then close and restart A:M. If your view still doesn't return that would be strange indeed. If A:M has somehow grown that attached to the weathermap (which is very unlikely) you could always add the file back in from the Extra CD. I assume you might have deleted the weathermap decal while viewing the model in realtime. Edit: I see you deleted the decal rather than the weathermap. .
-
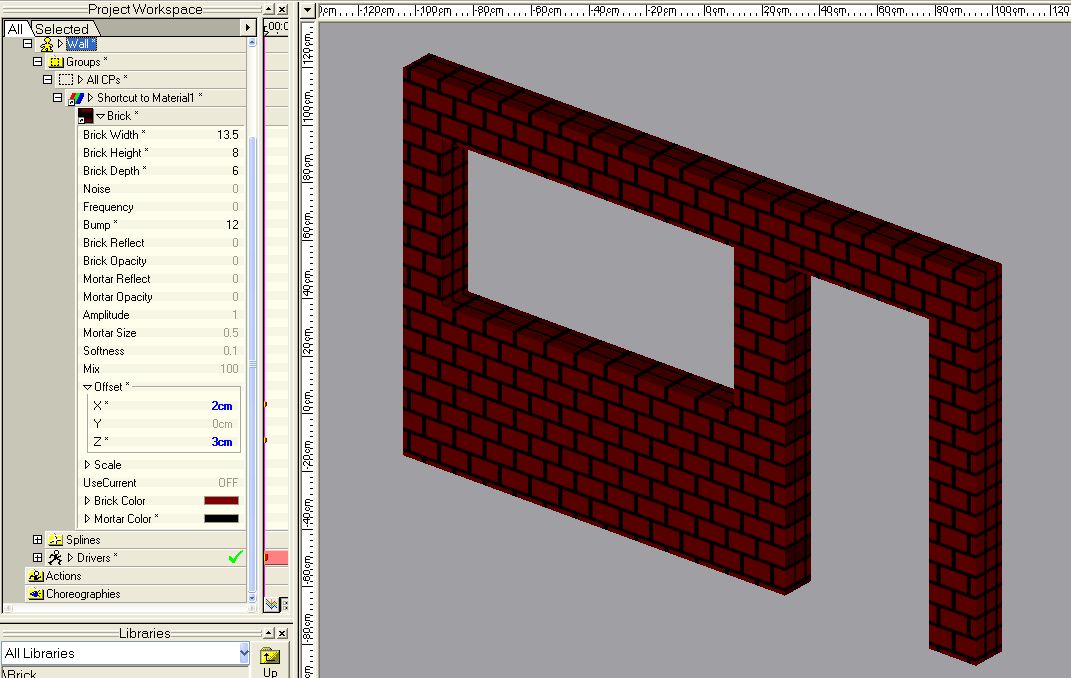
Okay... decals. I'm using my wall again because 5 point patches should be avoided where they aren't necessary. In walls they generally aren't necessary. Here's a little movie file demonstrating one decal with one tileable image placed on top of a strangely shaped wall that has a brick material preapplied. The number of bricks on the wall depends on the number of repeats set in the decal image properties. The setting can be animated over time. In my example the repeats should increase in size (in the X axis) in order to shorten the width of the bricks in the decal to make them look more realistically porportioned. DecalImageRepeat.mov
-
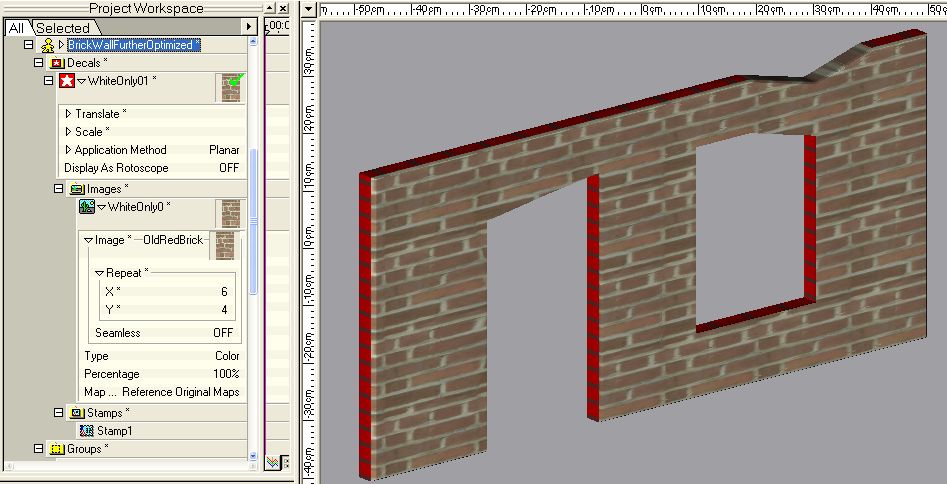
The sharing of files definitely tells the tale too. Here's an adjustment of some settings on your file from my end. Okay then... Decals it is. Note in the second attached image that this is just 1 image stamp/decal on the wall. The image itself is of a few bricks. Once the decal is applied (New/Decal in the modeling window) the decal's image can be set to repeat. In the second attached image the setting on the X axis probably needs to be increased to 12. I've made no attempt to flatten the object, hide or separate the various sides, etc. You'll see the undecaled areas in red. I've modified the object (made the door off center/the top of the wall drop down) to demonstrate how the decal images are effected (or in this case not effected) by the geometry beneath. This will not be true with patch images.

-
The direction you extrude shouldn't make a difference *with a material* outside of the direction the normals are pointing. First things first... select a large part of the model and hit the slash key / to group all. Name that group something new in your PWS and add your material to it. Does anything change? I see your edit: Nothing like the feeling of success and the eureka moment eh?
-
It'd been awhile since I tried to use tiled images in a single decal. I'm happy to say this is a lot easier than I remembered. If you stamp your wall with the 3 brick image (or any image for that matter) you can then tell A:M to repeat that image horizontally and vertically to get it to look right on your object. If you stamped it with another image you can just swap images and the repeat settings are applied to the new image. The only problem then (with decaling) is making sure you decal all sides of the object. This is relatively straightforward with the UV Editor. Yet another option is Bitmap Plus (by Marcel Bricman). It provides a nice solution similar to decaling but with materials that use images to penetrate objects.
-
I'm talking about with the material. You did that with a Patch Image. The reason we know this is that your image perfectly demonstrates the effect. You aren't too dumb but we all learn in our own ways. You have the tenacity. You know what you are after. You are making some basic mistakes that we all have made. Make more mistakes... learn more. The reason I say you should go with a decal is that it is the most likely to give you what you want with minimum hassel. As the images on the A:M CD are mostly all tilable you can make a larger decal image with more than 3 bricks fairly easy. You're thinking in terms of what you currently see... not in terms of what A:M can do. If you make a square patch and apply that one image to it as a Patch Image you can tell A:M to repeat the image horizontally and vertically to create more tiled bricks. Then once you render out that image you can bring it back in as a decal for your wall. The problem you are experiencing (with the Patch Images) is that your patches aren't identicle... your wall's patches aren't designed for tiling patch images. Now concerning the material solution... I personally like that method. I'm not sure if you opened the project file I uploaded. The material bricks should have been set up pretty well to demonstrate the material side of this equation. Not real pretty but the basics. You could adjust the settings of the material in that (Break it!!!) and see what works and what doesn't. Tell you what... pick one method and we'll run that to its logical conclusion. After that pick another... we'll do the same. Pursuing multiple solutions simulataneosly is sure to get this more complicated. Best to focus on one at at time. A lot depends on the time you have to play with this of course. We can get this documented pretty well along the way too. What do you say? Rodney
-
It looks like we are falling behind on our 'Welcomes' and 'Welcome Backs'! Another SIGGRAPH is over and that means yet another milestone has recently passed. As we approach the end of year things are really going to really get going. There are always lots of activities to get involved in the forum. Lots of great things to learn along the way. One word of advice... Don't lurk! Its detrimental to your artistic goals. Meet people. Make friends. Ask and answer questions. Get involved. Its great to see you all here in the forum. You may not now it yet but you've definitely come to the right place.
-
All the superlatives fail... It just keeps getting better. For some reason I like that last image... the one with the Bismark front. It looks a lot like a photograph to me. Not the grain or paper (or whatever) the setup and general look). My new superlative... "Stian!" As in "Damn... that's Stian!"
-
I see Patch Images and Materials but I think your going to want to use a decal. Its just easier. I won't suggest starting from scratch here though. Work with the material until you get the look you want. Patch Images are a non-starter here unless you just want to use a patch and your preferred image to create your decal. You can adjust either your splines or the material to get the bricks to look the way you want. Assuming you have the wall to the specs you want... adjust the material. Keep the renderer rendering if possible or open another window to view the wall as you adjust the material. Then adjust the X, Y and Z scale until you find the right position. If your image the doorframe and window cut off right at the point where the mortar in the material is... you have to adjust the bricks or wall to make them match. Honestly though I think decals is the easiest way to go. Also: It looks like the back of your wall isn't a part of the group you applied the material to. When in doubt just select everything, name the group 'All' or something similar and drop the material onto that.
-
Rather than just confuse you more I'll upload the project file. This is an adapted version of John's wall. The attached solves the internal patch problem in 2 ways. The first method is to add a middle layer in the extrusion. This can still result in internal patches if not careful. One way to defeat this would be to never extrude anything internal to the object... only the outline. The way I did it in this case was to grab all the inside Control Points within the outline of the wall, hit the Period key to invert the selection and extrude that outline. Note: Rather than being mostly useless this middle extrusion could also be used to create a bevel. The next method makes the first method unnecessary but I left both in the model for reference. For the back of the wall I just copied and pasted the front wall at the back and flipped its normals. Using this method the back wall cannot contribute to any internal patches as its not a part of the same mesh. A third method (not demonstrated in this file but I have one available) `can work if you've got enough splines available to you. For those internal patches that you want to be rid of hit the Y Key to insert a Control Point half way down the selected spline. The new CP then resolves the issue for the internal patch. Just check to make sure it didn't remove any other patches that are needed. If they are needed you might opt to make the other area a 5 point patch that renders. In summary, For a simple model make the outline and extrude that (extrude twice as necessary). close off the front and back (or just copy the front to the back and either attach or put in place). Delete unwanted/excess splines. Result: No internal patches. Rather unrelated: I changed the magnatude of the edges to 8% to give them a slightly beveled edge. There is a brick material embedded in the file and splines have been moved to try to best fit the bricks. rbBrickWall.zip
-
Ah... I see said the blind man. Your best bet would probably be to build in one more outline of a spline to separate the two openings. Pic coming up if someone doesn't beat me to it. A fairly easy way to avoid this problem is to always have 3 levels to your mechanical objects. Then the chambers inside will always at least have 5 points and therefore never be renderable (unless you make them that way via 5 point patch tool).
-
I am so so sorry. The first thing that popped into my mind when I saw your Rebel Snowspeeder was that I wanted to see it explode... legos flying all over the place. Does that make me bad? Am I inflenced too much by the Dark Side? Argggghhh. No, I don't really want to know. It is a great lego model though.
-
Easiest way to get rid of unwanted splines (internal or otherwise) is to use either the K Key (Kill) or D Key (Delete) on your keyboard. Just make sure the spline you want to get rid of is selected.
-
Not to press on here when I think you are finished but there is one important point that could be made yet. You correctly note that A:M will not allow a save unless it perceives something has changed. This is true but many A:M Users will rarely notice that Save isn't an option. As many A:M Users save incrementally (I think someone else already mentioned this) the default to Save As seems intentional. It is actually better to not have the Save option available as it encourages the practice of incrementally saving your files. I hope this makes sense because Incremental Save is definitely something the A:M Community seems to endorse. It will save a lot of heartache in both lost and overwritten files. The more I think about having the Save option default to Save As the more I like it. Sorry if this one is being beaten into the ground.
-
Actually it wasn't overlooked. Weathermaps (.wmp files) worked at the time the Extra CD was created. My earliest guesses weren't exactly accurate. I must have been thinking Windows Media Player instead of WeatherMaP or something. Which is an odd thing to think I'll admit as A:M has never natively imported .WMV files.
-
Roy, You can always put in a Feature request to A:M Reports. As I understand it the change would need to make the Project file read as 'dirty' prompting the save. You never know... it might be a quick fix and implemented in the next release. Of course just saving every once in awhile will make all this unnecessary too. In many cases it's enough to know that you've recently changed something and need to save (or abandon) the changes prior to moving on.
-
That was fun. (and as pugless said, "surreal!") Too short though. Probably more of a WIP piece than Showcase. Keep at it!