Rodney
-
Posts
21,514 -
Joined
-
Last visited
-
Days Won
103
Content Type
Profiles
Forums
Events
Everything posted by Rodney
-
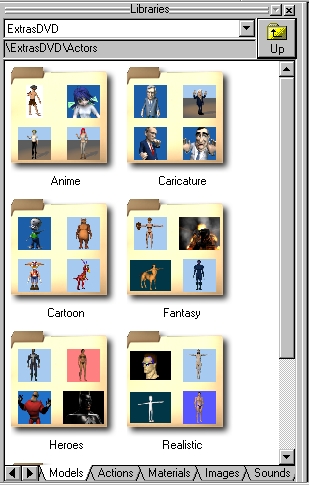
Something I've had a lot of fun with is changing the Ground model itself or pointing the shortcut with the Ground Model (in the Choreography) to another model. For instance, using the ground model as a guide go in and change things to suit your taste... then save the model out under a new name. In the choreography you can then change the shortcut to point to this new model. Modifying the current ground will work too of course but it works best to rename it. Creating a new Choreography will automatically create the flat Ground plane model so its never too far away. Heck... build a whole collection of various ground planes with different terrains and grass. Add them to your Library so you can easily drag and drop them into a Choreography when you need them. Save those tests!
-

Character Model: for Villikon Chronicles: Mysterre
Rodney replied to GraphicAnime's topic in Work In Progress / Sweatbox
Your usage will determine the method. You can model the skull cap type hair or use particle based hair in A:M. There are benefits and constraints to both methods. If you want to render your images quickly and have full control over your hair you'll probably want to use geometry/modeled hair. The downside of this method is generally it doesn't produce the results most artists seek. If you want the most realistic hair you can get you'll probably want to use particle based hair. The learning curve is steep however as there are a lot of options to choose from and the goal must generally be reached through testing. Using a little bit of both methods will probably produce the best results. A compromise might be to create the look you want with particles, render that to a 2D image with Alpha Channels and map the images made from that onto geometry. -
Save often and incrementally. What is meant by this? When you save your files you generally should save them with numbers appended to the end of the filename; ProjectName001.prj. Then the next time you save the file don't just save it but 'Save As' under a new name/number; ProjectName002.prj. Then you can return to earlier versions of the file should you need to recover a file. You'll also want to consider whether to embed all the resources (models, materials etc) into the Project file or keep them separate. But save first... then you can explore your other options. There are other aspects to consideras well, such as where you keep all of those files and what to do with the images that aren't embedded with the projects. Save often and incrementally... (and consider burning the folders/files to a CD as a backup) Edit: What Matt said directly above!
-
I'm not sure what exactly the process does behind the scenes but it works! The move basically selects the complementary CPs and then reselects the original CPs, most likely reordering them in the process. This seems to be enough to get A:M to recognize that the selection is a legal 5 point patch. Bottom line: It works.
-
Look into 'Aim At' Constraints. You can have your objects point at other objects easily that way. Alternatively you could assign a part of the laser to a bone and 'Translate To' the other object. Adjusting the Ease within the costraint will allow you some flexibility in those instances where you don't want the laser pointing directly at the object (for instance... someone fires the laser and it misses the first time...) Edit: Robert beat me to the reply and I think his method will work well for you. You might add a Pose to the laser that extends the end outward. That way you can adjust the length of the laser on the fly.
-
Thanks for posting this Ken. Its great to get the view into how you work. Nancy said it all better than me so... reread her post in my voice. As of this moment at least 52 other people have downloaded and viewed your video so I'd say others have enjoyed it too. Interesting character too.
-
There will be incompatibility between files saved in/after v13 and v11.1. With v13 the Projects, models etc. changed to a XML compatible text based format.

-
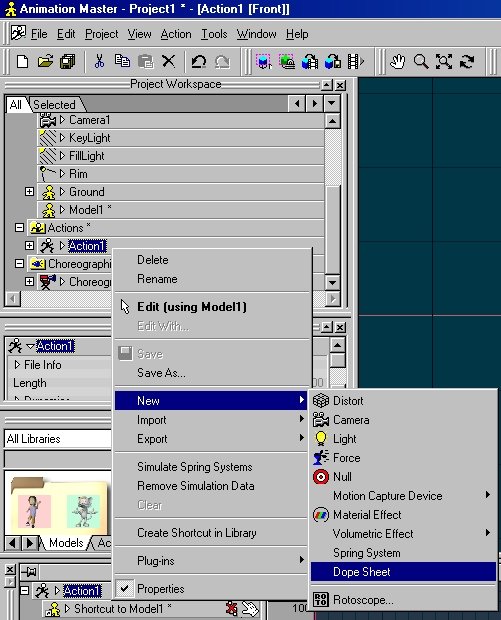
You'll want to be either in an Action or Action window to invoke the Dopesheet used for automating lipsync. Look for it within the 'New' menu.
-
The camera view is the important view in most instances. The camera can also said to be the view of the audience so its their/your Point of View (POV). If you were creating a realtime 3D game you'd likely have to spend more time getting poses to look as good as possible from every view. What you are striving for of course is clarity. Its been said that if you can't tell what is happening with a stick figure drawing of the pose... you most likely need to make changes so the pose will read better. So... when in doubt... consider drawing little stick figure thumbnails.
-
I'd say you are pretty close there with the second take on 'innocence'. You may want to experiment with turning the character to the side just a little bit. Then the pose might read even better. You could alway try the silhouette thing again.
-
Well... my second guess was going to be a shrug as when someone says... "Ooops... Sorry." This new image certainly suggests that. So... the emotion.... "Timid"?
-
Hmmm... my first impression... He's catching a ball (a little unexpectedly) so he's anticipating right as it hits him in the stomache. Am I close?
-
After reading your description I had something pop into my mind that I thought I'd test. It's probably more than a bit of overkill for what you want but the test... tested out. The idea was to create a Path consisting of three splines. - Constrain a card to each of these splines in three instances (IAW its the same card model) - The model has 1 bone and 1 null built into it - The bone is constrained to the Null in an Action - Drop the action on to each of the instances of the Card - Then use the Nulls to direct each Card's orientation (One additional Null/Bone could be used to control them all) - Animating the Ease of each Card on the Paths allows them to decend in whatever order is preferred See animation for a look into the process. It may be fairly useless to you but I felt a little like JohnL3D experimenting. cards.mov
-
Seeing them just in the T poses and not in context of a scene has me at a disadvantage. The feeling I got was similar to your explanation though... that this guy is larger than life. Much much larger than life... so consider that a success. The word grotesque is used here often to describe such characters but is often misunderstood to mean ugly... Cutthroat is definitely not ugly.. he's got great appeal! Jaws from the bond movies was both ugly and appealing of course. He was great fun to look at and as I understand it has a great many fans. I percieve that Cutthroat is going to have a whole lot of fans too. He's my favorite character thus far... I always love to hate those badguys. I assume McCrary is drawing him at similar scale (I love his strip BTW!). You've got the right idea just wanted a little more info on the scale. I'm happy to see you've got that angle covered. Once we see him in actual poses and in his environment it'll all make perfect sense. As always I look forward to your next update.
-
You've worked this one pretty good. Its definitely reading more of a 'victory' than your first image. You can call that pose a success.
-
Mike, I did a fresh copy of the Extra DVD content over to my v15 directory and connected to it via the standard method. I can't help but think its the capital letters that are messing up your connection. If you typed in the address manually thats got to be it. (I don't recommend doing that)


-
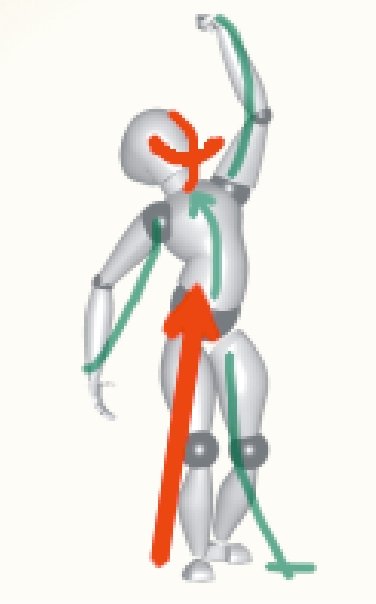
He does look a lot more relaxed. I'll stare at this one a bit more and see what there is to see. I'll try to thumbnail a few poses too as thats a great way to test out things. If you are still willing to work this pose a little more I'd like to see what you might do with that other arm. I'm not sure if it'll go well with your current pose but see how it arcs the other way in my overlay? The legs... they seem to be standing straight on. I think the staggering you had before was better. If you can pull one back he'll look like he has more balance/assymetry.
-
Very nice. I love Cutthroat Jacques. The scale looks a bit odd though. Not the height but the size of his head and hands etc in relationship to Flemm. I suppose its not unreasonable that he would be larger than life but something looks a bit off to me. Perhaps if you scaled his feet and hands down a bit(tapering in a little as you go of course) that would tell the tale. Hope I'm making sense.
-
I still suggest a pose more like this: Squint your eyes a bit as I didn't make your underlying figure transparent enough. Shoot that hip way up... like he's trying to take off flying. Scott has great point concerning the fist.
-
Mike, Thanks much for the annotated images. That clarifies things a lot. I'll look into it and get back to you (assuming someone doesn't beat me to it first) I'm taking my family to see The Spiderwick Chronicles and will investigate upon return. Added: Those two directories don't look like they are the same. Syntax matters and the one in A:M is all caps. The one in windows is not. Perhaps you can delete it and add it in again. (Note: I suggest restart A:M without the libary link present before you add it in again. This will ensure its not there and there are no conflicts when you open A:M again.)
-
I love it. Thats why people need face tracking... to get that story/song out there. I fear the size of Earnie's mouth and its limited articulation seems to restrict him a bit. You've played well to that constraint here with this animation. Perhaps where the character has such limitations the camera could move/zoom in on occasion? I haven't purchased Zign Track yet as I know I don't have time to use it now but rest assured it'll be finding its way into the budget.
-
Wow. You've been busy! Very nice texturing work. It looks like a really fun adventure. Is there a working title yet or is that the actual name '3D Mexican Movie'?
-
Ah... that makes a lot more sense then. I'll have to investigate 'warrior pose'. Those guys are always screaming at their gods. Edit: A few images (not particularly inspiring) on 'warrior pose': http://picasaweb.google.com/lh/searchbrows...rior%20pose#0+1
-
There is still a lot of tension in the pose that (as others have noted) reads as something other than victory. Perhaps if he's standing on a defeated foe your pose would be golden. Is that something that could be motivating the pose? For what its worth I think the tension may work against the average 'victory' pose. I'd try to soften up the angles a little shift the weight a little more... Relax and stretch the pose. Lowever the head to at least eye level (who is he looking at?) might be worth experimenting with too. As I say though... if you are trying to strike a Frazetta/barbarian/hero victory pose you might just have it. If he had a sword in the other arm it might even be a little further weighted down. I know it may sound a little ridiculous but what the character is doing really drives the pose. As we don't have that piece of the puzzle its a little hard to know.
-
Why does my light shine through walls?
Rodney replied to edlundart's topic in Work In Progress / Sweatbox
The short answer (I think) is to add a second layer to the wall. The light will pass through the first and be stopped by the second. I use to have a pretty decent description of why this happens laying around here somewhere. Its a necessary thing though to have the light penetrate the first level of geometry or else most models would hardly be lit at all. Creating objects with actual thickness is generally the answer to the problem. Again... I think this will be true in your case. Apologies if it is not.