Roger
-
Posts
2,058 -
Joined
-
Last visited
-
Days Won
46
Content Type
Profiles
Forums
Events
Everything posted by Roger
-

Have attached arm and hand, let me know what you think...
Roger replied to Roger's topic in Work In Progress / Sweatbox
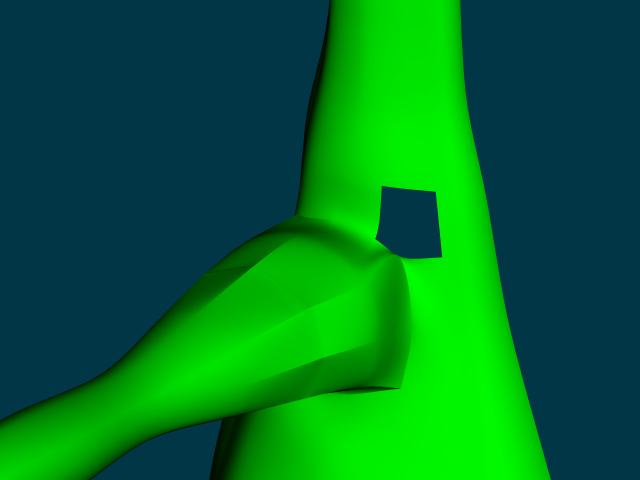
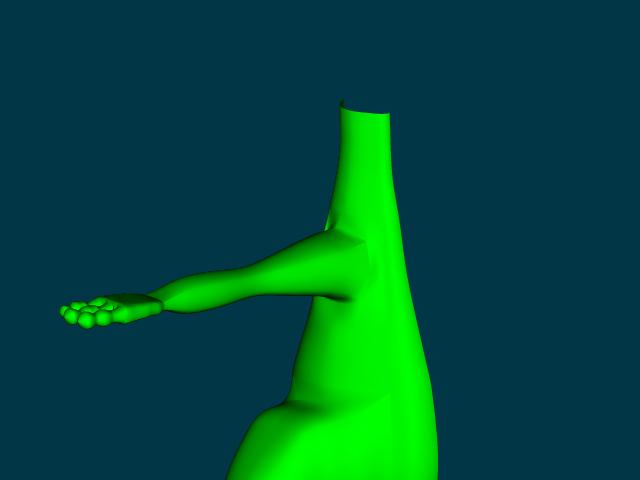
I don't think this is quite it yet, but if it weren't for the peaked or faceted look, I think this would be pretty close. What do you think? I am not quite sure why its doing that. I'll take a look at the tutorial. [attachmentid=18416][attachmentid=18417] Ok, I think I just about have it now. I'm cleaning up some more spots, I'll post in a bit.
-
What causes splines to loop back, or do other funny things??
Roger replied to Roger's topic in Work In Progress / Sweatbox
For this particular one I would add the points to each spline as I go across - dot, dot, dot, connecting all the splines together and leaving the trailing edges. Then deleting the trailing edges. I would not try to hook this, although I think you can hook up to four (or is it 3?), I would not do it in this case, especially if there will be any further modelling 'out" from the flat edge. Ok, I did the first thing you said----it worked perfectly. Thanks. I was going to start pulling my hair out soon. I will just have to make a note of that. This is just one of those things that I need to stick on a 3x5 card and keep it near the computer, so if I forget I can refer back to it-----until its automatic. Thanks again. BTW, I'm not sure I'm going to use this foot, I will probably modify the hand but I felt it was important to know why it was happening. Thanks. -
What causes splines to loop back, or do other funny things??
Roger replied to Roger's topic in Work In Progress / Sweatbox
Yeah, that's pretty much it. Are you making the crossing spline in add-lock mode, or do you just create one long spline, with cp's at the appropriate spots, and THEN start hooking it in? Or, just one spline w/ 2 cp's, one at each end, and then use hooks to attach the vertical members? Roger -
Have attached arm and hand, let me know what you think...
Roger replied to Roger's topic in Work In Progress / Sweatbox
I am confused......by continuous, do you mean that they are 2 unbroken splines that overlap each other? Or are they joined by a hook at that point? thanks -
What causes splines to loop back, or do other funny things??
Roger replied to Roger's topic in Work In Progress / Sweatbox
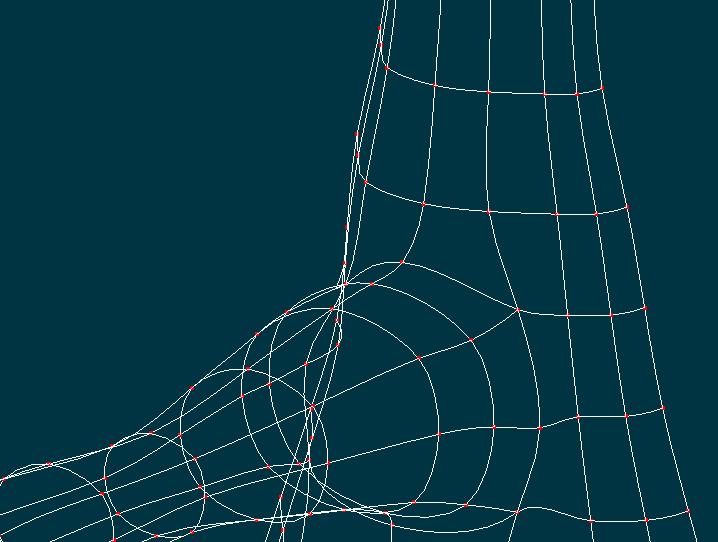
Well, I've got a pic posted of what I'm talking about, the area in question is on the far left. You might have responded when I was editing the post. I guess I will just do the giraffe tutorial today----or I may just modify my hand into a foot and be done with it. But I will have to do the tutorial at some point so that I don't keep running into this. Thanks for the suggestion. -
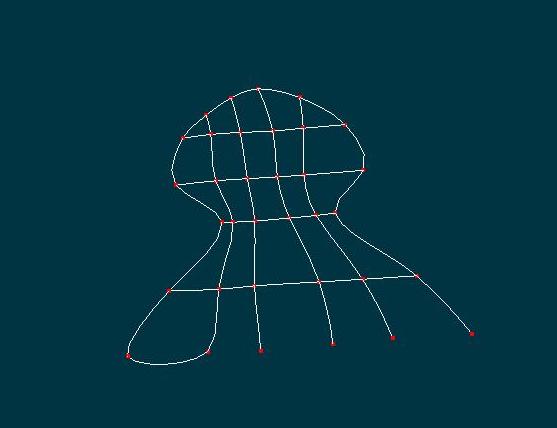
And what can you do to avoid it? I've noticed that in a lot of models that I build, I am getting these problems and I am not sure what I could be doing better to avoid it. I don't think I am doing anything strange as I am building these models, but maybe there is something that I am doing that I am not realizing. Seems to me like I'd have to do a screen capture of one of my work sessions for anyone to be able to tell where I am screwing up. I am probably going to try and do the giraffe tutorial, maybe that will shed some light, however----I was making good progress and would possibly like to have a finished dragon model at the end of the day. help........ Roger For instance, why the heck does this happen? I'm trying to model this foot, maybe not doing it the best way but I decided to delete a bunch of geometry and start over. Well.......I started with all the splines at the end not being closed off, then I started closing them. Instead of getting a nice squared off spline, like I have in the other areas, I get this curved goofiness, where I have multiple splines passing through the same cp (or I would if I started to close off the other open areas). [attachmentid=18408]
-
Have attached arm and hand, let me know what you think...
Roger replied to Roger's topic in Work In Progress / Sweatbox
Ok, I tried fixing it the way you showed........but I think I made it worse. It was easy enough to delete the bad splines and start creating new ones, however, sometimes the new splines I create look all funky, other times they are curved nice. I know this can sometimes be fixed w/ gamma and bias but I really don't know which to apply and when, its sort of like voodoo for me. I had to create another patch inside the one large 5 pt patch that is created by making the modifications you suggested, for some reason it just would not render closed. I think I may go back to the old version I had, its not quite that noticeable. I would have liked to have fixed it, maybe there is still something I am doing wrong. I have posted pics of the problems I had. [attachmentid=18404][attachmentid=18406]
-
The anemone looks good, although you should stick w/ the thicker tentacles w/ the tapered tip. There are anemones with thinner tentacles, but they don't look quite like that. The lionfish is pretty good, however the fins are generally longer. There is a Dr. Axelrod's (I think that's the name ) marine atlas which you should be able to get from a library. However.......there are several different types of lionfish, but it looks like you are trying to model one of the volitans lions, which have the longer fins. Looks good though.
-
Have attached arm and hand, let me know what you think...
Roger replied to Roger's topic in Work In Progress / Sweatbox
Hmmm ok well I guess I will have to break some splines and see if I can't fix that. and yes Eric I will be adding a tail There's a tail stump but I haven't bothered extruding it yet since that will be the last step after I finish modelling the feet, attaching them, and modelling the head and attaching it and then welding the 2 halves of the body together. I should have a complete model within 2 days, I hope. Thanks guys Roger -
Have attached arm and hand, let me know what you think...
Roger replied to Roger's topic in Work In Progress / Sweatbox
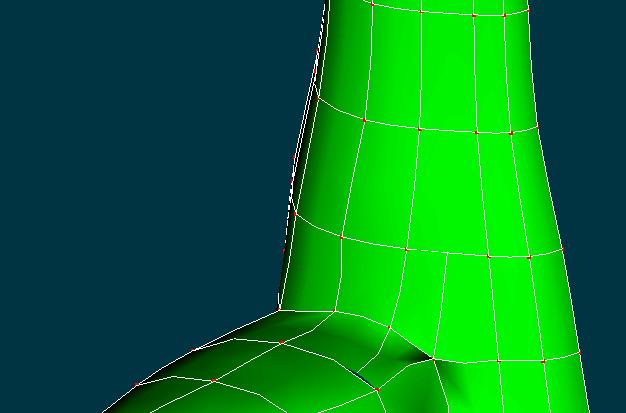
post a wireframe that shows that area. It might just be my imagination. Ok, well, here it is.........[attachmentid=18375][attachmentid=18376]
-
Have attached arm and hand, let me know what you think...
Roger replied to Roger's topic in Work In Progress / Sweatbox
Well the indentation of hand to arm is easily fixed...........how would you deal w/ the other thing? Roger -
Ok, I seem to have munged up the cp's by the base of the arm/ armpit a bit, but other than that things look ok. I'm pretty happy with the way that I managed to get the hand attached. I think it turned out best. All I have left to attach is the foot and the head, and now that I think I have the hang of things I may change the head slightly. [attachmentid=18354]
-
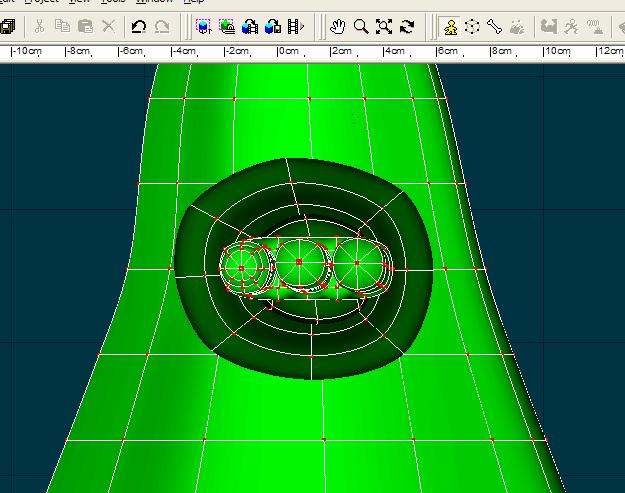
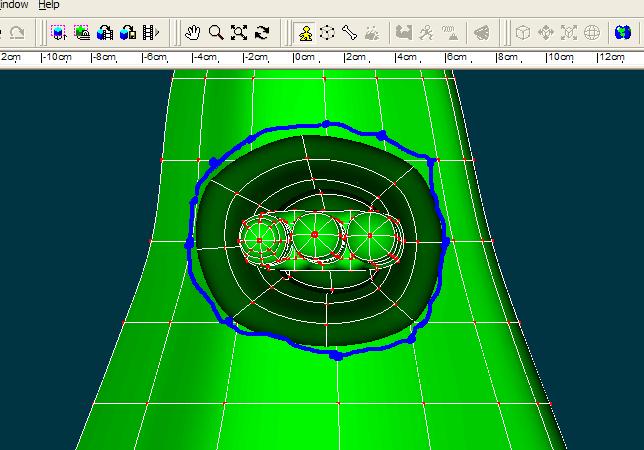
Ok, I did a pretty good job of attaching the hand, I need to attach the arm now and so I have to make a hole for it. This is my least favorite part as I have a good chance of screwing up the geometry I already have. I have taken 2 screenshots, one for reference of the way the arm is now, and another with blue lines and dots where I think the new splines and cp's should go. Do you think I am pretty much right on the money, or would you do it differenty? Roger[attachmentid=18351][attachmentid=18352]
-
Ok, I tried extruding the last ring, I get a new ring etc. But when I try to delete that ring, it doesn't leave any splines behind it just deletes the ring as well as the new patches that were extruded. Am I doing something wrong? Roger Ok, I tried extruding the last ring, I get a new ring etc. But when I try to delete that ring, it doesn't leave any splines behind it just deletes the ring as well as the new patches that were extruded. Am I doing something wrong? Roger Nevermind, I figured out what I was doing wrong. Thanks again.
-
OK well I answered my own question here----was fumbling around looking for the support number under the Help menu and found Reset Settings, which is what I was looking for in the first place. Anyway, just in case someone else was wondering, that's what it is.
-
doh.... Thanks pwknox. That made things a lot more clear, and should keep me from having to play "whack a mole" with trying to patch holes that keep popping up. I'm going to try that now. I will probably still do the giraffe tutorial, after I reinstall AM ( not the best way of resetting the tools>options settings, but the only way I could find that would work) I would have wasted all day though trying to do it the way I was going to do it. thanks again Roger
-
Hello I seem to have screwed something up.......I started working on the giraffe tutorial, since I thought that might be beneficial since I still have some problems with modelling. I wanted to change the units for the grid, so I could follow along properly, from cm to ft. However, after I did that, the grid disappeared even though I have "display grid" checked. I had changed the grid spacing from .16cm to 1foot, I wouldn't have thought that would have made it disappear. I probably did something wrong, what I want to know is is there anyway to get the default settings back? Roger
-
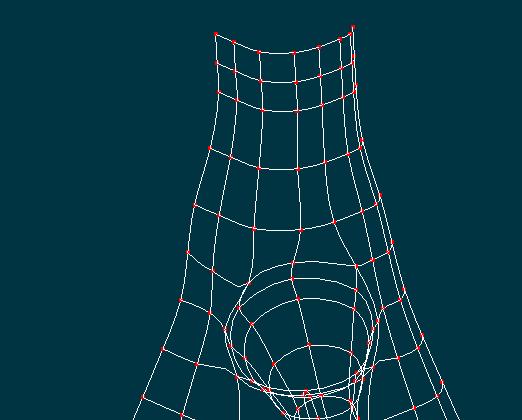
Hello, I'm getting to the point where I am finalizing the construction of this dragon model, and I have to attach a hand, where the hand has 12 pts at its beginning, and the stump of the wrist has 8, I believe. This has always been the most difficult part for me....I generally try to model parts separately, and then attach them later, as that has always been the way that has worked best for me in the past. However, due to AM being different from polygon modellers, it doesn't seem to make sense to do that anymore. When I am trying to join to parts with disparate numbers of points, the simple solution is to make sure that each end has the same number of points and then connect them up. However, when I start adding points to a piece of geometry that has fewer points, I always end up screwing up the underlying geometry to the point where I no longer have valid patches, and it turns into a nightmare trying to get back to having valid surfaces. Sometimes I can do it, sometimes I can't, and even when I can it doesn't seem to look quite right. So, when building a character, do you guys generally model the whole thing all in the same project, or split it up? I imagine I could do that, by grouping splines and then hiding the groups that I don't need, so I can concentrate on the particular piece I'm on. The biggest difficulty that I still seem to have with spline modelling is that sometimes my splines seem to do wierd things, and there doesn't seem to be any rhyme or reason why. Like, when I am inserting additional splines to "patch up" (pun not intended) a hole that has opened up, sometimes they appear to loop back on themselves, other times I get these wierd "waves" or distortions. I don't often seem to have these neat, orderly grids that all of the really good modellers seem to have. I will post a picture of the wireframe of the foot I am working on right now, to illustrate what I am talking about. I got everything closed off fine this time, but it just looks odd in wireframe, and has a few artifacts in shaded mode. thanks Roger
-
Its a cave.....thoughts on how to make it look better?
Roger replied to Roger's topic in Work In Progress / Sweatbox
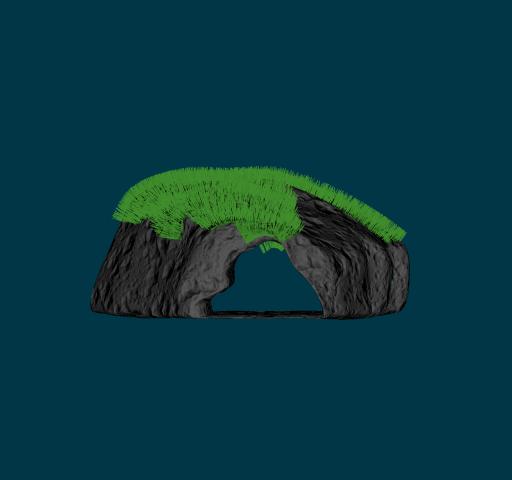
OK.... after some fiddling around and help from the hair forum, I now have.... Chia cave! Its not *quite* what I wanted, but its close. I can always refine things later on. What do you think??[attachmentid=18260]
-
possible useful feature for new/ intermediate users
Roger replied to Roger's topic in Work In Progress / Sweatbox
Thanks. Will do. Roger Huh....I didn't realize this was possible. I guess this is what I will have to do then. Probably not worth bringing to Martin's attention, but it would be nice if it was integrated. Roger -
BTW if anyone is interested in the solution, I can post it, or PM me and I can send it to you. I felt that it is more clear than what is in the help file. Roger
-
Its a cave.....thoughts on how to make it look better?
Roger replied to Roger's topic in Work In Progress / Sweatbox
I also posted this in the hair forum, but I think it might get more response here: Ok.... I was trying to follow the tutorial for creating grass that I found on the ARM...... but I don't seem to have gotten anywhere. I selected the area of my cave that I wanted to have grass....then I flipped the normals on that area. I created a particle system hair material, adjusted the parameters according to what was in the tutorial, did a test render....... and nothing but naked cave. What did I do wrong?? Roger -
I suppose that is a possibility, I'll keep futzing with it. Just now I posted a rough draft of the main character, I just sort of faked things by putting them close enough together. Of course I wil have to change that in order to be able to animate him. Ok I have the copy flip attach issue sorted thanks to Eric2575..... thanks to everyone else that chipped in. Roger
-
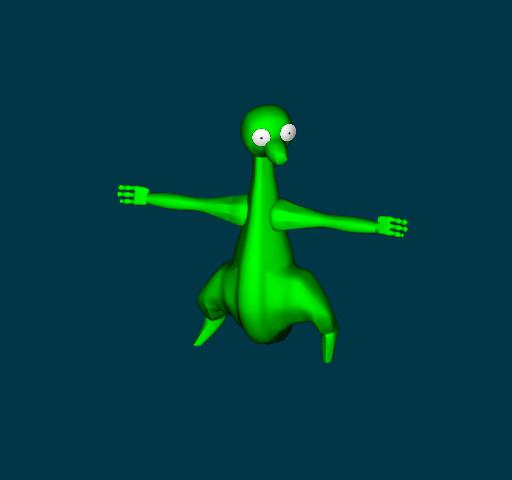
I suppose that is a possibility, I'll keep futzing with it. Just now I posted a rough draft of the main character, I just sort of faked things by putting them close enough together. Of course I wil have to change that in order to be able to animate him.
-
OK Well, he's not exactly cute or endearing yet, I think the pupils are too tiny..... And I still have a few things to add. I think I will just give him paddle feet, or modify the hands and make feet out of those. I've made horns, I just didn't bother to put them on. I'll be putting some decals on him at some point, nothing too fancy just something to punch him up a bit. He'll still be clay shaded. One thing I am not entirely happy with is the snout....this one is true to my original sketches, I didn't want to have a beak or anything with teeth, like an alligator or t-rex. I guess I could give him like a little anteater mouth with a tounge that flops out and one or 2 teeth. I didn't pay a lot of attention to the mouth as I don't intend to have him lip sync anything, just maybe sniffle and snort. thoughts?[attachmentid=18253]