Kelley
-
Posts
768 -
Joined
-
Last visited
Content Type
Profiles
Forums
Events
Everything posted by Kelley
-
First rough-cut at Tank in motion. Much tweaking to do, but far enough along to move on with a tutorial. TANK_IN_MOTION.zip
-
...might have something to do with being three years old at Pearl Harbor, entering teen years at Korea, drafted in 61' for the Berlin Wall, sweating through Vietnam, cheering Desert Storm, loathing and foreboding at Operation Iraqi Freedom...then again, maybe none of the above.
-

Placing bones on objects that move on a loop...
Kelley posted a topic in Work In Progress / Sweatbox
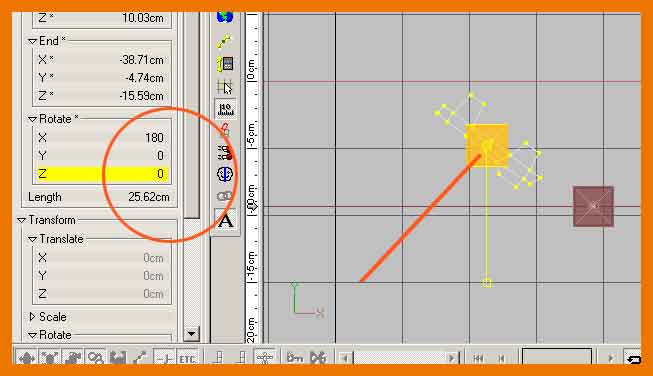
I think this is sufficiently different to warrant a new thread: [1] I'm installing a single bone that will move the same [left and right] plate on both treads. On a previous attempt, I installed the bone in the right hand tread plate, on the Z-axis. Some of the plates developed a twitch wherein the bone rotated 180 deg. and the left plate flopped over to the far right of the right plate. I suspect it was because of the oblique angle the bone occupied at the points where the plates moved over the major drive wheels at the front and back. [tho' I'm not certain] This time, I'm installing the bone along the X-axis. The question is: at the points where the plate moves across those acute angles, is there any advantage to setting the roll handle at 90 deg. to the plate itself? [2] As I placed the bones in the wheels, I notice that each bone comes in at a slightly different rotational angle. I set them all to X=180/y=0/z=0 for consistency's sake, but is there a key to hold down that will constrain them to 0/45/90 or 180?
-
Matt: Thanks for the come-back. It's now printed out and bound into "The Encyclopedia of Good Advice". I went for the 100% Sampling because the tutorial at the end of your link showed a progression of renders starting at 10%, up to 100%, and the big issue seemed to be that the shadows were very grainy/noisy at 10%, and very smooth at 100%. I went with the bigger %, and there was a lot more to it. Thanks again.
-
Ken: It's A:M from the ground up. I know that it's a little heavy on CP's...a legacy from my polygon days...especially in the way I've always built gear sprocket drive wheels. Also in the turret, as I was trying [perhaps harder than necessary] to keep it smooth. I took a shot at AO lighting. Followed the link in Matt's advice. Thought I was about to tangle with something hideously complex...turned out to be a lay-down. The numbers indicate the order in which I made the renders. I discovered that a little goes a long way. [#2, at 100% took nearly five hours before I regained control of my computer.] The last is best, and could even be less. Am I right in assuming that this would be an alternate method to Light Lists? Riste: I spent a few hours on Friday photographing the wheel hubs on local tractors and heavy-duty trucks. When I get the prints back, I'll muddy-up the bogey wheels.
-
Outstanding! We can't have too many. When mine's up, feel free to use any pieces of it in yours. Matt: Thanks for the link. I'll print it out.
-
Rodney: Is this what you have in mind? Ken: Can you point me to some text for AO and HDRI?
-
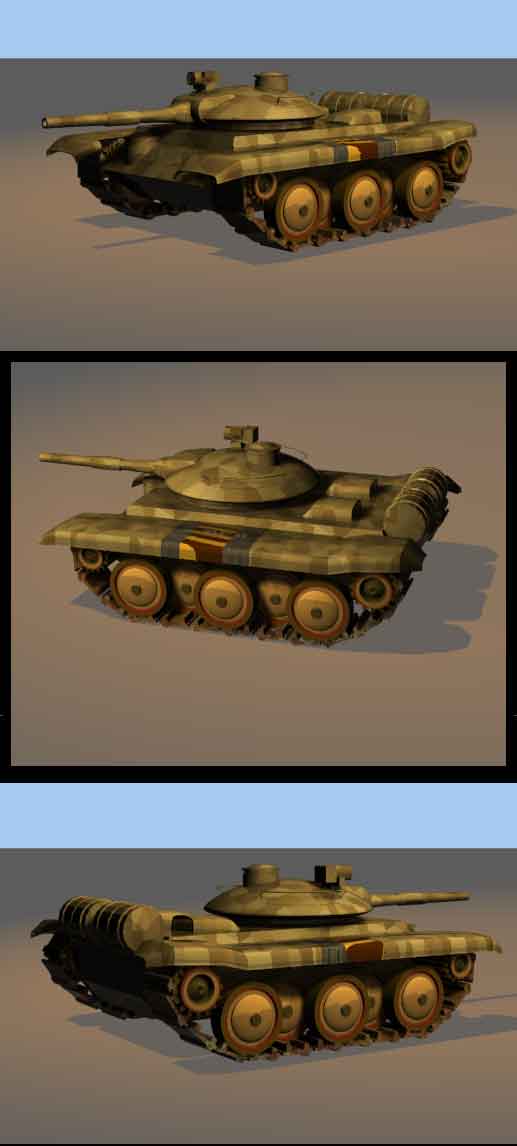
The lastest in my fascination with tracked vehicles. This, a generalized Soviet T-series tank. I've been keeping a Photoshop record of each step and expect to put together a tutorial when the treads are done and moving.
-
V.13 pastes new object slightly offset...
Kelley replied to Kelley's topic in Work In Progress / Sweatbox
Outstanding! Thanks. -
I notice that there's a built-in [?] offset when V.13 pastes a copy. Every time V.11 pasted the copy directly over the original, I half wished it wouldn't. Now that it doesn't, I find that I have need of the old way, particularly when making multiples that have to sit on the same baseline...like the engines on the Junkers flying wing, like the tank bogey wheels I'm trying to align. Can the offset be disabled, or re-set to a known figure, so that 'X' number of cliks up, and 'X' number sideways will put the copy back on the baseline?
-
Interesting. I, for the moment, am on my HP Pavilion with XP Home Ed. Seeing as I'm going to load V.13 onto my Compac laptop with [gasp!] Vista tomorrow, I'll run another test when I get that going. Thanks for all the advice.
-
Yes. And I only tried the Quicktime because the zipped .avi's were a little too big to upload. I haven't tried to do the whole animation as a Targa Sequence, but V.13 sees Targa decals allright.
-
Looked up Quicktime. I'm running 7.0.3 Quicktime Pro. I upgraded from some other version when I was told that it was necessary if I wanted to download SFX from the 'net.
-
...and so it proved to be. 'Got everything spec.'d out [& resolution set to 'Low']. But while I can see each frame as it renders, right out to the last, when I summon up the final product, there's just a solid black window.
-
Good advice all. It's small because my first iteration was 320x240, and even when zipped, it was a few Mb over the upload limit. So I hastily halved everything. Just for the helluva it, I'll post a re-do in Sorensen 3. Balance/Balance Rigid? Indeed? Another item glossed over in the manual. And speaking of manuals: why were all the tutorials deleted in V.13? It's what I loved in V.11. They actually told you where to go, what menus to pull down. But there was no theory. Now we're arse-deep in data and theory and [at first reading] no tutorials, no discernable organization, not even chapters headings. It would be nice if there was a "What's New" section and how to use it. I'll choke back my rant on the 9pt Miniscule light they chose for the text. I'm using an old mans eyes here... Back again...can't find Sorensen 3. Checked formats. There's only .avi, Quicktime, and Targa Sequence. Under "compression", there's Cinepak, Intel (4 flavors), Microsoft (2 flavors) Intel again, Microsoft (2), Indeo, Fraps Video Compress [for screen caps] and Full Frame Uncompressed. I tried rendering out at 320x240 Flat Shaded, but the .zip file is 2.81 Mb., even bigger than Final Quality 320x240 which was 2.64.\ Suggestions?
-
As the required rite of passage for TWO, here's the lion and the door. Have spent the best part of a week chewing on the carpet just to get it to this point. It's been better, and it's been a lot worse. Adding Kinetic constraints always flips the hands 180 degrees. Keeping constraints on has been an exercise in frustration suppresion. Ah well, if I have to disgrace myself before the entire Hash community, let this be the day. LION_AT_THE_DOOR.zip
-
Modeling/Choreography background colors?
Kelley replied to Kelley's topic in Work In Progress / Sweatbox
Got it. It was Tools>Customize>Appearence tab. I switched from OpenGL to DirectX when a decal came in as a ghostly box. It cured the decal, but not background. Hadn't had to cross this ground for quite a while. Thanks -
Opened V.13 today. Choreography and Modeling windows are solid black, no grid. How to change the color? Doesn't seem to be in Properties or Tools.
-
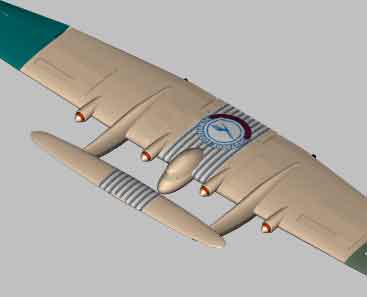
Peter: BINGO!...and Thank-You. Now I know what the landing gear looks like. My plane does have the vertical stabilizers out near the wingtips, they're just in the darker section of the pic. Robcat: I too, have seen many variations on the theme you mentioned. This plane had all that, but it was inside the central wing section. Like other Junker giants [G38] even the engines could be serviced in flight....also with some of the Russian monsters like the Antonov-20bis [Maxim Gorky] The nearest anyone got to your cartoon [i think...] was Igor Sikorsky's multi-engine "Ilya Mouremetz". The fuselage was square cross-sectioned, and rear of the wings, there was a waist-high railing that ran around the afterdeck. There's a picture of one of these about to touch down. Three Russian officers are out there casually enjoying the view. No safety tethers are in evidence. KenH: Check the picture. I am now convinced that my wierd problems are due to the video card overheating. [...with the exception of those times when I simply put my foot in it.] This test was done early this morning. Worked like a charm. On Saturday I went and bought a new computer that will be dedicated to A:M, Photoshop and Premier. A laptop with a desk stand and fan to keep it cool. With that, and a firm resolve to turn it off more often when I leave the room, I hope to see the end of these strange 'burbles' in the program. Thanks for your help.
-
Thanks. Here we go... JUNKERS_J_1000.zip
-
Ken: Drove it up to 444000, and 'no go'. I'm using v.11, but just bought my upgrade this morning.
-
Looking for modeler for short Star Wars film
Kelley replied to PurpleDingo's topic in Work In Progress / Sweatbox
A quick footnote: Here's a four-step sequence. The Chin Turret is 'Translated to" the main body of the UAV. Each of the two Muzzle Flashes are 'Translated to' the Chin Turret. In addition, you need to give each Muzzle Flash an additional constraint: Orient Like. If you don't, the flashes will move with the guns allright, but will continue to point in the direction they were initially set...in this case, facing forward.
-
Looking for modeler for short Star Wars film
Kelley replied to PurpleDingo's topic in Work In Progress / Sweatbox
Should be no problem. Just go into Bones Mode, add a bone, select [highlight it] marquee all CP's that should move and they should start to flash on and off in the bone's color. They will then move wherever you point the bone. -
Forgot to mention: having problems with bump maps. There's a bump map on the J-1000, much like the black & white stripes on the center section. This is to create the corrugated iron skin look common to 30's Junkers aircraft. I selected the 'Images' folder under 'Decals' and changed 'Color' to 'Bump' in the Properties and set, and re-set, until it was 444%...and nothing is showing. Is there another place that needs setting?
-
Yeah, thanks. I recalled reading that booleans are post effects. Probably that's why I've overlooked them. 'Have any opinions on them? Do they, in the end, look as good as those done in polygons?