detbear
-
Posts
946 -
Joined
-
Last visited
-
Days Won
29
Content Type
Profiles
Forums
Events
Everything posted by detbear
-
I agree with Keith. Ringling is another school in FL(Sarasota) with a pretty solid output of work. ***I also think that the net has made learning and opportunities much more obtainable without forking out the big bucks just to have a piece of paper on the wall. The industry would rather see talent than a piece of paper. And they'd rather see enthusiasm and a passion for what they are doing.
-
I saw a Batgirl issue on the shelf yesterday at a popular store. I think you've hit the mark right on. Looks Fantastic!!! Excellent work.
-
Looks cool Robert.
-
Hey, Thanks Fuchur for your suggestions. I had already worked on those routes. You are correct that they do work. But It is massively time comsuming. Yes...I did convert to Quads in Blender first. And I also did splits and separated things prior... But it is a very complexed model and that's hard to do.
-
Pulled the plug. A:M just couldn't pull it off.
-
4:00 now and still at 60%. could be days...... if I don't pull the chord on it.
-
23.4 meg obj........started transfer yesterday at about 4:30. It's now 12:30 the next day and it's only at 60 perc. I actually converted it to quads in Blender which brought the file size down some. And because I know A:M hates triangles. But this is a grueling way to have to do it. Plus it completely straps the computer for the time it takes to complete. I don't have lightwave, but I'm not sure that would be much shorter. Hopefully it will transfer.
-
Nemyax, Thanks. Got it installed and I'm working on an export. Looks very promising. OOOOppps!!!!!! Keeps giving me an error. It is a large model. (.obj that's 39 megabytes) I will keep trying. Is there a way to import .obj sequences into blender? From Hash??
-
That's a lengthy topic. Do you need the script at post #1 AND the "Middleman" thingy?? Or is it improved down in a further post??? That seems like a long workaround. I don't have any experience with blender either. Frustrating.
-
I find that some obj models simply refuse to import/ convert into A:M even if their file size/ complexity is radicaLLY reduced in the exporting APP. I would expect long conversions for high meg files, but these are as low as 3-9 megabyte obj models. I'm sure that there are many factors that I'm unaware of in this process, but at the same time much more complexed models transfer easily at times. I wonder how to improve this if possible. I'm happy to have the obj import option for sure, but it just won't import certain models. It seems to hate any triangles whatsoever. Would love to hear how you other guys are importing obj's, 3ds's, etc.
-
Submit your Insect Contest Image - Last Call... Monday!
detbear replied to robcat2075's topic in Contests/Challenges
Looking forward to seeing all you guys awesome images!!! -
Paul, I also know a guy who invested in this system and it seems revolutionary. For smaller shops with small budgets, this delivers abilities that ony major feature studios had only a short time back. I think it is also possible to run several people at one time. Please let us know how it works AND how you use A:M with it if you go that route.
-
Submit your Insect Contest Image - Last Call... Monday!
detbear replied to robcat2075's topic in Contests/Challenges
OK RC..... I just sent my image over to you. Like Matt.....I'd like to hear that you got it if possible. That way I can re-send if needed. Thanks Big Guy!!! Cheers, Detbear -
Submit your Insect Contest Image - Last Call... Monday!
detbear replied to robcat2075's topic in Contests/Challenges
I don't normally enter contests. But Robert has worked really hard to promote this. So yesterday I decided to enter. I had done absolutely no modeling, but I did have an idea that had been brewing. So yesterday I started from nothing but the idea. Wanted to see if I could pull it off on the deadline and support Robert's efforts. It's finally rendering. I think I'm gonna make it. Cheers, Kevin -
Submit your Insect Contest Image - Last Call... Monday!
detbear replied to robcat2075's topic in Contests/Challenges
RC, Just to clarify. Are entries allowed to have any Photoshop work? Or does it have to be soley a render from A:M? -
More to the actual model Det_Wyboo_045.wmv Adjusting fluid pass to the model
-
OK. I guess not.
-
Is MDD the only sequence importer in Hash. I was hoping to import an OBJ sequence. Is that possible?
-
Tech Watch: Automated Obstruction Removal from Images
detbear replied to Rodney's topic in Open Forum
Depending on how well it could differentiate between characters and environments, that could potentially be a Wowing compositing tool. If it could cut characters out and things like that. -
I had the initial stage play for episode 2 "pop in there" out of the blue yesterday. One that I think would add the comedy and drama appropriate for the second episode. But it will take some serious development like the first episode. So I don’t know when it will get done. But it was an idea that got me a bit rejuvenated about pursuing the second episode at some point. It will require two additional characters. Maybe three. That will be the biggest hurdle of development.
-
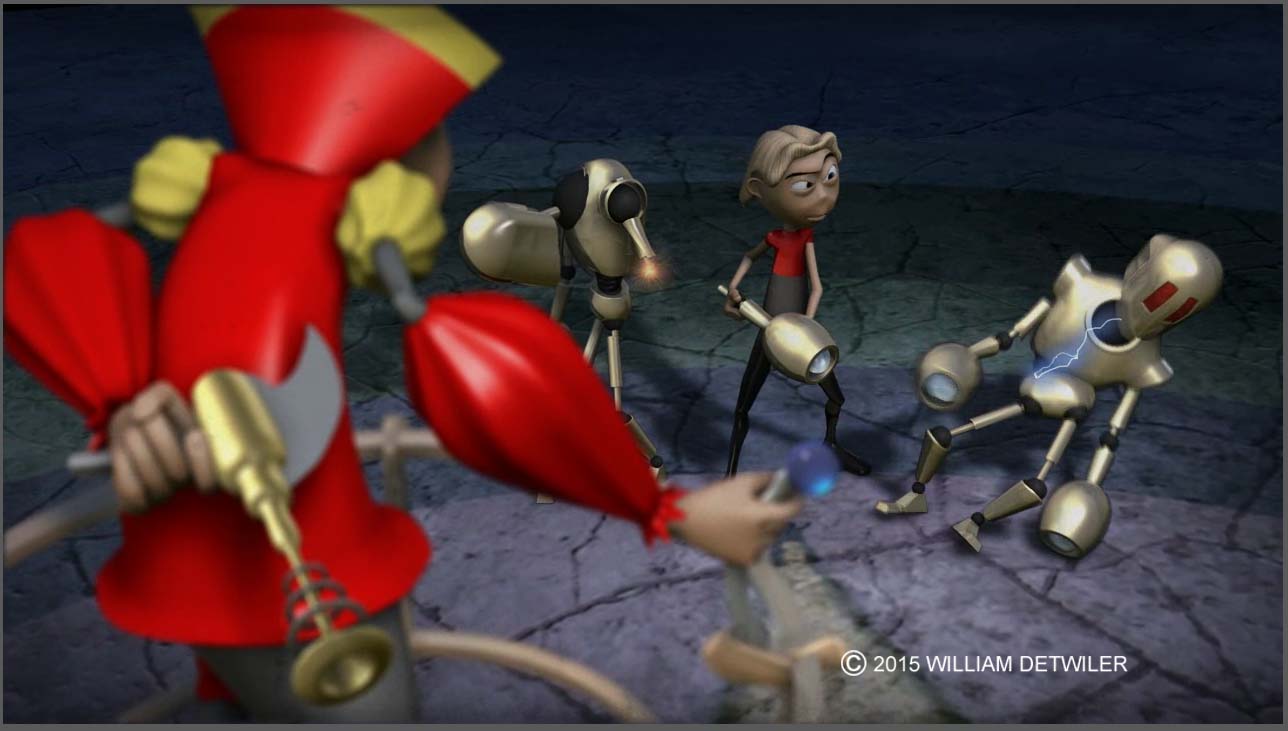
Hey Guys, Thanks for your kind words. You are all soo talented. If I could rig like David S., had the comic sense of story like Mark L., the creative edge of Serge, and the creative tech knowledge of Rodney......I would be able to crunch this stuff out with a real bang. No...But seriously, I enjoy and admire all of you guys talent. Rodney. You make some really great points about the color. Part of the problem is that the "Uncolored" original had more distinctions between the elements. When I got everything finally to the editing block.......it was easy to lose some of the vibrance. Especially when I began taking color away. The white text on white cloud has a really nice look prior to any desaturated version. Humbly, it is not the norm for an artist to where so many hats and be an expert at all. I have strengths and weaknesses like we all do. The color corrections can Sink or destroy a bunch of hard work. In the end, you have to make some decisions. I considered and even tried a silver finish on the robots. They looked much worse IMO. I think a better choice would've been to contrast Flash's hair. But again....the desaturated look has some to do with that lack of contrast between the two. Audio was incredibly tricky. I had to create and dubb dialogue from dialogue in the film. It's amazing what goes into just one minute of story. Back to the color.... I also find that what works well in a single frame doesn't have the same success at 24 or 30fps. There are about 16 camera shots. Keeping the lighting and coloring unified was a task. In hash every shot had to be lighted differently and yet when the film roles, it has to work together. I colored each shot individually as well. Rendering in layers. I separated the background, back sky and characters so that I would have a bit more control over light values of things. This is always a luxury in post because you can brighten a buried part in the back or visa versa. Also...I tried darker text on the title as you pointed out, but it looked un-authentic to the "older" look I was grabbing at. I remember seeing an interview with the "Colorist" who place the "Look" on Sky Captain. He first took all of the color out and then placed color back in frame by frame. The studio jokingly said that they were concerned about his health because the process took so many months to do such tedious work.
-
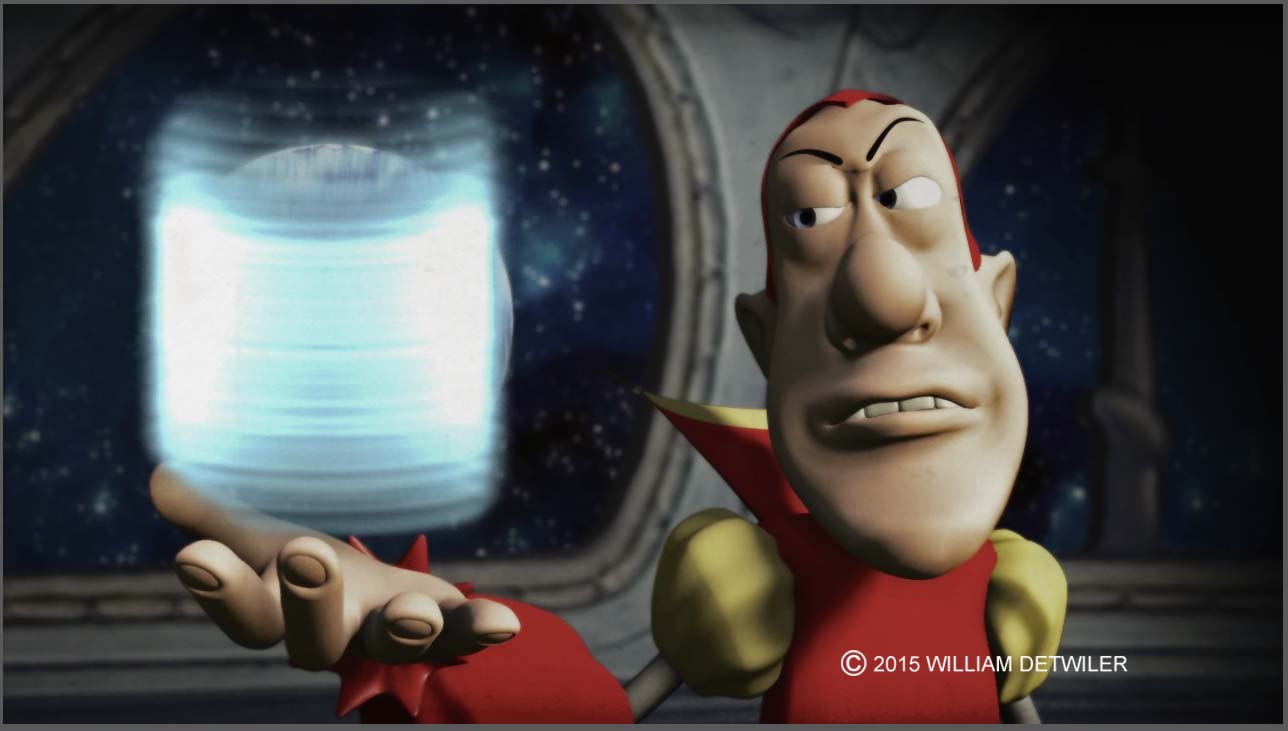
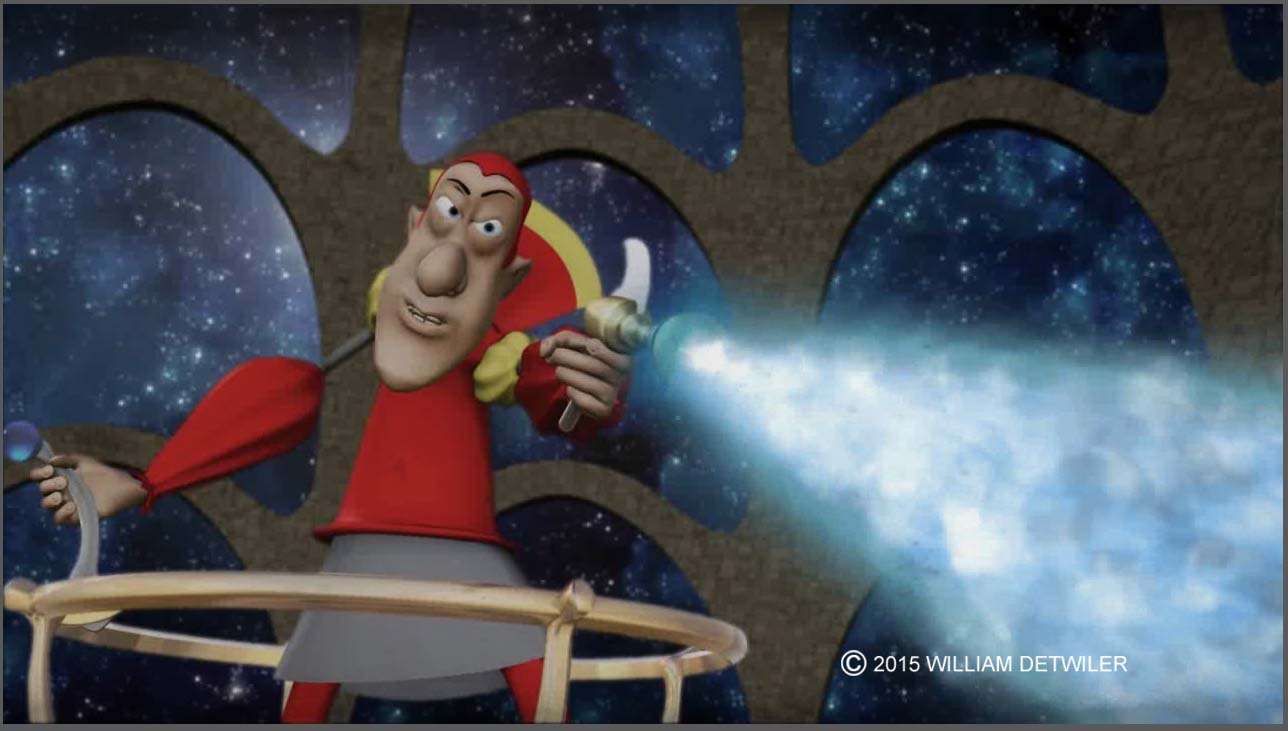
Thanks Rodney, I appreciate your kind words. They mean a bunch. ALSO.....I have some answers and comments for you: #1... The color draining ....... Yes! I wanted to de-saturate the color somewhat. Actaully I have several versions. One was nearly black and white. It looked awesome in places, but it got so dark in others that it was too dark. I tried to light just the dark shots, but it didn't match well. ALL IN ALL....I couldn've made it more vibrant, or sepia....but the colors in the ray, laser, glows and other elements got too buried IMO... But the plight of being the art director is that in the end you have to choose......Very difficult. I almost wanted to make it like Sky Captain & the world of tomorrow....but it would have taken a huge amout of time to get that right.. #2 I want to note that when this idea originally began, I was practicing "THIRDS" compositing. This is when you puposefully set up your shots placing the focal points on a "Thirds" grid...... The most apparent example of this is when Ming is holding the holographic earth and when he is holding the rocket up in the air. ...... The earth is on a focal point in the 3rds grid and Ming's face is on another. This is not true for every shot. But it is true for many. #3 LET ME ALSO NOTE.....that I rendered out of hash and there are many places where the Hash render has only color overlays and maybe some blur effect. All to say, Hash renders worked well. I did render the background, star backdrop, and characters separately. That way I could control a fake DOF in After Effects. #4 The MAT CAP shader is invaluable for quick rendering textures. The "Blue pearl" on the control handle of Mings hover craft is a straight up MAT CAP for instance. As well as Flashes pants and clothes. #5 Because of time, I rendered most shots with SSAO at 9 multipasses. I did have to avoid Motion blur at some places because it doesn't play nice with SSAO. #6 There is a small chance I could make chapter 2. But I had to create the entire audio track from the Movie. That is a whole different topic in itself. Plus...it takes a massive amount of time to go from an idea to a film.....As you know. I can only hope to get there. I have the Cinematic Submarine Shot also. Robert has been very patient thus far on that. I want to continue on that development. If I can think of anything else, I'll post. Or if you have another question...let me know.... BTW.....I made a model that set up on the camera to show 3rds and triangles....when you finish the composite you can delete it. I think I just turned it off. Do you think the community could use that compositing gizmo? William
-
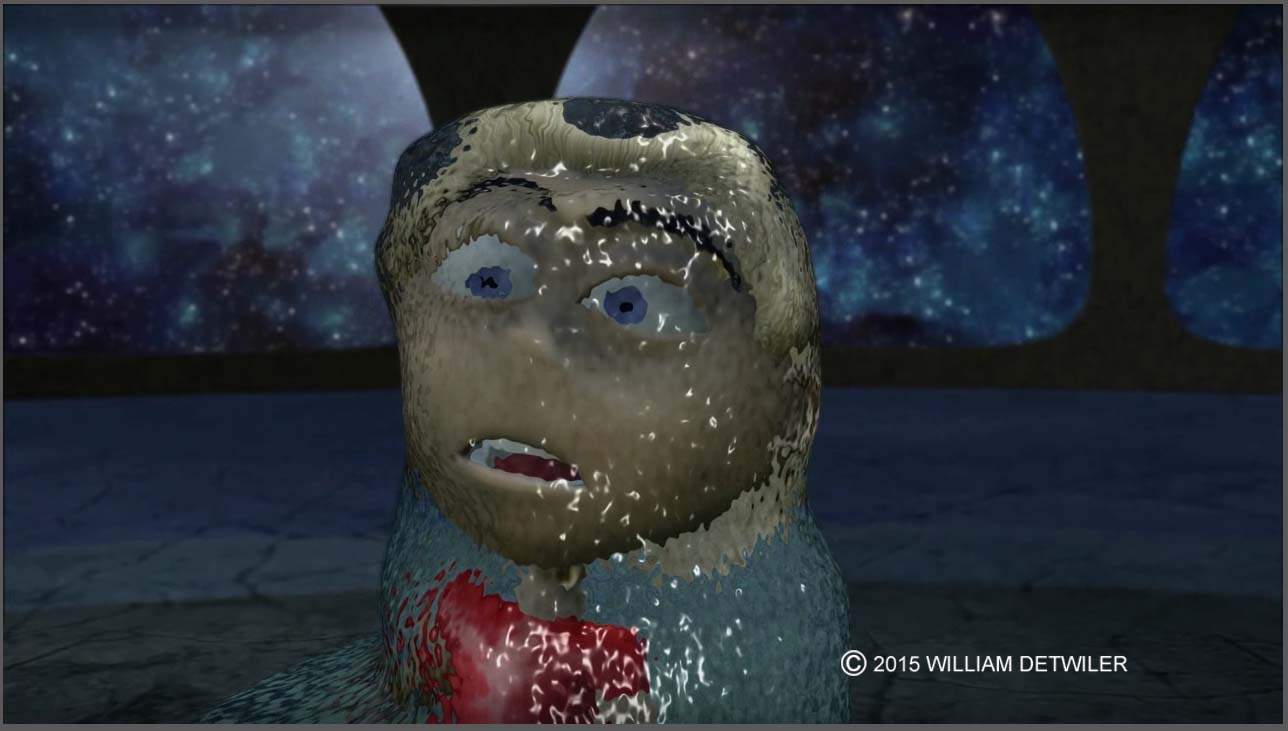
Also.....Here are a few screen shots from the composite: The ice was tricky, but I went with something I created inside Hash. The freeze ray was a combo of After Effects and Particle Illusion. The Planet transporter was done with Particle Illusion.

-
I finally finished my Flash Gordon Fan Film. It's certainly not perfect, but if you've ever worked on a long, paced, and staged projects from idea to screen, you know how long and how much work it takes. I'm happy to have it done whatever the case. I did notice that the vimeo conversion makes it glitchy in places. But I can't complain. Hope you guys enjoy watching it. Here's the Vimeo link to a "low Res" version: https://vimeo.com/135294317 Cheers, William
-
Yeah..it seems like the relationships between certain blends doesn't always work. I guess that's when your favorite compositing AP becomes move handy. Hey.....whatever happened to the "All the best" guy? Ever hear back from all that?