

williamgaylord
-
Posts
907 -
Joined
-
Last visited
Content Type
Profiles
Forums
Events
Everything posted by williamgaylord
-
Such a gathering would largely be for the benefit of "newbies". I'll prod Colin some more to see if we can get something going again. Bill Gaylord
-
Nice work, Melissa! Look forward to seeing the Jig. I see you are in Alpharetta, GA, or there abouts. I live in Stone Mountain, GA. Colin Freeman works at IBM in Atlanta. We used to have an Atlanta AM User's group a while back held at Colin's workplace every so often on a weekend. William Sutton lives in Chattanooga, TN, but used to join us here in Atlanta. There are a number of others in the area who used to attend. Colin and I have been discussing the possibility of getting it started again. Bill Gaylord
-
That is so cool! The background looks like Shaggy might be out in the Egyptian desert with Howard Carter digging in the Valley of the Kings..."Oh man! Where did they go? Wait...now I see them..." Ever watch the Red Green show? Have you seen the black and white "home movie" adventures with his goofy, accident prone friend Bill? These old film effects would be great for something similar done with AM. This would be great for some of my Marshmallow Safety Films. Bill Gaylord
-
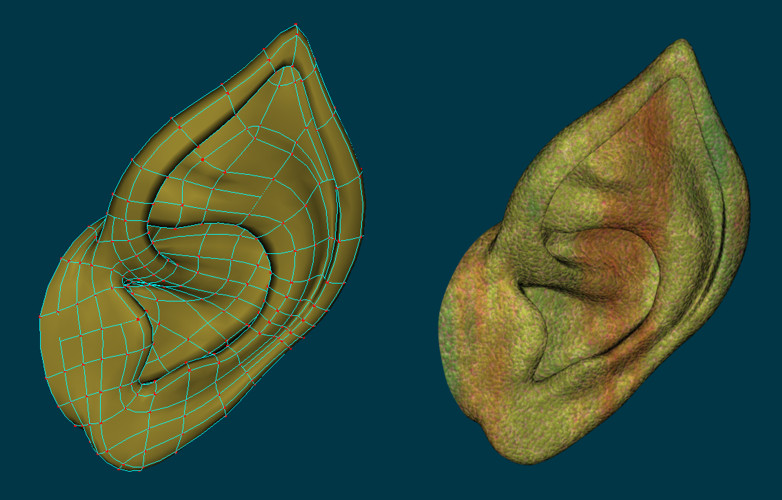
OK. Here they are for anybody that wants to use them. I would encourage you to try to make your own, based on some of the help and examples posted. It would be a good excercise! Ear Model Orc Ear Model Bill Gaylord
-
Joakim, since you have an orc in the works (very well crafted, by the way), here's a pointy orc ear...Once I figure out how to best post them, I'll make these ear models available for anyone who wants them. Bill Gaylord
-
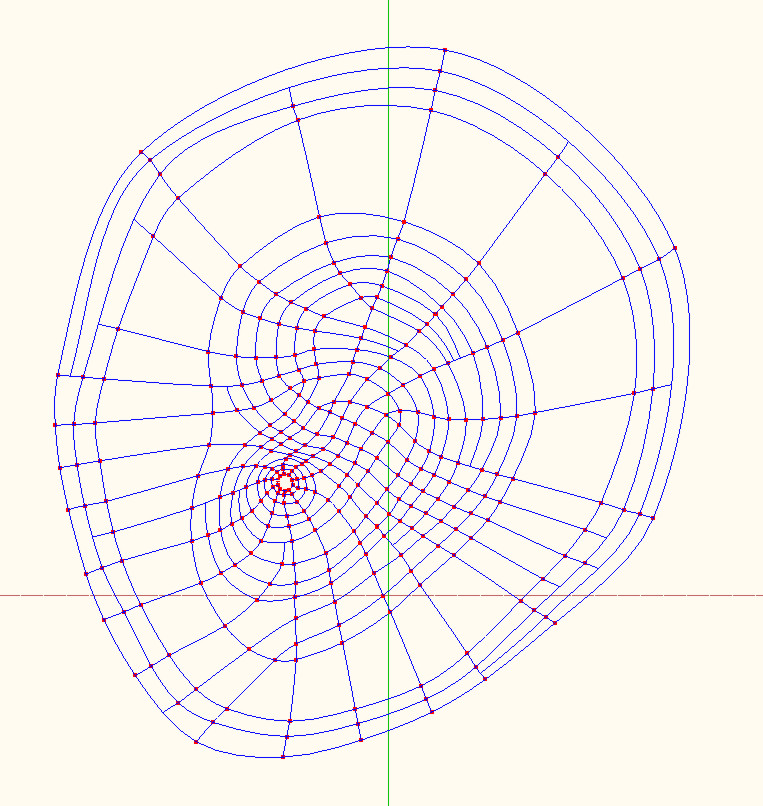
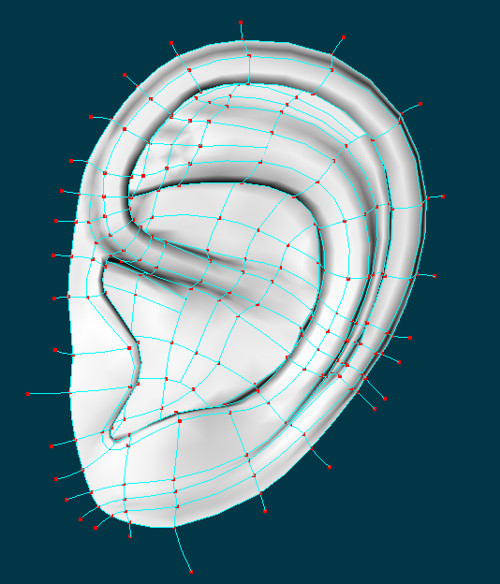
And here is the unmarked picture of the flattened mesh... Bill Gaylord
-
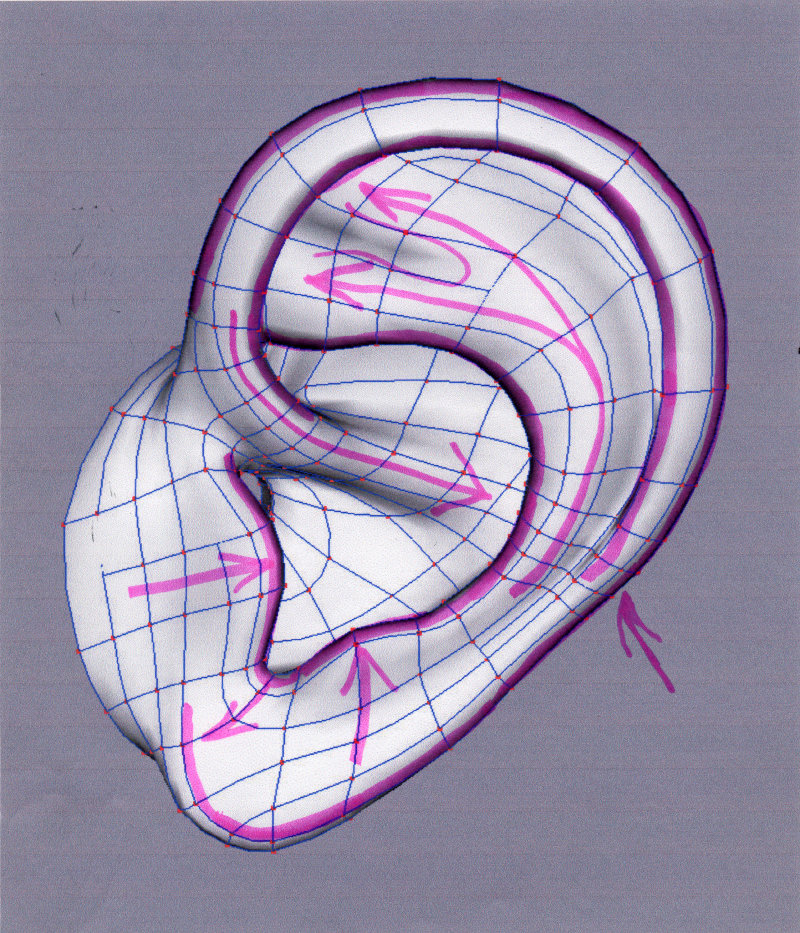
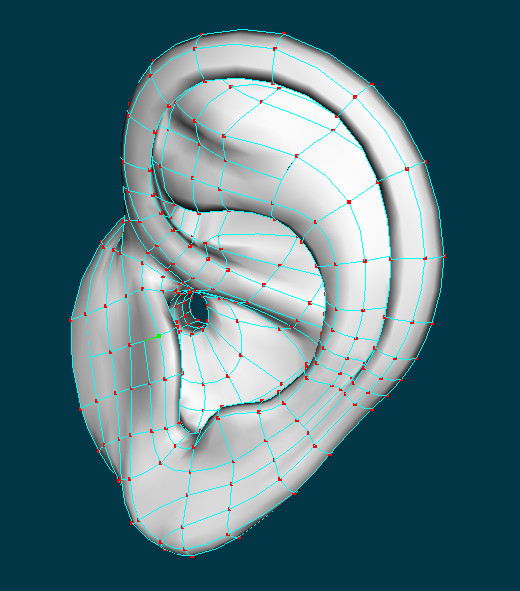
Here is the picture showing the shaped ear mesh with corresponding markings: Bill Gaylord
-
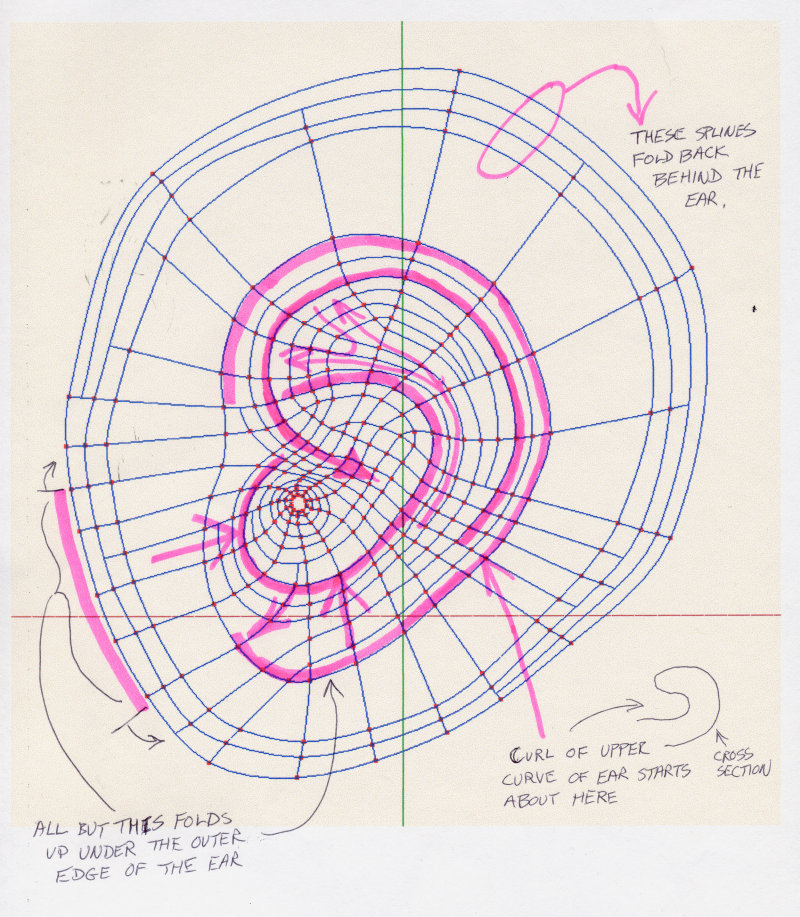
Here are three pictures that y'all can use as references. Two show the flattened mesh and the shaped mesh, with highlighter markings to help you visualize how splines in the mesh relate to the shapes of the ear. The third is the flattened mesh itself you can use as a template to try your own. I did not bother to add the anatomical names of the various ridges and depressions of the ear, but I did indicate the major ones with arrows and highlighted edges to give you clues about them. Note that the upper half of the outer edge of the ear curls around the top and then down into the main depression in the middle of the ear. Note also how the upper/inner edge of the main depress starts near this curl and wraps around the lower half, raising up in two protruberences that roughly face each other at the bottom, and a larger "y" shaped ridge that curls around the inside of the upper half. Study the pictures and you'll get the basic idea how the flat mesh relates to the final shape of the ear. You can use the "clean" picture of the mesh for a rotoscope for building your own as "an excercise left to the student". It's a good practice. The magnet tool and the lasso select tool are very handy for pulling and pushing select groups of control points to shape the ear mesh. Some of you spline wizards might actually notice ways to improve the mesh. Feel free to do so, especially if you share your "wiz"-dom with the rest of us! Later I may turn this into a more complete tutorial. The best approach is to build your own ears once or twice and then just copy and tweak them for new character models. Bill Gaylord
-
I bet you could. It takes a bit of determination and patience mainly. And some time studying real ears and photos of ears. The main challenge is learning how the ear spirals and folds into itself. You have to look at it from many angles to really understand how it is shaped. Then I would recommend drawing out a flattened mesh. I'll try to flatten out this ear's mesh and highlight some of the key splines. I spent at least a couple full days drawing a flattened mesh with colored pens to work out the basic mesh (lots of tries before I got to something workable). Then I put together the mesh in it's flat form based on the drawing and then pulled it into shape. I changed the mesh a bit here and there once I got it into the basic shape. Then I studied other fine examples like Yves Poissant's ear posted above and Mark Strohbehn's ear that I posted a reference to. I printed them out and drew flattened meshes as best I could figure theirs went together to learn from their examples. Then I went back to mine and made further improvements (still not as elegant as theirs, I would say). I still see some ways I could improve it. I think with a little work we could come up with a tutorial. I think with a tutorial to help, it would be a real boost for many folks to see that they too can tackle this challenge! Once you work through a realistic ear, you'll certainly have more confidence to tackle other body parts. Bill Gaylord
-
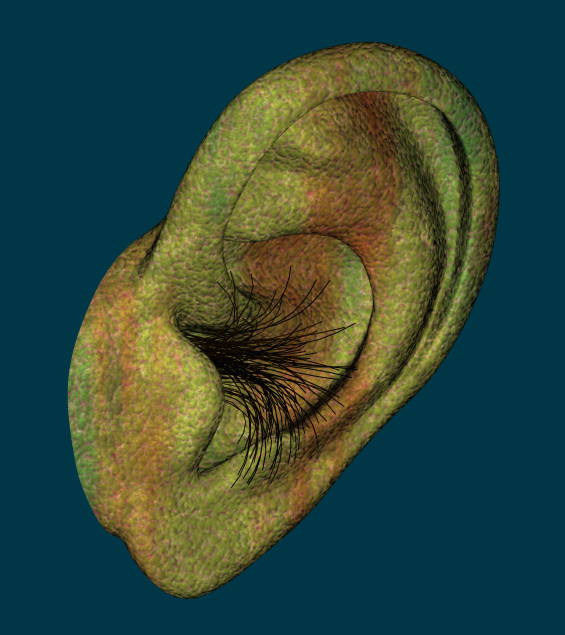
OK. Here it is patterned after real life...ear hair and all! Bill Gaylord
-
Oh man! I forgot the ear hair! I'll have to rectify that oversight! Ear hair should be easy with AM's new hair. Bill Gaylord
-
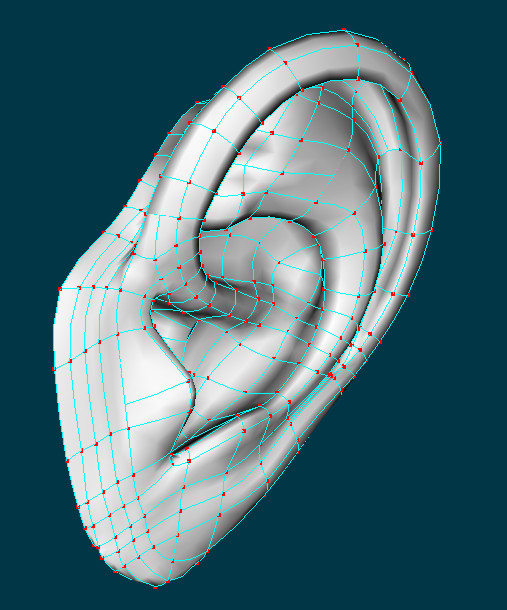
Some more tweaks to the ear model. Added the ear canal, which actually led to a more elegant mesh around the ear canal. I think once I finish tweaking the mesh, I'll flatten it out to make a template folks can use as a guide. Guess some day I should make a head to go with the ear. Bill Gaylord
-
Nice work Yves! I am learning a lot from these fine examples. One thing I am experimenting with is the idea of laying down a flattened ear mesh first, then pulling it into shape. The advantage is that you can more easily see how to minimize the number of patches and still get the smooth, nicely proportioned curvatures you want. It may be more of a teaching tool than a practical way to build an ear. The way the ear spirals and folds into itself makes it somewhat hard to understand, since from any viewpoint much of it is hidden by its own bends and folds. Another reason I am interested in accurately modeling the ear is the fact that I do binaural sound recording. I built my own "dummy head" microphone, making casts of my own ears. (Don't try this at home folks! You have to know what you are doing or you can wind up rupturing your eardrum trying to get the mold out of your ear! Don't try this at home!) I'd like to use a CG ear model to have a set of rapid prototype detachable ears made that would allow me to easily change the microphone capsules. You can see "Bob" my binaural microphone and listen to some of my binaural recordings at My Binaural Recording Web Page . Thanks so much for posting this example again! Bill Gaylord
-
I know it's not as attractive as an "onion butt", but here is an update on the ear. Tweaked it to improve the shape. The periphery where it would attach to the head needs to be simplified quite a bit to reduce the number of patches and splines to attach to. Mark, I have to say your ear has a much more elegant mesh to it. A lot of us would appreciate a tutorial showing how you put it together. Bill Gaylord
-
Here is my not so elegant attempt to create an anatomically accurate human ear (still a work in progress). Man! The human ear is a real puzzle to model! I would venture to say it has got to be the most difficult body part to model accurately. My hat's off to Mark Strohbehn and others who have shown us such beautiful examples! Bill Gaylord BTW, Ken, I like your toe design.
-

v12 cloth primitive car wash
williamgaylord replied to johnl3d's topic in Work In Progress / Sweatbox
Wow! I am impressed with how well the cloth behaves! Especially the collision detection. I don't see anything poking through at all as earlier versions of cloth were prone to do. Are there tweaks in the cloth setup that simulate things like air resistance? Bill Gaylord -
That cloth behaves so well! Man, AM is AMazing! I really look forward to animating with such cloth. John, your experiments give us unusually creative glimpses of the potential AM has. Bill Gaylord
-
I love the format. Sort of like sequential art with animation! Very fascinating. Look forward to seeing you develop an new project based on this approach. Dhar, you probably need to add the Divx player: Divx free download... Bill Gaylord
-
Mark Strohbehn has made the best realistic human ears I've seen posted so far: Mark's Work Bill Gaylord
-
Marshmallow Safety Film
williamgaylord replied to williamgaylord's topic in Work In Progress / Sweatbox
Just to be really mean and make many of you jealous...This is my outdoor studio! I've carved out some time to work on the Marshmallows today. The weather is absolutely fabulous!
-
Great first project! Great way to get your claws wet...I mean...feet wet. Actually sounds like you've had wet feet already, abeit, with other 3D tools. How do you like modelling with splines? Bill Gaylord
-
Like da monkey! One suggestion on the wind animation...maybe his ears could flap in the wind a bit... Bill Gaylord
-
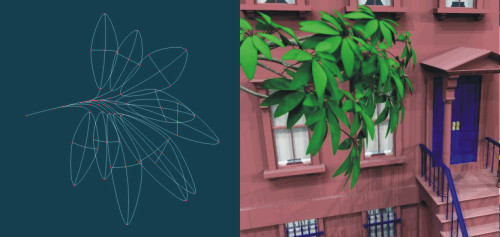
Another thing to notice is that the branches tend to spread out somewhat horizontally toward the ends until you get to the leafy branches that tend to stand up and out. The leaves sort of follow a curved surface as though they were cascading up and over the ends of the branches. There are of course leaves farther back, but most of the leaves are concentrated toward the ends. The leaves also face mostly up and out, rather than facing in random directions.
-
Ever since AM hair, probably yes. It's a wonderful way to add leaves to a tree! A lot less labor intensive than making your own! For my trees I actually build the leaf clusters. In this case I am animating trees growing from sprouts to full grown trees. I tried hair for the leaves, but discovered that the hair does not grow very smoothly...the decals jump in size in large increments so the result is very "poppy". (I'll have to try the latest version to see if it still does this.) I build leaf clusters using a very simple leaf design with only four patches. This allows me to give the leaves a nice curl. You can use a decal on this simple leaf surface to get any shape leaf you want. To reduce the patch count further, I use splines rendered as lines for the leaf stems. It is very labor intensive!
-
What kind of render time are you getting when you include the leaves? Here is a picture of a fully grown version of my tree:
