Slipin Lizard
-
Posts
204 -
Joined
-
Last visited
Content Type
Profiles
Forums
Events
Everything posted by Slipin Lizard
-
I'm trying to post both the project file zip, and the PDF file that I made explaining things, but my first attempts resulted in too large a file. Robocat, if you can get the zip, just open the project and from the images try and add a new decal. The project will open with the right modeling window open all ready to go. Hopefully I can post both the project and the PDF. I'll try the project zip first. Decal_Problem.zip
-
Getting the feet wet in A:M...
Slipin Lizard replied to Kelley's topic in Work In Progress / Sweatbox
Looking good so far... you're experience really shows! Nice! -
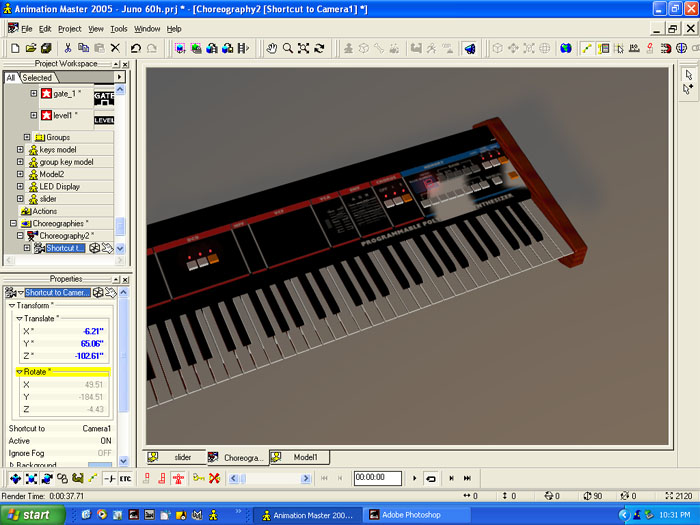
uh.... we're kinda of going backwards here. I realize its subtle as to what is missing, but put it this way, I could put a HUGE decal on the model at this point and it wouldn't show. In my earlier post, I said I was hesitant to put up a screen capture because how do I show the fact that the decal is "not there". Now I'm getting advice like "if you really are sure its missing".... FELLOWS! I am sure!! Its not the camera angle! Notice the HUGE WHITE BLOB on the far side? That is there regardless of the camera angle. I have tested this using: -different decals -different camera postions -different render settings -different file types for output -deleting different decals and replacing them with other ones... its not the decal, it the number. Take one away, I can add one, take two away, I can add two. While I appreciate you're trying to help, this is frustrating. I knew when I rendered out the whole model, someone would say to render a close up. And if I rendered a close up, someone is going to post "show us the whole model". Of course I already tried different camera angles and was only rendering the problem area, same result. This is why I didn't want to post screen captures in the first place, we're talking about something not showing up, so I have to show you "nothing" and you're supposed to see something. If you look carefully, at the second and third pics, all the white information and lines in the middle, between the colored blocks, there are two very small decals missing. To get an idea where, they are hidden by the little pop-up in the first picture. I don't think 20 or more decals is "a lot". Not for 3D graphic work. I tried moving all the files over to a different system, same problem.
-
The result is the same with or without Photoshop being open at the same time. I've gotten the same result many times over, this last time I had Photoshop open to save the screen captures, but the result was identical to before. If you're curious about the "missing" decal, take a look at the first image. Right where the little pop-up text box is, is where the decal goes missing. You can't see it in the first pic, the pop-up hides it. You can see it in the second and then missing in the third. Thanks for looking. The result is consistent, so how and what do I report to AM? I am abandoning this project for now. Many of the decals are condensed. Remember, with all those labels and stuff its still only 19 decals in all. For instance, all the colored blocks and white segment lines are all one decal. I wonder if that's part of the problem, because technically, all these decals are going "on top of" the main decal of colored box sections...
-
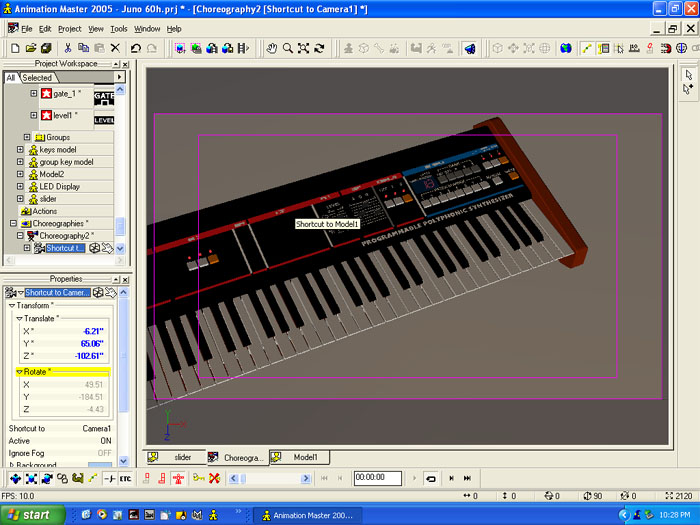
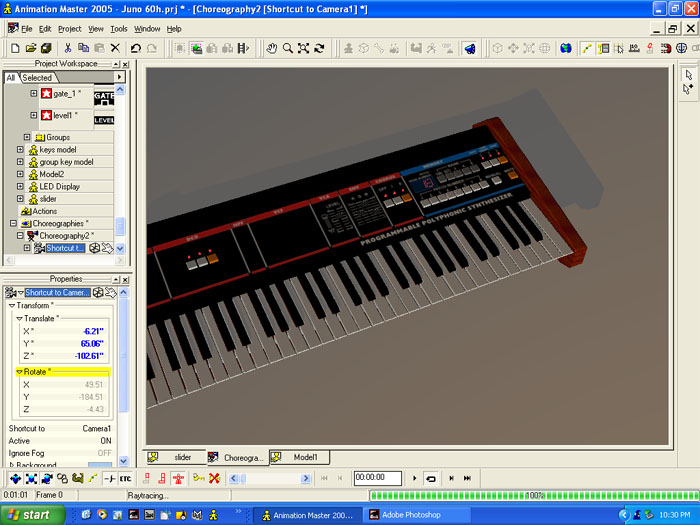
Ok, I'm lost here. This is what I know. I'm using about 19 decals. If I add more, they won't show up in the final render. I can switch decals. So, in other words, I can delete a decal, and a different one in a different spot, it will still work. Here's the strange thing: when I use render lock mode, all the decals show up fine. So I can go past my "limit" and using render lock mode click the screen in choreography and all the decals appear just fine. I am going to try and post screen captures. Assuming I'm successful, here's what you'll be looking at. 1) the model un-rendered. 2). the model rendered using "render lock" mode. 3) the model rendered hitting the "render" button. I've tested this by outputting to a Targa file and an AVI, get the same result. For the last pick, its obvious that there is something up with the white blotchy parts, but also notice that there are a couple of decals missing. They are the white little lines and words that say "ENV" and "GATE". render lock mode: .....

-
Just browsing, but that little pick you made for your avatar is just great noewjook, I really like it, a lot! Now, can you guys go find my decal posting and save me from my own AM hell?
-
Thanks everyone... Vern, yeah, I would like to consolidate the decals, but because the Illustrator and AM Master dimensions don't even come close to matching up, its very difficult if not impossible to do. Problem is, the decals are more than cosmetic, they are labeling button functions and such. But ideally, I would have made the entire "decaling" in Illustrator, so that I could simply apply it as one decal in AM. Its good to know other people are using more decals without difficulty. At least I know its not a program limitation. I tried using stamps in areas where there were multiples of the same decal, and this resulted in some really weird smearing effects, almost like when a CP is wildly out of place. I think what I'll do is transfer the project to another computer and see if it reaches a limit. If not, then it probably just means like Vern said, that its too much for the comp to process. Funny thing is the model came out really nice, its just decaling that is taking all the time now. Again, thanks to everyone for your input, it really helps. I better go watch the Super Bowl!
-
Thanks for the suggestions. The limit max drawing time was not checked in the options. Still the same problem. I can apply the decal to the model, and see it applied in the modeling window, but it doesn't show up in the final render. I currently have 20 decals applied to a flat surface. Decal 21 is a no go. I'm not going to get into posting screen captures for two reasons: 1) there's nothing to "see" the decals are there in the modeling window, and in Choreography, but don't show up when I render it out. Keep in mind, I've successfully applied 20 decals, so I understand the basics of how to do it. 2) the computer I use on the internet is not the one I work on, so its a bit of a pain in the butt to transfer screen captures. I'm going to do a test on a different model, and see if there is a limit to the number of decals I can apply to a single surface. Again, thanks for trying.
-
Is there a limit to the number of decals I can apply to a model? I'm doing a model of a music keyboard, and its pretty decal intensive. I've reached a point where I can still apply more decals, but they will not show up in the render.
-
Just a word of caution about using the TSM or TSM2. If you've got lots of rigging experience, then don't read any further. But if its all new still, just wanted to mention that The Set up Machine isn't just a simple "click here" and your character is perfectly rigged and ready to go. From what I understand, it makes rigging a whole lot less work, but you still need to know how to rig the chraracter properly. There's lots of guys that use it, and love it, so I'm sure its a good investment. However, still being new to AM myself, I made the mistake of thinking, "ok, I'll use the TSM2 so I don't have to learn about rigging". Wrong. You still have to set things up to work with your character, and if you don't know how to rig, you'll be lost. If you're new to rigging, I'd learn to rig from scratch, and once you have that down pretty good, then go ahead and get the TSM2 which will make the process a lot faster. Not putting down the TSM2, just trying to give you a heads up that its not an instant fix, or a by-pass to learning about rigging. Good luck, and lets see your character!
-
All those tutorials, including the two Dark Limit is suggesting, are not only helpful, but really vital in gaining understanding of how CPs and Splines work together. However, I don't mean this the wrong way, but I don't think UGP is making a good suggestion (or sense?)... The ")(" splines? Not sure what he means, possibly a cryptic reference to CPs with more than four splines coming into them. Regardless, hitting the "/" after selecting one CP simply selects all CPs that are connected in any way to the first, so if your model is a unibody, it will select the whole model. Why you would then want to set your Alpha and Gamma to 100 in an effort to avoid creases is beyond me, it will most certainly create them. Just do those tutorials, and then keep practicing modeling. Keep in mind that spline modeling takes a little getting used to at first, but once you figure out how CPs and Splines work together, and how to make the Alpha and Gamma work for you, you'll find that its pretty easy and fast to create just about any object you want. Here's a couple of tips for you: -save your work after any major success, but especially just before you delve into some unexplored splinemanship territory. This will allow you to experiment, and if things go wonky, you can quickly just revert or reopen the last saved version (I do this ALL the time). -in modeling and working with splines, try to avoid doing a procedure "just because it works" but without understanding why. Its sometimes hard to not just push on, but try to understand the why, and then you'll be able to fix problems when the occur. -if you're working on a patch intensive model, and you are trying to figure something out, see if you can figure out the principal of what you are trying to do on a seperate model. Experiment on something risk free, then apply what you have learned to your project. -you might want to check out Anzovin's "QuickStart 2" CD, its great, and covers a lot of these issuses. Same goes for David Rodgers book "Animation Master 2002: A Complete Guide", the opening chapters on modeling are excellent, but also he is coming out with a new version soon, so you might want to wait for that one. www.anzovin.com is the Anzovin website. Oh yeah, and most people miss this one, but learning to build the primitives from scratch that come AM is also a great way to learn, too. Good Luck!
-
Dhar's right, we need to really see a wireframe to know what's actually happening, but at the bottom of your model I don't like the look of those edges... Creases can happen for various reasons, but my guess here is one of two problems, or even more likely, a combination of both. First off, make sure that no more that four splines intersect one CP. So if the CP represents the "intersection", then you don't want any more than four "roads" converging. Another thing that can cause creasing is the alpha and gamma settings of the CP. When you're modeling and moving around CPs, attaching, unattaching, repositioning, etc, you can end up with some pretty strange values for the gamma and the alpha. These are basically the settings of curvature coming into the CP. It's almost like a having a piece of flexible plastic or tin foil. If you try to shape it by using gradual, smooth bends, the shape will stay smooth, but it you try to bend it really agressively, it'll crease. Remember the CP is a fixed point in space that the computer draws the splines to. If the path through the CP is simple and clear, the junction will be smooth. But if you get to drastic of shifts in direction, you'll be more likely to create creases. Don't be afraid to do your model, or part of it, once, then keeping that as a "safe" copy, start from scratch all over again. You'll be surprised how often you do it much better the second time round. For the Gamma and Alpha values, click the "show info" button top right toolbar. With practice, you'll intuitively know how to avoid creasing in Hash, and your modeling will be much easier. It just takes practice. To take a screen capture, open AM up, display the model in wireframe, and then hit your "print screen" button on your keyboard. Now open up any image program like Photoshop or whatever (I think even Word will do) and create a new file. You'll see under the Edit menu you have the option to paste. Do so, and your screen capture should appear. Size and crop as needed. EDIT: Two people responded in the time it took to right this thing... people are on the ball today!
-
Do you want my "master" title? If you can find a way to swap, I'll happily go back to being "newbie" again. I have no idea what's going on...
-
Actually, the "action safe" and "title safe" shouldn't be the cause of your problem. They are just arbitrary guidelines that let you know that anything outside of their boundries may be cut off when viewed on certain television sets. Thus the terms "title safe" which is used for titles and assures that what is within its boundries will be seen on all TV sets, and "action safe" which is basically saying it's really unlikely to be cut off on any TV set. Any editing software should not be looking at the title/action safe areas, I've never heard of those regions being encrypted with a video file when rendered. I think the issue is that somewhere along the rendering chain, your aspect ratios are not matching up. When you say its cropping on the sides, it almost sounds like the video file is being transcoded as 16x9 for the DVD. In other words, the DVD authoring program is saying "we're going to make a 16x9 widescreen image", then when it gets your video file it recognizes that it is a 4x3, and thus crops the sides to keep the image looking normal. It can be a little tricky when going through different programs to keep the aspect ratio correct all the way through the work flow. Does the image look squashed? stretched? These are indicators that the software is interpreting the video file in a manner you do not want. A bit of a check list: -check your intial render settings and pixel aspect ratio. -play the rendered file on you computer, does it look right? -if you are using a non-linear editing program before importing to DVD, check those render settings, and look for options such as "maintain original aspect ratio" sometimes considered an "advanced" option. -in the DVD software, what are the transcode settings? The DVD software will be set to some sort of aspect ratio, find out what it is and make sure its the same as your video file (in this case, 4x3). -some DVD authoring programs let you preview the DVD before you burn, again, check to see that the video looks normal. If all else fails, you can do a circle test. Just do a short, say 10 second animation of a perfect circle, sitting motionless on your screen. Then run the animation through your work flow until you find where it gets distorted. This will at least let you determine which software/process is culprit. One of the things I love about the Adobe suite, is that from After Effects, to Premiere, to Encore DVD, it all works together seemlessly so this issues are a lot less frequent and easier to fix.
-
The animation looks fluid and smooth. Something doen't feel quite right about it though, and I think it may be just how realistic the movement is. It seems strange to me that he intially sort of leaps forward, then goes into a crouch, then jumps into his kick. Its as if his forward momentum is arrested for a moment, then comes back on. I'm guess here, but from what I know about martial arts I think that a: you would take your eyes off your opponent and b: leaping into a crouch like that and ducking your head down would probably cause you to fall forward in an unintentional summer-sault. Are you basing the move on something that is real, or just making the move up in your head? It just seems like the physics are weird, but that's just me, it might be fine.
-
Gary, not sure what the problem is, I think you need to play around with it some more and get the hang of how to manipulate things in the timeline. I just tried my own advice, and it worked no problem at all. What I did is this: Dropped Shaggy into choreography, created a new path and constrained him to it; added "Resolute Walk", default is 1 second, I stretched it to 3 seconds to get a slower walk; wiggled his arm at frame 0, at frame 3:00, and then set a new position for the arm at 3:15. Lastly, I open the dope sheet and make sure to set the path to the same duration as the resolute walk action. It works fine, Shaggy walks up and then stops, immediately reaching up for the door. It takes awhile to get the hang of animation, just using the interface. I would recommend you try some simple stuff first, and get the feel of knowing you've created a channel and are setting keyframes at specific points in time. If you're nudging stuff around in the Choreography, and just hoping that a keyframe is being created at that point, then you're not going to know what's going on. You need to know how to look at the graph in the timeline and confirm that keyframes have been created where you want them. Later, you'll want to manipulate the curve of your keyframes, to make a ball bounce realistically for instance, so its good to get the hang of using the graph right away. Hope that clears things up a bit, I don't know.
-
I'm not super good at animating, but yeah, you need to do what's called "creating a channel". So whatever part of the body you want to move later in an animation, you need to estabilsh key frames for earlier if you want to hold it in place at the start. It sounds like you've got the right idea, and once you play around with the timeline and see the channel created for keyframes as you place them, you'll have a good grasp on what is going on. The "Animate" CD's from Anzovin are pretty helpful with all this stuff.
-
Hey Gary. When you have this problem, what is happening is that a key frame isn't being created where you thought it would be. So when you hit "force keyframe" you thought that there would be a keyframe created at that time, and the original at zero, so that his hand motion would stay the same up until that point, and you could now start a new movement. What you need to do is kind of think backwards. Go to the frame where you want the hand to start moving, and adjust it to its begining position. Just moving it around a little will create a keyframe. You can even "nudge" it with the arrow keys up one step, then back down, or side to side so it creates a keyframe without actually having changed position. Now go back to frame "0" and make sure that the hand position is where you want it, and check the animation between those to keyframes, your hand should not move. Now you can jump ahead to where you want the hand to move up, position it, and you should have the desired result of the hand holding its position, then moving to the new one. It really helps if you have the timeline window open, and know how to create keyframes in the timeline itself. Create a new choreography, and import a simple primitive from the library like a cube. Now, make the cube do ONE type of action, say move from one side of the screen to the other on ONLY the X axis. If you open the timeline window and see the graph below, you'll actually see the keyframe you created. You can click on that keyframe and move it up or down, changing its value. You can select a different frame in the timeline, and actually just click to add a new keyframe and again, set its value by moving it up or down. Play around with a simple primitive like this first and get a feel to how the time line works. It really helps.
-
I think AM can do what you're looking for, its correct that you can import curves from Illustrator up to version 8. Remember though, the program can only interpret so much, so its sometimes better if you break the logo down into its basic elements and import them one at a time. I think AM will do what you want as well as any other program, but you might find the learning curve a bit steep at first as you are dealing with a full 3D application. Once you figure things out a bit, you'll probably find it pretty straight forward to do your logo animations.
-
I don't know when David's book is due out, but I bought his "Animation Master: A Complete Guide 2002" book and its been really good so far. The tips he gives about modeling early on in the book are great, and the tutorials have a nice flow, make a lot of sense and are easy to follow. I'll be getting his new book for sure when it comes out. The Anzovin Quick Start CD has some really good tips on it too.
-
This is where I went wrong too when first trying to animate in AM. Everyone is giving the right advice here, but this might make it a little clearer. As best as I can tell, if you want to animate something in Choreography and you haven't animated it thus so far, clicking the "make a keyframe" button won't create a keyframe (the exception to the rule seems to be tranlating the root bone, or entire object, as a translate channel is created for this when you drop the object into choreography). Your approach was totally correct, and you're trying to make what is called a "hold" keyframe, essentially telling the computer that from 0:00 to 6:00 you want Shaggy's head to hold its position, then move between frames 6:00 to 6:10. However, because, as both people who have responded indicated, you didn't "create a channel" for Shaggy's head so far, the computer just starts animating his head from the beggining. I think where you went wrong is that you thought by clicking the "make a keyframe" button a keyframe would be made at 6:00 that had the same value as frame 0:00. A great way to get a better handle on what is being animated is to use the graph editor in the timeline. Instead of wiggling things around to try and create a channel, you can just click to add a keyframe directly in the graph on the channel you want, when you want it. You can even adjust the value by simply moving the keyrame up and down in the graph editor. I actually find this method almost easier sometimes, as I don't have to worry about creating unwanted keyframes on other channels, and you see the keyframe created right in front of you so you know its there. Sometimes it helps to work backwards when planning an animation. For instance, you could go to frame 6:10, move Shaggy's head into the postion you want it to be at that time, go back to frame 6:00, set the rotation values back to zero, go back to frame 0:00 and make sure his head rotation values are also at zero. If you get lost or muddled, I find it really helps to just save your project, then close it, open a new one and then play around with a simple cube or something, and figure exactly what you need to do, then go back to the excercise. Hope this helps!
-
If it doesn't end with Frosty's head getting lobbed off, I'm going to be terribly disapointed.
-
It would be good to see some of your work since as its hard to compare what you can't see. I agree the audio tends to be crux on a lot of projects. People can find audio fx and music, but a solid narrative track requires talent, good equipment, and a quiet place to record it. People may not have access to these resources, but your point is valid. Usually in animation the voice talent is recorded first, and the animation set to it and not visa versa. As for AE, I use and love After Effects as well. But it really comes down to what you are trying to accomplish. Some projects may allow a user to stay within in the realm of one application, while others are better served by utilizing other programs that may be able to do a certain task more easily, or just simply add an element not possible with other software. A lot of comes down to what you're familar with, and how efficient you need to be. A couple of examples I've noticed recently is first, creating 3D text with AM. While AM has a Font Wizard, there are certain fonts that have issues, and will not be created smoothly. You can work with it, and eventually sort out any issues, but there is also a program out there called "Cool 3D" which, while being totally simplistic and almost cheezy, actually creates nice 3D text with no issues at all, and has much better options for beveling than AM's Font Wizard. Another is Carrara 5, which if you need to quickly create a landscape, is just unreal. I've rendered out some terrains from Carrara and they look fantasic, and its pretty much instant. Now, if I delved more into AM I could probably come up with similar results, but sometimes a different program is just more efficient at one particular task. It's my understanding that AM was designed as a character animation program, and I think it does this very well. It offers a lot of easy to features for a very competitive price. For some, the one program is enough. In the end, its really not about which program is better, but just getting you're ideas out there... so lets see them!
-
I think he looks great! Exudes a lot of character already. Are you going to animate him? It would be nice to see a pic of him where's he's larger. Looks good though. Nice work.
-
In your Project Workspace right click on the folder that says "Images". Select "Import -Image/Animation" this will open a window where you can navigate to the file where the desired image is. Select this, and click "Open". The selected image will now be available in the Image folder in the Project Workspace. If you don't see it, make sure you've opened the Image folder by clicking the + sign. With your model window open, just drag and drop the image onto your model. AM will prompt you to select "Decal" or "Rotoscope". You want to select "Decal". Now you can move and scale your image until its placed where you want it over your model. When you're ready, right click and select "Apply". The image will still be selected, and it will appear that nothing has happened. However, by clicking on an empty space in your modeling window, and then hitting "t" for tumble view, you'll see that your image has been applied as a decal to your model. Remember that this type of decal application only applies the image to the parts of the model that are seen in the modeling window. You can change the type of projection of your decal in the properties window. A very useful technique to learn is how to "flatten" a model in an action window, and then apply the decal there. This allows you to apply the decal to all parts of the model. For example, if you wanted to wrap a decal around a rectangular box model like a book cover, you could flatten the box in an action window, and apply the decal to the front, spine, and back, all in one go. Finally, a great (really great, in my opinion) feature of AM is that you can just as easily apply a video clip as a decal. This makes it easy to have a video file actually playing on your model, and looks really cool (try making a little TV set, with an image playing on it).