Sacman
-
Posts
409 -
Joined
-
Last visited
Content Type
Profiles
Forums
Events
Everything posted by Sacman
-
I have a 7 month old. When he was first starting to sit up. all he ever did with his hands is pat himself on the leg over and over and over and... you get the point. Even now he still pats things. That is just a thought. Other than that he tends to hold his hands together and just twist them around against one another interlockinghis fingers and such. Looks great, Wade
-
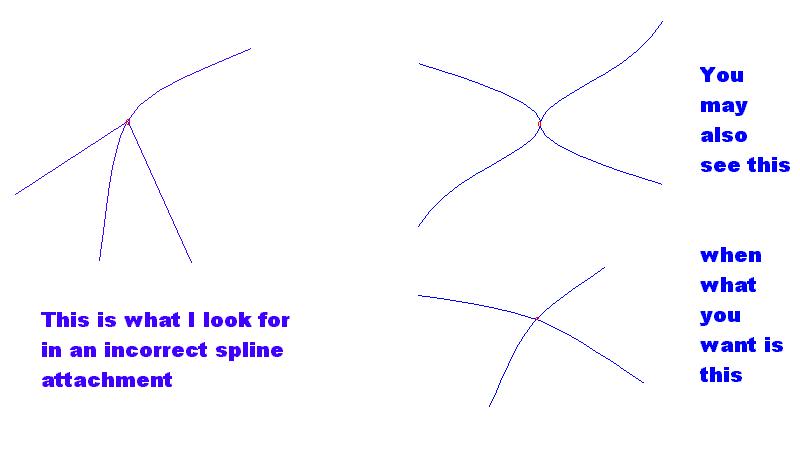
To continue the thought about the 2 splines entering and leaving the CP the way they are supposed to, I was getting horrible creases and lines until I finally recognized this problem. I still find myself having the problem often but now that I know about it I can fix it. Of course, the real question is why I keep creating them. Anyway. The way I find them is to look for abnormalities in a shaded and shaded wire frame view. If I see anything untoward, I will grab the cp and move it in extreme directions to see the bend in the Spline. It should make nice curves in both directions. If the spline looks peaked in one direction, then they are not connected correctly. With some trial and error I was able to find that you can usually get away with disconnecting the effected spline one side at a time leaving the good spline intact. This also maintains the integrity of the location. Then reconnect the two offending ends to each other and finally reconnect this completed spline to the original good spline. Sometimes the offending spline connections will be very obvious. Like I show in my crappy Microsoft Paint example on the right. These kinds of problems usually require a break and reattachment versus a simple disconnect and can often lead to problems upstream if you do not make the new connection carefully and correctly. If you did not need this info then ignore me. Thanks Wade

-
And another...
-
Take a look. Except for some minor tweaking I believe I am done. <1000 patches and will withstand close and long shots. Critiques please. This is done directly off a photo. I rotoscope the base but had to freehand the bulk of the hand gaurd. Thanks Wade
-
Can you link us to this tutorial. This looks great. If you were able to get here from his Tut, then I need to check it out. Thanks Wade
-
Here it is.
-
Can we please, please, please see wireframes?
-
Very nice. I can't wait to see it tricked and animated. Have you noticed that you can see the right front wheel through the grill? If this is on purpose I can't wait to see the hot chick models that you are going to make that get behind it and push the car at rip roaring speeds. Wade
-
You are making me ill. Those models are FANTASTIC. I love the style. I agree they look like a photo of some WizKid's characters mixed with some Final Fantasy. WOW! and again WOW! I think the importance of the post being about the skylight is lost. Maybe you should post some of my crap with your early skylight rig so that you can show that off instead of the great models . Wade
-
The more I think about this the more I think you would have to script something like this to get the randomness that would make it worth while. The problems I see are as follow: The end hair guide must be constrained to something. I would assume this would be a surface constraint to allow for the maximum flexability in movement. However, to constrain to a surface you have to use a bone. I don't even know if you can add a bone to hair guides. Adding a bone would then take away the ability of the force to affect the hair guide. Or so I would assume. I do not have V11 so I am only guessing to some extent. So Maybe the best answer is to just manually animate and give us a render. Then there is the possiblilty that I am totally wrong and it is just a matter of making sure the forces you are using are inside the glass ball so that the surfaces of the globe are not interfering with the forces. *shrugs* keep trying I wanna see this animated. Also there is the possibility of using the sprites along a path option that was discussed just a couple of days ago here in the forums. Luck, Wade
-
Are the forces inside the globe?
-
Lol, I have a Mini Cooper S and I don't think that the spokes on my wheels are even that thick. I think the wheel looks great. What about displacement maps? I don't have any real knowledge of them, I only know their basic function. I suppose that the edge surface would have to be VERY patch heavy to allow for displacement maps. Just a thought, Wade
-
How about a couple of forces with turbulance. And give us an animated render. This should blow the hairs around which would give a great impression of the flickering light in the ball. Wade
-
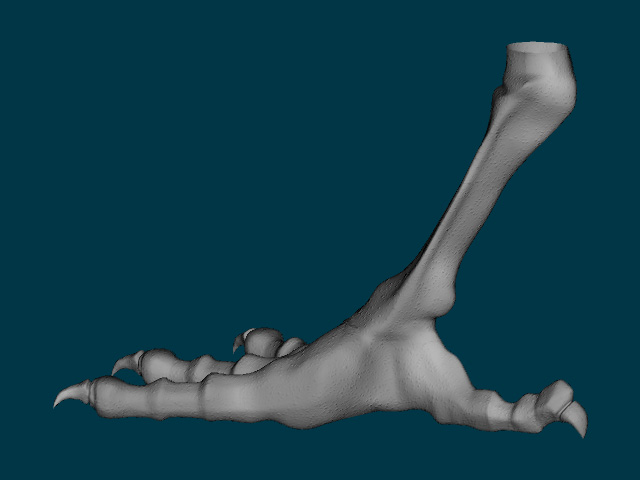
Thanks for everyone's help. I finally got it down to just a few 5 point patches and only two creases. As Vern said the creases should be hidden in the texture/decal. I had to add some geometry both on the leg and the front three toes. Instead of leaving 5 point patches there however, I continued the spline to the top of the leg and to the end of the toes. It adds extra patches but ultimately I think it worked well. I believe what I am going to do is use this as a higher detail close up. when needed but do a much lower patch count model for more streamlined rendering on shots where this detail is not needed. This all relates to the post I made in the Main discussion forum here: Digital Elevation Maps. Now my computer crapped out on me. I have everything backed up on CD thank goodness. So I am posting at work. I do not have a finished foot to show. I will wait till I have more done.
-
Ignore anything that looks bad at the bottom of the foot. I know how to fix that and just haven't. The problem areas circled in green are the ones giving me fits. I figure my two options are to add geometry or use hooks. I have not the faintest idea how to use hooks so I am leaning towards adding geometry. The problem with that is that it is at a crucial bending point in the model. I am going to look for a way to add the 5 point higher up on the leg and let 4 points cary to the foot so that I can avoid 5 point patches at the bend point. Any direction or advice would be nice. Thanks in advance Wade
-
That being said I am till having some problems with part of the top of the foot. I have several areas where I have 5 splines going to one cp. This is not good and leads to some ugliness. I have not rendered a wire frame yet but i will in the morning. I am thinking this is a good time for hooks but i have never used them and I am hoping for some help. Here is a shaded view of the problem area. I will post a wire frame in the A.M.
-
So far only a foot. I spent hours today trying to clean up the area where the 3 'toes' join the leg. I learned a lot that I had missed in my attempts at inorganic. The biggest problem I ran into that I finally figured out is how the areas that I joined using splines weren't joining correctly. I tried many different ways to get it to correct but I would have one axis of the CP curving like it was supposed to and the other axis was not. So I tried to delete/break splines and replace them. I have been under the impression that the direction that your attachment spline is going is critical. However, this did not appear to be the case. What I finally had to do was disconnect the CP's for each of the four splines coming into the cp until I got the two that were not curving. Once I connected them together I could connect the 2 sets of 2 easily and everything worked out great. Had I known an easy way to ask the question I probably could have gotten an answer here and saved myself a ton of time. Either way here is a rear 3/4 view with a simple texture so that it would not be boring. I am using another's model for rotoscoping.
-
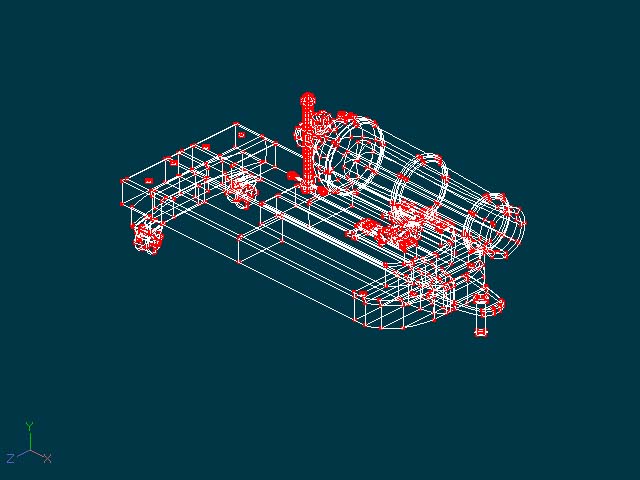
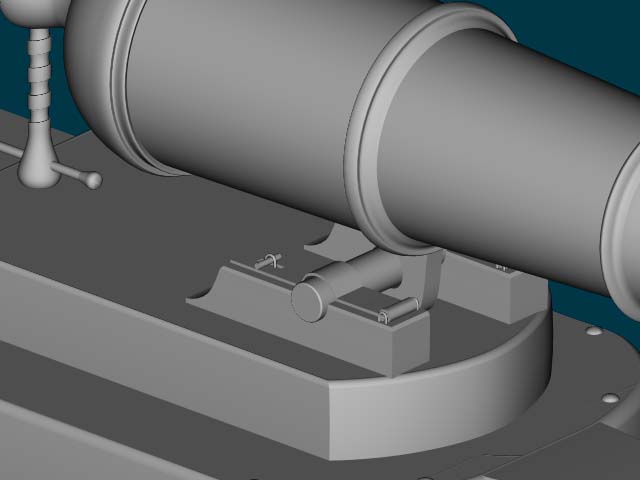
It's a question of weight. The rear weighs more. That is what keeps it in position. the screw on the rear is rotated to adjust the elevatin. I have a nice looking cast iron texture that I have applied. With some weathering effects it would be realy sweet but that is currently beyond my skills. I also don't have the wood grain concept down. Eventually I will texture it unless someone that has that skill set wants to take a stab at it. I will gladly share the model with anyone as long as they promise not to laugh at some of the questionable techniques that I am sure will arise once someone with skill sees the mesh. Thanks Since I am psoting again I will throw up another pic. How bout a wire frame:
-
One more pic to show a little close up detail. lease note the crazy artifacts at the lower edge of the picture. I am aware of this but only now do I know how to fix it. Wade
-
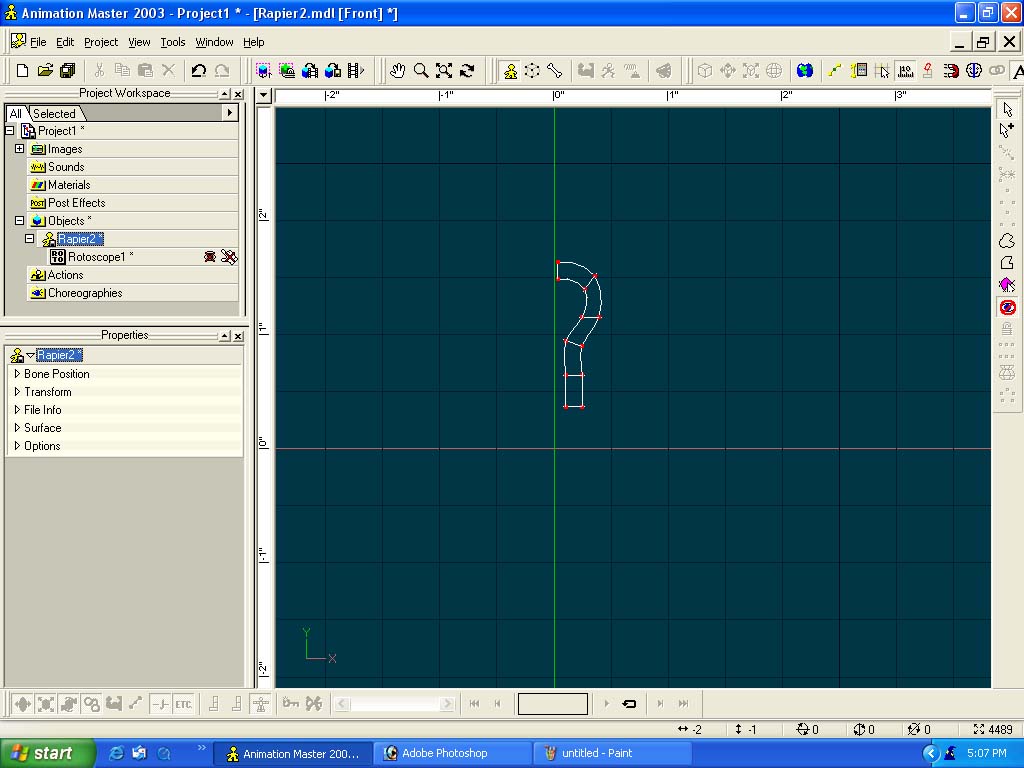
Now that I have finally figured out how to post a picture.....I will post my first true model. I did this some time late last year and have had no time do to much more than troll the boards. However, as luck would have it I just ran across a copy of The Animation:Master 2000 Handbook with the CD still in it at a local used book store (Mckays for Will Sutton and anyone else in or around Chattanooga, TN). It was only $6.00. Even though it is for version 8.0 and I am using 10.5, so many of the things that are in there still apply that I feal like it is Christmas. I get to play with my new toy again and actually have a clue what I am doing. Back to my gun. I did try to post this last year but couldn't post a pic and had some problems with the link to the web site I put them on. So....here it is. A 32lb Carronade of the type that can still be found on board the USS Constitution in Boston. My bevelled edges could use some work and I am afraid to check patch count. I have some more pics if anyone is interested and could put up a mesh if anyone wants to see it. I also have pose sliders assigned that allow for movement in all the relevant directions including the rotation of the jacking screw as the gun changes elevation. Comments and critiques please....
-
I agree. All of your showdown entries are top notch. I think his is one of the best. I watched it about 15 times. I think what really stands out is the head attenna movement. I think this is the kind of detail that really makes your animations top notch. To be able to put that much focus on the details in such a short time is outstanding. I am very glad to see that you aften win these competitions. Keep it up. Wade
-
Ken: I have been trying to post pics as attachments for months and it will not let me do it. I understand that you should go to the bottom of the post page to the 'Attachments' section and browse for the file. So I have done that. However, when I post it isn't there. I don't know why. I have sent email's to several on the staff there and they tell me the same thing. It just doesn't work for me. I have done so yet again for this post and lets see if it works. Jon: What a great explanation for the boat/ship question. HA!!!! I figured it out. I think!
-
I was in the Navy some time ago and was on board a guided missle cruiser (USS Bainbridge) for 3 years. This is a great job! I know you said you are going for a simplistic approach but the basic shape is fantastic. I like it. One thing though. It is a ship not a boat. In the Navy a boat is a Submarine. I want one, Wade I would post a pic but for some reason I have never been able to attach an image. So i put a link in instead. It is a grainy crappy pic but it works.
-
Caricature - can you tell who it is?
Sacman replied to thekamps's topic in Work In Progress / Sweatbox
Awesome Kerry head. Now get him rigged and do some shots of him debating himself over all of his flip flops and pop it off to Fox news or Hannity.com. I'm sure you could get some good sound bites off the internet that would be considered public domain. In fact I am almost certain if you rendered in the correct format, you may even see something like that on the air one night. I would watch and cheer. If you are a Kerry supporter then please ignore this post. Thanks Wade -
The weave could probably be done with a bump map easier han anything else. I have been working on a similar engraving problem with one of my models and have just about settled on bumps due to the complexity. Good luck Wade