RS3D
-
Posts
142 -
Joined
-
Last visited
-
Days Won
2
Content Type
Profiles
Forums
Events
Everything posted by RS3D
-
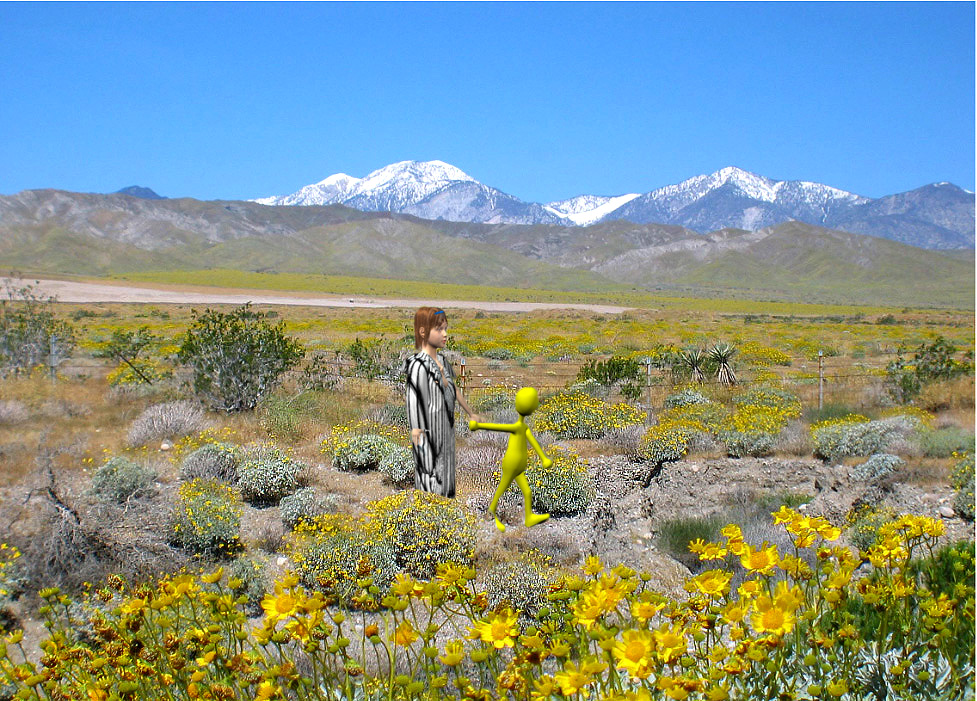
robcat2075 Posted Sep 14 2012, 07:45 PM hmmm... the girl and thom don't seem to be casting any shadows on themselves even though the light appears to be from nearly overhead. That's what i notice ---------------------------------------------------------------- I tried to create more contrast by changing the top down lighting to be stronger and decreased the bounce lights that I used to light the front of the models. This results in loss of some detail in the image characters but seems to make the scene more realistic. Rodney Posted Sep 14 2012, 07:54 PM The voice in my head tells me to say... It would be nice to gain a little more feeling of depth than what we are seeing here. Compositionally this would have the background fading to a lighter hue while the foreground would be darker. -------------------------------------------------------------------------------- I de-saturated the top half of the background image and blurred it a little. It did seem to add depth to the scene. Is this one frame of a sequence? --------------------------------------------------------- It is one frame from an animation. But before I re-render it, I wanted to get more realism in the choreography. Added: A trick I have used to get different elements not from the same source to match better is to add noise over the top of everything. ------------------------------------------------------ I tried different hazy materials on a front plane, but the changes in lighting seemed to be enough to get the characters to appear to merge with the background. I will look up the source you cited and try some other changes when I get some time. NancyGormezano Posted Sep 14 2012, 08:26 PM For me, the self shadowing on Thom (and other character) is too soft, compared to the dark, sharp shadows on the plants. And it does not appear that Thom is casting any shadow on the ground. The self shadowing also seems to be "wrong color". For my taste, I would also say that the color of Thom is not as saturated as the colors in the background image, so it looks odd, unbalanced. Something to try to make the colors look more consistent: use Image based lighting, and use the background image as your source. The colors on the models would have a better chance of blending in (would have to try to see if so). EDIT: This may not suit your taste, but I made the global ambiance color more orangey, to make Thom more match the bright sunflowers in the bright sunlight, and the shadow color on the flowers is more consistent with Thoms self shadowing. We now have Thom with dark black shadows on the ground. The ground is flat shaded, front projected & there is only 1 white klieg overhead casting shadows. It could use some tweaking. I tried using your image for the Global IBL, but it didn't do what I was thinking it would do. I thought the orange global color worked better (for my taste). ------------------------------------------------------------- I tried using the image based lighting, but I kind of gave up trying to get a better effect. I'm sure it is a good way to go, but I just do not have the knowledge to make it work. I did use the global IBL with an orange color. This, combined with the lighting changes kind of made everything blend better. I still would like to get the effects you suggested with the shadows on the Thom character, I tried different processes, but again I do not have the knowledge to pull if off effectively. ================== I think this new image is better (more realistic), but I seemed to have lost too much detail in the characters because of the shadows. I think I will have to work on some of Nancy's suggestions for changing the lighting characteristics in the shadows to restore some of the detail.

-
That was really good. I especially liked the little subtle face expressions by the band members. Things like that set it apart. It must have been a lot of work. Animations that take 30 seconds seem like a lot and yours is over 2 1/2 minutes.
-
Thanks for the excellent suggestions. I will work on them this coming week and post the results.
-
I have been working on getting the lighting correct for compositing Hash characters into photo backgrounds. This can be tricky sometimes because you have to take the entire scene into account in selecting the lighting. Please look at the attached image and see if the characters appear to be be part of the background image.
-
Thanks for posting those. I will play with them when I get some time.
-
When people move their head to music it seems as though they move it more forward and back (head bobbing) to the music. Yours is more side to side. Maybe you could try to get it going forward and back and see how that looks.
-
Looks a lot better. Are you going to put in some face movements? With that music intro, I would like to see that he is serious about getting ready to rock and roll.
-
Something that might help is to exaggerate his movements more, especially his head. Since he is a cartoon character, you can really go big and it will still work.
-
One big thing in dealing with polygon based models is to look at the size of the model ( either 3DS or OBJ). If it is more than about 1.5 meg for OBJ or more than about 300-400 k for 3DS it is probably not worth the effort. I have converted a few of the OBJ models at around 1.4 meg in around 5-10 minutes. After you do that, you can look for the parts that are the big space hogs like spheres and other curved surface items and copy them to another model, where you can work on them by using them as as a rotoscope to help in replacing with the Hash primitives that will look the same and require about 1/100 the amount of space. By replacing (copy/paste) the original parts with the new Hashified parts you can start to get the model down to a size where you can work on eliminating most of the triangles. As far as textures go, sometimes the textures work with the converted model and sometimes they don't. It seems like around 50-50 chance they will work automatically as a result of the conversion. However, if you look at the groups section of a model, you will notice that the groups tend to be parts of the model that correspond to the textures that come with the model. Then it is just a matter of importing the texture into the Hash project and reapplying the texture to the proper group just as you would for a standard Hash model. I hope that is helpful.
-
I have been experimenting with some of the game models available at http://thefree3dmodels.com. There are over 1,000 models there, most are in OBJ and 3DS format. The site is free and the models download pretty fast. Because many of these models were used in the game industry, they are set up to be efficient in terms of detail. They are much smaller than the usual file sizes for these formats. It is interesting to see how they were put together to maximize the ease of use and texturing processes. The included textures alone are worth examining the models. I got interested in one of the face models because of its simplicity and the way it takes decals without too much distortion when used from various viewing angles. I have attached some pictures showing some of my experiments. The first one shows 4 different faces, all made with the same face mesh. The 2nd, 3rd and 4th picture show how one of the faces looks from various viewing angles. This model is just the face mesh (+ my own hair model), with a decal slapped on it. I also attached a MOV of the helicopter pilot showing how the model holds up in an animation situation. I did spend a little time on the helicopter pilot model. It has a bump map and specular map in addition to the color map. I think I can get it even better with a little more work on the decals. duri2save.mov
-
I use your stuff all the time. Thank you and have a happy birthday.
-
These are excellent observations. You are correct about the problems in the walk cycle so far. However, the real problem is that the legs never reach a fully extended position. If you look at almost all walk cycles, the front leg extends straight (or almost straight) in the first frame and then again at the point where the hips are at their highest point (usually about half way through the cycle). As Robcat's tutorial points out, the leg actually is straight a little past the half way point in the cycle. The problem I have with the current model/bone rigging set up is that, when I keyframe the straight legs, the animation shows rather noticeable knee popping. You can look at previous posts from Robcat explaining the need for either changing the rig to a more sophisticated one or trying some other tricks to get to where I can use the straight leg position. Rather than changing the whole rig and model set up, I have tried to come as close as possible to the straight leg position without causing the undesirable popping action. This means you either raise the hips or raise the foot to try to compensate. Raising the hips looks worse than raising the foot. What you see in the first frame is the cheating the problem by raising the foot off the ground by about a keyboard click. This allows the hips to continue down for a couple of frames after the first frame. This helps give the feeling of weight to the walk cycle. The straight leg problem also comes up again in your second point, that the legs appear to be moving at the same time. Because I have to use a bent leg position, I have to compromise between bent leg/flat foot and bent leg/bent foot positions to try to overcome it. (I hope that is clear). I am afraid at this point, I am looking for a believable walk (per Mouseman's post) rather than a perfect walk.
-
If I understand you correctly, are you saying that the rear foot in the first frame of the animation should rest on the toe rather than more toward the middle of the rear foot?
-
Do you mean that the foot should bend more as the heel is lifted off the ground? I have attached a side view of the walk cycle. Please indicate where in the video you think the problem occurs. 110510Side.mov
-
Here is another update to the walk cycle. This one uses more up and down movement of the shoulders that are the opposite of the orientation of the hips. That is, as the right hip rises, the right shoulder lowers and I used the opposite sequence for the other side. It softens the walk at bit and seems to make the model more feminine. I also added stride length control. I used kinematic constraint to a null to control the head and it seemed to do the trick for this application, although I plan to use a suggestion from Robcat to see how it might work. I also attached another small sample of a front view of the walk cycle showing the shoulder movements. 110510walk.mov 110510Front.mov
-
You really mean the orientation, right? The head bone is attached to the neck and spine and has to move with them. you can isolate the rotation of the head (or probably better, the neck) by Orient Like constraining it to something higher in the hierarchy than the spine hones. The first spine bone is a likely target. I tried adding a null to the bone list and constraining the head to it as a kinematic type of constraint. This seemed to do the trick for what I wanted to accomplish with the shoulder movements conflicting with a relatively steady head position. I will try your suggestion also.
-
I forgot to ask if anyone knows a way to lock the head bone position while moving the upper back bones. The head bone is a child of the upper back bone in the model. I want to lower the shoulders in sync with the raising of the hips, but then the head follows and creates head jerking because the head follows the upper back. You can try to re-orient the head, but it is very difficult to get right. In a walk, there is some movement of the head but humans have a way of keeping their head steady despite moving other body parts. I hate to disconnect the head bone from the hierarchy if I can avoid it. I also tried putting a null in the model and constraining the head to it to see if it would override the bone chain, but it has not worked so far.
-
Attached is another update of the walk cycle project. This one changes the arm positions to be closer to the torso during the cycle as suggested by Mouseman. I think this was a improvement. I also re-instated the delay in the arms coming forward at the start of the cycle that was originally suggested by Robcat and I thought I had fixed, but as Mouseman pointed out, it needed to be more prominent. I also got the feet to be a little more stable. Definitely not perfect, but better than before. Mouseman also thought the feet seemed to be rushing toward contact with the ground on the forward foot in the stride. I intentionally made it this way because the Robcat walk tutorial clearly shows that the back foot stays back in contact with the ground longer than you would think. This causes a slight off-balance position at a point a little past half way and the front foot has to compensate by coming down faster to maintain balance. I think the relative speed of the walk has a role in this timing. If the walk is slow, the foot doesn't have to move so fast, but in a faster walk, it does have to move fast. The female walk cycle I referenced in a previous post can be found by searching YouTube for Female Standard Walk. It gives a side and front view of a walk cycle, including start and stop. It seems a little exaggerated, but it is still helpful. Robcat caught the fact that I had to use a different hip position on the 2nd part of the walk for one of the key frames (what an eye!). For some reason, the model seems symmetric, but I get knee popping on one side and not the other for the same position on the opposite side. I am not smart enough to figure out why, so I cheated and just raised the hip by one key click. I did not think anyone would notice (I was wrong). Once again, thanks to everyone for the suggestions. 110508walk.mov
-
Thanks for the observations. The child is basically there to show contrast with the adult. At the speed the little guy is traveling, it is almost a trot. One thing I learned is that you cannot rely on the action window to see what the walk will look like in a choreography. The changing camera perspective, etc. have unanticipated consequences when you see the walk from all different angles. I need to soften up the foot stomping a little bit. I am learning that the walk cycle is a gold mine for subtle changes and timing differences. I wanted to get the mechanical things done first and then start things like making the model more feminine, etc. I found a female walk cycle on YouTube which seems to indicate that in female walks, the hips are almost never level, they swing up and down for more than a couple of frames and this affects the arms and also the upper body, which tries to compensate by offsetting the extreme hip swaying. I should be done with this in about another year or so.
-
I completed another update of the walk cycle. This one incorporates the following changes: -delay by 2 frames before moving arms forward/backward from their extreme positions so as to not be directly in sync with the legs -eliminated all the frames that had completely straight legs because of knee popping issues -bent upper back forward a little bit -on lifting foot, pointed the toe straight down in the middle of the passing frames -held high point of the hips for 2 frames passed the mid point of the cycle -held low point of the hips for 3 frames at start of the cycle -increased the walk cycle from 29 to 32 frames in order to allow move time for coordinating hip/leg interaction I attached a 32 frame video showing the walk from the side and another full version similar to the others that were posted. I still think there is some floatiness in the feet, but overall the walk seems to be looking better. Unfortunately, I have had to increase from 7 key frames out of 29 to 12 key frames out of 32. 110504Walk.mov 110504WalkSide.mov
-
That's a small detail compared to the larger one that the whole body appears without mass because it is not moving down when it should. Here are some observations: RS3DWalkNotes.mov On the rig problem I mention... you can constrain the IK foot control to a null placed a the heel of the foot and animate with that heel null instead and that will substantially simplify the situation. The AM2001 rig also lacks a way to raise the heel and leave the toes in place. You will still have to animate around that. For future characters i'd recommend using one of the more recent rigs that are on the forum and avoid the hassle. Alos... I forgot... download that clip of me walking from my screen cam page and watch the arms. Real arms are not in sync with the legs. The front arm doesn't start back until a few frames after the front leg has started moving back. The rear arm doesn't start moving forward until a few frames after the rear leg has started moving forward. Exact synchronization makes things look mechanical. I appreciate the response very much. I went through the video you sent and it is very clear what needs to happen to clean this project up. I also implemented the suggestions on the arm movement and I think the delay in the 1st couple of frames of the cycle has already improved the look of the walk cycle. I think that the delay gives an indication of apparent motion that some of the other people in this thread have pointed out. It is not the amount of motion but the timing of the motion that is the issue. I already implemented most of your recent suggestions, but there is definitely a problem with the rig. I found out you cannot switch between IK and FK in the same action. (Is this the way it is supposed to be or is it something else?) I will post again as soon as I figure out how to stop the knee popping that continues to be a problem.
-
I have already done quite a bit with the shoulders and hips. The problem is in trying to have them work correctly with the various delays in the leg straightening cycle to move toward a natural kind of flow for the walk cycle. The walk cycle is not symmetric as far as leg straightening goes. This has caused me to change out quite a few of the original keyframes to try to make the leg straightening proceed as in the RobCat tutorial/video. Some people have pointed out there should be more arm/shoulder motion, but I think it is more a question of the timing of the motions (hips, shoulders, arms) than it is of the amount of the motion. I am trying to work on the issues raised by RobCat in his recent response which are all excellent suggestions but a little difficult to implement with the current rigging set up for the character.
-
Here is another update on the walk cycle. This one includes more hip roll(up and down) in the model and incorporates some of the points in RobCat's tutorial on walk cycles part 3. Specifically, that the toe of the foot never lifts more than about an inch off the ground (just enough to clear the toe) before moving forward to the next heel contact point. The only problem I see is that the model's walk is progressively starting to resemble RobCats personal walk in his demo video. 110428Walk.mov
-
Can you show a bit of this? I'm not sure what you mean. If you look at the 110416Walk2a.MOV on my April 20 posting, you can see that the leg has a bad little jerk at the knee. This was when I was trying to delay the start of any movement of the hips moving upward by two frames. I tried to compensate for this jerkiness by finding the best compromise for the point where I could delay the hip from rising as best I could, while eliminating the jerk at the knee. I am beginning to think that a 29 frame walk cycle may not be enough. It may have to be extended a few more frames to allow transition between key frames to smooth things out. In general, I am trying to minimize the number of keyframes as much as I can get away with.
-
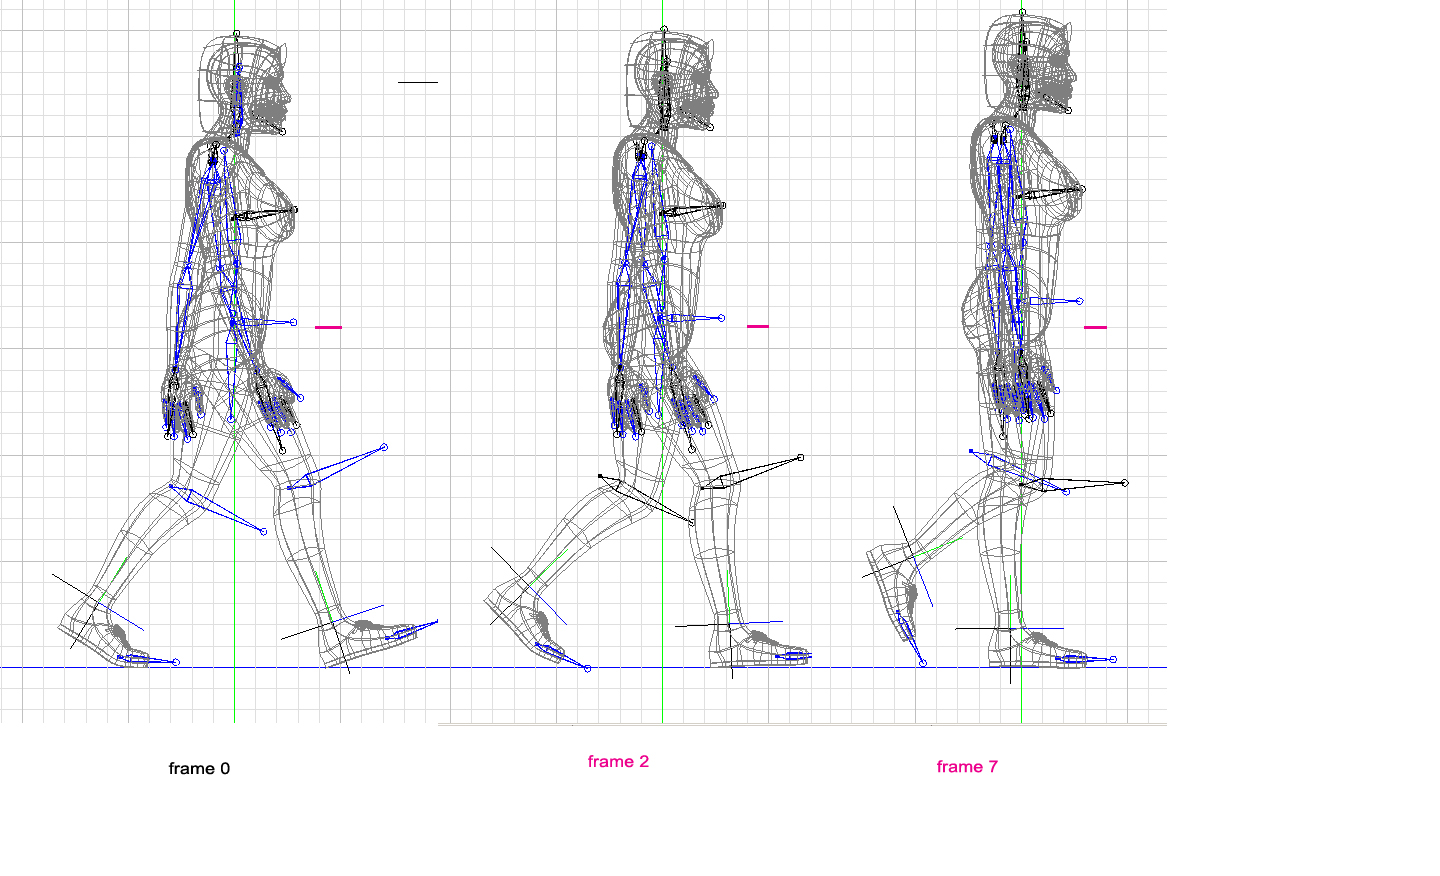
First of all, thanks for the feedback. I have attached a jpg of the 0th, 2nd and 7th keyframes. If you look at the difference between 0 and 2 there is very little lift in the hips there and what is there is necessary to reduce the snap in the leg as it straightens out to get to frame 7. Adjusting it is tricky. If I hold the hips down at frame 2 to exactly the same level as frame 0 (or slightly lower), there is a definite unsightly snap in the leg. I have the same problem you seemed to have with the Knight model in your tut on blocking in the key poses. That is, the adjustment you try to do by dragging the bones is too coarse to get the transition exactly where you want it. Does it appear in the animation that the body is lifting more than is indicated in the attached .jpg?