svetlik
-
Posts
298 -
Joined
-
Last visited
-
Days Won
6
Content Type
Profiles
Forums
Events
Everything posted by svetlik
-
Thanks for the help robcat I'll give that a try, much appreciated.
-
Does Netrender get angry when you have it running and minimize it or switch the monitor to watch cable? It was running fine on the desktop and I switched the monitor to cable and when I came back all the nodes were offline and the messengers disconnected. After much vulgarities I found there was AM running in the Task Manager, even after I had shut Netrender off and once I ended the task I was able to use Netrender again. So, that's my question-can you NOT minimize Netrender or switch your monitor to something else whilst it's running er whut????
-
Yes I've read about the light list in the manual but havent tried it yet. I'm a terrible lighting technician. Thanks.
-
HAHAAAAA GOT IT!!!!!! Found the little imp!!! Twas a light casting a shadow! (altho kinda liked the shadows but oh well) Thanks robcat, dave for responding. Very much appreciated. Please let me know if there's anything I could do for youse!
-
No, it doesn't happen in a new chor. Great. So I guess the search is on for what's causing this in the current chor. I'm open to any suggestions of course.
-
Additional note; also removed any materials from the geometry so it's only the decal that's coloring the shoes.
-
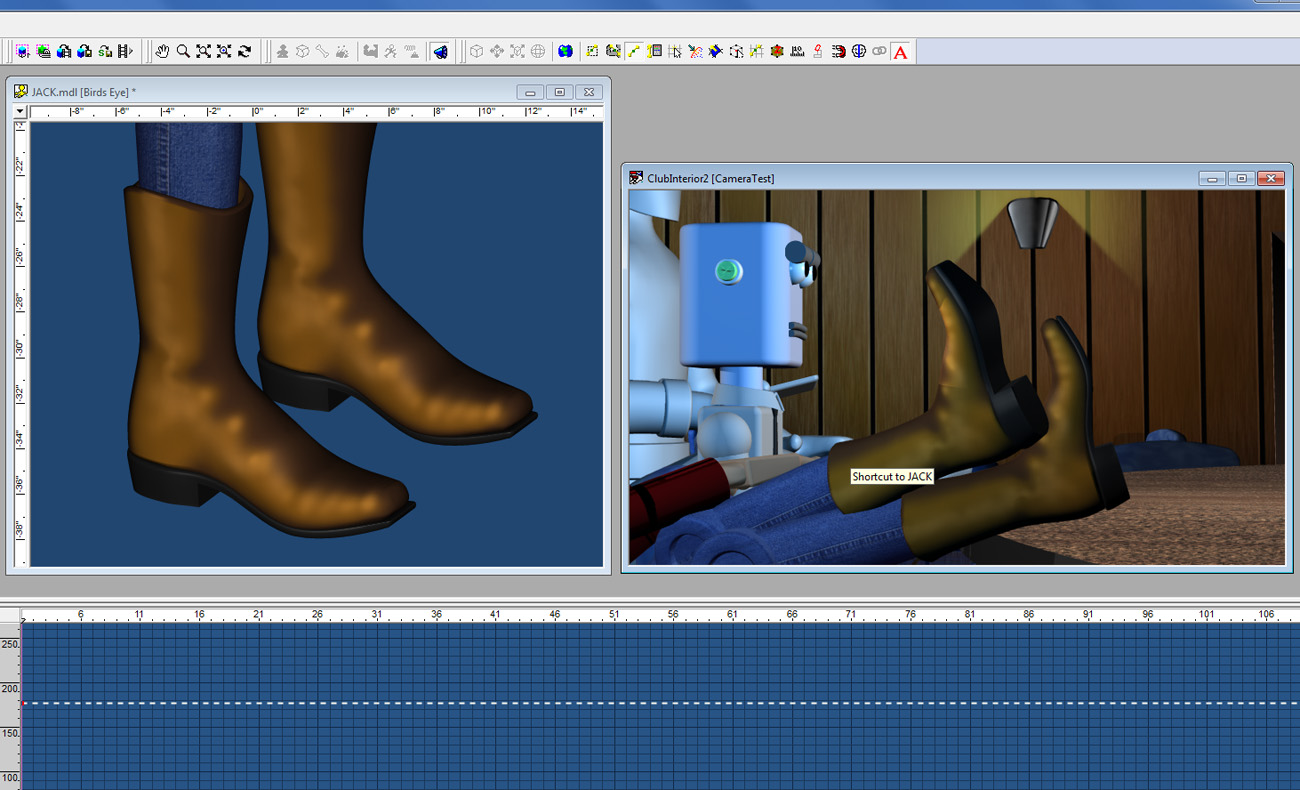
Bogus Boot Biz Back Again! Ok went thru and deleted the old maps, deleted the decals, made a new map image, checked the normals and it's STILL THERE!!!! This model is also saved to disk and used in 2 other chors but after checking they are the correct new decals. Renders fine in model view. Have run out of ideas to pursue. Wouldn't care if his feet were under the table or far away. Just want to finish my opus here, anyone else ever run into this?

-
Also thanks for responding as well David. I got it figured out.
-
Yes and yes my friend. I had given the boots a material and then applied decals at 80% opacity. Why? Don't know as I built these models 10 yrs. ago and then to make matters worse I had changed the size/shape of the boots so no wonder it got funky. Although AM is real forgiving when you move the CPs around after decaling. So I re-applied the decals and all is well, thanks for responding Robcat!
-
Everything checks out but yet this decal is rendering chopped off like this in the chor. Any help appreciated.
-
Robcat my AM ninja rescuer! Yes I hit the spacebar of all things and it popped back and yes I had copied the entire folder to back it up and move it so I must've left some crumb behind. Thank you so much for responding my friend, I very much appreciate it.
-
Anyone run into this besides me? Lots of work lost if there isn't a fix. Any help appreciated.
-
Yes checked the Task mgr. None of those were running. I had deleted the shortcut on the desktop awhile ago cuz I never used it but didn't touch anything in the Hash folder in the Programs dir.
-
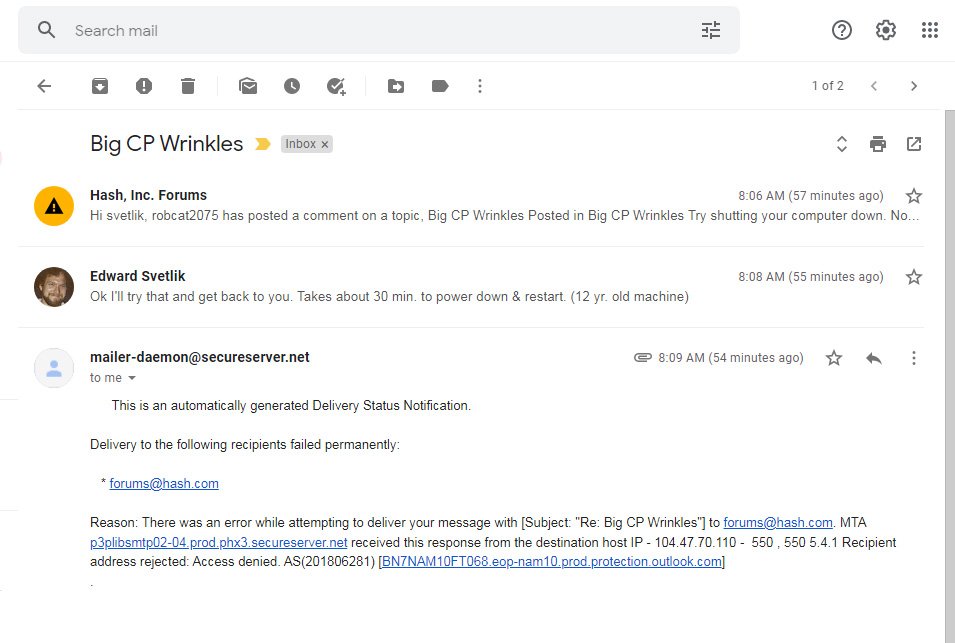
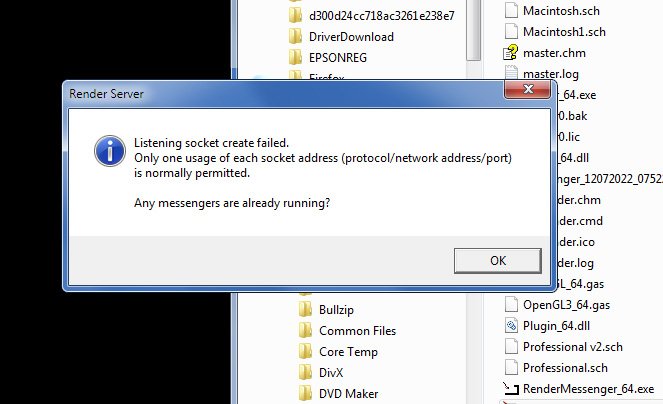
Haven't been able to reproduce the CP wrinkle reliably. Even now it isn't doing it where it was before but have been trying to replicate it with the same model in a test chor. but no luck. So far it's still random. I'll bring it to the next Live Time I guess. The Netrender issue - I'm clueless. If that error message I posted doesn't make any sense to you then I surely don't know. Thanks for all your effort.
-
Also, if you have any suggestions regarding ways to speed up my machine I'm wide open to any and all advice! thanks
-
Machine's been like that for years, wish I knew how to speed it up. I use Avast virus stuff. The emails I get from the forum must happen because I turn on the "follow topic" toggle at the bottom. And since my new forum identity is linked to my gmail address that's where they go as my sbcglobal.net email can no longer get emails from the forum. Why? Don't know but whatever you did at least fixed my forum ID and enabled me to get notices at my gmail. Am constantly getting annoying ads from Avast that my performance is crappy because of all this shit that's running that I can't turn off but for more money they could fix it. So I don't gots more money so it don't gets fixed I guess. Anyways back to the Net render issue that I can't seem to get to work, why? Don't know. That last error message that I just posted was whut I got when I tried to run it.
-
Ok, now I can't respond to the forum from my gmail. Gee I wonder what will go south next??? Anyways the relic is back up.
-
Ok that didn't work out. Shit does anything ever just WORK????? Apparently this isn't for idiots to try at home. Don't suppose you could walk me thru this?
-
Ok I'll give that a shot. Never used Net render before so I'll have to crack open the manual.
-
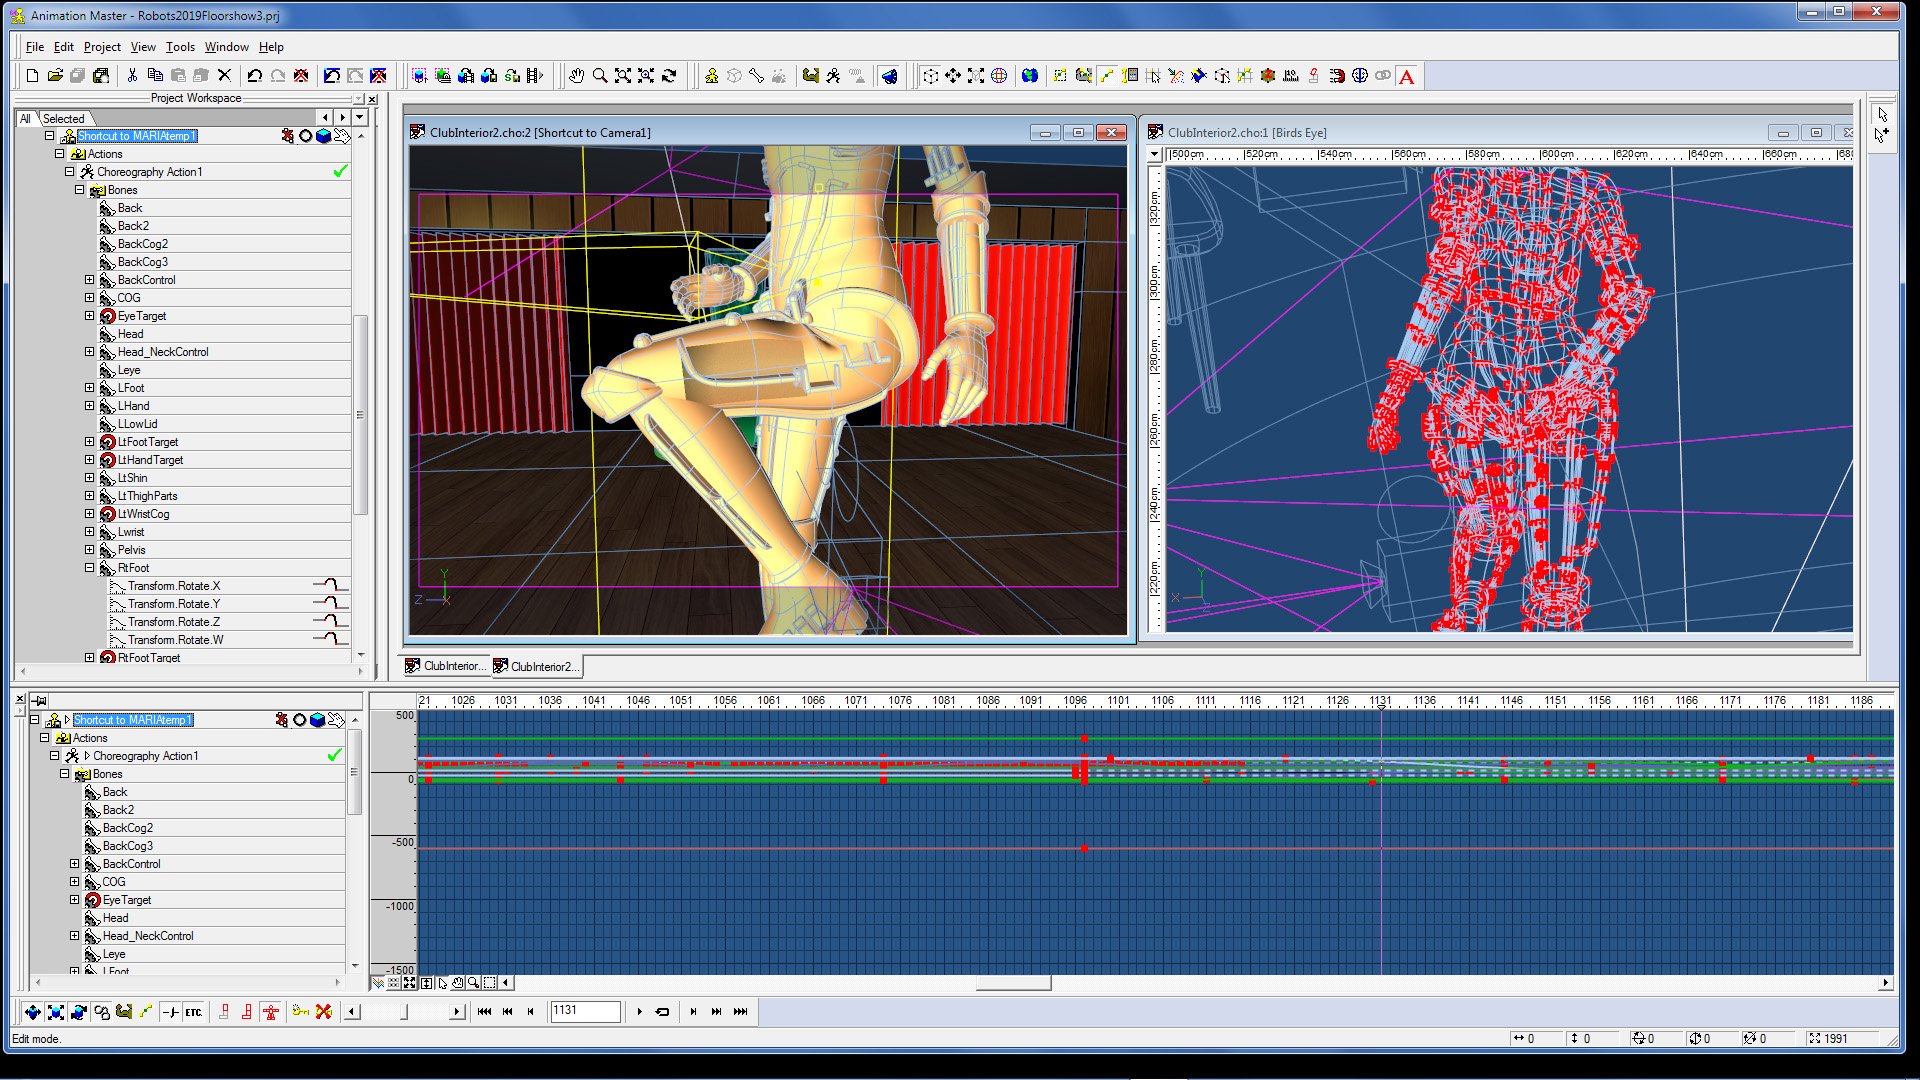
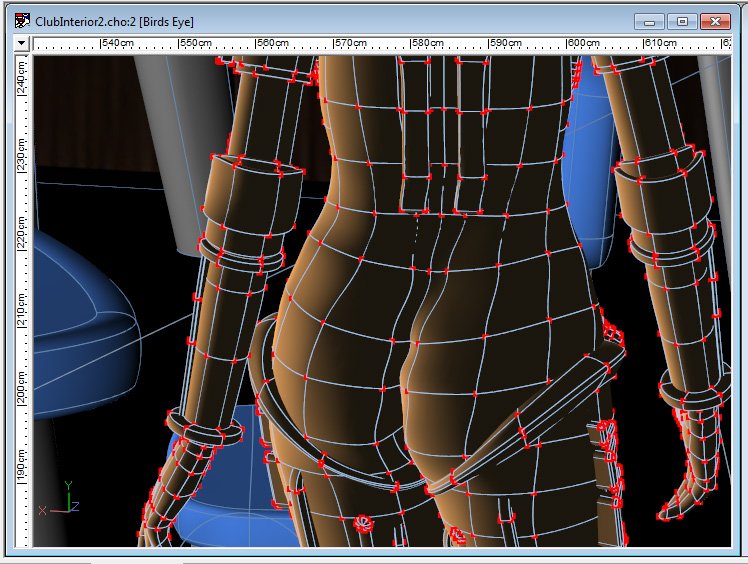
For but a moment my heart soared robcat-thought you'd found it but alas, upon trying again the rotate view tool had no effect with mine. Here's my layout as I'm working on it and I've tried with the model embedded or saved out, the timeline on/off and workbook mode on/off - no effect. I would leave the window on the left alone as it's a camera view and I would rotate the one on the right to view placements and such. Both windows are wrinkling. Although it seems to be only on CPs that are attached to fan bones. Quitting AM and reopening it fixes it for about a minute then the wrinkles return. I've made a Prj. file with the same model but can't get it to wrinkle but if I succeed I'll post it. I tried rendering out short sequences and the wrinkles are there in final rendering mode. This makes me really sad.
-
Ok but now I can't access the FTP site. What the hell is going on??????? Just a blank google page comes up telling me that google chrome isn't my default browser??????
-
Yes, looks the same in your sample above. I've even put the model in a Prj. file by itself to replicate the wrinkle but It won't frickin' wrinkle! ARRRR. Was hoping to replicate it and upload it here but apparently that's not going to happen, yet it's stil wrinkling in my Prj. where it started. I'll keep trying and post an update if I succeed. Thanks.
-
Crap I forgot that was today. anyway no cp weighting at all. Have never even messed with that yet. Just fan bones constrained to percentages of target bones which normally works really well until the wrinkling happened. Also this character is doing a lot of twisting and turning (it's what exotic robot dancers do) The models are saved out but have tried embedding and made no difference. I'm working on making a sample Prj that I can upload but so far haven't been able to replicate the problem but if I do I'll upload right away. Ya think AM doesn't LIKE me?????
-
CPs still wrinkling! Trying to return to the original problem before all of this password snafu. Seems to be happening only on CPs that are being constrained to move a percentage of a target joint & happens in Chor. & Action. Haven't seen it in model mode.(yet) Selecting CPs in muscle mode snaps them back to normal until frame is advanced then they wrinkle again and shows up in final render. Have tried all tricks listed in this thread and so far nothing has worked. The only thing that works is restarting AM but then wrinkling returns immediately upon frame advance/tweaking. As always ANY help appreciated.
-
This does show up in final render but haven't tried rendering out a whole sequence. This model is being saved to disk and the spacebar has no effect. This happens only in Action or Chor (haven't seen it in model mode) and seems to happen only after scrubbing/tweaking skeletal movement a lot. Seems ok after AM restart but will re-surface randomly.