


rusty
-
Posts
1,851 -
Joined
-
Last visited
-
Days Won
1
Content Type
Profiles
Forums
Events
Posts posted by rusty
-
-
Hi - I think I had this problem before, but did a couple of searches and can not find it... so maybe not. When I click on my character in the project workspace the "main" bone I guess it would be is huge and seems to get selected on accident because it is so large - can I shrink this down w/o shrinking down the character? It isn't the "root" bone - because when I click on that it is a normal size. Thanks - Eric
Regardless of what bone it is, to reduce its size you must open the model and within the 'modeling' window grab the end of the bone and move this toward the beginning of the bone. Do not put the bone in 'scale' mode or all children bones will shrink with it. If the bone is the 'model bone' (that invisible bone you get with all models), to select it, in the modeling window in bones mode and click on the model name in the PWS.
Hope this helps,
Rusty
-
To check out this , I need the model and the settings You are using (start the plugin with "write logfile" checked or make a screencapture from the settingsdialog)
Here's a model that will generate the extra bones and bone structures and also the settings I used to reproduce the problem.
Cheers,
Rusty

-
To check out this , I need the model and the settings You are using (start the plugin with "write logfile" checked or make a screencapture from the settingsdialog)
I'll get this to you ASAP.
Thanks,
Rusty
-
Select both cps and edit weights. Select the cp you want to copy to and delete the weight, select all cps and hit the balance selected button.
That sounds like just the sort of trick I was looking for!
Thanks!
Rusty
-
Hi,
Do we have such a thing as copy weights? Say I'm only working on the right side (don't need to mirror weights yet) and I can see that I will need to set another CP(s) like one I've already set -- is there a way to copy a CP's weights to other CPs?
Thanks,
Rusty
-
Hey, thanks for the replies but I think perhaps you lost sight of my exact question...
Does anyone know how I can straighten the hook shown below (adjust the bias)... without disconnecting it or anything around it? I'd rather not disconnect stuff and loose the decals right now.Or perhaps you thought 'you don't have to disconnect anything'... but the point is I don't want to disrupt the current decals and stamps. But that's cool. Its really a matter of wanting to do things in a certain order. I'd like to fix it now but I can wait. I'll address decals once I get a couple of other tasks out of the way and after I do that I won't care about maintaining the current decal stamp and can disconnect or add stuff and fix it. If that makes any sense. And yeah, its probably the dead end spline.
Thanks!
Rusty
-
When I use the mirror bones plug-in, it creates unwanted bones and bone structures (the ones indicated in red in the image below). I could not reproduce this in the simple TSM2 example -- if you need the model let me know.

BTW, this happened in the previous mirror bones version as well.
Thanks,
Rusty
-
well it does squash and stretch and i have 4 bones in the middle and one node, which lets it move its center in any direction. it deforms pretty well i think, but is it good for animation is what i'm not sure about...
I don't think too many people go to that much trouble squash and stretch a sphere but of course you can if you wish. And anything is good practice. I'm sure it is good for animation and I'm sure that you could create many different kinds of rigs to do the same thing. All is cool. Good work.
Edit: All the beginner classes and tutorials I've seen do this have all used one bone in the center. To squash and stretch they just selected the sphere in muscle mode then pressed 'S' to go into scale mode and stretched or squashed in this manner. There is also a very cool expression you can use that will insure that the volume of the sphere remains the same -- I don't know it off hand (wish I did) but the tutorial is on the Hash site somewhere.
-
Hi,
Does anyone know how I can straighten the hook shown below (adjust the bias)... without disconnecting it or anything around it? I'd rather not disconnect stuff and loose the decals.

Thanks,
Rusty
-
Hi,
I don't think anyone mentioned this but along with the other suggestions you should always have a middle-of-the-model spline which runs exactly along Y0 (and BTW, the front should face the front). This spline should be one continuous spline. It looks like you do not have this. The reason you want to do this is because normally you'll only model one side then do the copy/flip/attach. You do this so a] you only have to model one side (less work) and b] you want both sides of your model -- especially a face -- to be exactly mirrored. You can change this later (though I wouldn't advise it) but while modeling you want it this way. The reason you want your model mirrored exactly is because, among other things, all of the AM tools and plug-ins depend on this and you'll want to use these ('other things' include ease of flattening or UV mapping, texturing, CP assignment and weighting and, animating).
Many times you will model both sides for sanities sake or so you can see what you are doing but then you delete one side and do the copy/flip/attach. Also, say you think you are done but then find you have to change something... make the change on one side the copy/flip/attach.
Anyway... my 2 cents,
Rusty
Edit: BTW, one time a friend modeled a car but when he placed on a 'path' with the 'Path' constraint it was upside down and pointed the wrong way! The reason was he had modeled it facing backward and also had found the model bone and mucked with it. It is the model bone that aligns itself on the path and it is the model bone which aligns itself with the 'world view' in the chor and, when in chor view, determines the pivot of the model.
-
My daughter kicked the plug out before I could finish it but here it is. I still havent added cp weights, smartskinning or even comstraints although I am reading up on them. The animated lacks weight and the timing is off (things I was trying to fix before the plug was pulled).
Something seems off but I don't know what. The legs seem twined (they always move together) and, if there is a diving board, normally you jump and bounce on it before diving. The legs seem to jump at frame at one point. Oh, I know what is off... maybe... after the character extends its legs, the character does not rotate at the center of gravity but rather at the base of the legs. In truth, I'd have to look at someone diving to be sure.
Rusty
-
Welcome back 'mage',
Outside of putting a single bone in the center, I've never tried to 'rig' a sphere. Unless you had a particular reason for doing so (you wanted the sphere to do something more then squash and stretch), you wouldn't rig a sphere with much more than a single bone. Most people don't even add a bone to it -- they just use the 'model bone' which all models have as soon as they are created (its hidden, go into bones mode and in the PWS select the model name and you'll see it... of course rarely do you move or mess with it).
So, unless you want the sphere to deform and move in some way you would have no reason for more then perhaps one bone at the center so you could manipulate it from the center (the model bone is at the 0/0/0 coordinates or bottom of the model and is used for stuff like telling a path constraint which way the model should face and where the bottom is).
Cheers,
Rusty
-
Re: camera distortion, keep in mind that your eye distorts for the same reason. For your roto, you want a shot taken with the camera at a great distance so you can build an objectively correct model. But then you have to render it in a Chor with carefully chosen camera placement to see how it really looks. Shaded renders in the modelling window won't look right because our own eyes are used to seeing things with perspective distortion.
Very good point. Thanks!
Rusty
-
The biggest slow down of all is if you have other windows (model windows, action windows... any) open in the background.
r
-
"got no luck" = nobody would make exactly what i wanted for me.
http://www.hash.com/forums/index.php?showtopic=32135
-jon
There are MANY excellent female models on the AM disk and the two extra disks. I perhaps don't understand what you want.
Rusty
-
The reference drawings are wrong that's for sure. Maybe you could join a life drawing club and other than being an excellent way to develop skills, very often the models don't mind if you take a few photos. The way to get around distortion is to take the picture from a distance and zoom in. This flattens the image.
This of course is the proper course and in a way I have... I just have to make the time for it (between writing and animation). But I'm also an engineer by nature and reducing things to digital formulas and structures, if not really 'art', is always a desire, a trait and even a habit. I do need to get back to my sketching tutor and the lessons we started -- I very much enjoy it.
r
-
I think to a very good degree this illustrates why animators adopted 'Squash and Stretch' and 'Exaggeration' as fundamentals with regard to animated bodies. This is no doubt why more cartoons have been used than realistic humans over the years. You can get away with more with squash and stretch in imaginary characters.
Vern hits on an excellent point with the camera's view/perspective.
For some poses we may need to break the model's rig in order to get the proper effect of foreshortening.
We may often find poses where 'reality' doesn't look right or where something not filmed realistically looks somehow... better.
I think this is why I am attracted to the cartoon form over more realistic rendering/porportions.
In its own way the exaggeration makes a lot more sense to my brain... with stylized exaggeration I immediately accept that what I'm seeing is 'real enough' and I suspend my belief and move forward into the story. Going too realistic reminds the brain that what it is seeing is created with a computer and that can break the storyteller's spell.
The roto you've placed next to the character has considerable exaggeration however even for a line drawing. That first one has very 'superheroic' porportions. In order to get closer to that (I think) you would have to break with realism. (go with the flow.., chart your own course... break the mould)
From what I've seen of your characters thus far I can see you've strived to reach a good degree of realism in your work and I'd say you've achieved considerable success there. Keep it up!
Thank you for the kind words Rodney. My turn of the century 'million dollar idea' to produce animated book trailers has been my singular goal these last eight years. I have not IMHO reached a marketable artistic state yet plus I've had to face the fact that although I may achieve the technical and artistic level needed eventually, I don't know how to do 'the rest' (take it from pipe dream to reality... get investors, start a company, sell the idea, protect personal exposure, etc.). There's also the fact that my wife and I are comfortably retired, we don't need money and I'm not really anxious to return to the realm of deadlines and stress (not hungry).
But, LOL, I digress... I'm still pushing forward and its fun if nothing else.
r
-
At some point you have to... go solo... you have to let go of the reference and... use the artistic side of the brain.
A problem with photo references at least is camera distortion. It can be subtle but a "real" camera is not like the display in AM. AM is "flat" everything is the same scale no matter how you rotate. With photo reference even the slightest rotation completely changes the reference points... they will never line up. Not as big a problem with body proportions I suppose because they are closer to the same position. Another problem is slight changes in angle from one reference to the next. A slight tilt forward can completely mess up reference points.
Another problem is the rotation pivot points of the bones or limbs. If after creating a model based on reference or lengths of limbs and you put the rotation of a joint in the wrong spot it won't be correct. Finding the proper pivot point is crucial.
Yet another thing is what the body does when it rotates. I noticed from the original images that in the drawings there is all kinds of bending and shifting of different body parts. These small things can change how the parts relate to each other. If the back bends a little when the character bends over, the back gets shorter. If your model doesn't have a gradual bend of all the bones in the back it won't match the reference.
From what I could see you are pretty darn close... a bit of tweaking and you are almost there.
-vern
You've hit the nail on the head with all points Vern. I thought I was at the point were I could 'just do it' but the virtual actress model Monique who appeared in the Horrorthon trailer knocked me for a loop -- well after completion I noticed that her forearms were 'too long'. Instead of making any kind of physical correction at that point in the Horrorthon project I hid this defect with camera angles and scene staging. I then became determined not to make that mistake again and I'm now perhaps extra sensitive to this.
r
-
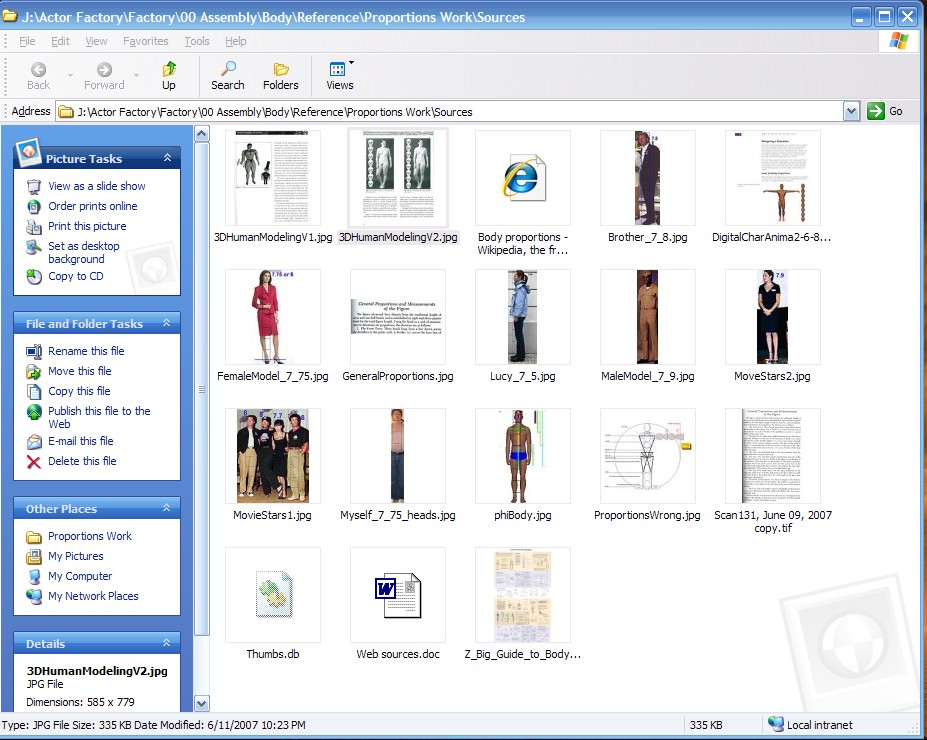
Thanks for all the responses and all the info! The source used in my posting was actually the only one that I hadn't used before rigging. The examples I used from it, to the extent I could tell, matched my own body.
BTW, I litterally have every source I could find on the Internet -- enough to make you crazy because they do not all agree.


Mostly I used myself to double check the sources I found that did agree (for the most part) but, even doing this there were inconsistencies. Believe it or not, even if I try go strictly by my own body I run into problems and things don't look right! I think its a case of trying to digitally measure an analog system (no pun intended). Meet one requirement and another fails... plus, you tend to lose your 'control' or starting reference point (you have to have one part you say is correct and use this as a starting point). I finally settled on what I thought was the best combination, checked this against myself as well as other people I had pictures of and a few months ago I posted this as a guide to average body proportions. At the end of the day everyone is a little different.
Despite my pre-rigging efforts, somehow I still managed to mess up LOL. I believe:
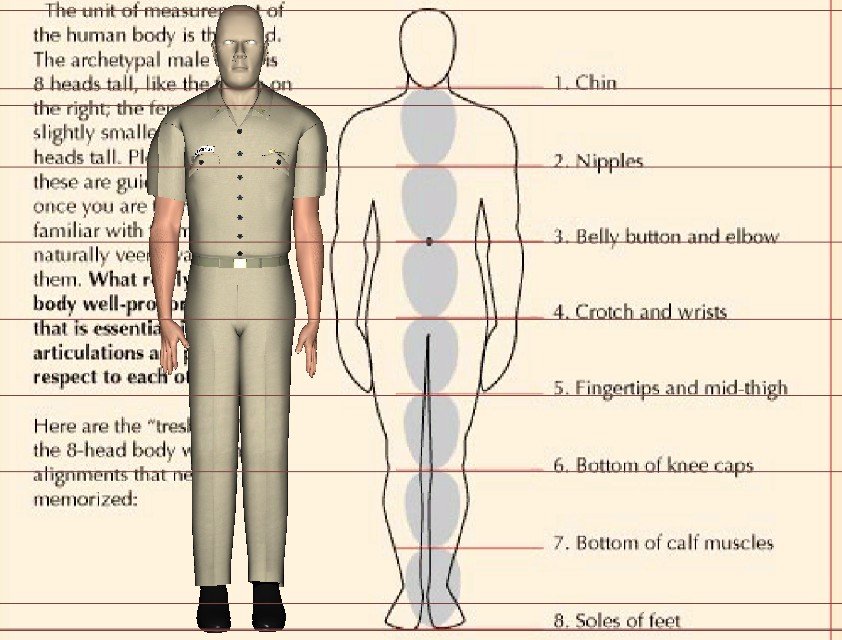
a) The hands are too small and need about a 120% increase (and once I increase these by 120%, other parts which use the hands as a basis will be off). Granting that my reference is a little accurate, image one shows this.
 Image 2 test correct on everyone in my family and clearly indicates that either a) the upper arm is too short, or the lower arm is too long or, c) a little of both.
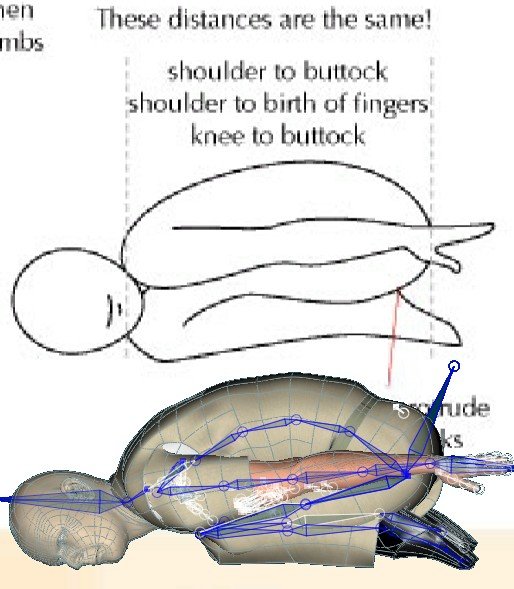
c) Image 3 indicates that the upper body is too long... or, the lower body is too short... or, a little of each. Perhaps the image is not 100% but my model is way off.
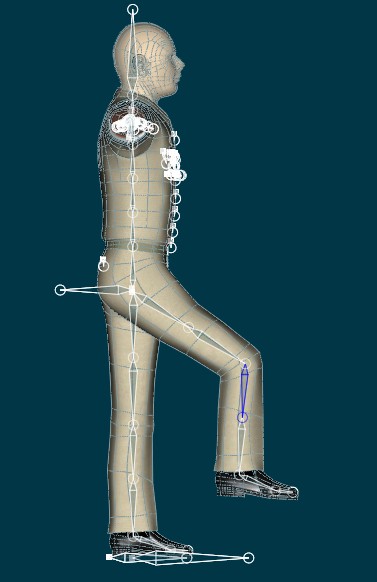
d) Looking at image 5 my gut feeling is that the body bone (or upper leg pivot) is a little too low (which will impact item c to some extent)
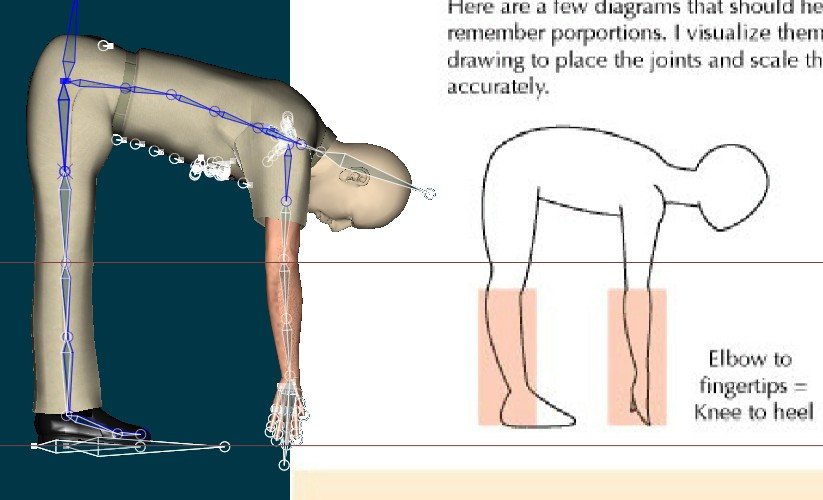
For now I am discounting image 4 but will come back to it after the above changes are made.
I'm surprised so many of you said that the reference I used was incorrect. It is a guide for 2D artists but I can't see how this matters. After what I've seen, I have to take all of the references I found with a grain of salt -- still, if something is 'way' off, I have to review it.
Finally, since I'll be adjusting mutually exclusive systems using the root bone for that system and holding down the
key to expand the mesh as well, I don't think the rig, fan bones, CP weights or Smart Skin will be affected in most cases. Rusty
-
Hello,
As hard as I've tried to come to terms with human body proportions (how long is the upper arm, lower arm, hand, upper leg, etc) I seem to still have issues! During the last stress test of model shown below I realized that things were not right so I placed it next to proper body proportions document (below).
Before I start scaling body parts this way and that way I wanted to get any feedback I could get from the forum. Also, for me, rigging starts with a 'guess' as to where the 'Body' bone goes (that's the bone that sticks out of the butt facing back wards). This is the pivot point of the legs and I'm never sure where it actually should be.


Any help will be greatly appreciated!
Rusty

-
Here's the Fireman for the locomotive. Engineer to come...
Radical! Left comment on site.
Rusty
-
Hello,
Read a thread about using the Mirror Splines plug-in to assist in mirroring smart skin manually (my previous post shows that AM 'Mirror all Smart Skin' is not working for me in 14.0c which is why I need an alternative). However, I've tried it in an action and a pose and Mirror Splines always changes the model itself so I do not know how anyone did this. If anyone has a suggestion on this please let me know.
I've always done 'Mirror all Smart Skin' in the modeling window (bones or muscle mode). I read a post were someone said to do 'Mirror all Smart Skin' in an on/off pose (????). I thought I'd try and maybe it would work, however the option is not offered in a pose (or an action) so I don't know what that was all about. Anyone know anything on this please let me know.
Grrrrrrrrrrrrrr,
Rusty
Edit: BTW, I've already taken fan and roller bones and, CP Weighting as far as I can.
-
Hello,
A:M's 'Mirror all Smart Skin' feature has never let me down but I've not used it in a year or so. My model's CPs are mirrored perfectly as are the bones and yet after selecting 'Mirror all Smart Skin'...
the legs...

the arms...

as well as elsewhere... ???
I'm using version 14.0c. What element of this am I missing?
Any help, suggestions or ideas would be greatly appreciated.
Rusty
Edit: Also, the CP weights were all mirror perfectly and the SS was applied after the CP weights.
-
Hi,
Perhaps one out of a hundred times I'm seeing CP weights that had set to valid values somehow change to invalid values. I suspect I am doing something that causes this to happen. Anyone know anything about this?
I believe I have seen this happen if I had closed the cp weighting dialog box by clicking on upper right corner "x" instead of clicking the "done" button. If I had closed the box improperly, then the next time I would try to weight the same cps I would get the "funnies".
I believe I have not had problems since if I terminated the process with "done".
Hm... I always terminate with 'done'. One thing I was thinking of was the 'Apply' which I love using but, you can only use it once... unless you know the secret which I have forgotten. You will crash if you use 'Apply' twice (in v14 anyway) unless you do something -- a workaround which Hash put out that I can't find. Know what it is?
There is also a problem where you use 'Apply' then click on a bone which has a percentage but the percentage shows a zero in the entry box... *the mark of death* ...if you attempt anything you will crash !!!AND!!! I do click on 'X' when this happens!!! Forgot about that so maybe that's it. In fact, I almost sure of it. Revelations while I type!!!
Thanks for replying and the insight!
Rusty
Edit: Ah, Mark just posted about using the 'X' as well. That's got to be it.


Large Main Bone
in New Users
Posted
Regardless of what bone it is, to reduce its size you must open the model and within the 'modeling' window grab the end of the bone and move this toward the beginning of the bone. Do not put the bone in 'scale' mode or all children bones will shrink with it. If the bone is the 'model bone' (that invisible bone you get with all models), to select it, in the modeling window in bones mode and click on the model name in the PWS.
Hope this helps,
Rusty