luckbat
-
Posts
2,750 -
Joined
-
Last visited
Content Type
Profiles
Forums
Events
Everything posted by luckbat
-
Holy cow! How do you make those textures? Do you hand-paint them in Photoshop?
-
Just so you know, setting the Specular Size value smaller is what makes objects look "harder." Raising the Specular Intensity just makes it look more reflective.
-
Hey, thanks, you guys. I'm feeling better now; my bug report was confirmed, and the TSM2 glitch was ironed out yesterday morning. I'll try not to let stupid stuff get the better of me like that. Thanks for all the encouragement. Mr. Jaqe wrote: ...maybe slow down and lenghten the path(in lack of a better word) the camera moves along from the big guys face, 'till it stops. Well, I can't really change the camera path, as I framed both ends of that camera move pretty meticulously. I understand what you're saying about the speed of the move, but I don't feel there's any point in doing a "slow reveal" for a shot like this, since we (the viewers) already know that there's someone over there. In a shot like this, the camera POV visually represents the character's "awareness," so the quick camera move should feel like a kind of visual "WTF?" moment. Paul Forwood wrote: It may not be much compensation but I think it's looking gorgeous! That is compensation, Paul. Thank you. Drakkheim wrote: ...im sure there are plenty of people who'd be willing to give you a hand, relighting shots, animating a hand or any of those other little things that draw you time away from getting on with the story. I hope that's true. I have much bigger plans for this project. But first I have to push myself to finish this short, to prove I can complete a quality project in a reasonable timeframe. Because if I can't do that, why should anyone volunteer to help me? Lafnjack wrote: ...But I do have a question about 3d workflow that you might be able to answer. Once the models are made, is 3d animation faster than 2d? Would 3d backgrounds with 2d characters be faster? Well, I have no hard facts for you, John, just my own opinions. I think most people would agree that an expert 2D animator probably works at about the same speed as an expert 3D animator. If you look at major animation studios, it seems like it takes about the same time to release a 2D feature film as a 3D one--about 3 years from conception to completion. (Well, except for stop-motion. Everyone knows that's way slower.) 3D backgrounds with 2D characters? Yikes. That sounds like the worst of both worlds. Sets take way longer to build and light than characters, and you need to build a new set for each location! I can tell you that I only chose Hash A:M as my medium of choice for Ebon after considering many other alternatives. I had been leaning towards Flash originally, based on the impact of projects like Ninjai, Genryu's Blade or Fool Lee. But ultimately I settled on celshaded 3D, as I wanted a range of movement and level of detail that would've been impossible in vector-based 2D. If you consider the shots I've assembled so far, I think you'd agree that Flash just can't match this "look." vf124 wrote: ...the light coming thru the stalls causes her to flash as she walks by ... It's true that volumetrics and the toon shader don't play well together. But in this case, that's actually the unrenderable-frames bug I mentioned in my previous post. I hope it gets fixed soon! Now, if you'll excuse me, I'm off to go re-rig Ebon with the Setup Machine 2...
-
I made myself sick this weekend. Physically, I mean. Headache, sore throat, stomach problems. I let my frustrations get the better of me, and for all the wrong reasons. After finishing another shot of my animation on Thursday, I hit a brick wall when I tried to render it. For reasons unknown, frames 828 through 860 could not be rendered. They'd lock up the machine, and I'd have to force quit. I spent all day Friday trying other ways to get those frames to render, but nothing worked. It wouldn't prevent me from working on the animation itself, but I wouldn't be able to see what I was doing. Then the Anzovins' TSM2 for Mac was released, and I thought I'd at least have a something new to play with while I figured out a way around my problem. But it soon became apparent that TSM2 had some glitches in it as well. I was going to have to wait for a fix. What I should have done would have been to step away from the computer, enjoy the sunny weather, see a movie, call a friend. Instead, I redoubled my efforts to render those missing frames. I wasted all of Saturday cursing and crashing, aborting renders and deleting keyframes. Sunday I woke up sick. Disgusted, I ended up taking screengrabs of the missing frames straight out of the application window, and compositing them into the animation separately. Which looks awful, for obvious reasons. It took me a few hours to figure out how I let my frustrations get the better of me. I wasn't really stressing about 32 unrenderable frames or an imperfect rigging too. No, the reason I pushed myself too hard this weekend can be summed up in four words: "One second per day." Believe it or not, ever since I started this thread I've been working pretty much seven days a week on the "Ebon" WIP. About five hours a day, on average. And yet no matter how many hours I put in, I can't seem to break the one second per day mark. After two weeks, I had about 15 seconds of animation. After a month, I had about 30. Now it's been six weeks, and I've got 38 seconds to show for it. Which is actually less than one second per day. Now, seven seconds a week is actually not all that bad, by some standards. But that's not the point. At one second a day, my two-minute animation will take four months. Four months of working seven days a week! It also means that a half-hour animation would, at my current rate of speed, require me to work every single day for five years before it was done. Realizing that is what really made me sick this weekend. I tried so hard not to let my seconds-per-day count drop below 1, but the end, it did. What's the big deal about a silly number, you may ask? It's a matter of perspective. I can't keep doing this if it takes half a decade to do half an hour of animation. That's just too slow to be worth it. Even one extra second per day would make a huge difference. That means you could do a 24-minute short in two years. That suddenly sounds a lot better. At five seconds per day, you could make your own feature film in three years. That's pretty darn good. But one second per day is not. Anyway. The 'W' in WIP doesn't stand for "whining," it stands for "work." So here's my latest 38-second extravaganza, complete with the 32-frame glitch in all its glory. (Yes, I submitted a report.) Clearly I over-storyboarded this sucker, because shots #5 and #7 join their colleague #2 on the cutting-room floor. All you folks who wanted a better look at Ebon, here's your chance. Just so you know, there is supposed to be dialog in this piece, but since I haven't done any lipsync/expressions yet, all I have is gesturing. Rest assured I will be adding sound to this, someday. Download Ebon: Shots 1 through 5
-
Are you suggesting that a character with a penis is controversial?
-
Don't forget the link to the movie!
-
Well, I'd remove the dangly bits before you submit your reel to Disney. Otherwise, it's your character, and your animation. Do what you like.
-
This thread might interest you: Metal Materials: http://www.hash.com/forums/index.php?showtopic=12611
-
I get the disappearing arm thing all the time--it reared its ugly head just yesterday while I was working on a walk cycle, in fact. It seems likeliest to occur when two different actions position the same bone at the same place and time. If I could reproduce it 100% of the time I'd submit a report, but it's been pretty random.
-
WIP: GAIL Female Android [SLIGHT NUDITY]
luckbat replied to patrick_j_clarke's topic in Work In Progress / Sweatbox
Wow! Hard to believe you can get such a nice-looking mohawk with so little geometry. But those shoulders are looking a bit... square, don't you think? -
Thanks, guys. Your support means a lot.
-
Another week, another update. Though I must say that I'm hitting some limits with these animatics. For one thing, the complex lighting--especially the volumetrics--and high-res textures I'm using guarantee painfully long render times. It looks like I'm gonna have to switch to some sort of low-res preview rendering from now on, because I'm almost spending as much time rendering as I am animating. Not cool. In any case, here's the latest animatic. I've begun to depart from my storyboards quite a bit at this point. Shot 2 is nowhere to be found, and Shot 1 has been re-framed yet again. Shot 3 has been re-lit, and things really start moving with Shot 4, which formed the basis of my "Mood Shot" contest entry. I don't know where else to post this, so I'll just come out and say it here: winning the Animation Contest was weird. First, because I didn't really think mine was the best entry of the bunch (I didn't vote for it), and second, because it's a bit intimidating joining the Fellows. Suddenly you're allowed to sit at the big kids' table, only they all know each other, and you're just some guy. It's like transferring to a new high school in the middle of the year. I always thought winning a Hash contest would be cool, but instead it's just... awkward. Anyway, I spent this past weekend developing yet another set of controls for Ebon's cloak bones, so she can now part the flaps of the cloak with her arms. Which is important, since she does a fair amount of pointing and grabbing in this short. You'll see some of that in the next update. latest_animatic.avi
-
You are invited for the CRITIQUE
luckbat replied to trajcedrv's topic in Work In Progress / Sweatbox
There's actually very little to criticize. Timing and keyframing looks uniformly good to my eyes. A simple story told clearly and efficiently. Perhaps a bit of squash-&-stretch on the teeth when the mouth closes? Maybe some texturing to make the teeth look more like teeth? From a modeling standpoint, the lack of brows limits the emotional range of the teeth. They can only act "sleepy" or "awake." I don't think you need eyebrows, but perhaps by sinking the eyeballs into the bodies a bit more, you can fashion foreheads from the upper bodies. -
Thanks. I was planning something way creepier, but as always, I ran out of time. Maybe for the Halloween contest that Hash usually runs in October... Ah. You'll want to be following this thread, then. Et voila:
-
Hey everyone. The Animation Contest guidelines specify that entries have to be 320x240 pixels, but, judging from the other entries, to quote Pirates of the Carribean, those are apparently more what you'd call "guidelines" than actual rules. I'll know better next time. In any case, because of how dark and high-contrast my 'Mood Shot' entry was, I thought I'd provide a link to a higher-res version, for anyone who might be interested. Mood Shot - 480x270, 3MB.
-
Pengy beat me to it! He's right about the squat. Try it yourself. Find something to step up to that's higher than your knees--maybe a bed. Now step onto it. If you crouch first, it's impossible. However, you might do a slight squat just after the first foot has been planted on the step, as a way to anticipate the shifting of the weight onto the upper leg. Great timing on the top of the stairs. The stretching out of the right leg is perfect. I'd like to see a little bit of swiveling of the "head" as he looks left and right. As far as I can tell, you barely use the X-axis at all in this animation. Virtually all the movement takes place along the Z and Y planes. Give Mr. Ball some swing! Have him shift his weight from one leg to another. Overall, I think this is one of the best pieces you've done. Your timing and anticipation are well thought out, and you've given the model some personality.
-
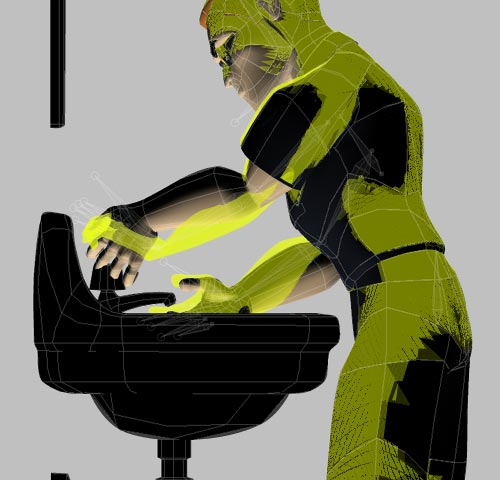
I'm not worthy! Animator Shao Guee, of Haruwo fame, dropped me an e-mail with some friendly tips on getting that anime-style look. And when Shao Guee gives advice, he puts his money where his mouth is: check out this elaborate demo video, with meticulously labeled "before" and "after" screens. Note the masking off of the wall areas, the subtle flicker of the fluorescent lights, and the added sparkle of the tap water. The man goes all out. He's right, of course. The greenish bloom he's added to the skin tones, in particular, really drives home the sickly "bathroom of the damned" atmosphere I'm going for. Stuff like this really makes my day. Thanks, Shao Guee! SG_overlay_demo.mov
-
Well, there are some setbacks that no amount of backups can cure. I was nearly done compositing a new sequence, but while viewing it, I noticed some rigging glitches in the wrists. So, I popped open the model and started reworking the constraints. I managed to improve the wrists, but in doing so, I noticed a very glaring mistake: my TSM-1 rig was installed improperly. The roll handles on the shoulders and arms were pointing forwards instead of backwards like they're supposed to. Unfortunately, I knew what would happen if I fixed the rig. All the keyframes from the shoulders on down would be ruined. But I saw no alternative. I flipped the offending bones and re-generated the rig. When I opened my choreography, sure enough, my character's arms were twisted up like licorice. Here's what I came up with in an effort to recover my lost keyframes: 1. I took my now-unusable choreography and exported it as an action. 2. I brought the action into the project, along with a copy of the rigged model from before I repaired the arm bones. 3. I took the old model, colored it yellow, and set its transparency to 50%, so I'd be able to tell the two apart. 4. I dropped the exported choreography onto the old model. Since both choreographies were identical, the two models occupied the same spot. The only different was that the old model moved its arms correctly, while the newly repaired model flailed about crazily. 5. Now that I had a "guide," I set about moving the hands and arms of my new model so that they matched the hands and arms of the old model. Yes, bone by bone, keyframe by keyframe. 6. I shared my sad story on the internet, in case anyone else ever encounters a similar problem. The good news is, I'm mostly done adjusting all the keyframes. The bad news is, I now need to re-render all my footage, so no new clips tonight. They're coming, though. I'm rendering the backgrounds as I write this.

-
Yeah. I think it would've worked fine if I'd cut to a close-up, but jumping to a wide shot like that causes the hand to "disappear," from a visual standpoint. Oo, you just gave me a great idea, though. Stay tuned.
-
Yikes! So much for h.264's market penetration. Sorry about that, folks. Sorenson it is... Shots_123.mov
-
Okay, I've calmed down a little. It dawned on me that what was really bothering me about the backgrounds wasn't so much the framing as the colors. Because I used only white lights in my choreography, the whole room looks washed out and dull. Although this was a perfect opportunity to brush up on my lighting skills, in the end I decided that, since I'm trying to emulate the look of hand-painted backdrops from cel animation, it would be better to spruce up my backgrounds in a 2D environment. Hence, these new contrast- and color-adjusted images. I've also improved the thumb somewhat and altered the toon lighting to yield harsher shadows (still needs work). But this newly assembled 3-shot sequence only confirms my earlier suspicions: shots 1 and 2 just don't cut well together. I know it's been suggested that I go from the side view of the sinks to the overhead view of the hands, but honestly I just don't see how I can animate someone rinsing his hands. How could I possibly animate the splashing water? I can barely even visualize it in my head. So, I'm still leaning towards making shot 2 the opening shot of the short. Maybe there's a way I can still use the "faucets" shot somehow, I dunno. P.S. Is this movie file viewable for you folks? I decided to try Apple's new h.264 compressor, but I don't know how compatible it is... Edit: Looks like it's not viewable for a majority of users. I've added a Sorenson version a few posts down from this one. Shots_123.mp4
-
Thanks for that Brad Bird link, Alonso. I wasn't familiar with that one. Camera positioning is an art, no doubt about it. The trick is in the balance; if you use "interesting" camera angles for every shot, they lose their impact.
-
You're right about the hands. Rather than pulling back, I'm just going to have the hands enter the right edge of the camera frame, thus motivating the cut. Visually, your sequence works fine (although I find it's a bit awkward to open a scene with three consecutive closeups before establishing the location). But I chose my sequence based more on dramatic impact. If I'd taken the time to do proper storyboards, here's the information you'd be working with: SHOT 1: Officer Terrence Monk begins to wash the wound on his hand. SHOT 2: He's alone in the police-station bathroom. SHOT 3: The wound won't stop bleeding. SHOT 4,5: As Monk scrutinizes the strange mark on his palm, he hears a rustling noise behind him. We, the audience, see a figure enter the bathroom through the far window. SHOT 6. The figure locks the door from the inside with a loud 'click.' SHOT 7: Monk slowly turns around. The figure is revealed to be the spooky young woman who carved up his hand last night. SHOT 8. She begins to advance towards him. So, while the exact order of cuts is flexible, I definitely need to establish the emptiness of the bathroom using a wide shot right at the beginning. It sets the atmosphere and also sets up the 'reveal' of Ebon's unconventional extrance. Yup. It was probably overkill, but I used a particle generator (Apple Motion) to create the blood streams, and rendered to a sequence of targas. The decal still needs a lot of work, but for now it gets the job done. I actually did a bit of compositing in post, but basically if you set the ambience on your model to 100% and then combine that with a faint toon line, it doesn't look half bad.
-
This update is so lackluster that the only reason I'm even including it is that I spent most of the last four days on it, and I gotta have something to show for it. This represents shots 2 and 3, although I'm weighing the idea of cutting shot 1 and making shot 2 be the opening shot--I'll have to see how it goes. Just for fun, I went with a soft, airbrush-y style instead of my usual anime toon look. (It sorta reminds me of old issues of Heavy Metal.) I'm still committed to the 3d celshading, it's just that the toon renderer is such a massive slowdown that it makes doing test renders a real chore. This airbrush style, by contrast, renders out at about 5 seconds per frame. Problems abound with these two shots, not the least of which is that the framing on both is drab and lifeless. They looked fine in the storyboards, but in motion, these are not dynamic shots. The animation in both is amateurishly floaty, and thanks to my poor CP weighting, the thumb moves like a sack of potatoes. Like I said, I normally wouldn't even upload crap like this, but WIP means WIP, for better or for worse. Shots_2and3.mp4
-
Are there tricks to managing a huge choreography?
luckbat replied to luckbat's topic in Work In Progress / Sweatbox
Actually, my method actually takes longer to render, since I'm generating three or four minutes of footage for a two-minute short. But I don't mind the longer setup times--it's the unwieldy PWS that I was having trouble with. John Artbox's "folders" solution makes a world of difference in this regard. Unfortunately, the biggest contributor to my render time by far is the toon renderer, which more or less quadruples it. I definitely could, but as I mentioned in a previous post, you can only use this method if your choreography is final. Otherwise, any changes you make to the action would need to be mirrored across multiple choreographies, which doesn't make it much of a time-saver. I think where I'm differing from my fellow animators is that I prefer to edit my footage after it's shot, rather than defining my edits as part of the animation itself. There's no question that this makes for longer render times and a complicated choreography, but I feel it gives me more control over the final product. I've been gradually developing techniques to squeeze down the toon-related render hit, and Artbox's folder trick has gone a long way towards helping me manage all my PWS elements. So things are looking up.