Pitcher
-
Posts
99 -
Joined
-
Last visited
-
Days Won
5
Content Type
Profiles
Forums
Events
Everything posted by Pitcher
-
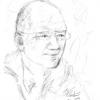
Thanks, Rodney. It's cartoony, but that's what I like. I have great respect for those who are able to do the textures, etc. and make it look real like in special fx, but I do this for fun, and this is the way I do it. You, robcat2075, and fuchur have been helping me from the time I found the forum after two years of stumbling around in the dark, so I really enjoy hearing from you guys. Of course, many other people have helped me, too, and I appreciate all of their efforts also. I like your motto. Most of the time I feel about half mental and forty percent off.
-
Thanks!
-
Some of my pigs from Donark are going to Venice to share donuts and recipes. I made a model where my pigs and the Venetians can interact. Unfortunately, it won't be a happy visit. I have attached a picture of my model. It's still in progress, and there will be some additions and tweaking. Among the changes will be creation of a population of Venetians and the arrival of a ship of Donark pigs. The pigs will have an adventure like they've never had before. (I also should note that this model is really Venice-y. It's not really a totally accurate depiction.)

-
I'll have to look for the Testor's plastic filler. That will probably do for my needs. I'm happy enough with the surface, generally, but there are a few places that had a glitch. Thanks for all the ideas.
-
Thanks! I feel like I really learned a lot by doing the project, and I appreciate the help all of you gave during the process. I hope that reading this thread will also help others who might want to try 3-D printing.
-
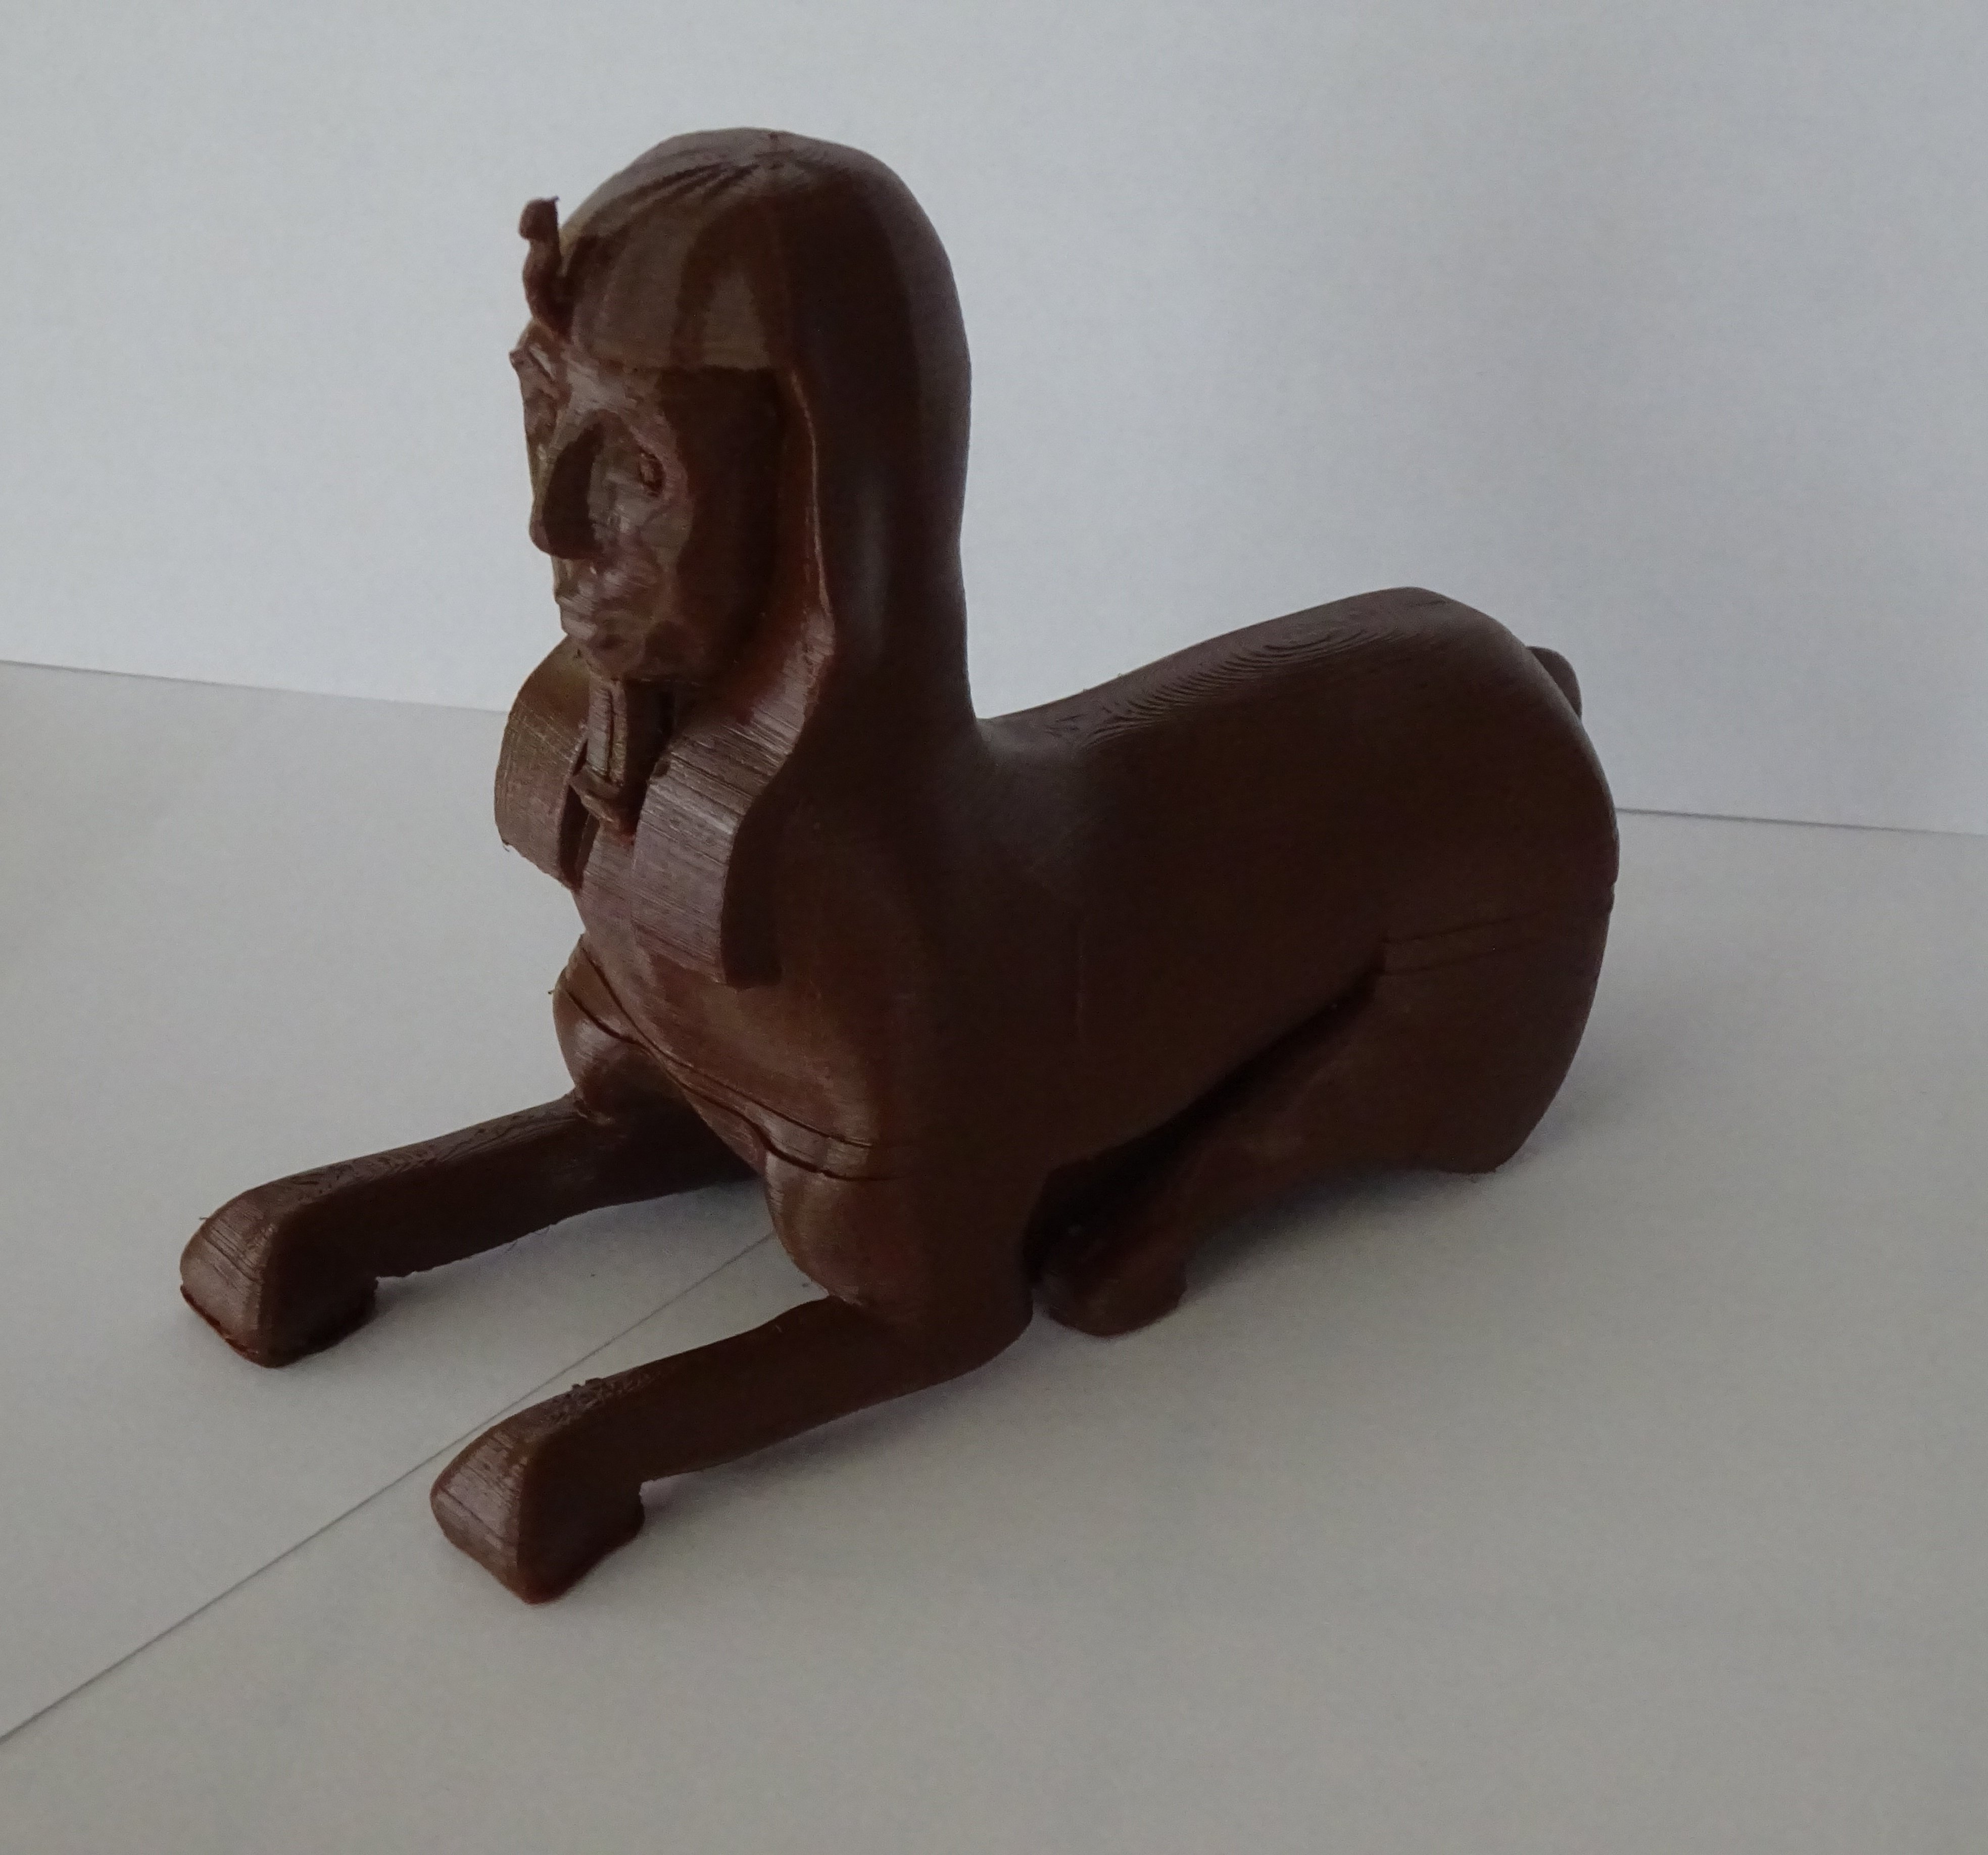
The library printed my Sphinx j model. Here are a few pictures. As you see, it still did not print perfectly, but I am happy with the result. Thanks again to everyone who helped. Your ideas, illustrations, and video clips really taught me a lot.
-
I didn't notice that there was a page 2 on this thread until tonight. I thought people had gone on to something else. The discussion on page 2 has been interesting, too. Fuchur, I am glad to see anything you have to say. You are not hijacking anything. It's all about 3-D printing, and I have everything to learn. The pictures of the print you made are really fun to see. I printed at the library, and it turned out pretty well, in general, but I have revised the model a little more, and I have requested that it be printed again about twice or three times as large, because some of the details were too small to see. The model I have now is about 2 1/2" long. I will try to take a picture the next time around. The model I am having printed is attached. I cleaned up some of the patches that were on the inside at the bottom of the headdress and shoulders. Sphinx new j1.mdl
-
pixelplucker, you seem to understand all of this at the nuts and bolts level. Your explanation really helps me to better understand what is happening and why. I am basically an application user who has gained whatever knowledge I have of computers through many years of using them. Thanks for the information about what is happening and for the ideas about other software. The Ultimaker Cura software has seemed at times to be very finicky to me. I have downloaded the free software Fuchur recommended, and I will try to find the Hexagon software also. With my level of understanding, one of my main approaches is to try several kinds of software and try to make adjustments to various items until something seems to work. For 3-D printing, I have very few tools at my disposal right now.
-
Thanks. I had already tried to make the bottom flat and had disconnected and reconnected many splines, but I was reluctant to do them all because I did not want to lose all the curves from the bottom of the side. Actually, when I disconnected some of the splines, I had a hard time finding where I was supposed to reconnect them. That's how the model became so weird where robcat2075 was showing when he moved the leg of the model. I had reconnected to the wrong place. When the librarian tried to print the initial model the first time, she added a brim to take care of the remaining splines that were not behaving. I appreciate your making a corrected copy of the model, and I downloaded it and looked at it. I always stay with the model I've made, however, because I don't want to just have you do the work for me. I take the concept you shared and apply it to my own model. In this case, I did flatten many of the splines, but others I just raised a little so that the curve would not go below the plane. To summarize what I learned from this experience: 1. Flip the normals (Shift 1, Shift 6, and Shift P are important in doing this); 2. Make the bottom flat; 3. Clean out the inside as much as possible 4. Learn how to operate the slicer software, and look at the model in "Layer view"; 5. The .stl file will work fine at resolutions 64 or 16 polygons per patch usually; 6. 3-D Printing is not something that is very user friendly right now (Everything has to be "just so"). Sphinx new f1.mdl
-
I have continued to work on my model and to eliminate the various garbage on the inside of it. Since I started with a standing cat and human head that I combined. I still had a lot of leg, more or less bent inside the torso of the model and since I extruded the hair to make the headdress, I had the back of the head inside the headdress. Apparently, the material inside the model interferes with the slicer which is trying to also fill the model with "honeycombs". By eliminating all extraneous extra inside the model, the slicer software seemed to work better. I am attaching the picture from the Cura slicing software, the model file, and the .stl so that you can compare it to earlier versions, if you are so inclined. I also note that sometimes flipping a Normal does not work forever. There was one patch in the face that I had to flip at least three times. I am not sure why the Normal would not stay flipped. Thanks to everyone who participated and helped me. Sorry that my model was so troublesome. I originally created it as part of the setting for when my pig characters went to Egypt. I did not think of it as a major piece, but I selected it for 3-D printing as similar to a character model that was posed in such a way that there would be few overhangs. (Silly me! I thought overhangs would be the major issue.) I read the conversation between robcat2075 and Fuchur above (about overhangs), and I probably should make the bottom of the nose at 60 degrees. I'm going to see what the Cura program does with the support first. I've seen some samples of where supports were removed after printing, and the surface was just disturbed slightly. I'm thinking that under the nose, the surface will not show much anyway. If it is a major problem, I'll make the change in the nose. Sphinx new f.STL Sphinx new f.mdl
-
Fuchur, Thanks for showing that the model can be printed in some form. Thanks also for the suggestions. 3-D Printing for me was an afterthought. I wanted to see if my models could be printed. It was sort of a passive interest. Once I started it, however, it has been very interesting. Even though it probably would have been better to start with a vase or something like robcat2075 and you recommended in your tutorial, at least this way I know how hard it would be to print my models that I already constructed in a sort of undisciplined way. I'm still working on the model. A short time ago, I ran it through Cura again and it looked solid at the bottom and at the head, but it was a hole at the middle. I went back and fixed all of the connections robcat identified in his video above, and I have been all over the model several times trying to get all of the wrong way Normals fixed. I'm probably going to put back the regular eyeballs since there was no real issue with them. I'll be interested in seeing what repairs you made to the model. There's a lot I have to learn from you and all those who have been so generous in giving me pointers. Thanks again!
-
Thanks for the analysis and the suggestions. Sorry that the model is so confused. It started out as a cat that was upright. I took off the cat head and gave it a human head. Then I tried to sit it down. Then I tried to make it flat on the bottom, because our orientation for 3-D printing emphasized getting the bottom as flat as possible. I'll work on the model and simplify it as much as I can and will try to get everything that could possibly be a wrong turned Normal set right. Then, I'll try again with the .stl.
-
Fuchur, I watched the video of your tutorial. I should have watched that first. It would have answered several questions that I posed later. I'm still have some difficulty that I cannot put my finger on. The Normals are all turned the right direction at this time, but the picture of the layer view for Ultimaker Cura still shows holes.
-
fae_alba, Thanks for answering. You all three are coming to the same general conclusion. I have fixed the Normals, but there seems to be something else happening also. In addition, I will have to consider the snake on the headdress. I may have to do that some other way, as you suggested.
-
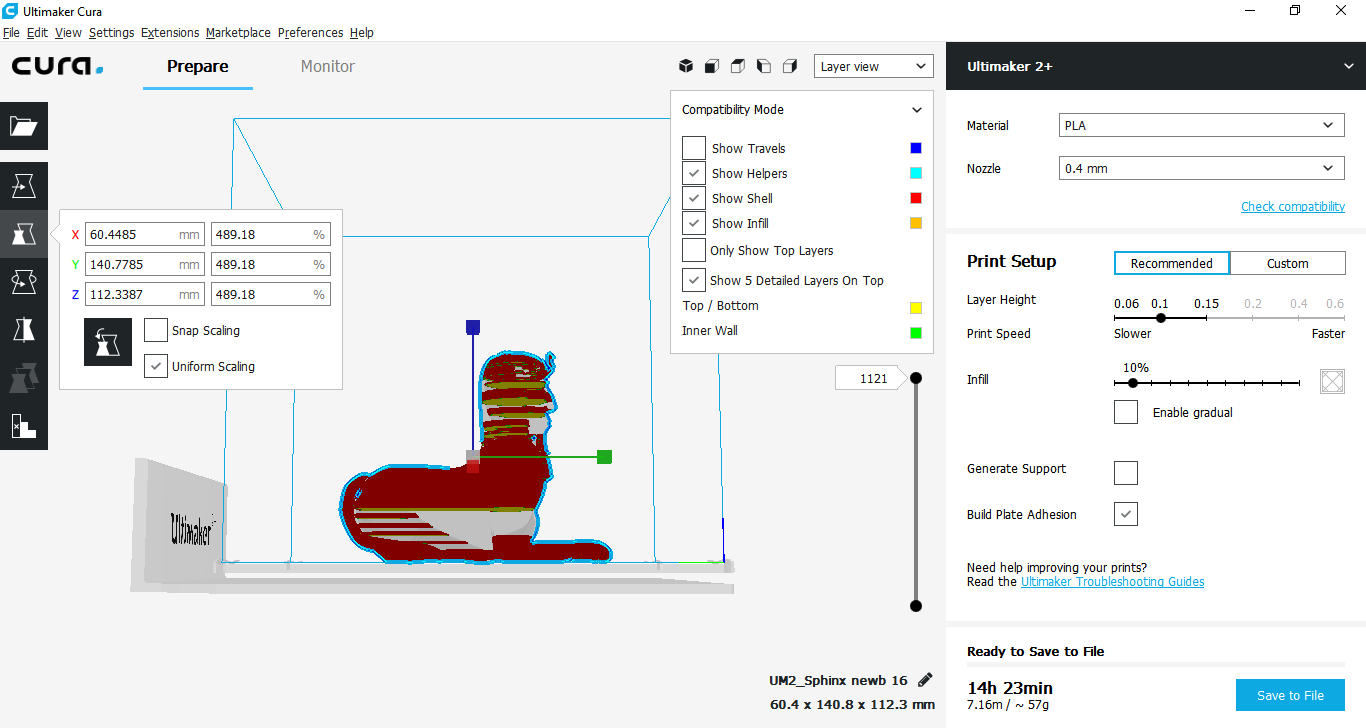
I turned around the Normals. I made a new .stl at 16. I made a new g-code in Ultimaker Cura. I'm still getting strange results. The model, the .stl, and a picture of the Cura prepared model is attached. The picture looks like there are holes toward the bottom of the model, and the face looks missing. Sphinx newb.mdl Sphinx newb 16.STL
-
robcat2075, Thanks for the video. It was great! You are much faster at turning those normals than I was. I worked on it for two or three hours and didn't do much more than you did in the few minutes on the video. You gave me some good tips on how to do it. I also appreciate your idea on continuing the splines and not using so many hooks.
-
Hi, Fuchur! I've been working on the model to close up any holes such as the eyeballs and the mouth. I can't really understand the Cura Layer View for the slicer because my version 3.6 is different from the version the librarian showed me and the version the librarian referred me to on Youtube . The library has Ultimaker 2+ and that's the software I downloaded. I am attaching the model I've been using. I tried exporting to .stl with 16 polygons per patch, and I used Cura 3.6 to see if there are any holes. I can't really understand what I'm seeing. Thanks for your help! Sphinx newb.mdl Sphinx newb 16.STL
-
I just went on a cruise for a week. Now, I'm back. I appreciate all of your input. (I really appreciate all the encouragement also. When I was doing this earlier, the cruise was coming up, and I was trying to get it done before the cruise. As I said before, I thought it would possibly be fun to be able to do this, but it is really a "nice to do". Now I feel like I have more time to pursue it without a time pressure. ) I'll have to try the 16 polygon setting as suggested above by fae_alba and Fuchur, and I might try to adjust my model by attaching the eyeball (minus the inner orbs) to the eye socket. Perhaps the free-floating eyeball is confusing the plug-in or the slicing program. I understand that I have a few small overhangs, and I will know that to do if that becomes the issue, but the giant holes as shown above are a complete mystery to me. All I can think is that the unattached eyeball is causing the problem.
-
After trying the 256 export and it not working, I also tried the 64, and I ran it through Cura in the layer mode also. It had the same issues as the 256. robcat2075, I appreciate your suggestion about making something simple and trying that to see if the problem is on our end or their end. They also had a suggestion that I rebuild my model in Tinkercad, because they thought that would work. My general approach is that my main focus in using Animation:Master is making models and creating pictures to illustrate my books or animations of characters in my books. The 3-D modeling was a "nice to do". I spent several days going back and forth with the library and also revising my model to try and make it work for them. When I went through the orientation, problems like I'm having were not mentioned. My concern was to make my model flat to sit on the plate and to not require very many support structures. Basically, I was hoping that with a few small adjustments, my models would print (and that I could become as rich as George Lucas from the marketing rights on my books and movies--Ha Ha). I really don't want to get into redoing my models in another program or spend a lot of time making other models or doing other things to get .stl files from A:M to work in a 3-D printer. If my models are ever in huge demand (ha ha again), I'll look at this issue then or hire someone to make them printable. Maybe, I'll get a later version of A:M and the plug-in will work better. Right now, as I mentioned before, at least to robcat2075, I am using version 18. I'm not a professional animator or artist. I'm just an old retired guy trying to do some art. I enjoyed Shrek so much and watched the short subject bonus feature entitles "The Tech of Shrek" that I thought it would be great to know how to do some 3-D animation at some level. I really appreciate everyone's help with my questions, and I don't want to let anyone down. Maybe someone else with more determination will read the advice given and work out the issues. I'll be glad to see what they learn, and maybe I will be able to print at that time. Thanks again, Everyone!
-
Thanks for letting me know that you can go as low as 16 possibly without affecting the look very much.
-
I tried 256 and 64. The librarian sent me a picture with the 256. It is below. The gray parts are holes. I think the librarian is getting annoyed with this. I'm going to wait a little time before going forward with another .stl.
-
I just tried the plugin again and instead of choosing 1024 polygons per patch, I chose 64 and got an .stl file size of 11 MB rather than 200 MB. I tried 256 and got a file size of 44 MB rather than 200. I'm going to make another appointment and see if their software can handle the 44 MB file size and see how the printout looks.
-
They meant file size. The slicing program was unable to handle an .stl file that was so large. I was interested in printing a character. A vase does not seem worth the effort. I have tried to streamline the model a bit. I was wondering if instead of choosing 1024 on the export tool, I should have chosen a lesser number. I'm not really sure what the numbers mean in terms of the final appearance of the model.
-
I started out thinking about printing a winged lion. After I showed the librarian the winged lion and the sphinx, she thought the sphinx would print more easily. I am the first customer to try printing at this library's new facility. We were all hoping for success.
-
Wow! There have been a few more answers in the last few days. I'll have to study these and try to understand them. I still am very new to 3-D printing. The printer the library has is called Ultimaker 2+. I don't know very much about it. The process the library has in place is that we patrons can submit an .stl file, and the librarian applies the slicing program (CURA) and plans the supports, if needed. I submitted an .stl of a model of a sphinx. My .stl was made at 1024. As it so happened, the librarian asked if I had looked at the CURA software, and I took this as a hint that she wanted me to do so. I ran the .stl through CURA and got a g-code file, which she used to size the model and change the orientation before sending the code to the Ultimaker. Everything started well, but about 2 or 3 hours into the 4 hours that the model was expected to require, something went badly. I don't know what, because I wasn't there. She called and told me about it. She tried again, but with similar results. She sent the .stl and g-code files "downtown" to be examined. Then she informed me of what "downtown" responded. They said that the .stl was too large for any of their slicing software to handle successfully. They advised me to redesign so that the .stl file would be much smaller. That's where we are now. I will attach a picture of the model I was trying to print. Perhaps, as suggested above, I need to break the model into pieces. I'll have to consider that. I'll study what you have suggested so far, and if any of this information helps you think of something further, I'll be interested in your ideas.