Pitcher
-
Posts
99 -
Joined
-
Last visited
-
Days Won
5
Content Type
Profiles
Forums
Events
Everything posted by Pitcher
-
It looks like someone has thought of about everything. The tag editing is more for me to know about. Believe it or not, I think I'm getting better at this. Maybe someday I'll not need to ask so many questions.
-
I went away for a while and came back to try out the suggestions. robcat, I tried what you suggested, and it worked great! The only change I needed to make was to wait until after I had applied the decal before adjusting the transparency of the window to 100%. Rodney, your suggestion looks very interesting also. At first, I did not know where to find the font wizard, but then I Googled the question and found that it was also asked by Simon Edmondson. robcat2075 gave the path there (i.e., in a model window, right click, then Plugins/Wizards/Font). I'm looking forward to trying this method also. I really like the effect you added to the font in your example. (I came back and tried the Font Wizard. It does look like it holds promise. I will have to work on the spacing between letters, but once I get that down, it seems like it will be a time saver.) Thanks, Everyone for the responses and great information! I had one further idea. I need to add to the tag above. When I started this topic, I should have added a tag "Font Wizard." Now, I am not sure how to reopen the tags section and put additional tags. It might be a good practice to review tags at the end of a topic and add tags that the person who started the topic did not know about at the beginning or remove tags that really were unrelated. That way the research facility becomes more useful, and other people can more easily find information on topics that confuse them.
-
That looks very do-able! Thanks.
-
I use The Print Shop 20, Photoshop Elements 5, or Microsoft Paint to create decals. I've used the invisible color in websites, but I didn't know if we could use that in A:M. I'm not sure what a "transparency map" is, but I'll try to look it up.
-
I want to make transparent windows with sign letters across them. For example, there might be individual letters saying "Bill's Barbershop" that we could see from the outside or from the inside. I don't want a rectangular sign that I decal on the window. I want only the individual letters or perhaps a logo to show. Is there a way to do this in A:M? How?
-
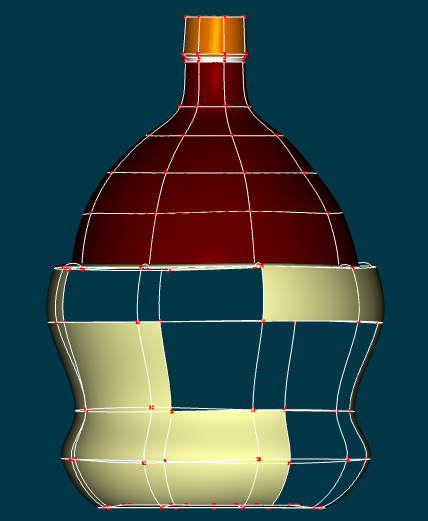
Why are the 4 point patches on the surface not filling?
Pitcher replied to Pitcher's topic in Open Forum
Thanks. That was great! I did not know about the show back faces off button. I apparently hit F6 accidentally and did not know what happened. Also, I have been having difficulty with rendering transparent bottles in general and switched my settings for rendering to shaded from final. Basically, I don't know a lot about the settings, and I use the same settings for quite a while once they work. When I change something accidentally, it always mystifies me. I really did not make this bottle with the lathe. I started with a circle and extruded the bottle and then shaped it by hand somewhat before I then extruded the basket from the bottom of the bottle. Then, when I had all the problems with the patches that would not show up, I started removing the layers underneath to see if they were causing the problem somehow (but I did not get all of the excess splines). Next time, I probably try to use the lathe. You are so much more scientific and knowledgeable about all of this than I am. I just poke around using trial and error and a few things I learned out of the book that came with the program or David Rogers's book or something that I learned in the Forum. Now, this is one more set of things I can look back on and try when this happens again. Eventually, there will be a collection of these called "The Pitcher Screw-ups" so that people who make my mistakes (if there are any such people) can find these write-ups with the solutions you and others provide. -
Why are the 4 point patches on the surface not filling?
Pitcher replied to Pitcher's topic in Open Forum
Thanks, robcat2075! I send it right away. One other thing I was wondering about is if it is possible to have a color that is transparent. When I color a surface and make it transparent, it always goes to some shade of gray. -
I have been trying to make a chianti bottle. For whatever reason the 4 point patches are not filling in. I have tried rendering, but the patches don't fill in there either. I am not sure what I am doing wrong. Any ideas? A picture of the bottle as it exists now follows:

-
I checked, and they all seem to be on five point patches. I also rendered, and the holes don't show up on the rendered image. I flipped normals for the patches, and I did not see a difference on the real-time view. Thanks for your help. I will know just to ignore the holes in the real-time view. I also appreciate knowing about the attachment function. That will make it not only easier for viewers to see the picture, but also much easier for me to post the picture.
-
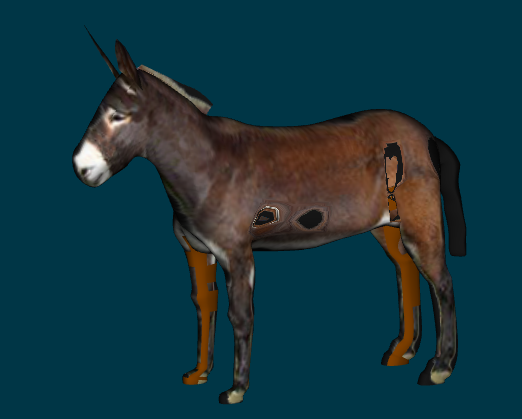
I have decaled quite a bit with good results, but today I encountered a new problem. I used a 32 bit TGA as the decal on a character that I made using the decal as a rotoscope. (In other words, the figure fits fairly well with the decal.) When I apply, I see actual holes in the model. It looks as if the picture has worn through with ragged edges. I'm using Version 18j (64 bit). There are no holes in the model before the decal is applied. I have attached a picture of the model below. I'm interested in how to avoid the problem and how to fix it. Thanks.
-
Thanks. I'll give it a look.
-
You guys know a lot more about this than I do (and, believe it or not, most of my friends regard me as a "tech guy"). I really appreciate your suggestions. Since LibreOffice was free, I downloaded that and tried it first, and guess what? It met my needs! I'm sure that if I used the higher cost software and devoted considerable time to learning all of the in's and out's of desktop publishing, I could probably produce something with finer design and greater beauty, but LibreOffice lets me put my graphics and text together quickly and easily without having all the little bubbles on the graphics. It's not absolutely perfect, but after producing pdf's about 20 or 30 times and seeing no improvement, I'm beside myself. Thanks, Journeyman!!!! If you want to take a look at what the illustrated script looks like, you can find it at: https://drive.google.com/file/d/0ByP4k82JQ7IOd2R3VkVNZ0M0MnM/view?usp=allocation It has many imperfections, but for right now, it is the best I can do.
-
I will look into those options. Thanks for the input.
-
I was using 2003. I heard that 2010 was better, but I wanted to hear from somebody here that it is really good enough. I don't want to buy something that doesn't work. I also was wondering if Adobe pdf creator (Acrobat?) has a setting that allows the pdf to be a little larger?
-
I'm sure you are right about the memory consumption, but there's a big world and many programs. I hope one can handle text and graphics well in some sort of magical way.
-
Thanks. I'll look into that. I've designed web sites. I'm not sure if a dynamic HTML page is the same. I was hoping to find a way to make one document that would have text and pictures, rather than an HTML document that links to graphics in a separate folder.
-
Thanks, Everyone. I finished what I was doing. I think it was some kind of temporary glitch.
-
I am working on animating a feature length video. It is slow as molasses. I decided to produce an illustrated script as an intermediary step. To do this, I put the text in a Microsoft Word document. I inserted the bmp's I created in A:M from cho files. There are about 210 pictures. I start out with nice big bmp's. They display well in full screen. Then these get compressed when I insert them into Word. They still display well in Word, but of course, are much smaller in the document. Then the entire document gets compressed when I make a pdf in Soda 5 Pro. My Word document is about 90 MB. My Soda pdf is about 17 MB. The pictures start out cear and end up blurry. I did the same thing, but first I made all the bmp's into png's. Same result. I tried tech support for Word and for Soda, but there was no help that worked. I know there must be a way to produce a document with pictures that are not blurry. Is there better software you could recommend or better procedures?
-
Sorry. I don't have an example right now. I was hoping it was something that was common and there was a control to adjust or turn off. Thanks for thinking about it.
-
Mirror mode is not on. I am not rotating anything. Sometimes it is in a very small space. It does't happen all of the time, but just enough to be annoying. What happens is I pull a control point out of a crevice (from between two other control points), and it snaps back to where it was. Sometimes, it seems to resist on the second time I pull it out.
-
I looked at the snap to grid, and it did not appear to be on. Is there some sort of automatic snapping it does to create a straight line among three control points?
-
Thanks! I hope that was the problem. Sometimes, I don't know what to call it, but only how to describe what is happening.
-
I find myself playing tug-of-war with Version 18 of A:M more than I used to with Version 15. There seems to be a lot more snap. I pull a control point to a position when I am modeling, and the computer snaps it back to where it was. How can I turn the snap off or adjust it to a level that is helpful?
-
The rig I use is the one that came with Version 15. It is called "2001 Skeleton." I will fix the settings as you suggest. I installed the rig per the instructions on the model that worked. The second model is just a file copy of the first, except that I imported a model of an object that happened to have an extra skeleton with it. I removed the second skeleton, but it had already corrupted the relationships. Now, I am just trying to find an easy way to restore the relationships. You are right about just copying the "hairpin." I should have done that. I used to do that, but then I also had problems resulting from copying a piece from one file to the other. Some of the items are much more complex than others and don't copy well. This one is so simple that I should have copied. Thanks, robcat 2075 for your help. I now understand a lot more about how the foot targets work and where the controls are for them. Above, I mentioned that both versions of the character worked in Version 15 of the program. I am not sure what I was looking at, but I don't find what I thought I saw before. It seems a few hours later that both versions of the program are working the same. I want to mention one other thing. The character I sent who is fine in one instance and has a problem with his foot target in the other is part of a larger piece I am working on. He is copyrighted. I appreciate your help, robcat2075 in helping me make him work better. If anyone is watching this, please do not use the character. Thanks.
-
That told me a lot. I wonder if last time I fixed this a couple of years ago I copied the relationships from one model to another rather than trying to copy bones one to the other. In answer to your question of where this came from, here is what happened. Sometimes I design some little piece while I am working on a model, and then I decide to use it on other models. Maybe it's a hairpin or something like that. Sometimes, I remove the character who is wearing the hairpin in the modeling mode and forget to remove the character's skeleton in the skeletal mode. Then I put the hairpin on another character and voila! I have a character with two skeletons. There is Root 1 and Root 2. Then I remove Root 2 and all its underlings thinking I'm getting back to Root 1 before the mistake. BUT... no such luck!! The relations have changed in the first model to relate to the bones in the Root 2 strand. Is there a way to copy the relations from one character to another?