


photoman
-
Posts
588 -
Joined
-
Last visited
Content Type
Profiles
Forums
Events
Posts posted by photoman
-
-
The IOR of actual glass (Well crown glass (ie lens glass)) is about 1.33, air is 1.000000001 and vacuum is 1.
Here is the super awsome best list ever of IOR's :
Photoman
-
Use the eXtractor plugin here: eXtractor
Its for Adobe After Effects, just drop it onto your EXR-sequence and it will seperate it into whatever channel/buffer/pass you want
Photoman
-
Thanks for the good comments! If anyone is wondering about the lighting setup, it is really simple, and... there is no AO!
First thing I wanted was the dark room spotlight look so I placed the first kleig light up top aimed right down at the piano.
Then I realized that that looked quite plain and didn't have any "pop" to it, so I placed 3 more kleigs at strategic points around the piano and set each of them to be just specular.
Then I wanted the reflection of the "guts" of the piano brighter so I placed a low powered bulb light inside it.
After I had all this done I went through each light and tweaked it, I changed the Top kleig to have 25% softness and 100% shadow darkness. Next I set the bulb to have 100% shadows with 3 rays distributed in passes to give more detail inside.
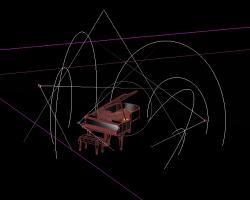
SO... that was my setup and for information I had each frame averaging about 1min 20sec over 240 frames @ 1024x435
Also that shiny look is from an environment map material of a studio HDR image, which needs to be upscaled...
Photoman
-
Been a while since Ive updated this... The project is on the backburner right now. Ive become quite busy with school and swimming so I get to this whenever I am not tired and have time (which isnt as often as I like). So to keep y'all in the loop here is a quick studio clip:
Photoman
-
Ok, I know I haven't updated in a while so here is what has happened. I did do a bit more work on it. Just some misc things that needed tweeking nothing much. I needed to render it at 12x8" for the final print. To do that I need a resolution of about 3600x2400 (w/ letterbox so its a little less), anyway, my computer does not have enough memory for a render that large with a scene as complex as this one. So.... I did some back tracking through my previous renders of the scene and I managed to snag one that was large enough to look good upscaled in photoshop. So thats what I did, I used that one (Which was an OpenEXR file).
My workflow with OpenEXR files goes like this:
1. Render OpenEXR with all the buffers I can
2. Open it in After Effects
3. Use eXtractor plugin to get each channel as a layer
4. Export composition as a multi layer .psd file
5. Open in photoshop and edit
In doing this I can edit things such as the intensity of each light, its shadows, and its specularity. As well as the amount of reflections and intensity of the AO.
So I managed to get a pretty flexible workflow going and I got a lot out of that older render than I thought possible.
And here it is:
I just want to give a big thanks to all that commented, critiqued, and or just browsed by

I have entered this in a Art contest at my school as well.
Photoman
PS mpix.com is GREAT, the print (12"x8") looks incredibly sharp and saturated. It is such a great experiance to be able to handle a rendering
-
All those reflections are from environment maps and hi-specularity (ie Spec Size: 150-300% Spec Intensity: 100-300%).
They probably used a studio HDR image for the environment map.
Photoman
-
Im digging the no shaving for a week look, great use of AM hair!
Are you using A:M Paint?
Photoman
-
Very nice, atmosphere settings really work in that scene.
I once did a tut on this subject (My first tut) unfortunetly its a video tut though

Photoman
-
Try rendering to multipass if you arent. I heard there are some issues with the AA render and bumps.
Photoman
-
Thanks for the Feedback!
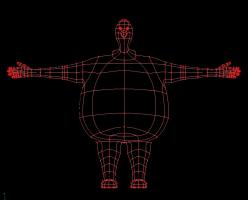
As for the clothing, I am kinda at a loss. I dont know if I should decal them or make actually mesh for cloth simulation.
As for the rigging my friend is going to do that (probably 2008 rig, Ill be sure to let him know about dynamic bones).
This is my first true character I modeled ( I dont count UltraThom since Thom was already a original character).
I am going to render a walk cycle out for him at several different angles to use as sprites in the game.
Photoman
-
Hello! Yet another project. My friend has asked me to do some graphic art and character animation for a game he is creator.
Here is a character I have finished modeling: (Just needs a rig and textures)
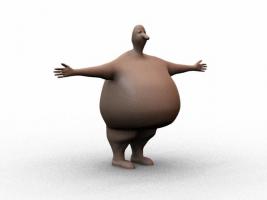
Cheers
Photoman
-
That looks good!
Ive always wondered what if you use several volumetric bulb lights with a fractal sum material on them would make good clouds?
Ill have to test that.
Photoman
-
I once made a procedural mountain texture a while back here:
http://www.hash.com/forums/index.php?showt...untain+photoman
Photoman
-
If you dont want to use displacement for terrain you can use the Terrain Wizard plugin the model view, or download A:M TerraForm.
Or better yet, do a mix of both.
Photoman
-
Ok I see what you mean now. Though it looks like that would be easier to do in post. I find it a pain to keep going btween photoshop and A:M trying to get exact spots correct.
-
I can adjust the diffuse settings higher (at about 80% in the render above) but the problem with that is that it gets closer to black the higher the value.
-
Are you using a couple of kliegs to get the underwater highlights? Would you share your water properties with us?
Yes. I plan to do a video breakdown when Im done and Ill explain all about that.
Photoman
-
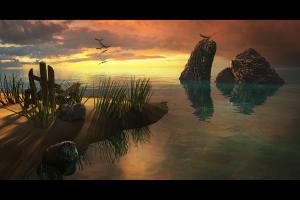
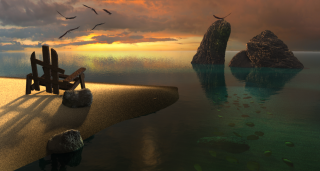
Ok here is another attempt at the shoreline. Better?
Photoman
-
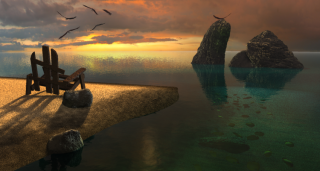
I'm a bit doubtful about what look like specular highlights facing us on the big rocks. How would the sun light those from that angle?
Ahh you caught me, I place a kleig to give fill because the angle of the sun makes all the detail in shadow. Odd though I dont have specularity on in the kleigs property's. Just diffuse... Ill tweak that in next render.
I can tell that your beach line tga is too undefined, and too small. I mean the scale is too small and you are losing detail when it is scaled up. That's what's causing it to look so ...pardon the pun...washed up
I still need to work on that, probably reopen in PS and spend some more time working on that, I am still having trouble though with realism there.
If i had A:M Paint Im sure it would be a lost easier to add that shore in
hmmm If I had the money.Photoman
P.S. same render as above with particles:
-
-
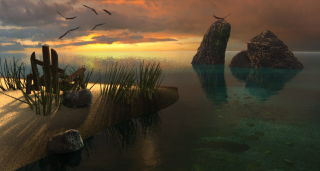
Here is a quick render of some recent progress, I turned particles off as well:
About a hour to render
Still working on the water line.
Photoman
-
PM:
making a transition decal for the shore is really easy. Take a screencap from the top of the chor in shaded view to get a good idea of where the water line is. Take this cap and load it into PS. Increase the size to what you feel is a good size for your final render, say 2000xs1067. Now make a new layer and use some kind of soft grunge stamp, I used a moss stamp before for this, to stamp the shoreline. Be creative - should be no problem for you - and random, making sure your stamps all connect, no individual blots, and make sure your stamps overlap the shoreline on both the water side and the beach side. It doesn't matter what color you use or if you used a green moss stamp and now you have a mossy shoreline, because you will be applying this shoreline grunge map as a diffuse map. Depending on the look you get, you might want to apply a soft gaussian blur. Once you are satisfied, save the stamped layer as a TGA with an Alpha map and import it into AM. Go to your beach model, temporarily import the water and now take a shaded screencap of that in top view. Use the screencap as a 50% opaque rotoscope to help you position the new grunge map decal you just imported from photoshop. Before importing the new decal, but after correctly sizing and positioning the top screencap, delete the shoreline model. Now all you have to do is apply the grunge decal using the top view rotoscope as a guide. Again, change the decal properties to diffuse and adjust the % to what looks best in the chor. That should give you a pretty decent water transition for your shoreline.
Hope that helps
Eric
Thanks for the advice!!
I did something similar to that to get my lame shoreline now... I screencaped the top view and in photoshop just used the paintbrush to add black to the shore line, then I blurred it quite a bit and saved as a tga w/alpha. Then in A:M applied it as a diffuse and reflection maps.
Though I does give a better transition I need to adjust it WAY more.
Thanks
photoman
-
No, just some badly groomed hair that needs to be adjusted
Photoman
-
Thanks for the C&C!!
I did add a relfection and diffuse map to the edge of the terrain. I noticed if I increased the reflections too much it created a almost mirror finish even with the displacement mapping and bump mapping of the terrain.
I am going to update it once again today and rerender it. The final has to be 4500x2400px (15"x8" @ 300dpi), so I render about 2000x1067 (The max my computer can handle without crashing
 ), and I uprez it in photoshop.
Photoman


Terrain lighting
in Work In Progress / Sweatbox
Posted
The second one is my pick.
When I light outdoor scenes or terrains I usually thing about how it works in the physical world. The sun casts its light from an angle depicted by the time of day. Based on that angle only certain wavelengths of light are visible (ie noon is very white harsh light as sunset is only the longer and thus redder wavelenghts). Also shadows depend on the time of day, for midday-noon harsh shadows are ok, but at dawn or late sunset/sunrise the shadows are very soft because of bounce/atmospheric light.
But as Robcat mention raytracing can be a render killer. With that said, I dont know if you would want to set up a z-buffered kleig array though
Ive been wanting to record a tut on out door lighting with a sun type light for a while now. Maybe I will this weekend, oh well.