


photoman
-
Posts
588 -
Joined
-
Last visited
Content Type
Profiles
Forums
Events
Posts posted by photoman
-
-
Here is the final rendered title sequence:
Photoman
-
This is sure been a quick project, rendering as I speak, averaging 30seconds/frame @ 720p without multipass...
I'll post when its done.
...
I am glad this is bringing back memories
 , I will post my faux-documentary when I finish it as well
Photoman
-
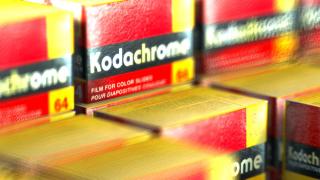
Well I started the modeling/decaling.
I modeled the box by first taking another box of 35mm film (Fomapan if your interested) and unwrapped it into a "T" shape. I then modeled that, took a screenshot of that. Then I pulled the K64 out of the freezer and setup my dSLR on my tripod like a copystand and photographed each side. Then using the screenshot in photoshop I cropped each photo of the sides of the K64 box into the "T" shaped model. THEN in A:M I made a pose and folded it into the box, and exported that decaled pose as a regular model...
Here is a quick render, only used 3 z-buffered kleigs, took about 3 minutes to render at 720p.
Photoman
-
Hello!
As always it has been a while since I've posted anything here but I have been lurking! I have a new project now that I figured I should post a WIP of.
First a little background:
As my forum handle suggests, I am a photographer. I shoot a lot of digital but have in the past year gotten into analog photography. I now shoot my own B/W film and develop myself.
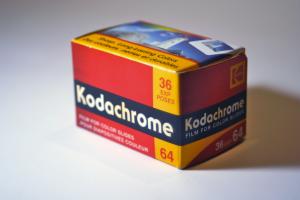
The very popular and famous film, Kodachrome, was discontinued last year by Kodak. This film which is truly unique will never be made again. Also the one lab in the world that can still process it will stop processing at the end of this year.
I managed to get a hold of a single roll of Kodachrome 64 the other day and I thought it would be great to make a video/documentary about me shooting the roll, sending it off to be developed, and studying the slides, as well as including a brief history about that film.
ANYWAY, the reason why I am posting this here is that I plan on doing the title sequence with A:M.
The plan for that is to have a stack of the K64 boxes and then have the title text drop down on top of them. Pretty simple right? Well I want them to be ultra realistic and professional so I am going to take my time in decaling each box carefully and exactly.
I will post more once I get the ball rolling a bit more!
Photoman
 (Shot with my Digital Camera)
 -
I will attempt an entry !
Photoman
-
I would try a velvet shader in combination with a bump/displacement map, and also place a few kleigs in the scene that just cast specular highlights and orient those to higlight the edges of the bumps to increase detail.
Photoman
-
That looks great!
What image did you use for the environment map?
Photoman
-
27 hours later.....
Render finished!
Despite crippling my computer for the past day or so the render has made it through the finish!
I have been playing with it in After FX and photoshop. I guess your right Matt I seem to be getting black skys when I load up the buffers and the reflections from the sky are all gone
 . But in the main RGB buffer everything is fine.... hmmm....
Anyway I brought the straight EXR into photoshop and did some adjusting, dodging, and burning. Converted to a 8-bit rgb jpeg for the web too, though the 32-bit version looks a lot better
 .
.Please critic the gamma, tell me if it looks right please!

Photoman
-
With those render times, I sure hope you are rendering with Light Buffers.
I am rendering with every buffer on except alpha and shadow.
I take the finished render into aftereffects I run a script which separates each buffer into a layer and I then export that frame as a multilayer PSD which I edit in photoshop.
Photoman
-
Yes, and what's more of a problem is the pixels on the boarder of your geometry will take some of the color from the background sky. It might be best just to set the background to something strange like neon green and just do a completely green screening in post processing; that, or I guess we could use sky boxes
Im not actually having many problems with the sky being black.
I have started the final render now.

1600x900px 3x3pass, 100,000 photons (i could have done 1,000,000 or 25,000 but 100k was the middle ground) final gathering at 50.
According to A:M it should take about 27 hours since each pass is just shy of 3 hours, also ignore the giant string of random numbers where the time is, its a glitch that happens occasionally.
Thanks for the crits!
Photoman
-
Some of the scenes look pretty dark, so you might want to add some gamma correction to your images. Render a small image (320x240 would do) as an EXR and use the A:M Compositor to find the exact gamma that looks best, and then apply that to your renders. The reason for not rendering everything with EXRs is because you have a lot of the sky visible, and EXRs tend to make all of those sky pixels black. If you put in a sky box, then you could use EXR without worrying about getting a solid black sky.
Its kinda funny actually, I am working on a MacBook right now and according the LCD gamma everything looks fine, but I know it is too dark, what I will do is gamma correct in photoshop on my PC when I am done.
Also I am using a skymap/skydome for the sky, also I have alpha channel turned off as well.
Photoman
-
The ammount of photons you need for a simple model should be low, but that doesn't mean you can't add more to make the radiosity calculations more accurate. The most important step is to get the sample size correct. In order to get it just right, do quick renders of your radosity without Final Gathering turned on. Increase your sample size incrementally (usually by 100), until you stop seeing any change in the shading. That's usually a good sample size to work with, but I find that once I hit that point, dividing the sample size by 2 gives me better results once I turn final gathering back on.
That what I usually do, I had the radiosity plugin with v13 but Ive been too lazy to install it with v14. Right now I am using 100,000 photons, photon sample size is 5,000. It works with 1,000,000 photons, size 500 and 25,000 photons size 20,000. The only difference I can see is accuracy, is there a render hit with more photons?
Also here are some photonmapped shots:


I have renders rendering right now with final gathering on, 1hour passes at 3x3pass 1000x665.
Photoman
-
It's looking better, and much brighter too.
To use soft reflections, turn on Soft Reflections in the rendering options window (it's inside of reflections), make sure your surface has some reflectivity, and change the specular size to make the reflection more or less blurry (0% being like a mirror, and 10,000% being like brushed metal). You might want to play around with those settings before you do any long renders. I believe the blurriness of the reflections is exponential, so 10% will be twice as blurry as 1%, and 100% will be twice as blurry as 10%, and so on.
Wow I never knew that, I had always thought blurred reflections was a mass override for all reflections in the scene, interesting. Thanks!
I have experimented with photon counts ranging from 25,000 to 1,000,000. Besides render times and lighting accuracy is there any reason to have more photons?
Photoman
-
Here is a quick radiosity run:

100,000 photons
It was taking an hour a pass at 1000x665 5pass so I canceled it at its 3rd pass to get more work done.
I am currently tinkering with other things as well.
Photoman
-
Nice project ....Did you try radiosity ?
Generally I like to save radiosity for indoor scenes, I find it more of a hassle sometimes when using it outdoors (I constantly adjust radiance values everywhere). BUT I may experiment with it later.
My render times are about 18minutes a pass at 1200x675 16pass. The IOR on the water with the bump map really adds to the render time.
@MattWBradbury
How do you set an individual material to have soft reflections? I like the sharp ones on the water. Also I may experiment with the steps being glass.
Thanks for the crits!
Photoman
-
I like the cantilevered steps. Are they clear or just reflective?
Probably a code violation, though.
They are very cliché, also they are 100% reflective, I may experiment with them being glass. Also since there is no handrail it is illegal, does not pass ADA.
Photoman
-
Hello! Once again it has been a while since I have posted a new project.
This one is more of a sketch. The idea came when I was daydreaming in class
.Here is where I am at:

I am using a z-buffed kleig as the sun light, AO for the indirect lighting, and a few fill lights here and there.
Notice the wavyness in the shadows, thats from low z-buffer map resolution.
I marked up what I plan to do now:

Photoman
-
I agree with fae_alba, the DOF is so shallow that it looks like it was shot with a macro lens, or a lens with a shifted focal plane. To achieve a more "accurate" DOF I would have less blur, most landscapes are shot with aperatures like f/32 and f/64 so that it minimzes the DOF and everything is in focus.
BTW love he foliage!
Photoman
-
It is possible with a:m composite... Let me see... I see if I can whip up a tut tonight...
Photoman
-
Hey Everyone.
Wasn't sure where to ask/ re-visit this topic. Here goes.
Getting the shadows separated for a composite is doable and I have been creating these in a separate pass with alpha buffer for some time.
HOW do I get the occlusion shadows separated out or together with the normal light shadows. Can you do this for overlaying it in a compositing app??
I have tried numerous things, but so far no real success.
Render to OpenEXR, there is an occlusion buffer that gets put in there.
Photoman
-
Thanks Robert. The one thing I didn't understand was that you can select the color to be in focus.
Glenn, I'm using Gimp with the focus blur plugin, which you can't select the color for focus. I'll have to look at the paint.net.
The one issue with using fog is, hair with images. For my landscape scene, I can't remove the images for the leaves and foliage, I would have to covert all of them to white images. So fog is not an option for me. I'll keep experimenting to see if I can come up with an easy reusable solution.
Use the null shader in camera plugin shaders. It worked for my scenes which had particle leafs (hair system) and particle grass.
Photoman
-
Well, Ive been looking back at this project (Its been a year since I finished it) and I now want to further enhance and update it.
I am going to rerender it at dusk-late afternoon, and I have a new plan on how to be able to render the displacement, hair, and AO!
And before anyone has a (another) rant about resolution, I AM NOT COMPLAINING ABOUT RENDER TIMES.
So.... here is a quickie update on the rock up front:


AO is used
Photoman
-
How do you create depth maps? Is it generated by using open exr and buffers?
Yes, it can be created by that.
However you have level the resulting Depth-Map, because it is 16 or 32 bit and will show as a black image if you dont do that.
*Fuchur*
I don't understand, could you make a tutorial?
The way I make my depth maps is:
1: Turn on null shader in the camera plugin shader settings (for all of them)
2. Set fog color to white
3. Adjust fog to simulate where infinity focus (pure white) is and where close focus is (no white)
4. Set to 1 pass
5. Render!
It can be a pain sometimes to get the fog correct, but it does work for me.
As for the EXR I have never gotten a Depth buffer that wasnt pure black.
Photoman
-
I used a depth map from this render here: Post 28
There is a quick video with sweeping focus.
Photoman


Imperial Hall
in Work In Progress / Sweatbox
Posted
Hello all!
It has been (I feel like I have said this too much) a long time since I have posted. I have been really busy with school and polo and photography stuff.
My Dad wants me to do another archviz sketch for his office card for Christmas. Last year I used my Residential Lap pool sketch.
For this year I wanted to mix it up a bit.
I first started by using a vertical composition (Final render is going to be 1200x1600px). I then chose to use a one-point perspective composition to emphasize scale and accentuate depth. After I had these in mind I sketched out a doodle involving pillars and arches. The idea was to have a hall lined with pillars lead to another chamber that had an arched door that lead either to a Christmas tree or some other festive element.
I started the modeling and shading. The modeling is pretty much finished, I have just started the shading/texturing. As of right now all materials are procedural, either darktree's or images used with the BitmapPlus plugin.
The lighting is supposed to be at night. I used a blue kleig pointing in as the main light in the large chamber, I also used several orange bulbs to simulate torch light in the large chamber. In the hallway there are 2 bulbs at low intensities to give shadow detail.
The first image is just a test render, the second is where I am at right now. Both are using radiosity with 35k Photons.
50minutes 5pass
1:40:04 9pass
I shall post more as I work on it more.
Photoman