alano
-
Posts
75 -
Joined
-
Last visited
Content Type
Profiles
Forums
Events
Everything posted by alano
-
Not sure where to put this post since it technically isn't a work in progress but a completed work. Tried to upload it to the gallery, but process stalled. Anyway, enjoy. http://www.decksawash.net/eggs/eggs.html Alan
-
Audacity rocks! I record dialoge and sometime foley using it and then massage the results. You drop the wav file into AM and Bob's your uncle. Why your mother's sister married that nimrod I'll never know. Alan
-
Render Problem- Strange artifacts showing up on final render
alano replied to cindylyoung's topic in New Users
I have some new information though I'm not sure what it means. I created a single 4-patch and added a decal with transparency that has given me trouble: Sample 1. I then deleted the decal, added one over the whole patch (no transparency) which rendered as expected. I then added my transparency decal and it also worked as expected: Sample 2. sample1.mov sample2.mov I'm confused. Alan -
Render Problem- Strange artifacts showing up on final render
alano replied to cindylyoung's topic in New Users
This looks similar to a problem I'm having with decals on v15. The decal somehow spreads to nearby patches and leaves solid color patch-like artifacts. Support has been no help and I'm still at a loss. Do you have an old copy of the model without decals to render with the new version? Alan -
Rotoscoping (animation) is the devil's work. Alan
-
Animation = Patience + Persistence Alan
-
You need to create the walk in a regular action to get access to the "has stride length" setting. Then when you drop the character into a chor with a path you can constrain the mdl to the path and drop the walk action onto the timeline (the chor action) and she should be all set. Don't know anything about the rig. Sorry. BTW, you can probably get rid of the leg "popping" by lowering the hips just enough so that the knees always have at least a slight bend. Alan
-
I thought the body motion was pretty good but I wanted something to tell me she's moving like a little vibration or hair movement. Good job. Alan
-
I noticed a few things about the walk. The first is that the hips don't move side to side or rotate. This makes the whole walk kind of stiff. Likewise the upper torso is doesn't rotate at all while the shoulders seem to move too much but that could be the armor. The feet slip on the ground instead of gripping firmly. This would be more obvious if the ground had a texture. The left elbow is too close to the body and passes throught the left hip. The whole thing is kind of jerky. Finally the character lacks weight. The lowest point of the hips should be a couple of frames after the heel strike. Look at your curves in the timeline and I'll bet you'll see a lot of sharp turns. Smooth out those curves and the action will look smoother too. I hope you were asking for a critique. If not, disregard all of the above. Alan
-
I noticed no walk. The video file didn't make it. Alan
-
I think your initial analysis of this as essentially a biped doing a standing jump is a good one for this character. That said, I'd start with the knees already slightly broken so they don't pop as she crouches. Bend the head forward, elbows back and stick the biped butt out which will push the rear hips rearward. Start the jump with the head, then the arms and finally the legs which will tuck in the biped butt thus pushing the rear hips forward. She also needs more settling time after the landing but maybe you didn't get that far. The model, while well done, is disturbing. Alan
-
That's the problem. When I do just as you say, I get the split spline. I tried smoothing, but since it isn't recognized as one spline it doesn't change anything since it wasn't peaked to begin with. I've never run across something like this before. The model is an egg carton and I think I'm just going to start over because the normals are causing me fits as well. As I clean up wrong facing normals, previously correct patches up and decide to switch wrong way round. AAARGH. Thanks for your help. Alan
-
Here's something I haven't seen before. In "improving" the patches on my model, I naturally want to attach ends of one spline to another to make one continuous spline. But when I do this, the splines connect but the result is not continuous. That is if I hightlight one side of the CP I get one bias handle and if I highlight on the other side I get a completely different bias handle. The "," key verifies that the spline isn't connected properly. This seems to be common all over the model, but if I create a pair of splines out in space and connect the ends, it works just as it should. Any help would be appreciated. Thanks, Alan
-
Bite the bullet and adjust it frame by frame. It really won't take that long compared to any other solution and it's important to remember that some actions simply must be tweaked on a frame by frame basis. I think this is one of them. Alan
-
I've got, thanks. Alan
-
Thank you Rusty, but I couldn't download it. Alan
-
Ah, this makes more sense now. I used AM some years ago for a short, but I wasn't smart enough to haul my archive out to see how I did it then. The program seems to beg to be used as a project file for a scene (a continuous span of time in one location) consisting of at least one shot per chor. Obviously for technical reasons this doesn't work well accept in the case where the scene only has one shot. So a wise move would be to create a master project file for each scene with all the objects, materials, actions etc needed and copy it x times for the x shots required and rename them accordingly before setting out to do setups and animating, yes? Thank you all very much. Alan
-
Thanks Rusty, but I guess I didn't put my original question quite right. My models, decals, actions etc are organized into folders inside one project folder in the root directory of my hard drive even for a small project (5-6 min) like this. When I'm done with the project, the entire project folder will be archived to data DVDs where I can easily find whatever I need again. My problem was that my AM project file loads all the chors into memory when it loads. I suspect this slows down the response of my computer when I'm animating in a new chor. My solution is to save the chors I'm done with (for the time being anyway) and delete them from the project so that only one chor gets loaded into memory at a time. When I'm ready to change something or render, I'll load that chor back into the project and then delete it again when through. I also wanted to know how people translate the filmmaking concepts of shots and scenes into the AM concepts of projects and chors. For example, do people put more than one shot into a chor or use multiple project files for a single scene? A shot per chor and a scene per project file seems right to me in most cases, but I recognize that others might have found a better way. Alan
-
Thanks for the tips all. I think I'm going to keep on with one chor per shot and limit the number of chors loaded into the project to 1 or 2 at a time. I'll be rendering the chors one at time anyway so this should keep the overhead low while keeping all the objects, decals etc handy in the overall project. This should work fine for my one-man short where I don't need all the organizational overhead a larger multi-person project would require. Alan
-
I'm working on a short film using AM and I'm interested to know how people organize their projects and chors. My short, like most, has a number of shots that need to be animated using a fairly consistent group of objects (characters, props, scenery, lights etc). I've started by making each shot a chor in one single project: if I was to have 12 shots, I would have 12 chors in that project. I am rethinking this since I've noticed that each chor seems to get stuffed into memory whether I'm working on it or not. So my question is, how do you take your scenes and shots and organize them into projects and chors? Thanks, Alan
-
Oh toolbar, you're home! Thanks Caroline. Now if only I could get my hair back... Alan
-
OK I was foolish and somehow I lost my models toolbar. All the other toolbars show up as they should. Checking or unchecking the model toolbar box in the toolbar portion of the view menu has no effect. Do I have to reinstall? I'm running v14 on an win XP setup. I suppose this could be the program's way of making me remember all the keyboard shortcuts. Thanks, Alan
-
Thanks for the responses. Ken, the spacebar trick didn't work but upgrading to v14 did (so far). I had thought I was using the newest version but I guess that whole number thing is a bit too much for me. John, I do have collision set for both, perhaps I'll try and turn it off on the least needy one for each shot as I go. I'm a little worried because I have a shot coming up with three characters. I suppose I could render them separately if I have to. I dislike workarounds though Alan
-
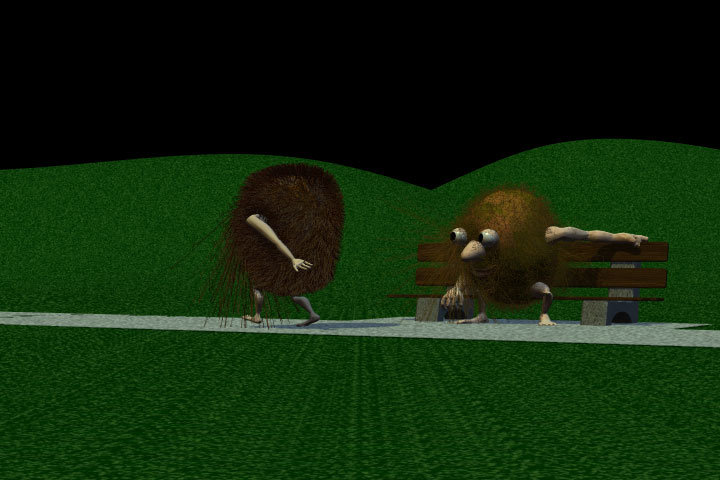
Hello all, I'm having a problem I've not seen elsewhere in the forums and I hope someone can help me. I have a hairy character that looks fine in the model window and for the first 15-20 frames of the chor. but she sprouts wild-ass (can I say ass on these boards?) hairs from part of her geometry after that. These hairs are much longer than they are supposed to be and show up in real-time as well as rendered pics. I've tried deleting the hair from the model and reapplying it, changing the length of the hair and weeping pitiously but to no avail. I'm running v13 on a P4 winXP system. Here is a pic from a motion test: Thanks, Alan