


entity
-
Posts
895 -
Joined
-
Last visited
Content Type
Profiles
Forums
Events
Posts posted by entity
-
-
Excellent work!! Much more like the original! I love it even more.
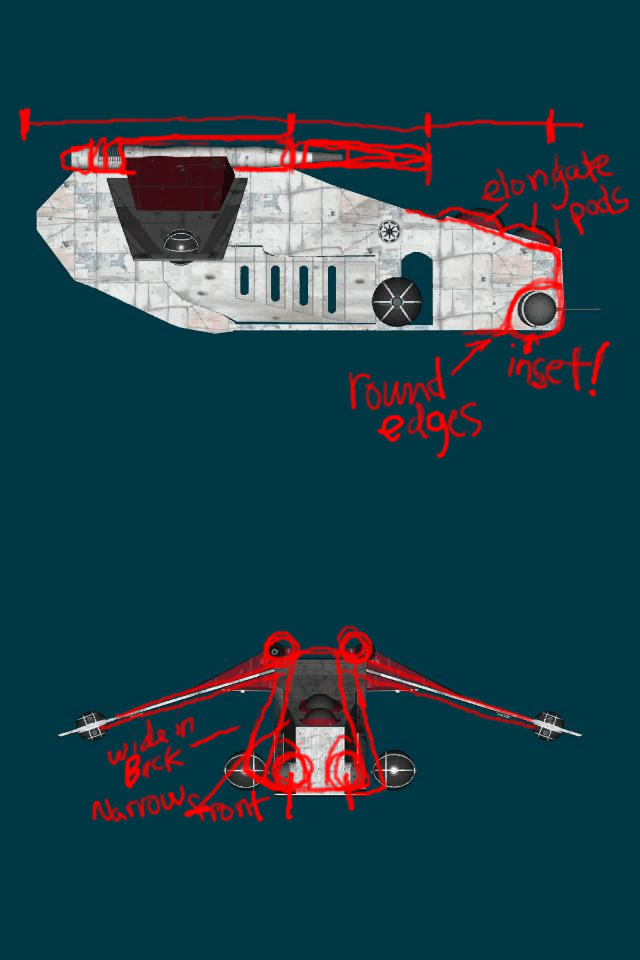
All I can see that is different from the actual one from the movie (I know you are using the GameArts version of it as your reference), is that it looks to me like the one in the movie version has rounder edges on the top of the body... I think it's acceptible as-is if your pressed for time... if not, round the top edges more, in my opinion.
The Force Is With YOU!

-
Can't wait to see it... GOOD GOING!!!
-
Maps should be placed normaly except make one of the side by side maps overlap the other. Then the map that is overlapping should have a alpha map added so that you end up with a smooth fade into the overlapped map. To create an alpha in photoshop... make a new alpha channel...select this channel and deselect the RGB channels, but keep them visible (make sure the alpha map is also visible... choose a tool to paint with (airbrush gives you a soft edge) and draw the alpha (using black with a white background- black is transparency in alpha channel).
Or you can simply use the mask tool to select an area and under channel options you can choose to use the selection to make an alpha from. I perfer the drawn method because I can see the faded area clearly... with a mask it gives you a line of "marching ants".
That's how you get well blended textures from one into another.... there are tutorials out there on how to do all this in detail... check the Hash site to find them.
If you mean by "seamless texture" one texture that will be repeated accross the entire mesh... I don't think that would be very defining on an animal... a tiger is not entirely striped. I'm interested to see what you come up with.
-
There is a tutorial (by Zandoria Studios) that I read to learn so I could texture my model.
THE best (AMv11) UV editor tut, I know of.
Hope that helps.
-
I think you use color very well! I might add, that I always find it very moody. No matter what you model/render it seems to have this dream-like quality... and in some of your work even nightmare-ish. Looks like it's coming along GREAT.
-
HeadlessBill:
You are the king of sarcasm. Thanks. <_>
-
Sounds like it'll work... Good luck.
-
You may need to post a wireframe so we can see where your patches are... I couldn't even tell you without more info on what you did there.
-
P.S.
Ken-- I still want the ear, so I can install in the female character next. I will credit you an ear... anything you would like in return for your ear?
-
I don't think I could handle another ear transplant... I ended up with and error deletion... which is when you delete a part of a hook but not actualy the whole hook and A:M thinks it's still a hook there even though you deleted the other end of the hook... had to delete more than I wanted and replaced more than ears and ended up with about 4 more 5 point patches, modeling H*LL if you ask me! I'd have to be crazy to attempt another. But thank you, I think it gives him character to have incomplete ears...
-
OKAY!
I worked on some of the problems with the model... The nostrils have more definition and the ear, well... I guess I'm just not good with ears at all, but I tried...

Think I'll go to bed now...
-
I couldn't help the temptation to try this... it is very difficult to do... take a look at it and try it... I had a hard time with the indented parts... but I just wanted to show you what I meant about round corners...
I attached the model I tried...
-
Confirmation from Yves... it breaks the illusion so MUST be fixed... Thanks. Details on the nostrals and ears... argggg! That means re-texture.
To quote Dr.Smith:
"Ohhhh, the pain!"
-
P.S. You don't have to take my advice, I'm no expert... But I love Star Wars and all of it's parts. You are close enough already to a likeness of the ship, but I would love to see an exacting duplicate.
Thanks for sharing... I'm waiting to see it in motion!
-
the head on view (front view) shows that it's not narrow enough at the top and doesnt have the round corners associated with this vehicle. I hope you don't mind, but I had one more look at the movie to make sure I was seeing this right...
-
In Windows machines you can just hit Alt+Insert/PrntScrn buttons ( which copies an image of your screen to the clipboard) then just paste into a new document in a photo editor or paint program.
-
I hope you didn't shave your head for this project!
If that's the inner mouth, it looks a little patch heavy to me. Especially as it's rarely seen in detail.
Ken-- HUH?
 , I got from 10,000 down to 7,600 patches and lost a lot of detail... I formed the gums to wrap around the teeth... it was necessary to keep that detail, in my opinion. Without it, you have teeth growing out of a bump.
 -
So far the textures alone are 1.26 gb! And I didn't waste much of that. It takes my computer about 20-30 mins just to load texures ... no problem though, because the render times are short thereafter; about 2 min.(full figure) to 5 min.(close-up) per frame depending on how close the camera is to the model. But then again I usually run other things while I render, so that probably slows A:M's rendering a little.
I plan to use cloth simulation... just to test and see "what I can get away with". If it proves too time consuming to do, then I will just replace the body with unibody clothing+rigged with dynamic bones.
edit: The texture maps I included to show what they look like but they are about 5 times that size... I was inspired by the work done on the HULK movie... I think those were 5 times larger than my textures... but they have a render farm!
-
 I cheated on the nostrals... I took away lotsa patches that held the original shape of things because I was running up to 10,000 patches (lag city)... without teeth gums and tongue. By the way... his gums are connected to an inner lining of the mouth... yes I modeled the inside of the mouth completely attached, but I had to give up the finger nails to do it.
Heres the UV-Head_color map/ head wire map. The ears and teeth have their own maps. Using alpha map to blend between the edges of some of the maps.


Thanks for your comments... I can "see" a lot better now.
-
This is what I modeled from...


I "traced" him, literally from photo reference, the only problem with that is when you model a character you are doing it with an orthogonal view... the camera the actual model was shot with has perspective... I've tried different camera angles and settings and find that this is normal depending on where your camera is and what your focal length/angle is... I may have pushed the virtual camera outside of the real world limits... so things got distorted. Realism is a B*tch.
-
Posting some work in progress on my character, he is not clothed yet, but 90% of the phenome poses are done, 1% of facial poses, and the "hair" is complete... I should have the model clothed in 4 weeks--
week 1: finish phenomes
week 2: finish facial moves
week 3: rework rig/shoulders
week 4: finish/ test clothing + any textures
The first renders are of the head from the modeling window (Each was 1280x960 and reduced and composited together in photoshop):
(Note: Textures are 4000x3093...(Color/bump/diffuse/specular intensity) Head, torso, right & left arms, right & left legs, right & left hands (color only), and feet are not texured. The reason I have seperated textures for limbs is because I may want to add tattoos or scars to only one side, so I need individualized texures for each part.)

The next renders are of the head rendered with Skycast plus two lights. Rendered at 1280x960 and reduced in photoshop. And I worked on beefing up the structure of the ears a little, before these renders.


And One body shot:
I got suggestions on another thread on this forum to make the shoulders bend at the proper proportions because the width compared to the hips is wrong.

-
No-- it is not needed to create glow, now in version 11.
Just make sure ambience is high enough to produce the glow you want and I believe radience might have some bearing on the glow too...
but not sure about that one...
I think that tut was done for A:M 99 which would make it version 7 or 6??
????
 ????
????****strike that it's version 8!
-
Hello Hashers, splinespeoples, and Fellow Fellows,
So far, those attending the MAAMUG meeting v2.0:
Don "Batteries Included" Davis
John "Man with the Golden web space" Hubickey
Chris "Zen Cyborg- Mech Operator" Hover
Vern "Severely Overworked" Zehr
Rich "Not There, Yet" Jackson, and Sandi "Frenchist-Artist-Authorist"Johnson-Bohannan
Any others willing to attend, you can find out more information at:
MAAM user group page...
http://ddldavis.home.comcast.net/MAAM/maam.html
Basic info:
The date for the second meeting is Saturday, August 21st 1:00 PM
The location:
1817 York Avenue Williamstown, New Jersey (the home of Don Davis).
Again, anyone who wants to come on buy, please do... it's fun and informative, also anything except what you'd expect.
-
Yeah!!! I have P2p also and I noticed the same thing... I even uninstalled it once... but things got worse after that... so I reinstalled and just shut it down when running PS or AM or WMP. It slows things down for me two... It's probably P2P program is attached in some way to your system... and if you try to get rid of it ... it doesnt entirely delete... and I couldn't find the other parts of it.... so I just reinstalled it and said:
The H*ll with it!
How to arrange the texture map?
in Work In Progress / Sweatbox
Posted
You definitly there, friend. Looks good. Can't wait to see the results with the stripes added.