Tralfaz
-
Posts
899 -
Joined
-
Last visited
-
Days Won
1
Content Type
Profiles
Forums
Events
Everything posted by Tralfaz
-
I am not at the computer with A:M on it right now, but if you select QuickTime first, then click on Compression, you should be brought to a window where you can select Sorrenson 3 and a host of other goodies... The compression types you mention are for .avi files. Al
-
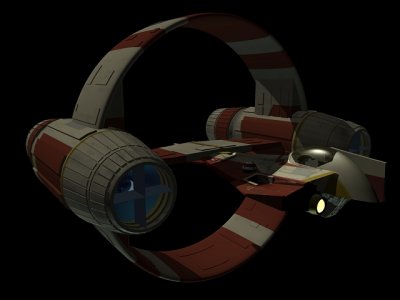
I needed a bit of a break from working on my Jupiter 2 model, so thought I would re-create the Jedi Starfighter and HyperRing model created in Anim8or. This is what I have so far after a few hours of work... C&C always welcome... Al

-
> I am assuming that this is London, England and not London, Ontario, Canada... Al P.S. If anyone is from London, Ontario, Canada, I would be interested in getting together to discuss A:M.
-

Looking for modeler for short Star Wars film
Tralfaz replied to PurpleDingo's topic in Work In Progress / Sweatbox
Anim8or was actually a pretty good free polygon based program. I got to be not too bad at modelling with it, but Anim8or lacked some features that I was looking for when it came to animating. A:M has all those nifty features and a whole lot more!! -
Jupiter 2 - From the classic TV series
Tralfaz replied to Tralfaz's topic in Work In Progress / Sweatbox
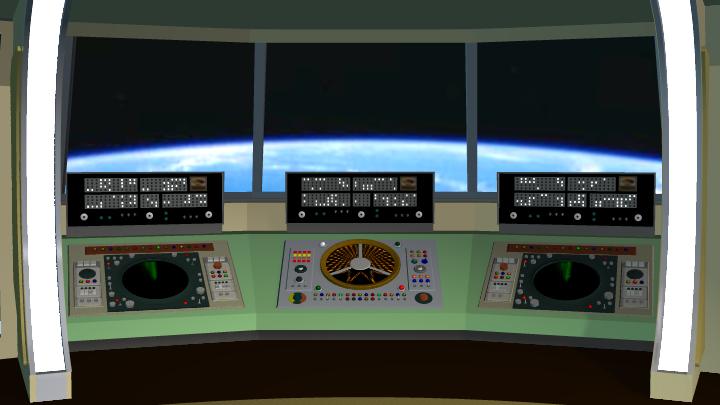
Another update: I have completed the flight deck consoles along with the animated actions. Now for some launch couches, astrogator, lift between upper and lower decks and a few other goodies... Jupiter2.mov C&C always welcome... Al
-
Looking for modeler for short Star Wars film
Tralfaz replied to PurpleDingo's topic in Work In Progress / Sweatbox
Any other ships that you need? Thanks... Al Edit: In case you need them, I have been working on an AT-AT in A:M... ... as well as this Jedi Starfighter and Hyper Ring. It was created in Anim8or, but I don't think it would be that difficult to re-create in A:M.
-
Jupiter 2 - From the classic TV series
Tralfaz replied to Tralfaz's topic in Work In Progress / Sweatbox
Thanks Martin. Watching the series now does kind of spoil the childhood memories. Somehow, a giant talking carrot doesn't hold up over time as well as it should... Once the interior is finished, I would like to donate it to the next Extras CD/DVD, if that is okay. Al -
They did that in Mel Brooks 'Spaceballs'. Funny, funny movie.
-
Jupiter 2 - From the classic TV series
Tralfaz replied to Tralfaz's topic in Work In Progress / Sweatbox
Another update: Completed the 3 computer consoles and center console. Everything is animated on it now with blinking and pulsing lights, rotating radar display, etc. C&C always welcome... Al flightconsoles.mov
-
Great looking models! How do you get renders to look like that? Al
-
I put together a quick small project that shows an ECG (see animation below). Hope this is what you were looking for... ecg.zip ECG Animation ecg.mov Al
-
Hi Grandma: Check out my animated flight console from Lost In Space at the bottom of the page here: http://www.hash.com/forums/index.php?showtopic=27452 If the bottom of the scope is something along the lines you are looking for, let me know. I can post a small tutorial that would explain it. I belive that technique could be easily modified for what you would like to do. Thanks... Al
-
Jupiter 2 - From the classic TV series
Tralfaz replied to Tralfaz's topic in Work In Progress / Sweatbox
Nope. Although Robert Kinoshita did design Planet Cruiser C57-D from Forbidden Planet as well as worked on the design for the Jupiter 2 and the Robot. Quick Update: Started working on the Flight Consoles. This is the start of the center console. I am going to model the interior from Season 2 working from photos of the original sets as well as captures from the TV series. Here is a quick animation of the console at work. Still trying to get the lights to blink properly though... flightconsoles.mov To be continued... Thanks... Al
-
Jupiter 2 - From the classic TV series
Tralfaz replied to Tralfaz's topic in Work In Progress / Sweatbox
In the Lost In Space Technical Manual, they tried to explain the changes in Dr. Smith. It had to do with the reasons the family were put into suspended animation prior to launch. The full power lift off as required by the Jupiter 2 when it launched from Earth, would cause serious mental problems to anyone who was not protected in the 'freezing tubes'. Since Dr. Smith was just strapped into a launch couch, his unprotected brain was affected by the engines, which then slowly caused his personality to change. Apparently, the Jupiter 2 was never used for a 'full power' lift off after that as the family never used the freezing tubes for space travel again. In reality though, Jonathan Harris realized that a character as sinister as Dr. Smith was, would have only a short lived time in the series, so he slowly changed his personna. The writers then in turn started writing for his changed part. That, and competing against the new TV series Batman, the producers decided the show should be a bit more humorous and not as serious as in the first season. Personally, I preferred the first season over the other two. Never could figure out where the Space Pod came from in the third season, and definitely missed the cliff hanger endings in season three. Just watched the first episode of the Land of the Giants a couple of days ago. Funny how when I watch it now, I can appreciate how Irwin Allen re-used just about everything from series to series. Music by John Williams, sound effects, set pieces, lots of stuff. Would really like to see the Spindrift modelled. Hope you do give it a go... Al -
Jupiter 2 - From the classic TV series
Tralfaz replied to Tralfaz's topic in Work In Progress / Sweatbox
Thanks for the kind words folks. It would be fun to do the whole wobbly flying through space as the Jupiter 2 tries to avoid a missile or a meteor storm. Love to see what you have done with your robot model George. After I was done with the Jupiter 2, I was going to do a robot as well as try a Dr. Smith. Quick update: I reworked the front view port as well as re-located the hatch a bit to line up better with the interior wall bracing. Also, am working on roughing in the interior parts. Colors need to be adjusted (a lot) and a whole lot of detailing needed. Just got access to season 2 of Lost In Space, so that will help out a lot with color and details. Thanks... Al
-
One of my all time favourite TV shows when I was a kid was 'Lost In Space'. Loved Robert Kinoshita's design of the Jupiter 2, the spacecraft that was to get the Robinson family to Alpha Centauri. So here is my attempt to model the Jupiter 2 spacecraft. Head on view Top view showing NGS locations Lower view showing fusion core View of flight deck Animation showing the fusion core and EVA hatch opening and closing. jupiter2_.mov C&C always welcome... Al
-
Woloshyniuk and dark jedi's project
Tralfaz replied to Woloshyniuk's topic in Work In Progress / Sweatbox
Kudos on a great model. The render looks fantastic, and I also can't wait to see the animation! Keep up the great work and keep us posted. Al -
If the story and animation are half as good as the models and renders, then it would be a serious contender for an Oscar in the short animated series. Excellent work, and look to seeing much, much more... Al
-
Pretty impressive. Congratulations on a job well done! Al
-
STAR WARS: The Battle Of Mygeeto
Tralfaz replied to Dark_Jedi's topic in Work In Progress / Sweatbox
Yes, please keep working on this film! And keep us posted on your progress. Al -
Great job on the phaser. You nailed it the look and feel of it. Also like the look of the Captain. And what about those hand held flash light thingies in the TNG? They had to be the most difficult thing to point, the way you had to cup your hand around it and hold it up at head level! Except for the big knobs on computer consoles (ala engineering), I preferred the design and style of the original Star Trek than any of its incarnations. Al
-
Those are some great looking models. Keep up the great job! Al
-
Hmmm. Jedi Dex in blue spandex bikini shorts on a Wookie skin rug. Yeesh! Gonna' have nightmares about that. Can't really remember how long it took to re-create the model in A:M. It was a while ago, and was learning modelling techniques at the same time. Would definitely do things different now. Jedi Dex really does have a butt. It is just that the blue spandex bikini shorts he is wearing underneath his clothes is keeping his butt well concealed. Thanks, but the real credit goes to the person who originally created the 3DS model that I worked from. I don't think I could create something like this from scratch yet. Once I am done with MMC 5 and the Lost World, I would like to get back to this Fan Film. Later... Al
-
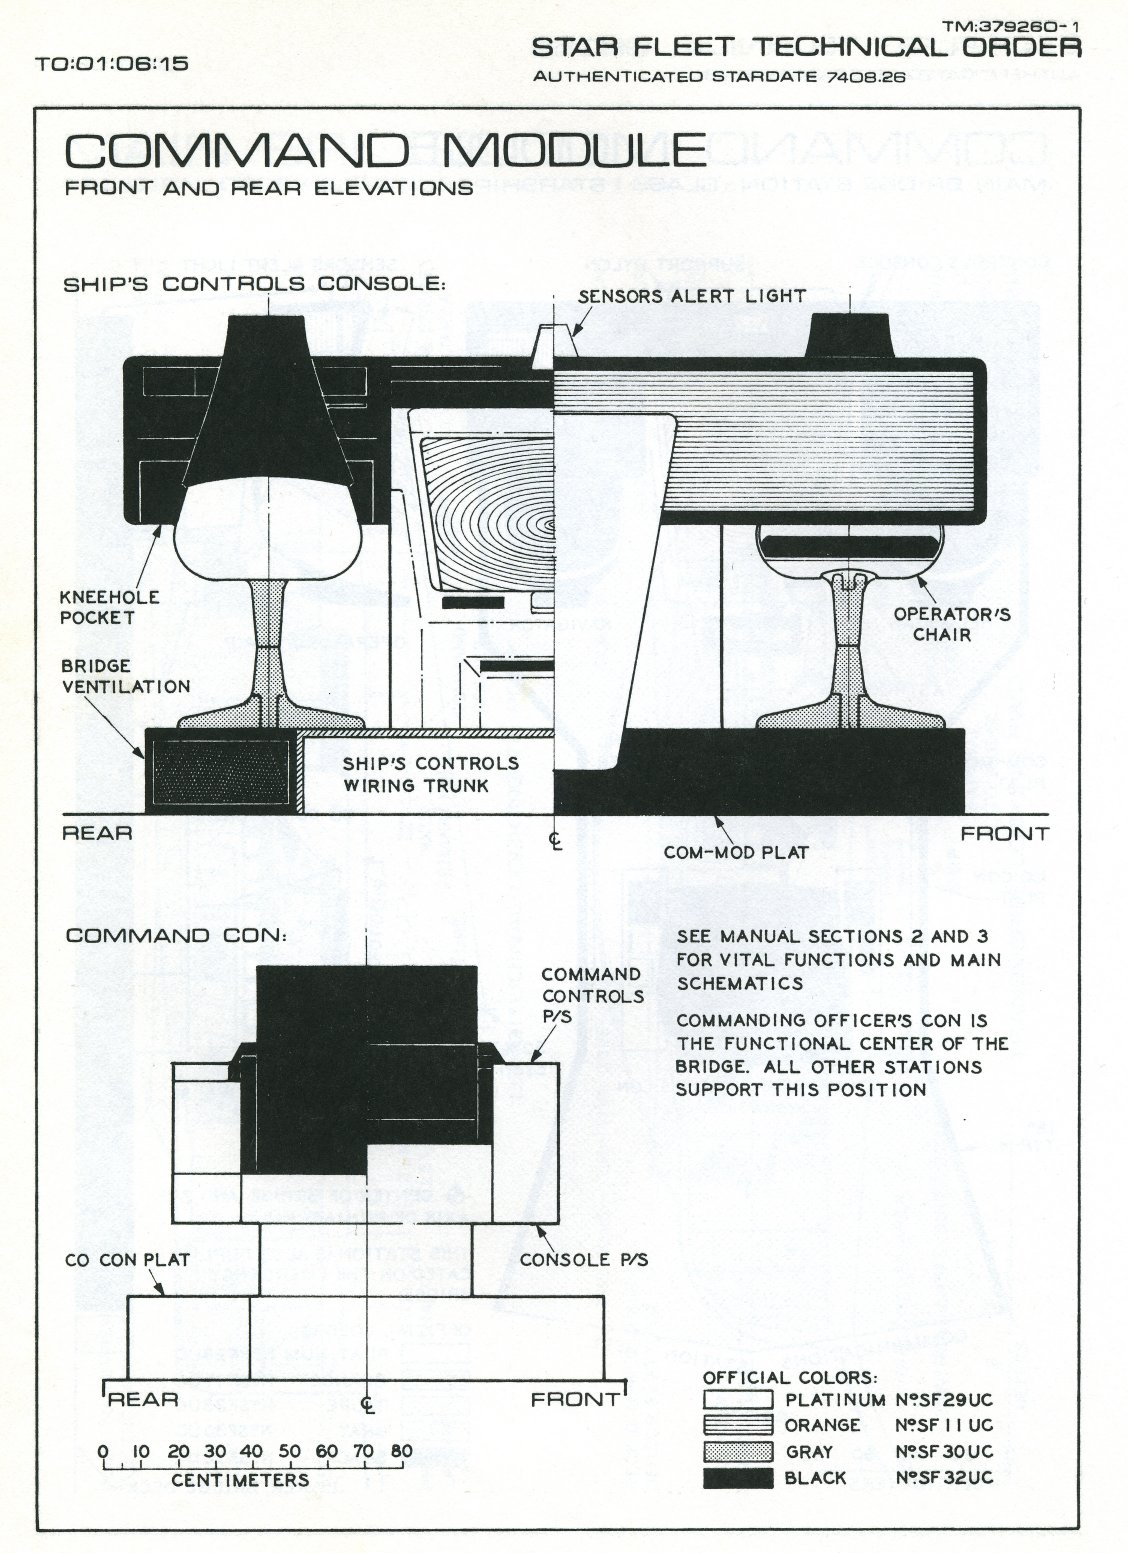
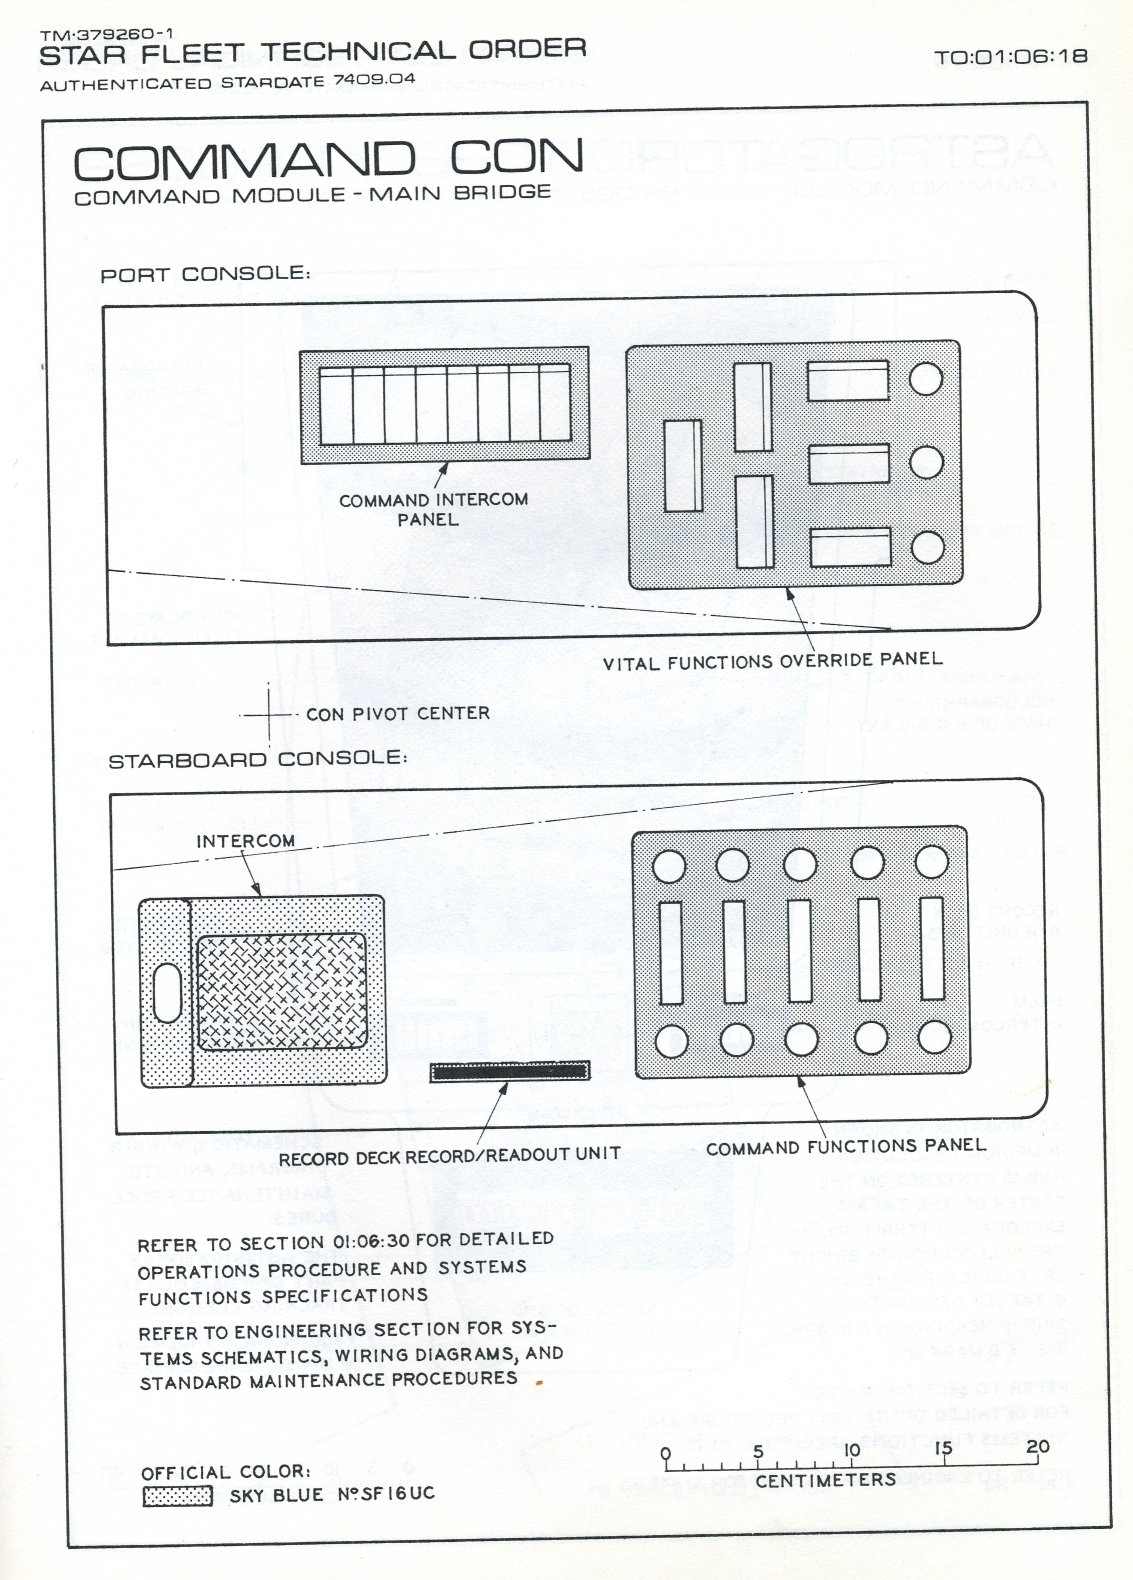
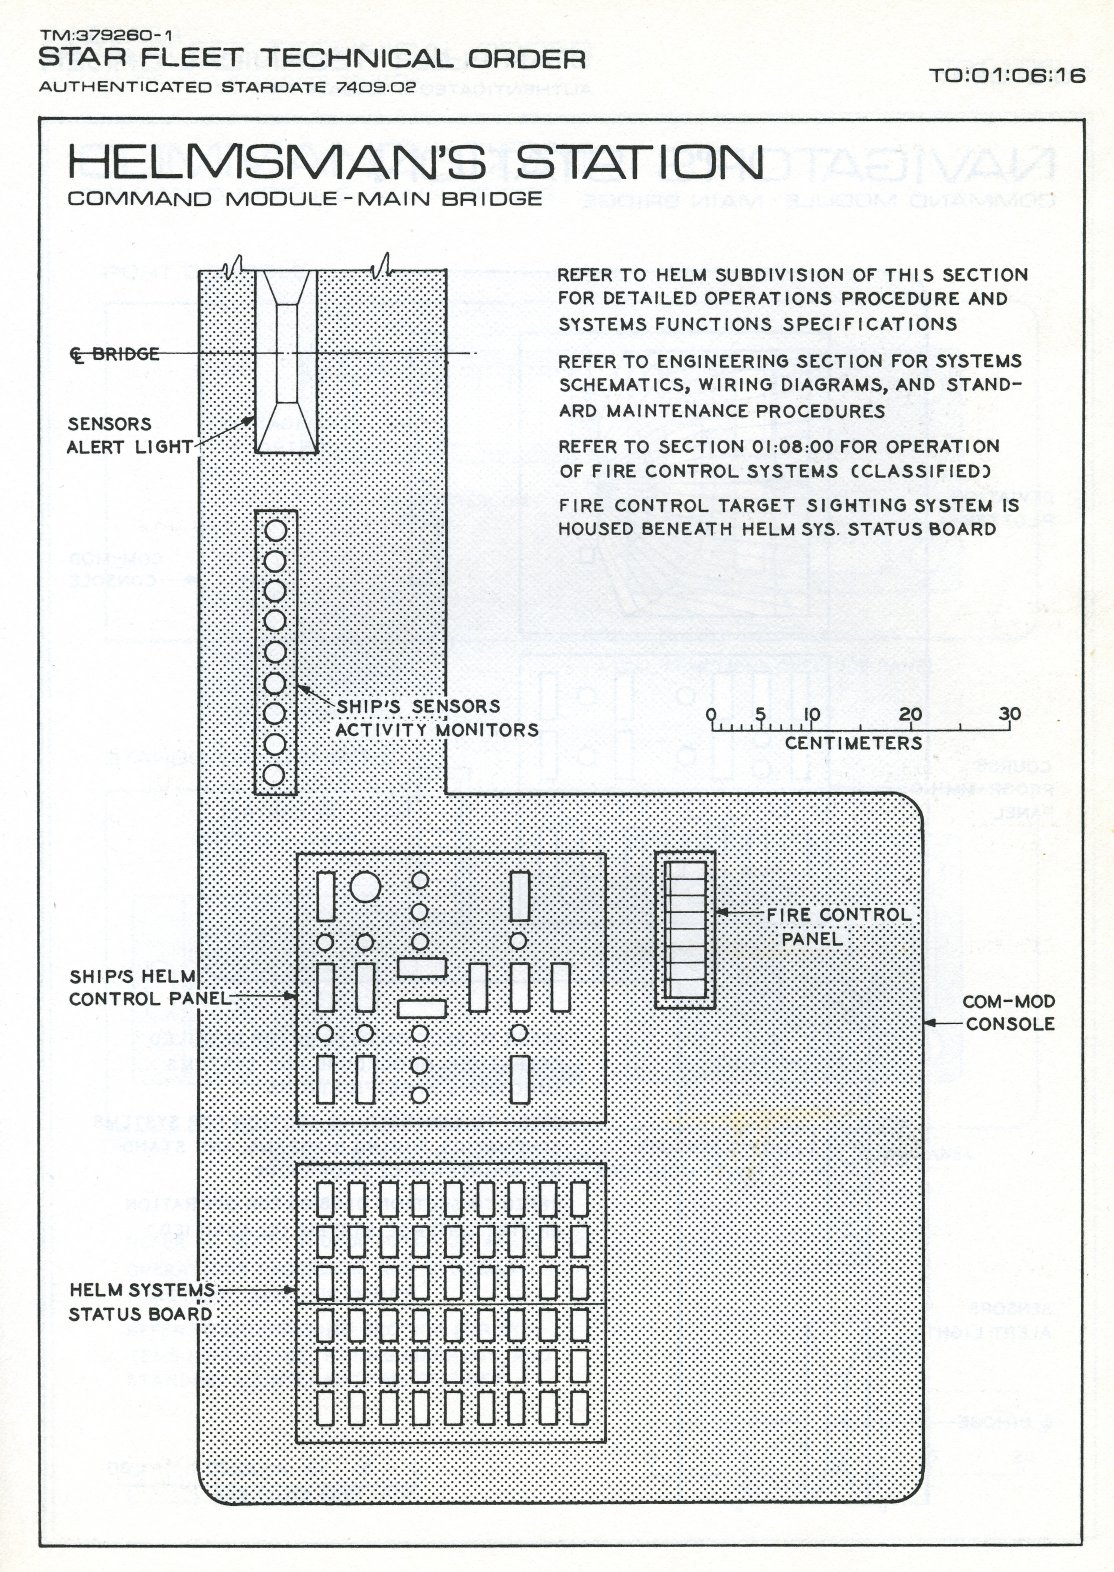
Here are some of the blueprints. Unfortunately, there weren't any really good close-up details of Sick-Bay, just an overview of it. Al
-
It has just about everything on the Enterprise as well as the shuttle crafts, tricorders, phasers, space docks, uniforms, bridge stations, medical equipment, well, the list goes on. When I get home tonight, I will scan a few things and post it here for you to take a look at. Then if it is what you are looking for and there is anything you need, just ask. Al