


KNBits
-
Posts
218 -
Joined
-
Last visited
Content Type
Profiles
Forums
Events
Posts posted by KNBits
-
-
Nice indeed. Let's all check for models to donate to community.
-
Hey it is looking great, but I think you should put it in a cho with proper lighting and minimum environment to do justice to your modeling and texturing. Then we'll see how it really turn. Also I suggest a render with at least 16 passes, 25 is even better, and with shadows turn on.
-
What Richard says is true, but if I remember correctly, Animation Master does not only work as square pixels. You can choose the pixel ratio of 0.9 (NTSC DV) in the camera propertie panel, so the stretch effect will already be compute in a 720 X 480 frame.
-
It look very nice so far. It seem like a very solid project. Definitely will enjoy to follow you through your progress. Good luck!
-
The windows look a little strange to me. Their layered style appears as if the middle portion is stationary while both the top and the bottom panes can slide up or down. A window that size wouldn't usually open, so I recommend make the window one flat pane rather than the layered panes like you have.
You're right. This is due to a change of design, but it kept some characteristic of the previous windows. The bottom panel is the only one that suppose to slide up. Thxs to point it out to me.
Bits - this looks awsome sir...... This scene has come a long way.... 6 hrs rendering time eh!! seems worth it to me.... I look forward to more......Thxs DL! I would like to go as low as 2 hours / frame and eventually render a little 5 sec animation of it. 24 fps X 5 X 2 = 240h = 10 days (ouch!). But I guess I will have to set a smaller frame size. I want to give a try to Yves radiosity tutorial with it too.
Man this looks better than the Half Life 2 scenes and they're good.I don't know about Half Life 2 but thxs a lot. Dunno how this would turn up in a real-time engine though.
-
I think this curvy and bold modeling style is very efficient, and you got a pretty nice feeling going on in that scene. The new lighting help a lot. I like the floor design that separate the kitchen and the living room area. The details are great and the images are colorful. Inspiring.
-
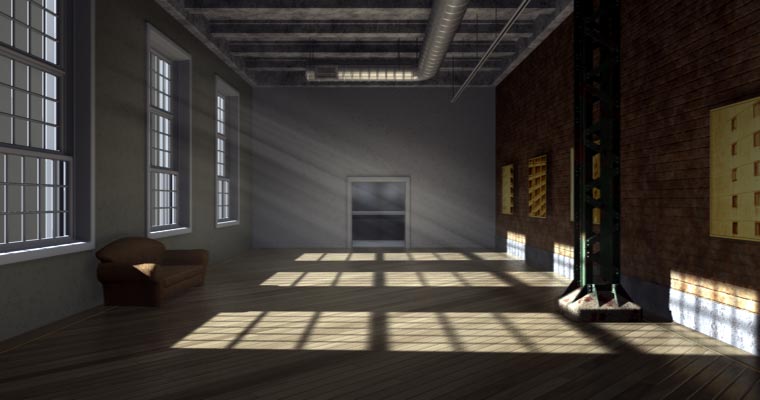
Here is the latest version of my scene. Some models and textures will be add later, but the mood is pretty done.
Fortunately, I manage to drop the rendering time under 6 hours barrier with a 2600+ by dropping the number of rays per light. I think this is not bad for a 28 lights set and DarkTree texture.
Now I will go around the clock with the scene, try to set different lighting according to the time of the day and the weather outside.
Thxs to everyone who helped me with this!

-
-
yeah gorgeous!
For suggestion, you might try increase specular a bit, I remember those canes a bit more shiny.
Good job
-
Coming along nicely!

-
However, this glitche can be used as a reminder to save a project with a different name through the process, like Project001.prj, Project002.prj, and so on. This could save your work in case of project corruption, and it can be very useful to revert to any version of an ongoing.
-
Whoa strong stuff there! Good job!
-
Hey Matrickz I think it look good so far! Those small details should pay off down the road. Is this scene is for animation or still rendering? Are you using any reference pict to built the scene?
Nice lamp!
-
what kind of modeling style are you looking for? realistic, cartoon, ...? there is a lot of models out there, but they do not always mix well.
Also check this
http://www.hash.com/users/alweb/intro.htm
Click Al's Archive...
There are a lot of stuff in these two cd, a real value. It might get you started.
-
Modeling is pretty much the same, since I try to fix the lighting first. I will add spot on the lighting track soon to add "artificial" light eventually. More modeling and texturing soon.
Any suggestion to improve light and color would be appreciate.
12h 08m 15sec
AMD 2600+, 512meg RAM
PS. The grid and numbers on the brick wall are for future references for texturing map. They will be replaced in final render.

-
Nice! You made good use of people suggestions. This picture tell a piece of a story by itself, and that is good. You might want to add some clues to it (or maybe not). What is this place exactly? To me, it is a modest hotel room now. I could add a phone on the table, a bag on the bed, some cheap painting reproduction on the wall. And I would replace this expensive solar powered lamp by another one that plug in the wall
 .
.The light coming from outside is great and create a nice mood with volumetric. The rays of light could be more parallel to fake a sun effect, but the way it is right now add to the enigma (it looks like a strong police light or helicopter light to me right now).
I'm not sure what the other light suggest though (the one coming from the left side of camera). It cast hard shadows like a spot (like the one under his right arm, and the one that the lamp cast on the wall), but also feel like the bouncing light of the main source coming from the window. If it's that the case, you might try to increase the width of the light, . This will blur the shadows. Check to decrease the shadow darkness for this light too.
Great work!
-
Thxs I appreciate! I will soon have an updated render. It takes about 5 hour to render at 25 passes, because of the lighting setup and the Simbiont I guess (2600+). There is significant change to lighting in the new version, after I got great advices from John ArtBox and DarkLimit, and go through Yves Poissant web site (amazing references there!).
For this render, I did a lot of trial and error, especially on the location and width of the light. For the light coming out of window, I have use 2 Klieg constrained together, and located very very far from the room model:
-One take care of the light and shadows in the room (3' width, 290' fall-off, 150 intensity, raytraced shadows with 8 rays and 100% darkness).
-The other klieg take care of the volumetric effect (1' width, 400' fall-off, 2% intensity, volumetric 2000 quality 25 brightness 50 contrast, raytraced shadows with 2 rays and 100% darkness).
I find it easier to adjust everything that way. No lightmap used in this render, but I will use some to blur a bit due to the stains in windows (that you can't see yet in this one). The indoor lighting is also done by low intensity kliegs (7 in this render, but 17 in the next one) to fake light rebound.
I will post a schematic of lighting rig with the next render.
-
forgot the attach...

-
Nice arena! Here's another option...
I had similar difficulties to adjust volumetric light in my theater setup. My problem was to get balance between volumetric effect and effective lighting. I finally decide to split in two, and get one klieg for the light and shadow, and another one fully constrained to the first one, just to create the volumetric effect.
For volumetric, I prefer the one with very low brightness (under 10), and very low intensity. Fall-off is also a major factor to adjust like MTPeak suggest. Due to render time consideration, I didn't add any turbulence, but you might consider this option.
(render with 8.5h)
-
I noticed the same behavior yesterday. The lens flare don't show the same if you right-click render a zone, or if you left-click render the entire image. I don't think it is how it should be (I mean if I could choose), but for now I think you can adjust your lens flare while rendering the entire image and get very decent result.
-
Hi,
The Gradiant will go from one attribute to the other. To set the way it do that, click on the Gradiant itself and set the Start and End. The axis and the value you choose to set will depend on your model orientation and scale.
-
Hi,
here it is, half finish I would say. There still a lot of modeling and texturing to do, but it gives an idea. I seek advices and comments especially on lightning.
Thxs
-
That's a great idea Ragtag! I hope to see Hash people jump in. They are in the best position to put this online. It would be a great addition for the entire Hash community.
I also hope that Hash will update their Free Model section soon, and have a system to include model donation.
Count me in anyway
-
obviously, AVI and MOV are out as neither are sophisticated enough to handle channels
MOV support Alpha Channel depending on what codec you will use. Animation Codec with 32bit is an example, and it is Lossless so it is considered as a production Codec.
For great info on CODEC...
http://www.onerivermedia.com/codecs/
Rendering as TGA with Alpha ON in A:M is still the best technic, because you will keep the frames already rendered in case of crash. But if your editing solution can't handle TGA sequence, you can export them as a .mov with Animation Codec and keep your Alpha Channel. Quicktime Pro will do that stuff.
iMac G5
in Work In Progress / Sweatbox
Posted
Nice spin!
Maybe I could participate to this mac hardware gathering... it is not finish yet as the stand is missing and the glass need adjustment, but it wouldn't be too long to do. Same address Igeek?