-
Posts
3,775 -
Joined
-
Last visited
-
Days Won
1
Content Type
Profiles
Forums
Events
Everything posted by Gerry
-
Holmes, if you're around I'm having some trouble when I assign cp's to the thumb bones. I did manage to straighten out the left thumb with some trial and error, but the right thumb crimps up badly when I assign the cp's. In an effort to work it out I copied the exact position and rotation numbers of the left bones and used them to reposition the right bones, but assigning the cp's still messes up the mesh. Everything else appears to be working fine so far. I can post some screen shots if that's any help.
-
I just saw your last post a day or two ago but fortunately I had already positioned the feet as you suggest. I did puzzle over it but then opted to keep it simple and everything at 90 degrees where possible. I do have another question about positioning the thumb bones. In the instructions it says "The roll handles for the thumb bones must point in whatever direction the thumb is intended to curl." Based on the roll handles of all the other bones I assume this means that it points AWAY from the curl, i.e., out the back of the thumb knuckle. Is this correct?
-
That's looking nice!
-
Holmes , it was indeed the legs IK pose. Turned it off and the leg bones are now visible. Thanks.
-
Nancy, I'm using both. The cp weighting works for joints to bend nicely, but at the knees and elbows I want the folds in the pj's to expand out a little (and collapse in on themselves in a more realistic fashion) when the joints bend. Also, I'm being careful to follow the steps exactly as in the pdf instructions. I definitely haven't done the install yet, that much I know! Holmes, I will look at the rig that's up there now. I think I have the latest and greatest, but I will check on that. And as I mentioned, I'm following the instructions to the letter so I'm pretty sure I haven't turned on any poses but if that one is on by default I will check it. Thanks for all your comments! I'm sure I'll be posting more questions.
-
You know I hate to be a stickler but shouldn't "HHHEEEELLLPPPP!!!!!!!!!!!!!" be spelled with only one H? Oh, yeah, voted again!
-
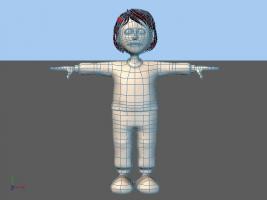
I'm working my way through installing the lite rig in the little girl character I'm doing for my Christmas animation. I'm working on doing smartskinning before I activate the Install action, but when I open the model in an action window, I can test, for example, the elbow smartskinning because the arm bones are visible and I can manipulate the forearm bone, but when I want to test the smartskinning at the knees, there's no shinbone visible. the Hide Bones switch turns on some bones but not the ones I think I need. How do I make the shinbones visible in the action? Is there a step I'm missing or a better way to do this?
-
Hey Mark, I did add a third spline ring to her shoulder, thanks for the tip. I'm working on the rigging and so far it seems to be proceeding okay. Lots of trial and error but being able to go back and fine tune at each step is a big plus.
-
That has GOT to be photoshopped!
-
I'll definitely look at that Mark. I'm doing some trial-and-error testing with the Lite Rig but the stress is gone since I *kind of* know what I'm doing now.
-
Thanks for looking in, Eric!
-
I wanted the neck skinny for a more cartoony look. What I had in mind was skinny neck, wrists and ankles but it didn't come out that way. If it looks distracting I'll change it. I'm working on the rigging today and I've already got some questions!
-
-
That's a good point Robert. I wonder if making her feet and hands bigger would help. I noticed her feet were bigger in my sketch but as I was modeling, smaller seemed like a better proportion. But I may do a reproportioned version.
-
Okay, it's fixed now.
-
Oops, there's one frame out of order there. I'lll fix it shortly.
-
Here's the color storyboard in a slideshow. Visualex2009storyboard.mov
-
Well I've got a whole set of full color storyboards I've done so I think I've got that covered. the dance sequence will be quite jazzy! I'm using shots of the Rockettes for reference. I would post the color sketches but I thought I'd put them in a slideshow somehow. Maybe over the weekend.
-
Here's my shot list: 1) Close up of plate of gingerbread men and note for Santa 2) Long shot of room, slow zoom in as Annie, clicking remote, tries to stay awake, then nods off 3) Profile shot of Annie jerking awake 4) Over shoulder shot as she looks at the candy cane remote, then pull back to include TV in shot 5) Head-on shot of TV as she clicks, then zoom in as gingerbread men jump up from plate 6) Jazzy shot of gingerbread men in kickline 7) Annie reaction shot, then she hops off the couch out of frame 8) Profile shot of TV, she dives into the screen in slo-mo, in a crackling plasma cloud 9) Head-on shot of TV as plasma cloud dissipates, and we see Annie dancing in the kickline 10) Two-shot of Annie and GBM, then his head snaps off 11) Two-shot of 2 GBM’s as they lose heads and arms 12) Annie reaction shot, which dissolves to- 13) Annie asleep on couch. Slow pan to cookie dish, then camera rises for different vantage point as Santa’s hand comes in from off camera and takes the last cookie.
-
I see what you mean. I'll look at that. Thanks!
-
Yeah, I have to work the snail in for a guest appearance somewhere! Oh yeah, and here's last year's! http://www.visualexllc.com/vlexholiday2008/2008Holiday.html
-
Thanks and thanks. Yep, she'll have eyebrows!
-
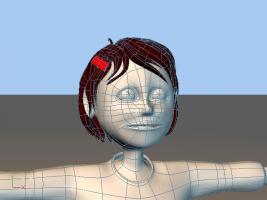
Paul, could you show me what you mean? and any other comments are welcome. Also, the eyeballs are just placeholder for now.
-
Thanks guys. I'm most concerned with the face looking nice and working nice since so much of this depends on closeup reaction shots.
-
Thanks Mark! Here's the rough schedule I've laid out for myself, though there's a lot of wiggle room. As of today I've got ten and a half weeks and I've broken it down like this: Storyboards - 1 week Modeling and rigging - 3 weeks Texturing - 1 week Choreographies (shots) - 3-1/2 weeks Rendering - 2 weeks Like I said, this is rough. I just noticed I haven't put any time in there for sound or post, but on the other hand the storyboards and modeling are close to being done, or at least I've got a solid start on them. I may start a checklist to keep track of work as it's completed as well.


