Sacman
*A:M User*-
Posts
409 -
Joined
-
Last visited
Contact Methods
-
MSN
WadeSacca
-
ICQ
0
Previous Fields
-
Interests
Reading<br />Movies<br />Indy Film and Filmaking
-
Hardware Platform
Windows
-
System Description
Windows XP Media. Dell Inspiron 6000 Laptop. 1.7Ghz Processor 2.0GB Ram. 128MB ATI Mobility Radeon X300. Also have an incredibly crappy Desktop that needs to be restored.
Profile Information
-
Name
Wade Sacca
-
Location
Chattanooga, TN
Sacman's Achievements

Craftsman (5/10)
0
Reputation
-
I did not look at the project but when I made my simple chain, I translated the first bone in the chain to the 'Parent' or main object. I did not translate to the last bone in the chain. This caused the problems you are describing. Instead, I set the target of the dynamic constraint to be the 'child' object' main bone. This gave me the results I needed. I also set the offsets to 0 but you can set these offsets to place the end of the rope to whereever you need it in the child and parent models. Wade
-
I couldn't disagree more. To set up the attached sequence, I made a 'tube' with 30 bones and two nulls. Bone one is translated to null 1 Bone 2 is dynamically constrained to null2. The trageting method was changed to none. The translate offsets were set to 0. That's it. No other setup. Now, on the downside, I could not get rid of the squash that happens when the bottom loop of the 'rope' comes too close together. This would not be as severe if the motion wasn't so drastic. It can be minimized by increasing the drag a little. The only real disadvantage I see with using Dynamics is that there is no pre-roll option. Other than that, it seems to be a much easier solution. This 10 second video rendered in 1:13 with no multipass. Dynamics_Test2.mov
-
Or just use Dynamics. Wade
-
Noober, did you use cloth? I think the advantage to Dynamics is that it's basic premise is that it wants to maintain its modelled shape whereas cloth will collapse. I know you can increase the stiffness oft he cloth but that will also limit its flexibility. Wade
-
I did a quick test using Rob's project and dynamics. I drew added a 'Rope' to the model consisting of 21 extruded cross sections and ten bones. The first bone is a child of the Beast floating thing. I cheated and did not model the rope in place I connected it in the pose. The first bone in the chain is Translated to the Beast bone. The last bone in the chain is Dynamically constrained to the Floaty thing bone. That's it. It would need some tweaking to get it to look just right but I think it does what you want. I left Rob's lag contraints in place cause I thought they really add to the effect. I never thought about using lag so i learned something from this one. Dynamics_Test.mov
-
I think Dynamics coupled with Rob's lag solution would work great. Dynamics can be confusing though. Wade
-
You might be missing the little option button in the bottom left of the import box. You have to check it to import a series of images as an animation. Then follow the instructions above. Wade
-
First Search the forums: http://www.hash.com/forums/index.php?showforum=46 Second you might want to also try simbiont which offers some great looking materials that are ready to use. http://www.darksim.com/html/simbiontam.html Keep in mind that Materials, while resolution independent, will significantly increase render times as opposed to decals. It's a trade off which you may not be willing to make depending on what you are doing. Oh yeah, I believe there is an excercise in TAoM for materials about making a marble material but it has been a long time since I looked at it. Wade
-
Where in the world would you get the inspiration to do this? Kind of disturbing. Pretty well done for what sounds like not much work. The only noticable glitch was in the 'jog' cycle. There was a key frame missing that caused a jump back to the beginning of the cycle. Wade
-
What codec are you using? It would not let me view it. Wade
-
Great Tutorial. I learned some things from that. Can't wait to see more. Wade
-
Is that the old I wanna be a cowboy and you can be my cowgirl song from the 80's? I've got my hat....on I've got my boots....dusty That song was stupid funny. Wade
-
Okay so now I get attachments so here is a shot of what I am talking about: boy you can tell I don't spend enough time on here. Can't even figure out how to post images anymore. temp.bmp
-
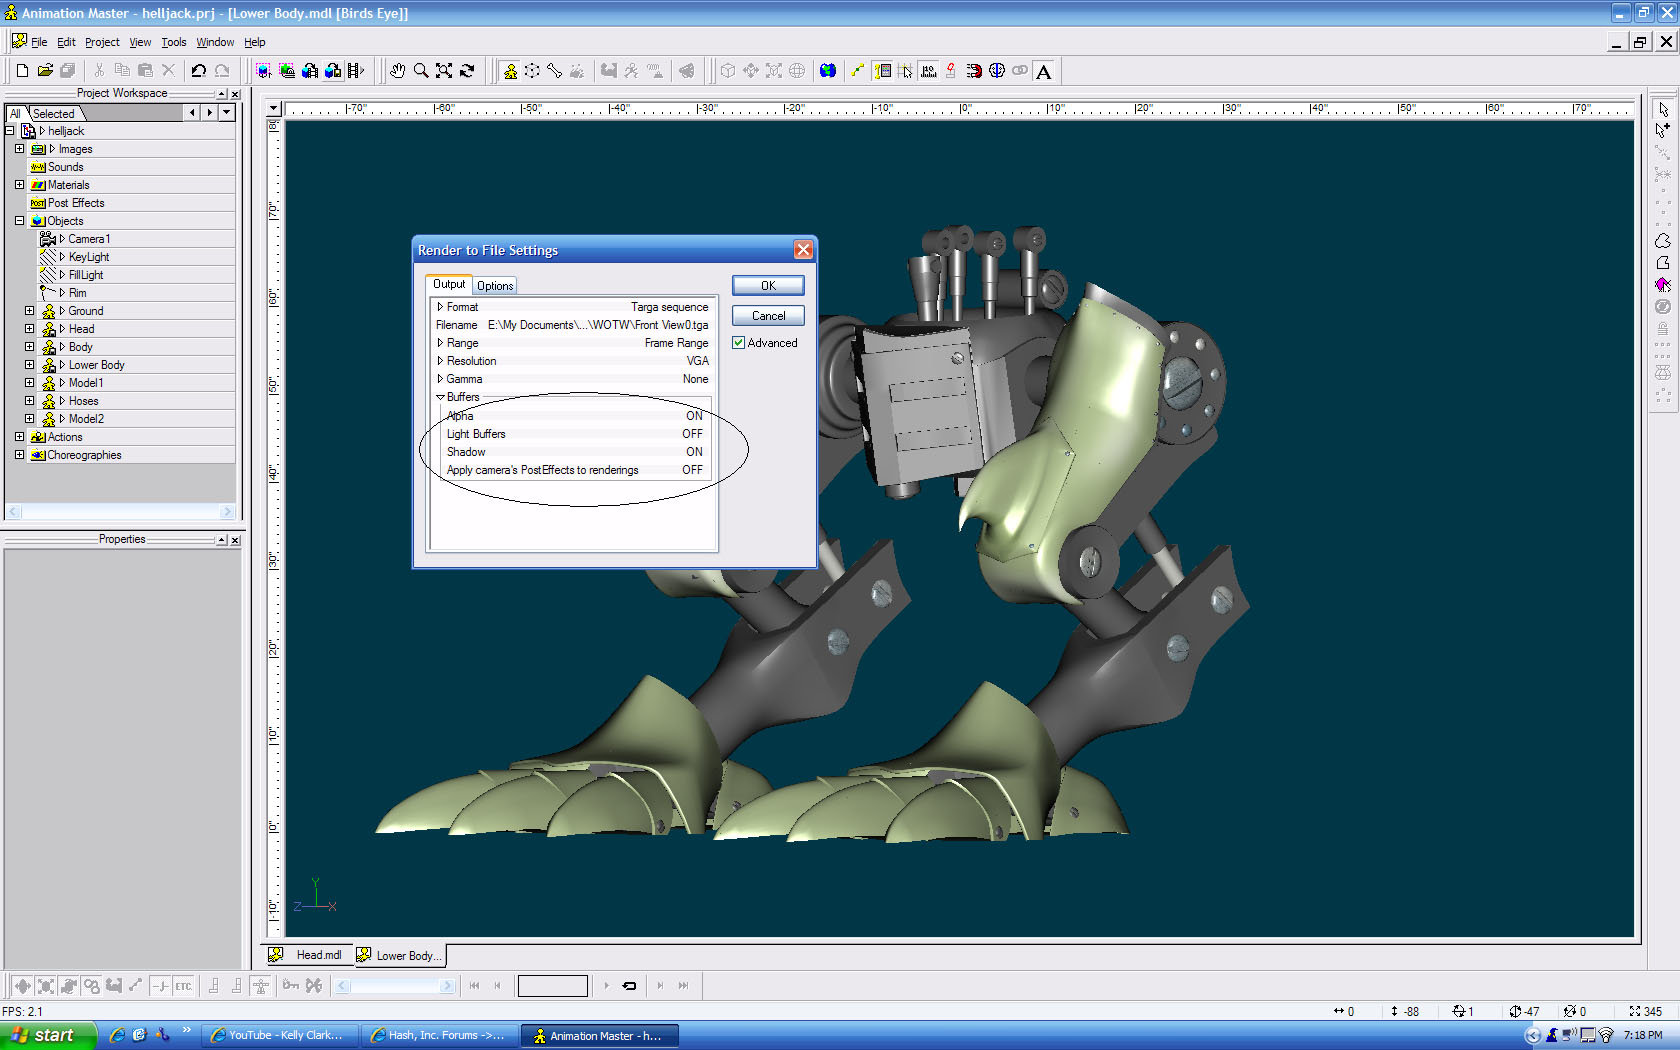
No the shadow was rendered in A:M. For some reason I can't add attachments so I will explain. When you go to render to file, select advanced options. go to the Output tab click the expansion arrow next to buffers. You will see several buffers in there. Select the alpha and shadow buffers on. As mentioned above, the final image or image series will appear to be a black screen. However, the alpha data is there. Once you import to another app the alpha channel will be clear. Having said all of that, this could have been done inside of A:M, like I said, I was testing my skills in After Effects. Wade
-
I did using the process described above. I rendered with an alpha channel. Then I rendered with a shadow buffer. I composited in After Effects. It was all done simply to try out my skills in After Effects. I was pretty pleased with the results even though the shadow is techinically not correct for the lighting in my kitchen. Wade


