


Eric2575
-
Posts
2,615 -
Joined
-
Last visited
Content Type
Profiles
Forums
Events
Posts posted by Eric2575
-
-
Rob:
Thanks for the brief, yet very concise explanation of the distort. I played around with it and in a few seconds had the shape to where I wanted it (will tweak it a bit later.) The ability to change the xyz box factors is great - AM rocks, this forum rocks, you rock

Here is a question before I started distorting the mesh - before. The mesh was already pretty smooth, so I wanted to see what porcelain would do. See the attached pic. What is causing the unwanted distortion, and what can be done about it besides removing the porcelain?
The distortion is not there without the porcelain.

-
Here is my latest attempt with everyone's help. Although it is very smooth, I can't brag because I still need to bend it. I'm gonna try distortion - have to find a tutorial on how to do that.
Will keep ya posted.

-
Thanks for all the input. Ken, I know about the shift key. The problem is the slight adjustment after laying down the splines. Since the piece isn't on any axis, any movement of a cp, even if ever so slight will deform the dang thing. I can't model it on an axis and rotate it later because it is curved in two directions.
The attached pic shows two attempts (out of many), one on each corner of trying to get a smooth surface at the corners.
I will try all of your suggestions and keep you posted.
Thank you

-
This has been giving me fits all night long. I can't get the surface smooth of this simple, yet compound shape - notice the deformations around the cutout. The cutout is giving me all the problems, but I have to have it there. Any suggestions on how to do this? None of the planes are flat and none are directly on the xyz plane. The piece is curved too.
The picture doesn't do the shape justice. The shape I am trying to get is very similar to the rounded quarterpanel of a roadster like the AC Cobra. Who is the expert on forming sheetmetal in AM?

-
I have been working on a mechanical model with a lot of success until last night. The problem section involves modeling a piece of sheetmetal that does not lie squarely on any plane, is curved in two different directions, and has a rectangular hole in it with beveled edges.
I posted a pic of my attempt in the WIP forum. If you look at the picture, you can see the deformations along the splines due to bias tweak and trying to align so many different ways.
It seemed simple in the beginning, but I was up all night and late into the morning without any success. I though about porcelan once I got it somewhat shaped, but the model requires sharp edge detail.
This is my desperate cry for help
 . I hope someone can come up with a solution since I am just a beginner using AM.
Thanks in advance
-
The spheres are cut in half and each half has 9 patches. I used a higher resolution sphere because the 8 patch sphere you mentioned tended to deform slightly. Not a whole bunch, but I didn't like the rendered result.
-
I have modeled every rivit on this upper structure with a small sphere. As the number of spheres increased, my copy/paste function slowed considerably.
To get back some speed, I cut each sphere in half, which helped quite a bit by cuttin down on spline count. I received a suggestion that I might be able to achieve rivits with displacement maps?
Take a look at my project and tell me if and how I could do this? It is important to be able to actually see raised rivits on the upper structure since close-up will be taken of it when finished.
Thanks

-
When I use the copy/extrude wizard on a bowl shape in particular, I want to be able to control the orientation of the bowl after the copy along path command. The default behavior stacks the bowl as you would expect, open end to bottom of bowl (just like you would stack them in your cupboard.) I want the bowls open end down and side by side - hope that makes sense. The reason I want to do this is to create the impression of bolt heads on a ship hull. Any other ways to do this? I don't want to use bump maps for this particular project, since I want to actually see the raised bolt heads.
Is there a way to do this?
-
Sorry, I double posted.

-
Update:
On a whim, I lathed a small sphere (1" tall) and used the duplication wizard to copy it about 50 times. After that, I copied the batch again until I had 200 spheres on my screen. At that point I started noticing a slowdown. Please don't take these numbers to heart, the point is that copying a large number of objects will eventually slow down the machine. Duh!
Another experiment was rather telling. I made some more spheres and kept an eye on the spline count. Just one sphere with a lathe factor of 5 already contained a large number of splines. I copied the sphere a few times and then proceeded to erase them again to see if the spline count went up and down with the copy and erase actions. When I was back down to one sphere, my spline count was higher than with the original sphere....hhhhmmmmmmmmm. On a hunch, I selected a large area around the sphere, hit delete, and low and behold, the spline count went back down. Invisible cp's? I haven't tried to duplicate this, but will do so and get more accurate numbers.
XP, P4 2.44 GHz crappy ATI (don't ever buy ATI if you value your money!!) Raedon 9600 (anyone want to buy it..he, he)
My sphere tests lead me to believe that my model does contain enough splines to slow it down. I am modeling the Nautilus (Disney) and the wheelhouse is modeled with every rivit in place. For the hull I will use bump maps.
Keep ya all posted...
Eric
-
First off, Ken, no I don't have a material in this model. It's just splines, cp's, and diffuse color. I do have 6 rotoscopes, but the slowdown just happened in the last few days and the rotos have been there all along.
Eric L, you mentioned that this has happened to your mechanical model more so than on organics. Well, mine is definitely mechanical with lots of copy/paste actions.
Rodeny, I copied the model into a new project as well as delete ALL shortcuts in the PWS to no avail. Still slow as molasses.
I'd be more than happy to have someone take a look at my MDL file although I was trying to keep it under wraps until the whole project was complete.
Hope we can get more input on this to get a better picture. I already send a post to Steve at Hash.
P.S. I just checked my spline count in the PWS - 38745 splines! My model may have quite a large number of spheres, but not enough to get a count of 38745 (IMHO.)
Anyone care to speculate????????????
One more thing - I tried to delete some of the splines and or cp's in the PWS under the spline heading but wasn't able to do that. Hitting delete only moved the cursor to the next selection without deleting anything.
-
I've deleted almost all shortcuts in the PWS with no improvement.
-
I have just experienced what many others in this forum have posted about - the computer comes to a crawl during copying and pasting of just about anything in a particular model I am working on in AM.
The mdl file is 2.9 MB but that is not the problem. I have another mdl file that is 3 MB and has no problems with cut and paste. Several posts mentioned the problem might have something to do with named groups. One thing I noticed is the fact that there are a gazillion splines in the model. Another thing is the fact that unless I keep deleting them, groups keep duplicating themselves after copies, ie, ball, ball1, ball2, etc. If AM keeps repeating the group names, maybe it is also repeating the splines. That would account for the fact that I have so many of them. Btw, mirror mode is not on.
Some people have indicated that they have edited the mdl file in a wordprocessor to slim it down. I looked at my mdl file and would have no clue what belongs and what could go.
The bottom line is that I am very happy with my progress so far, but am to the point where I can no longer be productive working on the model. It still has a long way to go, but I need to find a way to bring it back up to speed.
Let's get some good feedback to solve this nagging problem.
Thanks
-
Julian, you are awesome!!
Did what you said and now have GRUNGE on my model. Let's see how far I get this time.
Eric
-
Thanks Julian, I've gotten a bit further, but am not out of the woods yet. Now I find I am having trouble creating the grunge material. I created a new material, at which time a small window with a globe popped up. Next I changed the attribute to a spherical projection map. In the properties preview pane I selected the grunge.jpg that is saved on my HD and under filename I saved as "grunge". Yet when I render my model, the grunge texture does not show up, my model stays white as a ghost. I've looked hard for a basic tutorial on making materials, to no avail.
Help
-
http://www.robballen.com/tutorials/composite/
I've been trying to do this tutorial for two days now with no luck. Page three is not specific about the details of how the rendering was accomplished and I am running out of ideas.
I set the background to black in the chor. It says to put a model in front of the camera; which I did, then to put a light source behind and to the right; which I did. It does not say anything about the two existing light sources in a newly created chor. Should they be eliminated, should they be left where they are, should one be eliminated and the other moved behind the model? Should all be set to diffuse off? When I do that, my model is almost black.
It also mentions mixing two different materials - which two - chrome is one, which is the other? When I render the model with chrome only, it comes out as very shiny chrome but only if diffuse is left "on". As I mentioned earlier, with diffuse on the lights set to off, the model is just about black.
Please help.
Thanks
Eric
-
I just bought the book and tried to do the project described in chapter 11 on Decal_Basics. The included CD is supposed to contain the Decal_Basics project; it doesn't. I went to the Book's web site only to find that it hasn't been updated for about a year, and that none of the update files for the book are available for download even thought it says they are free to anyone who bought the book.
Anyone have any input on this?
If this is all a dead end, I would appreciate a recommendation on a book that has a cd with included files to follow along.
AM is great!!
-
Thanks all!
I also just received Animation:Master 2002 a complete guide. Just going through the first few pages has been helpful. Will also go through the reference on the CD. Maybe I should read the manual a bit more thoroughly.
Again, this forum is a lifesaver. My first project should turn out quite nicely with everyone's help. Don't want to give it away just yet.
-
Chor? Is that the choreography window? If so, do I import my model and then set the glow value somewhere? If not, what is chor?
So far AM has been pretty exciting to work with, but as I get past the examples in the so called manual, the lack of a REAL manual with all aspects of the program covered is a real downer. Thank god for this forum. <_>
Thanks Hutch, number four is what I needed.
-
Two questions: In the properties dialog box is an on/off setting for glow. I like it, but would like to kow if that setting can be adjusted. The glow is too bright in rendered mode, I want to turn it down a bit.
Seccond: When I add a CP to a spline that is off the normal xyz axis, I need to find a way to move the CP along the spline without disturbing the axis of the spline. Is there a way to constrain the CP to the spline?
Thanks in advance
-
Yes, v.11. Not blocky, resolution is fine. The CP's are actually off from where they were before. I noticed it because I was following a rotoscope in great detail. When I saved it and opened it again the next day, two CP's were a very tiny bit out of whack. I wouldn't care if it weren't for the fact that the two CP's were part of a sphere, and if the CP's are just a little off, the sphere gets distorted.
I've been playing around with grouping and naming the various groups in order to hide/unhide them. Maybe I am causing the problem by not being careful enough in picking my CP's
-
New to AM:
I'm not sure if this is the right forum to post this, but I know this is the only one I can post a pic.
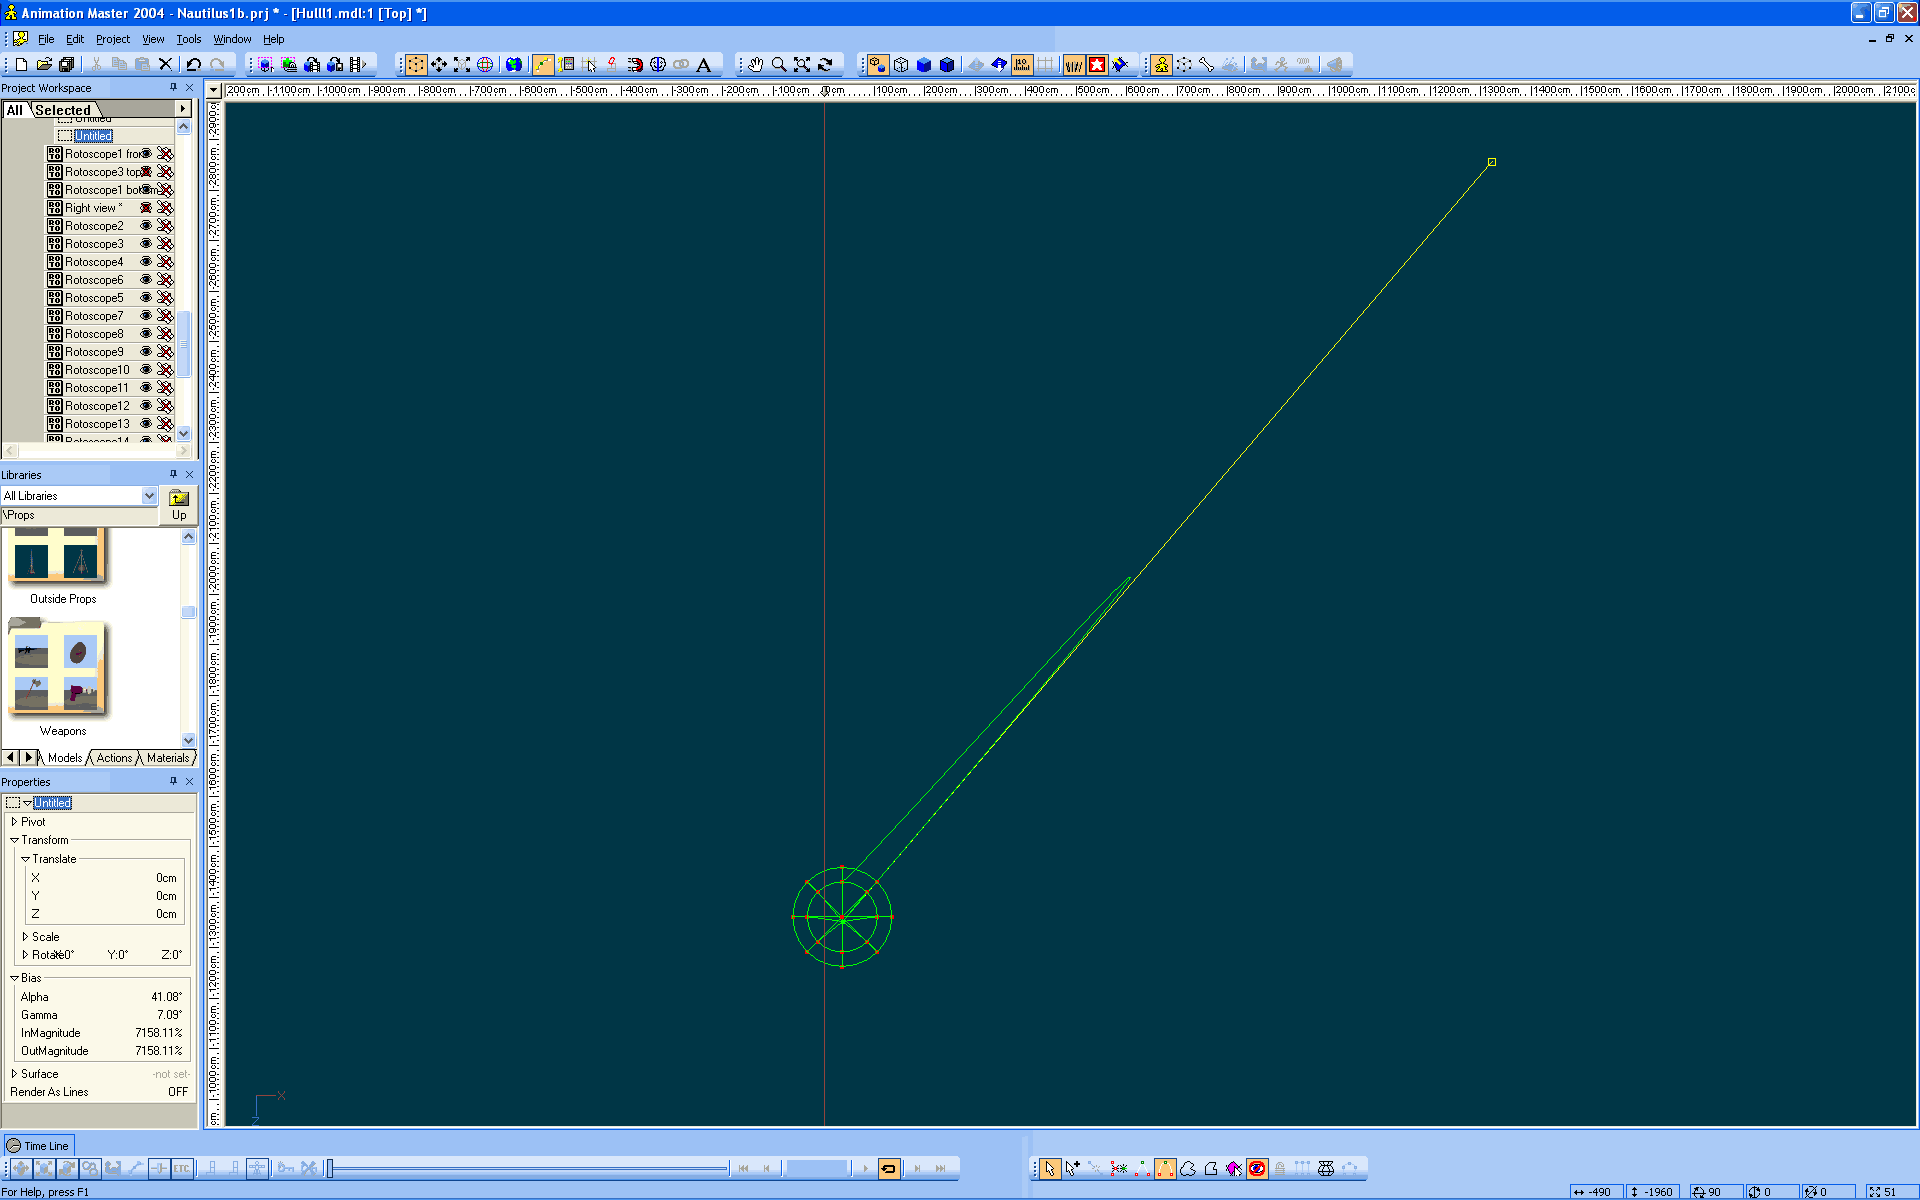
Usually after saving and then reopening a project will this glitch occur. Upon reopening, I may see some artifacts or slight changes in alignment that I want to correct (another glitch?) When I try to move the CP's or the CP Bias points, the Bias handles jump way off the working area and can't be brought back in line. I have to shut down, not save and start over.
In the attached pic, you see a sphere that I wanted to tweak in a very close view around the bottom where all points converge. When I clicked on a Bias handle, it jumped to the point in the picture. I had to unzoom several times just to see where the Bias handle jumped to.
What causes this odd behavior?
-
Sorry about such a simple question, but the manual doesn't seem to mention it. I read a thread somewhere that the hide key can be used to hide selected splines, not the other way around. What is it?
-
Ok, I draw a spline with two CP's, lathe the spline, discard the top half, select what is left and change the axis of rotation in adv. manipulator, then lathe to get a sphere. When I examine the sphere, I notice it has double splines. What am I doing wrong?
Modeling smooth curved metal with holes
in Work In Progress / Sweatbox
Posted
I want to thank everybody for the great input and being patient in teaching me. This has been a very good experience. I'll post the final piece when I'm done with it.